Quantcast
Channel: Lingesh, Author at UnixArena
Viewing all 369 articles
Browse latest View live

Puppet – How to install and configure Puppet Enterprise (Master) ?

$
0
0

This article is going to brief about the Puppet Server – Enterprise installation and configuration. We are going to install the puppet server  in monolithic mode. In monolithic installation, Puppet Master , Puppet console , Puppet DB will be installing on one node. This is the simple method to evaluate puppet enterprise and you can manage up to 500 puppet agent nodes. To know more about Monolithic installation vs Split installation , please refer this article.


Prerequisites:

  • Working DNS  Set-up or /etc/hosts
  • Puppet Enterprise Package
  • Redhat Enterprise Linux  7


Install and Configure Puppet Enterprise: (Puppet Master)

1.Login to RHEL 7 system.

[root@UA-HA ~]# cat /etc/redhat-release
Red Hat Enterprise Linux Server release 7.2 (Maipo)
[root@UA-HA ~]# uname -a
Linux UA-HA 3.10.0-327.el7.x86_64 #1 SMP Thu Oct 29 17:29:29 EDT 2015 x86_64 x86_64 x86_64 GNU/Linux
[root@UA-HA ~]#


2.Copy the Puppet Enterprise package to /var/tmp .

[root@UA-HA ~]# cd /var/tmp
[root@UA-HA tmp]# ls -lrt puppet-enterprise-2015.3.1-el-7-x86_64.tar.gz
-rw-r--r-- 1 root root 336274958 Jan 22 14:33 puppet-enterprise-2015.3.1-el-7-x86_64.tar.gz
[root@UA-HA tmp]#


3.Un-compress the package.

[root@UA-HA tmp]# gunzip puppet-enterprise-2015.3.1-el-7-x86_64.tar.gz
[root@UA-HA tmp]# tar -xf puppet-enterprise-2015.3.1-el-7-x86_64.tar
[root@UA-HA tmp]# ls -lrt
-rw-r--r--  1 root root  338452480 Jan 22 14:33 puppet-enterprise-2015.3.1-el-7-x86_64.tar
drwxr-xr-x  8 root root       4096 Jan 22 14:43 puppet-enterprise-2015.3.1-el-7-x86_64
[root@UA-HA tmp]#


4.Navigate to the puppet enterprise directory and list the contents.

[root@UA-HA puppet-enterprise-2015.3.1-el-7-x86_64]# ls -lrt
total 408
-rw-r--r-- 1 root root   1225 Dec 23 16:03 README.markdown
-rw-r--r-- 1 root root  19151 Dec 23 16:03 LICENSE.txt
-rw-r--r-- 1 root root  10189 Dec 23 16:03 environments.rake
-rw-r--r-- 1 root root  10394 Dec 23 16:03 db_import_export.rake
-rwxr-xr-x 1 root root 110726 Dec 28 12:46 utilities
-rw-r--r-- 1 root root   3221 Dec 28 12:46 update-superuser-password.rb
-rwxr-xr-x 1 root root  26275 Dec 28 12:46 puppet-enterprise-uninstaller
-rwxr-xr-x 1 root root  20598 Dec 28 12:46 puppet-enterprise-support
-rwxr-xr-x 1 root root 134721 Dec 28 12:46 puppet-enterprise-installer
-rw-r--r-- 1 root root  10235 Dec 28 12:46 pe-code-migration.rb
-rw-r--r-- 1 root root  25595 Dec 28 12:46 pe-classification.rb
-rw-r--r-- 1 root root      9 Dec 28 12:49 VERSION
-rw-r--r-- 1 root root    206 Dec 28 12:49 supported_platforms
drwxr-xr-x 3 root root     64 Jan 22 14:43 packages
drwxr-xr-x 2 root root     26 Jan 22 14:43 noask
drwxr-xr-x 2 root root   4096 Jan 22 14:43 modules
drwxr-xr-x 2 root root     31 Jan 22 14:43 gpg
drwxr-xr-x 2 root root   4096 Jan 22 14:43 erb
drwxr-xr-x 2 root root   4096 Jan 22 14:43 answers
[root@UA-HA puppet-enterprise-2015.3.1-el-7-x86_64]#


5. Execute the puppet enterprise installer and select the guided installation.

root@UA-HA puppet-enterprise-2015.3.1-el-7-x86_64]# ./puppet-enterprise-installer
==================================================================================

Puppet Enterprise v2015.3.1 installer

Puppet Enterprise documentation can be found at http://docs.puppetlabs.com/pe/2015.3/

-----------------------------------------------------------------------------------

STEP 1: GUIDED INSTALLATION

Before you begin, choose an installation method. We've provided a few paths to choose from.

- Perform a guided installation using the web-based interface. Think of this as an installation interview in which we ask you exactly how you want to install PE.
In order to use the web-based installer, you must be able to access this machine on port 3000 and provide the SSH credentials of a user with root access. This
method will login to servers on your behalf, install Puppet Enterprise and get you up and running fairly quickly.

- Use the web-based interface to create an answer file so that you can log in to the servers yourself and perform the installation locally. If you choose not to
use the web-based interface, you can write your own answer file, or use the answer file(s) provided in the PE installation tarball. Refer to Answer File
Installation (http://docs.puppetlabs.com/pe/2015.3/install_automated.html), which provides an overview on installing PE with an answer file.

?? Install packages and perform a guided install? [Y/n] y

Installing setup packages.

Please go to https://UA-HA:3000 in your browser to continue installation. Be sure to use https:// and that port 3000 is reachable through the firewall.


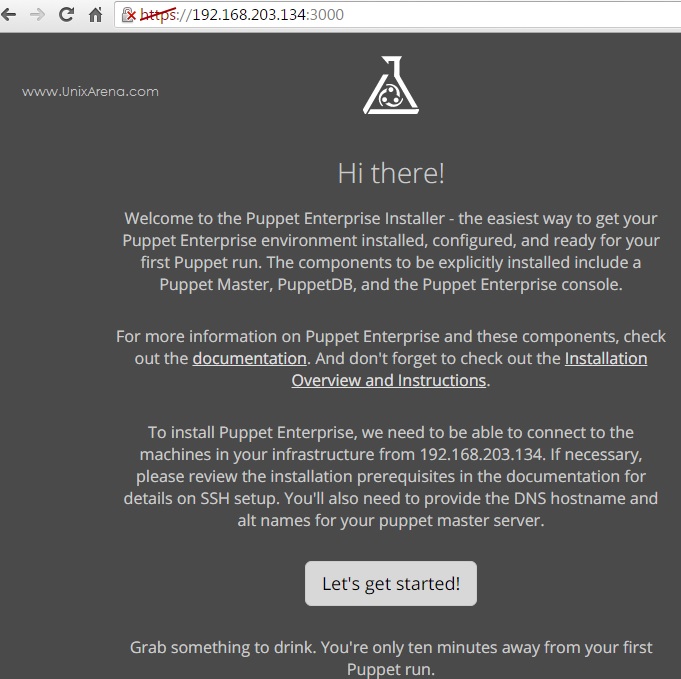
6. Open the browser and enter the URL which is provided in the previous command output. (https://UA-HA:3000).
If you do not have DNS configured , use the IP address.


7. Let’s get started.

Welcome to Puppet
Welcome to Puppet


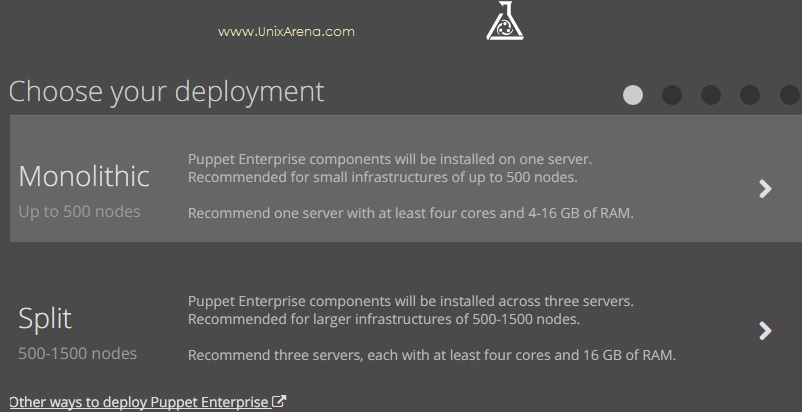
7. Choose monolithic installation.

Choose Deployment Method - Puppet
Choose Deployment Method – Puppet


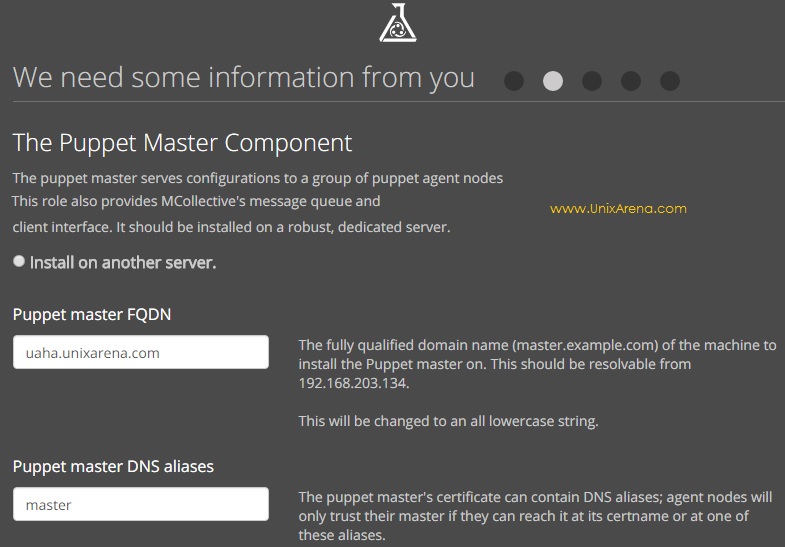
8.Enter the FQDN and host alias.

Puppet Master FQDN
Puppet Master FQDN


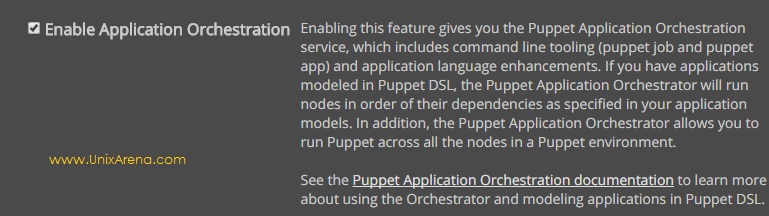
9.Enable application orchestration.

Enable Application Orchestration


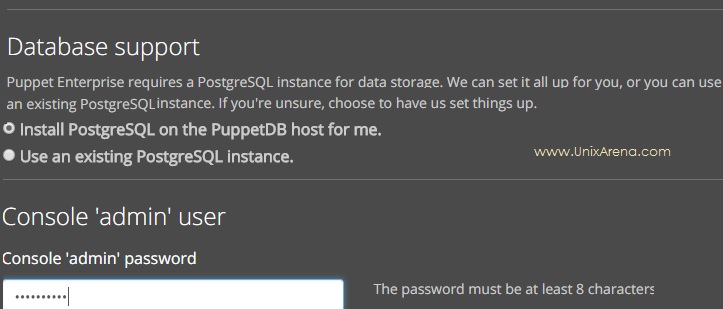
10. Puppet enterprise requires a PostgreSQL instance for data storage. Install PostgreSQL on Puppet DB node. Here you have option to set the “admin” user password.

Database - Puppet
Database – Puppet


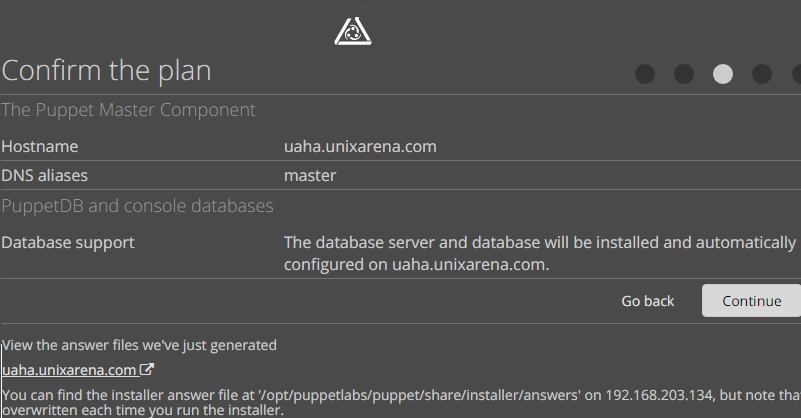
11. Confirm the puppet deployment plan.

Confirm the Plan - Puppet
Confirm the Plan – Puppet


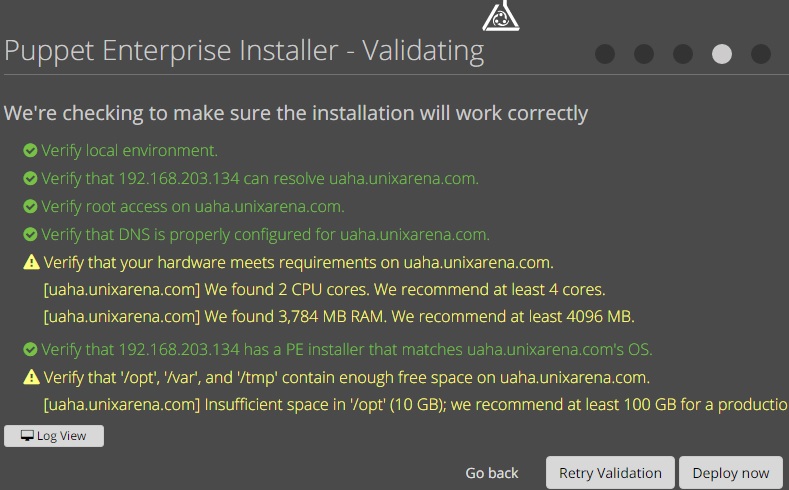
12. Puppet installer will validate the prerequisite.  You can safely ignore the warning since it’s for testing purpose.  Click on “Deploy Now”.

Validating the installation


13. You can see that Puppet enterprise is deploying.

Installing Puppet Enterprise


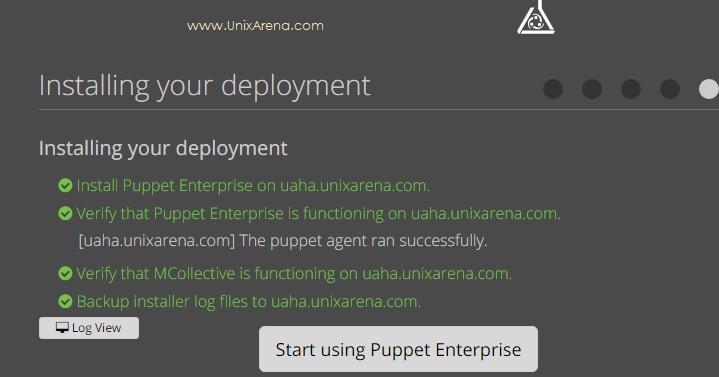
14. Once the installation is completed, you should be able to get the below screen. Click on “Start using Enterprise”.

Installation Completed - Puppet
Installation Completed – Puppet


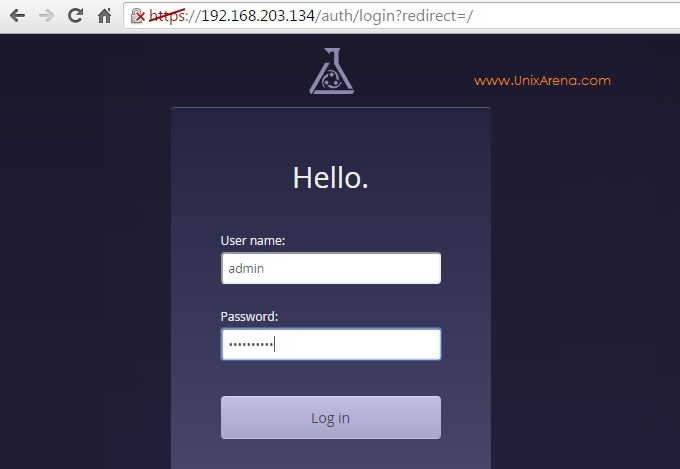
15. You will be automatically redirected to puppet login page.

Login Page - Puppet
Login Page – Puppet


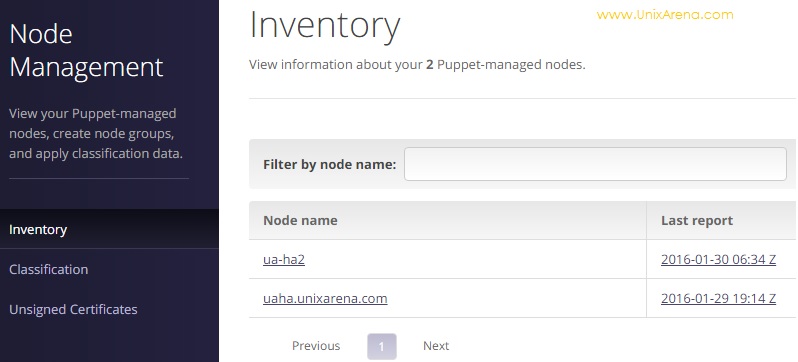
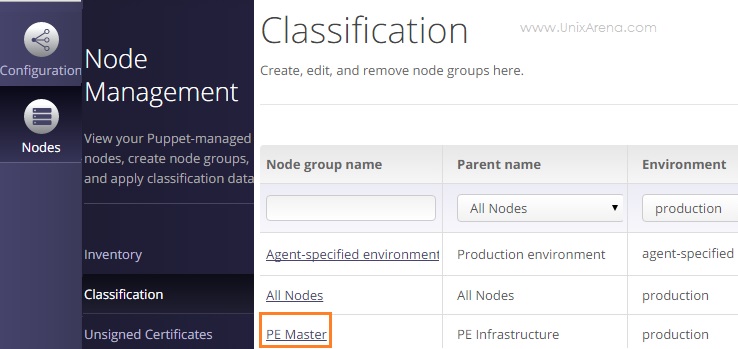
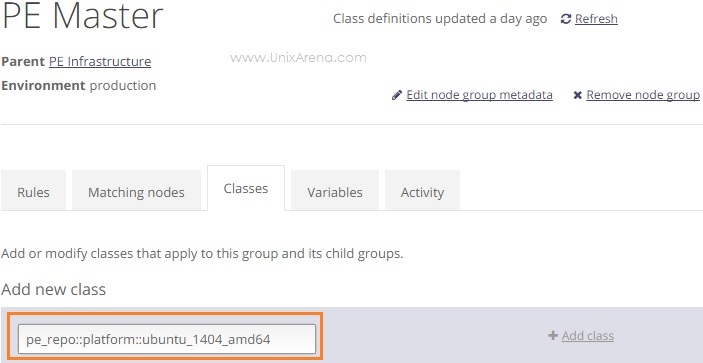
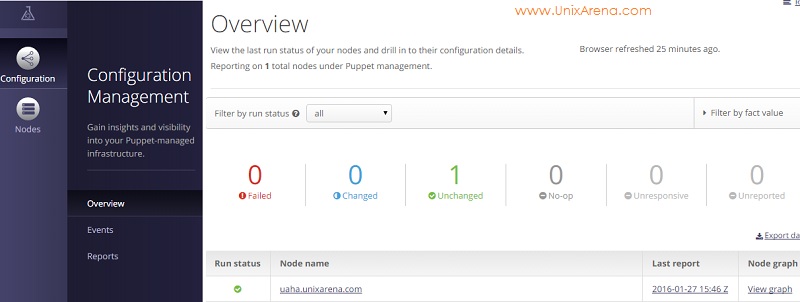
16. Once you have logged in as admin , you will get the overview console like below.

Overview - Puppet
Overview – Puppet


Puppet Version:

[root@UA-HA ~]# puppet --version
4.3.1
[root@UA-HA ~]#

We have successfully deployed the Puppet Enterprise (Puppet Master) on RHEL 7.  Hope this article is informative to you . Share it ! Comment it !! Be sociable !!!

The post Puppet – How to install and configure Puppet Enterprise (Master) ? appeared first on UnixArena.


Puppet – How to install and configure Puppet Agent (Client) ?

$
0
0

Once you have configured the Puppet Server, you can start adding the puppet agents to it. This article will brief about installing and configuring the puppet agent on Linux systems (RHEL 7 and Ubuntu 14.04).  Puppet agents are nothing but the client machines which will regularly pulls configuration catalogs from a Puppet master and applies them to the local system. Puppet agent supported  on multi-platform including windows , all the Linux variants and Unix systems. This guide assumes that you have installed a monolithic puppet enterprise deployment and have the Puppet master, the PE console, and PuppetDB up and running on one node.


Puppet Server (Version  4.3.1): 192.168.203.131 / UA-HA     (RHEL 7)

Puppet Agent : RHEL 7 (New Client)


Install Puppet agent on Linux Server:

Puppet agent  installation method differs when you have different architecture than the master node.

  • Puppet agent node has the same OS and architecture as  Puppet master.
  • Puppet agent node has a different OS and architecture than Puppet master.


Let’s see if you have puppet agent node has the same OS and architecture as puppet server.


1.Login to the RHEL 7 node in which you would like configure the puppet agent.

2. Execute the following command to install the puppet agent.

[root@UA-HA2 ~]# curl -k https://UA-HA:8140/packages/current/install.bash | sudo bash
  % Total    % Received % Xferd  Average Speed   Time    Time     Time  Current
                                 Dload  Upload   Total   Spent    Left  Speed
100 14576  100 14576    0     0   9855      0  0:00:01  0:00:01 --:--:--  9855
Loaded plugins: langpacks, product-id, search-disabled-repos, subscription-manager
This system is not registered to Red Hat Subscription Management. You can use subscription-manager to register.
Cleaning repos: pe_repo
Cleaning up everything
Loaded plugins: langpacks, product-id, search-disabled-repos, subscription-manager
This system is not registered to Red Hat Subscription Management. You can use subscription-manager to register.
pe_repo                                                                                                                                       | 2.5 kB  00:00:00
pe_repo/primary_db                                                                                                                            |  23 kB  00:00:00
Resolving Dependencies
--> Running transaction check
---> Package puppet-agent.x86_64 0:1.3.2-1.el7 will be installed
--> Finished Dependency Resolution

Dependencies Resolved

================================================================================================================
 Package                 Arch                Version               Repository                            Size
================================================================================================================
Installing:
 puppet-agent           x86_64             1.3.2-1.el7             pe_repo                               21 M

Transaction Summary
=================================================================================================================
Install  1 Package

Total download size: 21 M
Installed size: 98 M
Downloading packages:
warning: /var/cache/yum/x86_64/7Server/pe_repo/packages/puppet-agent-1.3.2-1.el7.x86_64.rpm: Header V4 RSA/SHA1 Signature, key ID 4bd6ec30: NOKEY20 MB  00:00:00 ETA
Public key for puppet-agent-1.3.2-1.el7.x86_64.rpm is not installed
puppet-agent-1.3.2-1.el7.x86_64.rpm                                                                                                           |  21 MB  00:00:04
Retrieving key from https://uaha.unixarena.com:8140/packages/GPG-KEY-puppetlabs
Importing GPG key 0x4BD6EC30:
 Userid     : "Puppet Labs Release Key (Puppet Labs Release Key) <info@puppetlabs.com>"
 Fingerprint: 47b3 20eb 4c7c 375a a9da e1a0 1054 b7a2 4bd6 ec30
 From       : https://uaha.unixarena.com:8140/packages/GPG-KEY-puppetlabs
Running transaction check
Running transaction test
Transaction test succeeded
Running transaction
  Installing : puppet-agent-1.3.2-1.el7.x86_64                                                                                                                   1/1
  Verifying  : puppet-agent-1.3.2-1.el7.x86_64                                                                                                                   1/1

Installed:
  puppet-agent.x86_64 0:1.3.2-1.el7

Complete!
service { 'puppet':
  ensure => 'stopped',
}
Notice: /Service[puppet]/ensure: ensure changed 'stopped' to 'running'
service { 'puppet':
  ensure => 'running',
  enable => 'true',
}
service { 'puppet':
  ensure => 'running',
  enable => 'true',
}
Notice: /File[/usr/local/bin/facter]/ensure: created
file { '/usr/local/bin/facter':
  ensure => 'link',
  target => '/opt/puppetlabs/puppet/bin/facter',
}
Notice: /File[/usr/local/bin/puppet]/ensure: created
file { '/usr/local/bin/puppet':
  ensure => 'link',
  target => '/opt/puppetlabs/puppet/bin/puppet',
}
Notice: /File[/usr/local/bin/pe-man]/ensure: created
file { '/usr/local/bin/pe-man':
  ensure => 'link',
  target => '/opt/puppetlabs/puppet/bin/pe-man',
}
Notice: /File[/usr/local/bin/hiera]/ensure: created
file { '/usr/local/bin/hiera':
  ensure => 'link',
  target => '/opt/puppetlabs/puppet/bin/hiera',
}
[root@UA-HA2 ~]#


3. Login to the puppet enterprise console as admin user .


4. Navigate to the Nodes – > Unassigned certificates.  Verify the node name and click on “Accept All” or “Accept” .

Puppet Agent - Accept the certificate
Puppet Agent – Accept the certificate


5. Once you have accepted the certificate of node “ua-ha2” , you should be able to see the message like below.

Puppet Agent - Accepted the certificate
Puppet Agent – Accepted the certificate


7. The new puppet agent node will not appear immediately  on the puppet inventory (Default client check in time 30 minutes ).  Once you have accepted the certificate on Puppet console , run the following command to re-run the puppet agent.

[root@UA-HA2 ~]#  puppet agent -t
Info: Caching certificate for ua-ha2
Info: Caching certificate_revocation_list for ca
Info: Caching certificate for ua-ha2
Info: Using configured environment 'production'
Info: Retrieving pluginfacts
Info: Retrieving plugin
Notice: /File[/opt/puppetlabs/puppet/cache/lib/facter]/ensure: created
Notice: /File[/opt/puppetlabs/puppet/cache/lib/facter/aio_agent_build.rb]/ensure: defined content as '{md5}cdcc1ff07bc245c66cc1d46be56b3af5'
/Stage[main]/Puppet_enterprise::Mcollective::Server::Certs/File[/etc/puppetlabs/mcollective/ssl/clients]/ensure: created
Notice: 
Notice: /Stage[main]/Puppet_enterprise::Mcollective::Server::Facter/Cron[pe-mcollective-metadata]/ensure: created
Notice: /Stage[main]/Puppet_enterprise::Mcollective::Server/File[/etc/puppetlabs/mcollective/server.cfg]/content:
--- /etc/puppetlabs/mcollective/server.cfg      2015-12-02 14:14:08.000000000 -0500
+++ /tmp/puppet-file20160130-60237-181cepp      2016-01-30 00:20:26.914025013 -0500
@@ -1,27 +1,81 @@
-main_collective = mcollective
-collectives = mcollective
-
-libdir = /opt/puppetlabs/mcollective/plugins
-
-# consult the "classic" libdirs too
-libdir = /usr/share/mcollective/plugins
-libdir = /usr/libexec/mcollective

-logfile = /var/log/puppetlabs/mcollective.log
-loglevel = info
-daemonize = 1
-
-# Plugins
-securityprovider = psk
-plugin.psk = unset
+# Centrally managed by Puppet version 4.3.1
+# https://docs.puppetlabs.com/mcollective/configure/server.html

+# Connector settings (required):
+# -----------------------------
 connector = activemq
+direct_addressing = 1
+
+# ActiveMQ connector settings:
+plugin.activemq.randomize = false
 plugin.activemq.pool.size = 1
-plugin.activemq.pool.1.host = stomp1
-plugin.activemq.pool.1.port = 6163
+plugin.activemq.pool.1.host = uaha.unixarena.com
+plugin.activemq.pool.1.port = 61613
 plugin.activemq.pool.1.user = mcollective
-plugin.activemq.pool.1.password = marionette
+plugin.activemq.pool.1.password = gHQFayooU2pGXvu2XQdh
+plugin.activemq.pool.1.ssl = true
+plugin.activemq.pool.1.ssl.ca = /etc/puppetlabs/mcollective/ssl/ca.cert.pem
+plugin.activemq.pool.1.ssl.cert = /etc/puppetlabs/mcollective/ssl/ua-ha2.cert.pem
+plugin.activemq.pool.1.ssl.key = /etc/puppetlabs/mcollective/ssl/ua-ha2.private_key.pem
+plugin.activemq.heartbeat_interval = 120
+plugin.activemq.max_hbrlck_fails = 0
+
+# Security plugin settings (required):
+# -----------------------------------
+securityprovider           = ssl
+
+# SSL plugin settings:
+plugin.ssl_server_private  = /etc/puppetlabs/mcollective/ssl/mcollective-private.pem
+plugin.ssl_server_public   = /etc/puppetlabs/mcollective/ssl/mcollective-public.pem
+plugin.ssl_client_cert_dir = /etc/puppetlabs/mcollective/ssl/clients
+plugin.ssl_serializer      = yaml

-# Facts
+# Facts, identity, and classes (recommended):
+# ------------------------------------------
 factsource = yaml
 plugin.yaml = /etc/puppetlabs/mcollective/facts.yaml
+
+identity = ua-ha2
+
+classesfile = /opt/puppetlabs/puppet/cache/state/classes.txt
+
+# Registration (recommended):
+# -----------------------
+registration = Meta
+registerinterval = 600
+
+# Subcollectives (optional):
+# -------------------------
+main_collective = mcollective
+collectives     = mcollective
+
+# Auditing (optional):
+# -------------------
+plugin.rpcaudit.logfile = /var/log/puppetlabs/mcollective-audit.log
+rpcaudit = 1
+rpcauditprovider = logfile
+
+# Authorization (optional):
+# ------------------------
+plugin.actionpolicy.allow_unconfigured = 1
+rpcauthorization = 1
+rpcauthprovider = action_policy
+
+# Logging:
+# -------
+logfile  = /var/log/puppetlabs/mcollective.log
+loglevel = info
+
+# Platform defaults:
+# -----------------
+daemonize = 1
+libdir = /opt/puppet/libexec/mcollective:/opt/puppetlabs/mcollective/plugins
+
+# Puppet Agent plugin configuration:
+# ---------------------------------
+plugin.puppet.splay = true
+plugin.puppet.splaylimit = 120
+plugin.puppet.signal_daemon = 0
+plugin.puppet.command = /opt/puppetlabs/bin/puppet agent
+plugin.puppet.config  = /etc/puppetlabs/puppet/puppet.conf

Notice: /Stage[main]/Puppet_enterprise::Mcollective::Server/File[/etc/puppetlabs/mcollective/server.cfg]/content: content changed '{md5}73e68cfd79153a49de6f5721ab60657b' to '{md5}dabe5d8af8f8a4fe3ecb360b43295f5c'
Notice: /Stage[main]/Puppet_enterprise::Mcollective::Server/File[/etc/puppetlabs/mcollective/server.cfg]/mode: mode changed '0644' to '0660'
Info: /Stage[main]/Puppet_enterprise::Mcollective::Server/File[/etc/puppetlabs/mcollective/server.cfg]: Scheduling refresh of Service[mcollective]
Notice: /Stage[main]/Puppet_enterprise::Mcollective::Service/Service[mcollective]/ensure: ensure changed 'stopped' to 'running'
Info: /Stage[main]/Puppet_enterprise::Mcollective::Service/Service[mcollective]: Unscheduling refresh on Service[mcollective]
Notice: Applied catalog in 4.10 seconds
[root@UA-HA2 ~]#


8. In Puppet console, you should be able to see the puppet agent node.

Puppet Agent node added

We have successfully configured Puppet agent on RHEL 7.


Let’s see if you have puppet agent node has a different OS and architecture than puppet server.

Server:  Ubuntu TLS 14.04 x86_64  (Role: Puppet Agent node)

1. Login to the puppet console as admin user.

2. Navigate to Nodes – > Classification. Click on PE Master.

Classification - PE Master
Classification – PE Master


3. Navigate to Class and Add a new class . In my case, I would like to add Ubuntu TLS 14.04 x86_64  nodes as puppet agent. So the new class should be pe_repo , platform as Ubuntu 14. 04 64 Bit.

PE Master - Add New Class
PE Master – Add New Class


4.  Once you have added the class , you should be able to see the below screen.

Adding New Class for Ubuntu Puppet Agent


5. In the bottom , you need to click on the “commit changes” to save it .


6. Login to the puppet server as root user via ssh session and  initiate the puppet run.

[root@UA-HA ~]# puppet agent -t
Info: Using configured environment 'production'
Info: Retrieving pluginfacts
Info: Retrieving plugin
Info: Loading facts
Info: Caching catalog for uaha.unixarena.com
Info: Applying configuration version '1454507627'
Notice: /Stage[main]/Pe_repo::Platform::Ubuntu_1404_amd64/Pe_repo::Debian[ubuntu-14.04-amd64]/Pe_repo::Repo[ubuntu-14.04-amd64 2015.3.1]/Pe_staging::Deploy[puppet-agent-ubuntu-14.04-amd64.tar.gz]/Pe_staging::File[puppet-agent-ubuntu-14.04-amd64.tar.gz]/Exec[/opt/puppetlabs/server/data/staging/pe_repo-puppet-agent-1.3.2/puppet-agent-ubuntu-14.04-amd64.tar.gz]/returns: executed successfully
Notice: /Stage[main]/Pe_repo::Platform::Ubuntu_1404_amd64/Pe_repo::Debian[ubuntu-14.04-amd64]/Pe_repo::Repo[ubuntu-14.04-amd64 2015.3.1]/Pe_staging::Deploy[puppet-agent-ubuntu-14.04-amd64.tar.gz]/Pe_staging::Extract[puppet-agent-ubuntu-14.04-amd64.tar.gz]/Exec[extract puppet-agent-ubuntu-14.04-amd64.tar.gz]/returns: executed successfully
Notice: Applied catalog in 131.98 seconds
[root@UA-HA ~]#


7. Login to the Ubuntu 14.04 64 node and execute the following command to install the puppet agent.

root@uacloud:~# curl -k https://uaha.unixarena.com:8140/packages/current/install.bash | sudo bash
  % Total    % Received % Xferd  Average Speed   Time    Time     Time  Current
                                 Dload  Upload   Total   Spent    Left  Speed
100 14576  100 14576    0     0   7560      0  0:00:01  0:00:01 --:--:--  7560

Reading package lists... Done
Building dependency tree
Reading state information... Done
The following packages were automatically installed and are no longer required:
  librabbitmq1 python-librabbitmq python-oslo.messaging python-oslo.rootwrap
Use 'apt-get autoremove' to remove them.
The following packages will be upgraded:
  apt-transport-https
1 upgraded, 0 newly installed, 0 to remove and 155 not upgraded.
4 not fully installed or removed.
Need to get 25.0 kB of archives.
After this operation, 0 B of additional disk space will be used.
Get:1 http://in.archive.ubuntu.com/ubuntu/ trusty-updates/main apt-transport-https amd64 1.0.1ubuntu2.11 [25.0 kB]
Fetched 25.0 kB in 9s (2,553 B/s)
# ...and we should be good.
exit 0
(Reading database ... 112997 files and directories currently installed.)
Preparing to unpack .../apt-transport-https_1.0.1ubuntu2.11_amd64.deb ...
Unpacking apt-transport-https (1.0.1ubuntu2.11) over (1.0.1ubuntu2.10) ...
Reading package lists... Done
Building dependency tree
Reading state information... Done
The following packages were automatically installed and are no longer required:
  librabbitmq1 python-librabbitmq python-oslo.messaging python-oslo.rootwrap
Use 'apt-get autoremove' to remove them.
The following NEW packages will be installed:
  puppet-agent
0 upgraded, 1 newly installed, 0 to remove and 155 not upgraded.
4 not fully installed or removed.
Need to get 12.5 MB of archives.
After this operation, 65.1 MB of additional disk space will be used.
Get:1 https://uaha.unixarena.com:8140/packages/2015.3.1/ubuntu-14.04-amd64/ trusty/PC1 puppet-agent amd64 1.3.2-1trusty [12.5 MB]
Fetched 12.5 MB in 4s (3,105 kB/s)
Selecting previously unselected package puppet-agent.
(Reading database ... 112997 files and directories currently installed.)
Preparing to unpack .../puppet-agent_1.3.2-1trusty_amd64.deb ...
Unpacking puppet-agent (1.3.2-1trusty) ...
Processing triggers for ureadahead (0.100.0-16) ...
ureadahead will be reprofiled on next reboot

Setting up puppet-agent (1.3.2-1trusty) ...

service { 'puppet':
  ensure => 'stopped',
}
Notice: /Service[puppet]/ensure: ensure changed 'stopped' to 'running'
service { 'puppet':
  ensure => 'running',
  enable => 'true',
}
service { 'puppet':
  ensure => 'running',
  enable => 'true',
}
Notice: /File[/usr/local/bin/facter]/ensure: created
file { '/usr/local/bin/facter':
  ensure => 'link',
  target => '/opt/puppetlabs/puppet/bin/facter',
}
Notice: /File[/usr/local/bin/puppet]/ensure: created
file { '/usr/local/bin/puppet':
  ensure => 'link',
  target => '/opt/puppetlabs/puppet/bin/puppet',
}
Notice: /File[/usr/local/bin/pe-man]/ensure: created
file { '/usr/local/bin/pe-man':
  ensure => 'link',
  target => '/opt/puppetlabs/puppet/bin/pe-man',
}
Notice: /File[/usr/local/bin/hiera]/ensure: created
file { '/usr/local/bin/hiera':
  ensure => 'link',
  target => '/opt/puppetlabs/puppet/bin/hiera',
}
root@uacloud:~#


8. Run the puppet agent . (Otherwise you need to wait puppet agent to check-in automatically. The default interval is 30 minutes )

root@uacloud:~# puppet agent -t
Info: Using configured environment 'production'
Info: Retrieving pluginfacts
Info: Retrieving plugin
Info: Loading facts
Info: Caching catalog for uacloud
Info: Applying configuration version '1454512140'
Notice: Applied catalog in 0.42 seconds
root@uacloud:~#


9. Go back to puppet console.  Navigate to the Nodes – > Unassigned certificates.  Verify the node name and click on “Accept All” or “Accept” .

or

# puppet cert list
# puppet cert sign  "host_name"


10. Go back to puppet agent node and re-run the puppet agent.

root@uacloud:~# puppet agent -t


You should be able to see the new puppet agent node in the Puppet enterprise console.

We have added two different type of puppet agent nodes in Puppet server. Hope this article is informative to you .

Share it ! Comment it !! Be Sociable !!!

The post Puppet – How to install and configure Puppet Agent (Client) ? appeared first on UnixArena.

Puppet – What is Facter ? How it works ?

$
0
0

This article is going to brief about Puppet’s  Facter.  It’s a cross platform system profiling library  which helps to provide the similar formatted output on all the operating systems. Puppet agent uses facter to send the node information to the puppet server and this is required when you compile the node’s catalog.  Facter system profiling library  is part of the puppet agent package. By default , it ships with default core facts which are sufficient to manage the environment however you can also write the custom facts .

In simple term,

  • Facter is simple command line tool which provides the node specific information
  • This is just like “env” command in bash shell (which provides the set of variables) => (Not Exactly though).


Facter uses the OS commands and configuration files to generate the system information. For an example, to get the OS release details , it uses the lsb-release command.


Puppet Version:

[root@uapa1 facts.d]# puppet --version
4.3.1
[root@uapa1 facts.d]#


FACTER: 

1. Login to any of the puppet agent node.

2.Check the puppet agent service status.

[root@uapa1 ~]# /opt/puppetlabs/bin/facter --version
3.1.3 (commit 1aa380a82ec35b7f8e7e58fab627e74f93aaeff3)
[root@uapa1 ~]# systemctl status puppet.service
● puppet.service - Puppet agent
 Loaded: loaded (/usr/lib/systemd/system/puppet.service; enabled; vendor preset: disabled)
 Active: active (running) since Mon 2016-02-08 14:00:45 EST; 21h ago
 Main PID: 2823 (puppet)
 CGroup: /system.slice/puppet.service
 └─2823 /opt/puppetlabs/puppet/bin/ruby /opt/puppetlabs/puppet/bin/puppet agent --no-daemonize

3. Facter is part of puppet agent package. You can verify it using following command.

[root@uapa1 ~]# rpm -qf /opt/puppetlabs/facter
puppet-agent-1.3.2-1.el7.x86_64
[root@uapa1 ~]#


4. Check the facter version.

[root@uapa1 ~]# facter --version
3.1.3 (commit 1aa380a82ec35b7f8e7e58fab627e74f93aaeff3)
[root@uapa1 ~]#


5. Execute the “facter” command and see what it provides.

[root@uapa1 ~]# facter
augeas => {
  version => "1.4.0"
}
disks => {
  fd0 => {
    size => "4.00 KiB",
    size_bytes => 4096
  },
  sda => {
    model => "VMware Virtual S",
    size => "20.00 GiB",
    size_bytes => 21474836480,
    vendor => "VMware,"
  },
  sdb => {
    model => "VMware Virtual S",
    size => "512.00 MiB",
    size_bytes => 536870912,
    vendor => "VMware,"
  },
  sr0 => {
    model => "VMware SATA CD00",
    size => "1.00 GiB",
    size_bytes => 1073741312,
    vendor => "NECVMWar"
  },
  sr1 => {
    model => "VMware SATA CD01",
    size => "3.77 GiB",
    size_bytes => 4043309056,
    vendor => "NECVMWar"
  }
}
dmi => {
  bios => {
    release_date => "07/31/2013",
    vendor => "Phoenix Technologies LTD",
    version => "6.00"
  },
  board => {
    manufacturer => "Intel Corporation",
    product => "440BX Desktop Reference Platform",
    serial_number => "None"
  },
  chassis => {
    asset_tag => "No Asset Tag",
    type => "Other"
  },
  manufacturer => "VMware, Inc.",
  product => {
    name => "VMware Virtual Platform",
    serial_number => "VMware-56 4d 16 2a 57 dc 86 3e-66 dc 48 c2 67 da 2e f9",
    uuid => "564D162A-57DC-863E-66DC-48C267DA2EF9"
  }
}
facterversion => 3.1.3
filesystems => xfs
identity => {
  gid => 0,
  group => "root",
  uid => 0,
  user => "root"
}
is_virtual => true
kernel => Linux
kernelmajversion => 3.10
kernelrelease => 3.10.0-327.el7.x86_64
kernelversion => 3.10.0
load_averages => {
  15m => 0.05,
  1m => 0,
  5m => 0.02
}
memory => {
  swap => {
    available => "2.00 GiB",
    available_bytes => 2147479552,
    capacity => "0%",
    total => "2.00 GiB",
    total_bytes => 2147479552,
    used => "0 bytes",
    used_bytes => 0
  },
  system => {
    available => "3.21 GiB",
    available_bytes => 3441639424,
    capacity => "13.26%",
    total => "3.70 GiB",
    total_bytes => 3967950848,
    used => "501.93 MiB",
    used_bytes => 526311424
  }
}
mountpoints => {
  / => {
    available => "7.46 GiB",
    available_bytes => 8006574080,
    capacity => "57.39%",
    device => "/dev/mapper/rhel-root",
    filesystem => "xfs",
    options => [
      "rw",
      "relatime",
      "attr2",
      "inode64",
      "noquota"
    ],
    size => "17.50 GiB",
    size_bytes => 18788384768,
    used => "10.04 GiB",
    used_bytes => 10781810688
  },
  /boot => {
    available => "284.02 MiB",
    available_bytes => 297811968,
    capacity => "42.82%",
    device => "/dev/sda1",
    filesystem => "xfs",
    options => [
      "rw",
      "relatime",
      "attr2",
      "inode64",
      "noquota"
    ],
    size => "496.67 MiB",
    size_bytes => 520794112,
    used => "212.65 MiB",
    used_bytes => 222982144
  }
}
networking => {
  dhcp => "192.168.203.160",
  fqdn => "UAPA1",
  hostname => "uapa1",
  interfaces => {
    br0 => {
      bindings => [
        {
          address => "192.168.203.134",
          netmask => "255.255.255.0",
          network => "192.168.203.0"
        }
      ],
      bindings6 => [
        {
          address => "fe80::62:40ff:fe07:2913",
          netmask => "ffff:ffff:ffff:ffff::",
          network => "fe80::"
        }
      ],
      dhcp => "192.168.203.160",
      ip => "192.168.203.134",
      ip6 => "fe80::62:40ff:fe07:2913",
      mac => "00:0c:29:da:2e:f9",
      mtu => 1500,
      netmask => "255.255.255.0",
      netmask6 => "ffff:ffff:ffff:ffff::",
      network => "192.168.203.0",
      network6 => "fe80::"
    },
    eno16777736 => {
      dhcp => "192.168.203.160",
      mac => "00:0c:29:da:2e:f9",
      mtu => 1500
    },
    lo => {
      bindings => [
        {
          address => "127.0.0.1",
          netmask => "255.0.0.0",
          network => "127.0.0.0"
        }
      ],
      bindings6 => [
        {
          address => "::1",
          netmask => "ffff:ffff:ffff:ffff:ffff:ffff:ffff:ffff",
          network => "::1"
        }
      ],
      ip => "127.0.0.1",
      ip6 => "::1",
      mtu => 65536,
      netmask => "255.0.0.0",
      netmask6 => "ffff:ffff:ffff:ffff:ffff:ffff:ffff:ffff",
      network => "127.0.0.0",
      network6 => "::1"
    },
    virbr0 => {
      bindings => [
        {
          address => "192.168.122.1",
          netmask => "255.255.255.0",
          network => "192.168.122.0"
        }
      ],
      ip => "192.168.122.1",
      mac => "52:54:00:16:bc:24",
      mtu => 1500,
      netmask => "255.255.255.0",
      network => "192.168.122.0"
    },
    virbr0-nic => {
      mac => "52:54:00:16:bc:24",
      mtu => 1500
    }
  },
  ip => "192.168.203.134",
  ip6 => "fe80::62:40ff:fe07:2913",
  mac => "00:0c:29:da:2e:f9",
  mtu => 1500,
  netmask => "255.255.255.0",
  netmask6 => "ffff:ffff:ffff:ffff::",
  network => "192.168.203.0",
  network6 => "fe80::",
  primary => "br0"
}
os => {
  architecture => "x86_64",
  distro => {
    codename => "Maipo",
    description => "Red Hat Enterprise Linux Server release 7.2 (Maipo)",
    id => "RedHatEnterpriseServer",
    release => {
      full => "7.2",
      major => "7",
      minor => "2"
    },
    specification => ":core-4.1-amd64:core-4.1-noarch"
  },
  family => "RedHat",
  hardware => "x86_64",
  name => "RedHat",
  release => {
    full => "7.2",
    major => "7",
    minor => "2"
  },
  selinux => {
    enabled => false
  }
}
partitions => {
  /dev/mapper/rhel-root => {
    filesystem => "xfs",
    mount => "/",
    size => "17.51 GiB",
    size_bytes => 18798870528,
    uuid => "6eddf97b-99d2-4cde-b08c-98967063a482"
  },
  /dev/mapper/rhel-swap => {
    filesystem => "swap",
    size => "2.00 GiB",
    size_bytes => 2147483648,
    uuid => "3b2d06f7-b655-4de9-b1b5-41509adf3029"
  },
  /dev/sda1 => {
    filesystem => "xfs",
    mount => "/boot",
    size => "500.00 MiB",
    size_bytes => 524288000,
    uuid => "ecc9aba3-4b15-49ef-b571-b65beaa3ca46"
  },
  /dev/sda2 => {
    filesystem => "LVM2_member",
    size => "19.51 GiB",
    size_bytes => 20949499904,
    uuid => "uZymRJ-CiuQ-AA8a-lZMP-0pls-zu9C-cdcqhk"
  }
}
path => /usr/local/sbin:/usr/local/bin:/usr/sbin:/usr/bin:/opt/puppetlabs/bin:/root/bin
processors => {
  count => 2,
  isa => "x86_64",
  models => [
    "Intel(R) Core(TM) i5-4310U CPU @ 2.00GHz",
    "Intel(R) Core(TM) i5-4310U CPU @ 2.00GHz"
  ],
  physicalcount => 1
}
ruby => {
  platform => "x86_64-linux",
  sitedir => "/opt/puppetlabs/puppet/lib/ruby/site_ruby/2.1.0",
  version => "2.1.7"
}

system_uptime => {
  days => 0,
  hours => 21,
  seconds => 76292,
  uptime => "21:11 hours"
}
timezone => EST
virtual => vmware
[root@uapa1 ~]#

Facter provides all the available facts about system. If no facts are specifically asked for, then all facts will be returned.


6. Would you like to use facter to fetch specific information?  Just provide the specific fact like following.

  • To see the CPU information,
[root@uapa1 ~]# facter processors
{
  count => 2,
  isa => "x86_64",
  models => [
    "Intel(R) Core(TM) i5-4310U CPU @ 2.00GHz",
    "Intel(R) Core(TM) i5-4310U CPU @ 2.00GHz"
  ],
  physicalcount => 1
}
[root@uapa1 ~]#


  • To check the OS family,
[root@uapa1 ~]# facter osfamily
RedHat
[root@uapa1 ~]#


  • To check other OS details,
[root@uapa1 ~]# facter os
{
  architecture => "x86_64",
  distro => {
    codename => "Maipo",
    description => "Red Hat Enterprise Linux Server release 7.2 (Maipo)",
    id => "RedHatEnterpriseServer",
    release => {
      full => "7.2",
      major => "7",
      minor => "2"
    },
    specification => ":core-4.1-amd64:core-4.1-noarch"
  },
  family => "RedHat",
  hardware => "x86_64",
  name => "RedHat",
  release => {
    full => "7.2",
    major => "7",
    minor => "2"
  },
  selinux => {
    enabled => false
  }
}
[root@uapa1 ~]#


7. Let’s see how the output differs when you run the same facter command from Ubuntu.

root@uacloud:~# facter processors
{
  count => 2,
  isa => "x86_64",
  models => [
    "Intel(R) Core(TM) i5-4310U CPU @ 2.00GHz",
    "Intel(R) Core(TM) i5-4310U CPU @ 2.00GHz"
  ],
  physicalcount => 1
}
root@uacloud:~#


  • OSFamily:
root@uacloud:~# facter osfamily
Debian
root@uacloud:~#


  • OS details:
root@uacloud:~# facter os
{
  architecture => "amd64",
  distro => {
    codename => "trusty",
    description => "Ubuntu 14.04.3 LTS",
    id => "Ubuntu",
    release => {
      full => "14.04",
      major => "14.04"
    }
  },
  family => "Debian",
  hardware => "x86_64",
  name => "Ubuntu",
  release => {
    full => "14.04",
    major => "14.04"
  },
  selinux => {
    enabled => false
  }
}
root@uacloud:~#


We are just using same facter commands irrespective of any  operating systems and it provides the output in same format. Just the results are different (Ex: OS family) . These all facts are required when you are classifying the nodes. For an example, if you want to install the Apache on Redhat & Debian systems,  you need to specify the packages names as “httpd” & “apache” respectively. In Module, we will just define that if it’s a redhat OS family , use “httpd” and if it’s a Debian family , use “apache” to install the packages.


Custom Fact:

Let’s write the first custom fact.

1.Login to any of the puppet agent node.

2.Navigate to “/opt/puppetlabs/facter/facts.d” directory .


3. Create a simple shell script to define the variable and make it executable.

[root@uapa1 facts.d]# cat env_custom-facts.sh
#!/bin/bash
echo "hostgroup=UA"
echo "environment=SBX"
[root@uapa1 facts.d]#
[root@uapa1 facts.d]# chmod +x env_custom-facts.sh

We have configured the new fact for this puppet agent.


4. Let’s test it . Use the facter command to display the hostgroup.

[root@uapa1 facts.d]# facter hostgroup
UA
[root@uapa1 facts.d]#


You can also see that environment fact also defined.

[root@uapa1 facts.d]# facter environment
SBX
[root@uapa1 facts.d]#
[root@uapa1 facts.d]# facter |egrep "hostgroup|environment"
environment => SBX
hostgroup => UA
[root@uapa1 facts.d]#

This is how you can write own fact to classify the puppet agents.


Hope this article is informative to you . Share it ! Comment it !! Be Sociable !!!

The post Puppet – What is Facter ? How it works ? appeared first on UnixArena.

Puppet – Resource Declaration – Overview

$
0
0

Resources are essential unit to perform the system configuration. Each resource will describe the particular thing in puppet. For an example,  specific user needs to be created or specific file needs to be updated across the puppet agent nodes. When you would like to manage the users, “user” resource type will come in to play. If you want to modify specific file, you need to use “file” resource type.  To create a user , you need to provide set of attributes to define home directory , user id , group id , type of shell and comments. To define these attributes, you need to create a block of puppet code and this is called resource declaration. You must write these codes in “Declarative Modelling Language” (DML).


Let’s have look at the sample resource declaration code.

user { 'oracle':
ensure => present,
uid => '1020',
shell => '/bin/bash',
home => '/home/oracle',
managehome => true,
comment => 'oracle DB user',
}


The above code consists following parts.

  • Resource Type – which in this case is “user“
  • Resource Title – which in this case is “oracle”
  • Attributes – these are the resource’s properties. (UID, GID, SHELL,HOME)
  • Values – this are the values that correspond to each properties.


Let’s apply the above resource declaration code on one of the puppet agent node.


Executing the Resource Declaration Code:


1.Login to the puppet agent node .


2. Apply the resource declaration code which we have created.


3.Navigate to directory “/etc/puppetlabs/code/environments/production/manifests” . (Not Mandatory)


4. Create a new file with name init.pp with following code.

user { 'oracle':
ensure => present,
uid => '1020',
shell => '/bin/bash',
home => '/home/oracle',
managehome => true,
comment => 'oracle DB user',
}


5. Let’s apply the code using puppet command.

[root@uapa1 manifests]# puppet apply init.pp
Notice: Compiled catalog for uapa1 in environment production in 0.04 seconds
Notice: /Stage[main]/Main/User[oracle]/ensure: created
Notice: Applied catalog in 0.31 seconds
[root@uapa1 manifests]#


6. Verify our work.

[root@uapa1 manifests]# id -a oracle
uid=1020(oracle) gid=1020(oracle) groups=1020(oracle)
[root@uapa1 manifests]# ls -ld /home/oracle
drwx------ 3 oracle oracle 74 Feb 9 18:58 /home/oracle
[root@uapa1 manifests]# puppet resource user oracle
user { 'oracle':
 ensure => 'present',
 comment => 'oracle DB user',
 gid => '1020',
 home => '/home/oracle',
 password => '!!',
 password_max_age => '99999',
 password_min_age => '0',
 shell => '/bin/bash',
 uid => '1020',
}
[root@uapa1 manifests]#


We can see that oracle user is created as defined in the puppet code.  At this point , we are not dealing with puppet Server/Master. We are just dealing with puppet agents on the client systems. Master/Server will come in to play when you would like to manage the things from centralized location (Which is the industry common practice).  The above demonstration is just to understand that how puppet agent works.


To remove the resource , you just need to specify the resource name with “ensure=absent” value.

[root@uapa1 manifests]# puppet resource user oracle ensure=absent
Notice: /User[oracle]/ensure: removed
user { 'oracle':
 ensure => 'absent',
}
[root@uapa1 manifests]#


Verify the user again,

[root@uapa1 manifests]# puppet resource user oracle
user { 'oracle':
 ensure => 'absent',
}
[root@uapa1 manifests]#
root@uapa1 manifests]# ls -ld /home/oracle
ls: cannot access /home/oracle: No such file or directory
[root@uapa1 manifests]# grep oracle /etc/passwd
[root@uapa1 manifests]# id -a oracle
id: oracle: no such user
[root@uapa1 manifests]#


This is just an small example that how to define the resource with require attributes, create and delete it. In the above example, we have seen about “user” resource type. Let’s see that what are the in-built resource types available in puppet.


RESOURCE TYPE:

1. You view the available resource type using puppet command.

[root@uapa1 manifests]# puppet describe --list
These are the types known to puppet:
augeas          - Apply a change or an array of changes to the  ...
computer        - Computer object management using DirectorySer ...
cron            - Installs and manages cron jobs
exec            - Executes external commands
file            - Manages files, including their content, owner ...
filebucket      - A repository for storing and retrieving file  ...
group           - Manage groups
host            - Installs and manages host entries
interface       - This represents a router or switch interface
k5login         - Manage the `.k5login` file for a user
macauthorization - Manage the Mac OS X authorization database
mailalias       - .. no documentation ..
maillist        - Manage email lists
mcx             - MCX object management using DirectoryService  ...
mount           - Manages mounted filesystems, including puttin ...
nagios_command  - The Nagios type command
nagios_contact  - The Nagios type contact
nagios_contactgroup - The Nagios type contactgroup
nagios_host     - The Nagios type host
nagios_hostdependency - The Nagios type hostdependency
nagios_hostescalation - The Nagios type hostescalation
nagios_hostextinfo - The Nagios type hostextinfo
nagios_hostgroup - The Nagios type hostgroup
nagios_service  - The Nagios type service
nagios_servicedependency - The Nagios type servicedependency
nagios_serviceescalation - The Nagios type serviceescalation
nagios_serviceextinfo - The Nagios type serviceextinfo
nagios_servicegroup - The Nagios type servicegroup
nagios_timeperiod - The Nagios type timeperiod
notify          - .. no documentation ..
package         - Manage packages
pe_anchor       - A simple resource type intended to be used as ...
pe_file_line    - Ensures that a given line is contained within ...
pe_hocon_setting - .. no documentation ..
pe_ini_setting  - .. no documentation ..
pe_ini_subsetting - .. no documentation ..
pe_java_ks      - Manages entries in a java keystore
pe_postgresql_conf - .. no documentation ..
pe_postgresql_psql - .. no documentation ..
pe_puppet_authorization_hocon_rule - .. no documentation ..
resources       - This is a metatype that can manage other reso ...
router          - .. no documentation ..
schedule        - Define schedules for Puppet
scheduled_task  - Installs and manages Windows Scheduled Tasks
selboolean      - Manages SELinux booleans on systems with SELi ...
selmodule       - Manages loading and unloading of SELinux poli ...
service         - Manage running services
ssh_authorized_key - Manages SSH authorized keys
sshkey          - Installs and manages ssh host keys
stage           - A resource type for creating new run stages
tidy            - Remove unwanted files based on specific crite ...
user            - Manage users
vlan            - .. no documentation ..
whit            - Whits are internal artifacts of Puppet's curr ...
yumrepo         - The client-side description of a yum reposito ...
zfs             - Manage zfs
zone            - Manages Solaris zones
zpool           - Manage zpools
[root@uapa1 manifests]#


2. To know more about the specific resource type, use the following command with specific resource type.

[root@uapa1 manifests]# puppet describe cron

cron
====
Installs and manages cron jobs.  Every cron resource created by Puppet
requires a command and at least one periodic attribute (hour, minute,
month, monthday, weekday, or special).  While the name of the cron job is
not part of the actual job, the name is stored in a comment beginning with
`# Puppet Name: `. These comments are used to match crontab entries created
by Puppet with cron resources.
If an existing crontab entry happens to match the scheduling and command of
a
cron resource that has never been synched, Puppet will defer to the existing
crontab entry and will not create a new entry tagged with the `# Puppet
Name: `
comment.
Example:
    cron { logrotate:
      command => "/usr/sbin/logrotate",
      user    => root,
      hour    => 2,
      minute  => 0
    }
Note that all periodic attributes can be specified as an array of values:
    cron { logrotate:
      command => "/usr/sbin/logrotate",
      user    => root,
      hour    => [2, 4]
    }
...or using ranges or the step syntax `*/2` (although there's no guarantee
that your `cron` daemon supports these):
    cron { logrotate:
      command => "/usr/sbin/logrotate",
      user    => root,
      hour    => ['2-4'],
      minute  => '*/10'
    }
An important note: _the Cron type will not reset parameters that are
removed from a manifest_. For example, removing a `minute => 10` parameter
will not reset the minute component of the associated cronjob to `*`.
These changes must be expressed by setting the parameter to
`minute => absent` because Puppet only manages parameters that are out of
sync with manifest entries.
**Autorequires:** If Puppet is managing the user account specified by the
`user` property of a cron resource, then the cron resource will autorequire
that user.


Parameters
----------

- **command**
    The command to execute in the cron job.  The environment
    provided to the command varies by local system rules, and it is
    best to always provide a fully qualified command.  The user's
    profile is not sourced when the command is run, so if the
    user's environment is desired it should be sourced manually.
    All cron parameters support `absent` as a value; this will
    remove any existing values for that field.

- **ensure**
    The basic property that the resource should be in.
    Valid values are `present`, `absent`.


Resource Abstraction Layer (RAL)

Each resource is belongs to specific resource type. Resources are described independently from the target operating system. It gives you enough information to the puppet server regardless of whether the puppet agent is a windows or Linux machine. Puppet agent allows you to view/manage all these resource via Puppet’s CLI interface Layer. (Ex: user creation , deletion )

The platform-specific-implementation exists in the form of “Providers” for each resource type. By default, in-built  resource type will cover all Linux, Unix and windows platforms for each resource-type’s attribute. You can use the “describe” subcommand along with it’s “–providers” option to view a list of providers for each attribute for a given resource type. For an example, to view all the providers for the “service” resource type, use the following command.

[root@uapa1 manifests]# puppet describe service --providers


Providers will be displayed in last section. Let me just bring  up the “providers” part.

[root@uapa1 manifests]# puppet describe service --providers |grep -A 1000 "Providers"
Providers
---------

- **base**
    The simplest form of Unix service support.
    You have to specify enough about your service for this to work; the
    minimum you can specify is a binary for starting the process, and this
    same binary will be searched for in the process table to stop the
    service.  As with `init`-style services, it is preferable to specify
    start,
    stop, and status commands.
    * Required binaries: `kill`.
* Supported features: `refreshable`.

- **bsd**
    Generic BSD form of `init`-style service management with `rc.d`.
    Uses `rc.conf.d` for service enabling and disabling.
    * Supported features: `enableable`, `refreshable`.

- **daemontools**
    Daemontools service management.
    This provider manages daemons supervised by D.J. Bernstein daemontools.
    When detecting the service directory it will check, in order of
    preference:
    * `/service`
    * `/etc/service`
    * `/var/lib/svscan`
    The daemon directory should be in one of the following locations:
    * `/var/lib/service`
    * `/etc`
    ...or this can be overriden in the resource's attributes:
        service { "myservice":
          provider => "daemontools",
          path     => "/path/to/daemons",
        }
    This provider supports out of the box:
    * start/stop (mapped to enable/disable)
    * enable/disable
    * restart
    * status
    If a service has `ensure => "running"`, it will link /path/to/daemon to
    /path/to/service, which will automatically enable the service.
    If a service has `ensure => "stopped"`, it will only shut down the
    service, not
    remove the `/path/to/service` link.
    * Required binaries: `/usr/bin/svc`, `/usr/bin/svstat`.
    * Supported features: `enableable`, `refreshable`.

- **debian**
    Debian's form of `init`-style management.
    The only differences from `init` are support for enabling and disabling
    services via `update-rc.d` and the ability to determine enabled status
    via
    `invoke-rc.d`.
    * Required binaries: `/usr/sbin/invoke-rc.d`, `/usr/sbin/update-rc.d`.
    * Default for `operatingsystem` == `cumuluslinux`. Default for
    `operatingsystem` == `debian` and `operatingsystemmajrelease` == `5, 6,
    7`.
* Supported features: `enableable`, `refreshable`.

- **freebsd**
    Provider for FreeBSD and DragonFly BSD. Uses the `rcvar` argument of
    init scripts and parses/edits rc files.
    * Default for `operatingsystem` == `freebsd, dragonfly`.
    * Supported features: `enableable`, `refreshable`.

- **gentoo**
    Gentoo's form of `init`-style service management.
    Uses `rc-update` for service enabling and disabling.
    * Required binaries: `/sbin/rc-update`.
    * Supported features: `enableable`, `refreshable`.

- **init**
    Standard `init`-style service management.
    * Supported features: `refreshable`.

- **launchd**
    This provider manages jobs with `launchd`, which is the default service
    framework for Mac OS X (and may be available for use on other
    platforms).
    For `launchd` documentation, see:
    * <http://developer.apple.com/macosx/launchd.html>
    * <http://launchd.macosforge.org/>
    This provider reads plists out of the following directories:
    * `/System/Library/LaunchDaemons`
    * `/System/Library/LaunchAgents`
    * `/Library/LaunchDaemons`
    * `/Library/LaunchAgents`
    ...and builds up a list of services based upon each plist's "Label"
    entry.
    This provider supports:
    * ensure => running/stopped,
    * enable => true/false
    * status
    * restart
    Here is how the Puppet states correspond to `launchd` states:
    * stopped --- job unloaded
    * started --- job loaded
    * enabled --- 'Disable' removed from job plist file
    * disabled --- 'Disable' added to job plist file
    Note that this allows you to do something `launchctl` can't do, which is
    to
    be in a state of "stopped/enabled" or "running/disabled".
    Note that this provider does not support overriding 'restart' or
    'status'.
    * Required binaries: `/bin/launchctl`, `/usr/bin/plutil`.
    * Default for `operatingsystem` == `darwin`.
    * Supported features: `enableable`, `refreshable`.

- **openbsd**
    Provider for OpenBSD's rc.d daemon control scripts
    * Required binaries: `/usr/sbin/rcctl`.
    * Default for `operatingsystem` == `openbsd`.
    * Supported features: `enableable`, `flaggable`, `refreshable`.

- **openrc**
    Support for Gentoo's OpenRC initskripts
    Uses rc-update, rc-status and rc-service to manage services.
    * Required binaries: `/bin/rc-status`, `/sbin/rc-service`,
    `/sbin/rc-update`.
    * Default for `operatingsystem` == `gentoo`. Default for
    `operatingsystem` == `funtoo`.
    * Supported features: `enableable`, `refreshable`.

- **openwrt**
    Support for OpenWrt flavored init scripts.
    Uses /etc/init.d/service_name enable, disable, and enabled.
    * Default for `operatingsystem` == `openwrt`.
    * Supported features: `enableable`, `refreshable`.

- **rcng**
    RCng service management with rc.d
    * Default for `operatingsystem` == `netbsd, cargos`.
    * Supported features: `enableable`, `refreshable`.

- **redhat**
    Red Hat's (and probably many others') form of `init`-style service
    management. Uses `chkconfig` for service enabling and disabling.
    * Required binaries: `/sbin/chkconfig`, `/sbin/service`.
    * Default for `osfamily` == `redhat`. Default for
    `operatingsystemmajrelease` == `10, 11` and `osfamily` == `suse`.
    * Supported features: `enableable`, `refreshable`.

- **runit**
    Runit service management.
    This provider manages daemons running supervised by Runit.
    When detecting the service directory it will check, in order of
    preference:
    * `/service`
    * `/etc/service`
    * `/var/service`
    The daemon directory should be in one of the following locations:
    * `/etc/sv`
    * `/var/lib/service`
    or this can be overriden in the service resource parameters::
        service { "myservice":
          provider => "runit",
          path => "/path/to/daemons",
        }
    This provider supports out of the box:
    * start/stop
    * enable/disable
    * restart
    * status
    * Required binaries: `/usr/bin/sv`.
    * Supported features: `enableable`, `refreshable`.

- **service**
    The simplest form of service support.
    * Supported features: `refreshable`.

- **smf**
    Support for Sun's new Service Management Framework.
    Starting a service is effectively equivalent to enabling it, so there is
    only support for starting and stopping services, which also enables and
    disables them, respectively.
    By specifying `manifest => "/path/to/service.xml"`, the SMF manifest
    will
    be imported if it does not exist.
    * Required binaries: `/usr/bin/svcs`, `/usr/sbin/svcadm`,
    `/usr/sbin/svccfg`.
    * Default for `osfamily` == `solaris`.
    * Supported features: `enableable`, `refreshable`.

- **src**
    Support for AIX's System Resource controller.
    Services are started/stopped based on the `stopsrc` and `startsrc`
    commands, and some services can be refreshed with `refresh` command.
    Enabling and disabling services is not supported, as it requires
    modifications to `/etc/inittab`. Starting and stopping groups of
    subsystems
    is not yet supported.
    * Required binaries: `/usr/bin/lssrc`, `/usr/bin/refresh`,
    `/usr/bin/startsrc`, `/usr/bin/stopsrc`, `/usr/sbin/chitab`,
    `/usr/sbin/lsitab`, `/usr/sbin/mkitab`, `/usr/sbin/rmitab`.
    * Default for `operatingsystem` == `aix`.
    * Supported features: `enableable`, `refreshable`.

- **systemd**
    Manages `systemd` services using `systemctl`.
    * Required binaries: `systemctl`.
    * Default for `osfamily` == `archlinux`. Default for
    `operatingsystemmajrelease` == `7` and `osfamily` == `redhat`. Default
    for `operatingsystem` == `fedora` and `osfamily` == `redhat`. Default
    for `osfamily` == `suse`. Default for `operatingsystem` == `debian` and
    `operatingsystemmajrelease` == `8`. Default for `operatingsystem` ==
    `ubuntu` and `operatingsystemmajrelease` == `15.04`.
    * Supported features: `enableable`, `maskable`, `refreshable`.

- **upstart**
    Ubuntu service management with `upstart`.
    This provider manages `upstart` jobs on Ubuntu. For `upstart`
    documentation,
    see <http://upstart.ubuntu.com/>.
    * Required binaries: `/sbin/initctl`, `/sbin/restart`, `/sbin/start`,
    `/sbin/status`, `/sbin/stop`.
    * Default for `operatingsystem` == `ubuntu` and
    `operatingsystemmajrelease` == `10.04, 12.04, 14.04, 14.10`.
    * Supported features: `enableable`, `refreshable`.

- **windows**
    Support for Windows Service Control Manager (SCM). This provider can
    start, stop, enable, and disable services, and the SCM provides working
    status methods for all services.
    Control of service groups (dependencies) is not yet supported, nor is
    running
    services as a specific user.
    * Required binaries: `net.exe`.
    * Default for `operatingsystem` == `windows`.
    * Supported features: `enableable`, `refreshable`.
[root@uapa1 manifests]#

Here you can see that “service” resource type has different attributes for each OS family. Puppet agent handles these things in back-end.


Hope this article is informative to you. Share it ! Comment it ! Be Sociable !!!

The post Puppet – Resource Declaration – Overview appeared first on UnixArena.

Puppet Server – Code and Configuration Directories

$
0
0

This article will brief about the puppet server’s directory architecture and important configuration files.  We can classify the puppet server directories  as  1. Code Directory and Data  Directory   2. Config directory. Puppet’s code directory is a main directory to store the code and data.  It contains environments which stores manifests and modules.  Manifest directory contains site.pp and nodes.pp files which helps you to apply the configuration across whole puppet environment. Modules directory contains several directories and we should follow the rules to make the module “autoload” in puppet. Puppet automatically loads modules from one or more directories. The list of directories Puppet will find modules in is called the “modulepath”.


Let’s explore the puppet server directory structure.


1. Login to the puppet server as root user.

2. Puppet configuration and code directories are defined in pe-puppet-server.conf.

[root@UA-HA conf.d]# grep master /etc/puppetlabs/puppetserver/conf.d/pe-puppet-server.conf
 master-conf-dir: /etc/puppetlabs/puppet
 master-code-dir: /etc/puppetlabs/code
 master-var-dir: /opt/puppetlabs/server/data/puppetserver
 master-run-dir: /var/run/puppetlabs/puppetserver
 master-log-dir: /var/log/puppetlabs/puppetserver
 # (optional) Authorize access to Puppet master endpoints via rules specified
[root@UA-HA conf.d]#


3. Puppet configuration files are stored in “/etc/puppetlabs/puppet” directory path.

[root@UA-HA puppet]# ls -lrt /etc/puppetlabs/puppet
total 24
-rw-r--r-- 1 pe-puppet pe-puppet 62 Jan 27 10:35 classifier.yaml
-rw-r--r-- 1 root root 944 Jan 27 10:35 auth.conf
-rw-r--r-- 1 root root 116 Jan 27 10:35 puppetdb.conf
-r--r--r-- 1 pe-puppet pe-puppet 68 Jan 27 10:35 routes.yaml
-rw-r--r-- 1 root root 144 Jan 27 10:36 fileserver.conf
drwxrwx--x 8 pe-puppet pe-puppet 119 Feb 5 03:59 ssl
-rw------- 1 pe-puppet pe-puppet 527 Feb 5 04:12 puppet.conf
[root@UA-HA puppet]#


Some of the files are stored in “/etc/puppetlabs/puppetserver/conf.d/” location.

[root@UA-HA conf.d]# ls -lrt
total 44
-rw-r--r-- 1 root root 49 Dec 1 01:14 ca.conf
-rw-r----- 1 pe-puppet pe-puppet 752 Jan 27 10:36 webserver.conf
-rw-r----- 1 pe-puppet pe-puppet 1772 Jan 27 10:36 web-routes.conf
-rw-r----- 1 pe-puppet pe-puppet 452 Jan 27 10:36 global.conf
-rw-r----- 1 pe-puppet pe-puppet 875 Jan 27 10:36 metrics.conf
-rw-r----- 1 pe-puppet pe-puppet 75 Jan 27 10:36 rbac-consumer.conf
-rw-r----- 1 pe-puppet pe-puppet 83 Jan 27 10:36 activity-consumer.conf
-rw-r----- 1 pe-puppet pe-puppet 688 Jan 27 10:36 file-sync.conf
-rw-r----- 1 pe-puppet pe-puppet 2185 Jan 27 10:36 pe-puppet-server.conf
-rw-r--r-- 1 root root 6320 Jan 27 10:36 auth.conf
[root@UA-HA conf.d]#


4. Puppet variable files are stored under “/opt/puppetlabs/server/data/puppetserver/”

[root@UA-HA ~]# ls -lrt /opt/puppetlabs/server/data/puppetserver
total 0
drwxr-xr-t 2 pe-puppet pe-puppet 6 Jan 27 10:37 state
drwxr-xr-x 2 pe-puppet pe-puppet 6 Jan 27 10:37 lib
drwxr-x--- 2 pe-puppet pe-puppet 6 Jan 27 10:37 preview
drwxr-x--- 2 pe-puppet pe-puppet 6 Jan 27 10:37 bucket
drwxr-x--- 2 pe-puppet pe-puppet 6 Jan 27 10:37 server_data
drwxr-x--- 2 pe-puppet pe-puppet 6 Jan 27 10:37 reports
drwxr-xr-x 2 pe-puppet pe-puppet 6 Jan 27 10:37 facts.d
drwxr-xr-x 4 pe-puppet pe-puppet 33 Jan 27 10:38 filesync
drwxr-x--- 4 pe-puppet pe-puppet 29 Jan 27 10:41 yaml
[root@UA-HA ~]#


5. Puppet server logs are stored in “/var/log/puppetlabs/puppetserver” .

[root@UA-HA ~]# ls -lrt /var/log/puppetlabs/puppetserver
total 6084
-rw-rw---- 1 pe-puppet pe-puppet 0 Jan 27 10:37 masterhttp.log
-rw-r--r-- 1 pe-puppet pe-puppet 23327 Feb 3 05:32 puppetserver.log-20160203.gz
-rw-r--r-- 1 pe-puppet pe-puppet 25594 Feb 3 05:34 puppetserver-access.log-20160203.gz
-rw-r--r-- 1 pe-puppet pe-puppet 160835 Feb 3 05:40 file-sync-access.log-20160203.gz
-rw-r--r-- 1 pe-puppet pe-puppet 25376 Feb 8 14:21 puppetserver.log-20160208.gz
-rw-r--r-- 1 pe-puppet pe-puppet 34356 Feb 8 14:21 puppetserver-access.log-20160208.gz
-rw-r--r-- 1 pe-puppet pe-puppet 139993 Feb 8 14:26 file-sync-access.log-20160208.gz
-rw-r--r-- 1 pe-puppet pe-puppet 343321 Feb 10 07:33 puppetserver.log
-rw-r--r-- 1 pe-puppet pe-puppet 464938 Feb 10 07:42 puppetserver-access.log
-rw-r--r-- 1 pe-puppet pe-puppet 4106745 Feb 10 07:45 file-sync-access.log
[root@UA-HA ~]# 

6.  Here is the code directory path for puppet.

[root@UA-HA puppet]# ls -lrt /etc/puppetlabs/code
total 4
-rw-r--r-- 1 pe-puppet pe-puppet 371 Jan 27 10:38 hiera.yaml
drwxr-xr-x 3 pe-puppet pe-puppet 23 Jan 27 10:38 environments
[root@UA-HA puppet]#

Let’s explorer more about “environments”. (/etc/puppetlabs/code/environments)


1. Navigate to “/etc/puppetlabs/code/environments” directory and list the configured environment.

[root@UA-HA environments]# ls -lrt
total 0
drwxr-xr-x 4 pe-puppet pe-puppet 70 Feb 8 14:18 production
[root@UA-HA environments]#

Here we can see that only one environment  (Production) has been configured.


2. Let’s see what production environment has. By default , It has the environmnet.conf file, manifests and modules directory.

[root@UA-HA production]# ls -lrt
total 4
-rw-r--r-- 1 pe-puppet pe-puppet 879 Jan 27 10:38 environment.conf
drwxr-xr-x 2 pe-puppet pe-puppet 49 Feb 9 02:53 manifests
drwxr-xr-x 5 root root 49 Feb 9 18:50 modules
[root@UA-HA production]#


3. “manifests” directory contains the file “site.pp” . This file is used to  make the configuration environment wide.  Let’s see the content of site.pp.

[root@UA-HA manifests]# more site.pp
## site.pp ##
# This file (/etc/puppetlabs/puppet/manifests/site.pp) is the main entry point
# used when an agent connects to a master and asks for an updated configuration.
#
# Global objects like filebuckets and resource defaults should go in this file,
# as should the default node definition. (The default node can be omitted
# if you use the console and don't define any other nodes in site.pp. See
# http://docs.puppetlabs.com/guides/language_guide.html#nodes for more on
# node definitions.)
## Active Configurations ##
# Disable filebucket by default for all File resources:
File { backup => false }
# DEFAULT NODE
# Node definitions in this file are merged with node data from the console. See
# http://docs.puppetlabs.com/guides/language_guide.html#nodes for more on
# node definitions.
# The default node definition matches any node lacking a more specific node
# definition. If there are no other nodes in this file, classes declared here
# will be included in every node's catalog, *in addition* to any classes
# specified in the console for that node.
node default {
 # This is where you can declare classes for all nodes.
 # Example:
# class { 'mycode': }
}
[root@UA-HA manifests]#


You can also create a file called “nodes.pp” under manifest to list the specific nodes.

Example:

[root@UA-HA manifests]# cat nodes.pp
node uapa1 {
include mycode
}
[root@UA-HA manifests]#


In this example , we are calling module called “mycode” for specific puppet agent “uapa1” .


4. Navigate to “module”  directory for production environment  “/etc/puppetlabs/code/environments/production/modules” .

[root@UA-HA production]# tree modules
modules             # all modules are stored in this directory for production environment
├── accounts        # Rule: the module's main folder must be named after the module itself.
│   ├── examples    # Example directroy is used to perform the dry on current machine
│   │   └── init.pp # Calling Main manifest from manifests directroy
│   ├── files       # This contains a bunch of static files, which can be downloaded by puppet agents. 
│   ├── manifests     # This houses all your manifests.
│   │   ├── groups.pp # Manifest
│   │   └── init.pp   # rule: all modules should have a manifest called init.pp
│   └── templates     # This contains templates that are used by a module’s manifest.


5. Let’s create a new module directories . you must specify a dash-separated username and module name.

[root@UA-HA modules]# puppet module generate lingesh-httpd
We need to create a metadata.json file for this module.  Please answer the
following questions; if the question is not applicable to this module, feel free
to leave it blank.

Puppet uses Semantic Versioning (semver.org) to version modules.
What version is this module?  [0.1.0]
-->

Who wrote this module?  [lingesh]
-->

What license does this module code fall under?  [Apache-2.0]
-->

How would you describe this module in a single sentence?
--> To install httpd(apache) on Linux servers

Where is this module's source code repository?
-->

Where can others go to learn more about this module?
-->

Where can others go to file issues about this module?
-->

----------------------------------------
{
  "name": "lingesh-httpd",
  "version": "0.1.0",
  "author": "lingesh",
  "summary": "To install httpd(apache) on Linux servers",
  "license": "Apache-2.0",
  "source": "",
  "project_page": null,
  "issues_url": null,
  "dependencies": [
    {"name":"puppetlabs-stdlib","version_requirement":">= 1.0.0"}
  ],
  "data_provider": null
}
----------------------------------------

About to generate this metadata; continue? [n/Y]
--> y

Notice: Generating module at /etc/puppetlabs/code/environments/production/modules/httpd...
Notice: Populating templates...
Finished; module generated in httpd.
httpd/Gemfile
httpd/Rakefile
httpd/manifests
httpd/manifests/init.pp
httpd/spec
httpd/spec/classes
httpd/spec/classes/init_spec.rb
httpd/spec/spec_helper.rb
httpd/tests
httpd/tests/init.pp
httpd/README.md
httpd/metadata.json
[root@UA-HA modules]#
  • You should to run this command while in the module’s directory.
  • You should to pass the module’s name as a “authorname-modulename” construct.
  • You must ensure that your module has a unique name if you decide to share your module on puppetforge.
  • Hence your puppetforge account’s username is what you start your module’s name with.


After that it creates the following:

[root@UA-HA modules]# ls -ld httpd
drwxr-xr-x 5 root root 110 Feb 10 15:39 httpd
[root@UA-HA modules]# tree httpd
httpd
├── Gemfile
├── manifests
│   └── init.pp
├── metadata.json
├── Rakefile
├── README.md
├── spec
│   ├── classes
│   │   └── init_spec.rb
│   └── spec_helper.rb
└── tests
    └── init.pp

4 directories, 8 files
[root@UA-HA modules]#

We have successfully created new module directories. (we will write the manifest later)


Creating New Environment:

1.List the existing environment in puppet.

[root@UA-HA environments]# pwd
/etc/puppetlabs/code/environments
[root@UA-HA environments]# ls -ld production
drwxr-xr-x 4 pe-puppet pe-puppet 70 Feb 8 14:18 production
[root@UA-HA environments]#


2. Check the existing production environment settings.

[root@UA-HA environments]# puppet config print --section master --environment production
cfacter = false
confdir = /etc/puppetlabs/puppet
codedir = /etc/puppetlabs/code
vardir = /opt/puppetlabs/puppet/cache
name = config
logdir = /var/log/puppetlabs/puppet
log_level = notice
disable_warnings = []
priority =
trace = false
profile = false
autoflush = true
syslogfacility = daemon
statedir = /opt/puppetlabs/puppet/cache/state
rundir = /var/run/puppetlabs
genconfig = false
genmanifest = false
configprint =
color = ansi
mkusers = false
manage_internal_file_permissions = true
onetime = false
path = none
libdir = /opt/puppetlabs/puppet/cache/lib
environment = production
environmentpath = /etc/puppetlabs/code/environments
always_cache_features = true
diff_args = -u
diff = diff
show_diff = false
daemonize = true
maximum_uid = 4294967290
route_file = /etc/puppetlabs/puppet/routes.yaml
node_terminus = classifier
node_cache_terminus =
data_binding_terminus = hiera
hiera_config = /etc/puppetlabs/code/hiera.yaml
binder_config =
catalog_terminus = compiler
catalog_cache_terminus =
facts_terminus = facter
default_file_terminus = rest
http_proxy_host = none
http_proxy_port = 3128
http_proxy_user = none
http_proxy_password = none
http_keepalive_timeout = 4
http_debug = false
http_connect_timeout = 120
http_read_timeout =
filetimeout = 15
environment_timeout = 0
environment_data_provider = none
prerun_command =
postrun_command =
freeze_main = false
trusted_server_facts = false
preview_outputdir = /opt/puppetlabs/puppet/cache/preview
app_management = true
module_repository = https://forgeapi.puppetlabs.com
module_working_dir = /opt/puppetlabs/puppet/cache/puppet-module
module_skeleton_dir = /opt/puppetlabs/puppet/cache/puppet-module/skeleton
forge_authorization =
module_groups = base+pe_only
certname = uaha.unixarena.com
dns_alt_names =
csr_attributes = /etc/puppetlabs/puppet/csr_attributes.yaml
certdir = /etc/puppetlabs/puppet/ssl/certs
ssldir = /etc/puppetlabs/puppet/ssl
publickeydir = /etc/puppetlabs/puppet/ssl/public_keys
requestdir = /etc/puppetlabs/puppet/ssl/certificate_requests
privatekeydir = /etc/puppetlabs/puppet/ssl/private_keys
privatedir = /etc/puppetlabs/puppet/ssl/private
passfile = /etc/puppetlabs/puppet/ssl/private/password
hostcsr = /etc/puppetlabs/puppet/ssl/csr_uaha.unixarena.com.pem
hostcert = /etc/puppetlabs/puppet/ssl/certs/uaha.unixarena.com.pem
hostprivkey = /etc/puppetlabs/puppet/ssl/private_keys/uaha.unixarena.com.pem
hostpubkey = /etc/puppetlabs/puppet/ssl/public_keys/uaha.unixarena.com.pem
localcacert = /etc/puppetlabs/puppet/ssl/certs/ca.pem
ssl_client_ca_auth =
ssl_server_ca_auth =
hostcrl = /etc/puppetlabs/puppet/ssl/crl.pem
certificate_revocation = false
digest_algorithm = md5
ca_name = Puppet CA: uaha.unixarena.com
cadir = /etc/puppetlabs/puppet/ssl/ca
cacert = /etc/puppetlabs/puppet/ssl/ca/ca_crt.pem
cakey = /etc/puppetlabs/puppet/ssl/ca/ca_key.pem
capub = /etc/puppetlabs/puppet/ssl/ca/ca_pub.pem
cacrl = /etc/puppetlabs/puppet/ssl/ca/ca_crl.pem
caprivatedir = /etc/puppetlabs/puppet/ssl/ca/private
csrdir = /etc/puppetlabs/puppet/ssl/ca/requests
signeddir = /etc/puppetlabs/puppet/ssl/ca/signed
capass = /etc/puppetlabs/puppet/ssl/ca/private/ca.pass
serial = /etc/puppetlabs/puppet/ssl/ca/serial
autosign = /etc/puppetlabs/puppet/autosign.conf
allow_duplicate_certs = false
ca_ttl = 157680000
req_bits = 4096
keylength = 4096
cert_inventory = /etc/puppetlabs/puppet/ssl/ca/inventory.txt
config_file_name = puppet.conf
config = /etc/puppetlabs/puppet/puppet.conf
pidfile = /var/run/puppetlabs/master.pid
bindaddress = 0.0.0.0
manifest = /etc/puppetlabs/code/environments/production/manifests
modulepath = /etc/puppetlabs/code/environments/production/modules:/etc/puppetlabs/code/modules:/opt/puppetlabs/puppet/modules
config_version =
user = pe-puppet
group = pe-puppet
default_manifest = ./manifests
disable_per_environment_manifest = false
code =
masterhttplog = /var/log/puppetlabs/puppet/masterhttp.log
masterport = 8140
node_name = cert
bucketdir = /opt/puppetlabs/puppet/cache/bucket
rest_authconfig = /etc/puppetlabs/puppet/auth.conf
ca = true
trusted_oid_mapping_file = /etc/puppetlabs/puppet/custom_trusted_oid_mapping.yaml
basemodulepath = /etc/puppetlabs/code/modules:/opt/puppetlabs/puppet/modules
ssl_client_header = HTTP_X_CLIENT_DN
ssl_client_verify_header = HTTP_X_CLIENT_VERIFY
yamldir = /opt/puppetlabs/puppet/cache/yaml
server_datadir = /opt/puppetlabs/puppet/cache/server_data
reports = puppetdb
reportdir = /opt/puppetlabs/puppet/cache/reports
reporturl = http://localhost:3000/reports/upload
fileserverconfig = /etc/puppetlabs/puppet/fileserver.conf
strict_hostname_checking = false
devicedir = /opt/puppetlabs/puppet/cache/devices
deviceconfig = /etc/puppetlabs/puppet/device.conf
node_name_value = uaha.unixarena.com
node_name_fact =
statefile = /opt/puppetlabs/puppet/cache/state/state.yaml
clientyamldir = /opt/puppetlabs/puppet/cache/client_yaml
client_datadir = /opt/puppetlabs/puppet/cache/client_data
classfile = /opt/puppetlabs/puppet/cache/state/classes.txt
resourcefile = /opt/puppetlabs/puppet/cache/state/resources.txt
puppetdlog = /var/log/puppetlabs/puppet/puppetd.log
server = uaha.unixarena.com
use_srv_records = false
srv_domain =
ignoreschedules = false
default_schedules = true
noop = false
runinterval = 1800
ca_server = uaha.unixarena.com
ca_port = 8140
preferred_serialization_format = pson
agent_catalog_run_lockfile = /opt/puppetlabs/puppet/cache/state/agent_catalog_run.lock
agent_disabled_lockfile = /opt/puppetlabs/puppet/cache/state/agent_disabled.lock
usecacheonfailure = true
use_cached_catalog = false
ignoremissingtypes = false
ignorecache = false
splaylimit = 1800
splay = false
clientbucketdir = /opt/puppetlabs/puppet/cache/clientbucket
configtimeout = 120
report_server = uaha.unixarena.com
report_port = 8140
report = true
lastrunfile = /opt/puppetlabs/puppet/cache/state/last_run_summary.yaml
lastrunreport = /opt/puppetlabs/puppet/cache/state/last_run_report.yaml
graph = false
graphdir = /opt/puppetlabs/puppet/cache/state/graphs
waitforcert = 120
ordering = manifest
archive_files = true
archive_file_server = uaha.unixarena.com
plugindest = /opt/puppetlabs/puppet/cache/lib
pluginsource = puppet:///plugins
pluginfactdest = /opt/puppetlabs/puppet/cache/facts.d
pluginfactsource = puppet:///pluginfacts
pluginsync = true
pluginsignore = .svn CVS .git
factpath = /opt/puppetlabs/puppet/cache/lib/facter:/opt/puppetlabs/puppet/cache/facts
tags =
evaltrace = false
summarize = false
external_nodes = none
ldapssl = false
ldaptls = false
ldapserver = ldap
ldapport = 389
ldapstring = (&(objectclass=puppetClient)(cn=%s))
ldapclassattrs = puppetclass
ldapstackedattrs = puppetvar
ldapattrs = all
ldapparentattr = parentnode
ldapuser =
ldappassword =
ldapbase =
storeconfigs = true
storeconfigs_backend = puppetdb
max_errors = 10
max_warnings = 10
max_deprecations = 10
strict_variables = false
document_all = false
[root@UA-HA environments]#


3. Let’s create a new environment .

[root@UA-HA environments]# mkdir -p testing/mainfests
[root@UA-HA environments]#
[root@UA-HA environments]# ls -ld testing/
drwxr-xr-x 3 root root 22 Feb 10 17:26 testing/
[root@UA-HA environments]#

4. To verify the settings.

[root@UA-HA environments]# puppet config print --section master --environment testing
cfacter = false
confdir = /etc/puppetlabs/puppet
codedir = /etc/puppetlabs/code
vardir = /opt/puppetlabs/puppet/cache
name = config
logdir = /var/log/puppetlabs/puppet
log_level = notice
disable_warnings = []
priority =
trace = false
profile = false
autoflush = true
syslogfacility = daemon
statedir = /opt/puppetlabs/puppet/cache/state
rundir = /var/run/puppetlabs
genconfig = false
genmanifest = false
configprint =
color = ansi
mkusers = false
manage_internal_file_permissions = true
onetime = false
path = none
libdir = /opt/puppetlabs/puppet/cache/lib
environment = testing
environmentpath = /etc/puppetlabs/code/environments
always_cache_features = true
diff_args = -u
diff = diff
show_diff = false
daemonize = true
maximum_uid = 4294967290
route_file = /etc/puppetlabs/puppet/routes.yaml
node_terminus = classifier
node_cache_terminus =
data_binding_terminus = hiera
hiera_config = /etc/puppetlabs/code/hiera.yaml
binder_config =
catalog_terminus = compiler
catalog_cache_terminus =
facts_terminus = facter
default_file_terminus = rest
http_proxy_host = none
http_proxy_port = 3128
http_proxy_user = none
http_proxy_password = none
http_keepalive_timeout = 4
http_debug = false
http_connect_timeout = 120
http_read_timeout =
filetimeout = 15
environment_timeout = 0
environment_data_provider = none
prerun_command =
postrun_command =
freeze_main = false
trusted_server_facts = false
preview_outputdir = /opt/puppetlabs/puppet/cache/preview
app_management = true
module_repository = https://forgeapi.puppetlabs.com
module_working_dir = /opt/puppetlabs/puppet/cache/puppet-module
module_skeleton_dir = /opt/puppetlabs/puppet/cache/puppet-module/skeleton
forge_authorization =
module_groups = base+pe_only
certname = uaha.unixarena.com
dns_alt_names =
csr_attributes = /etc/puppetlabs/puppet/csr_attributes.yaml
certdir = /etc/puppetlabs/puppet/ssl/certs
ssldir = /etc/puppetlabs/puppet/ssl
publickeydir = /etc/puppetlabs/puppet/ssl/public_keys
requestdir = /etc/puppetlabs/puppet/ssl/certificate_requests
privatekeydir = /etc/puppetlabs/puppet/ssl/private_keys
privatedir = /etc/puppetlabs/puppet/ssl/private
passfile = /etc/puppetlabs/puppet/ssl/private/password
hostcsr = /etc/puppetlabs/puppet/ssl/csr_uaha.unixarena.com.pem
hostcert = /etc/puppetlabs/puppet/ssl/certs/uaha.unixarena.com.pem
hostprivkey = /etc/puppetlabs/puppet/ssl/private_keys/uaha.unixarena.com.pem
hostpubkey = /etc/puppetlabs/puppet/ssl/public_keys/uaha.unixarena.com.pem
localcacert = /etc/puppetlabs/puppet/ssl/certs/ca.pem
ssl_client_ca_auth =
ssl_server_ca_auth =
hostcrl = /etc/puppetlabs/puppet/ssl/crl.pem
certificate_revocation = false
digest_algorithm = md5
ca_name = Puppet CA: uaha.unixarena.com
cadir = /etc/puppetlabs/puppet/ssl/ca
cacert = /etc/puppetlabs/puppet/ssl/ca/ca_crt.pem
cakey = /etc/puppetlabs/puppet/ssl/ca/ca_key.pem
capub = /etc/puppetlabs/puppet/ssl/ca/ca_pub.pem
cacrl = /etc/puppetlabs/puppet/ssl/ca/ca_crl.pem
caprivatedir = /etc/puppetlabs/puppet/ssl/ca/private
csrdir = /etc/puppetlabs/puppet/ssl/ca/requests
signeddir = /etc/puppetlabs/puppet/ssl/ca/signed
capass = /etc/puppetlabs/puppet/ssl/ca/private/ca.pass
serial = /etc/puppetlabs/puppet/ssl/ca/serial
autosign = /etc/puppetlabs/puppet/autosign.conf
allow_duplicate_certs = false
ca_ttl = 157680000
req_bits = 4096
keylength = 4096
cert_inventory = /etc/puppetlabs/puppet/ssl/ca/inventory.txt
config_file_name = puppet.conf
config = /etc/puppetlabs/puppet/puppet.conf
pidfile = /var/run/puppetlabs/master.pid
bindaddress = 0.0.0.0
manifest = /etc/puppetlabs/code/environments/testing/manifests
modulepath = /etc/puppetlabs/code/environments/testing/modules:/etc/puppetlabs/code/modules:/opt/puppetlabs/puppet/modules
config_version =
user = pe-puppet
group = pe-puppet
default_manifest = ./manifests
disable_per_environment_manifest = false
code =
masterhttplog = /var/log/puppetlabs/puppet/masterhttp.log
masterport = 8140
node_name = cert
bucketdir = /opt/puppetlabs/puppet/cache/bucket
rest_authconfig = /etc/puppetlabs/puppet/auth.conf
ca = true
trusted_oid_mapping_file = /etc/puppetlabs/puppet/custom_trusted_oid_mapping.yaml
basemodulepath = /etc/puppetlabs/code/modules:/opt/puppetlabs/puppet/modules
ssl_client_header = HTTP_X_CLIENT_DN
ssl_client_verify_header = HTTP_X_CLIENT_VERIFY
yamldir = /opt/puppetlabs/puppet/cache/yaml
server_datadir = /opt/puppetlabs/puppet/cache/server_data
reports = puppetdb
reportdir = /opt/puppetlabs/puppet/cache/reports
reporturl = http://localhost:3000/reports/upload
fileserverconfig = /etc/puppetlabs/puppet/fileserver.conf
strict_hostname_checking = false
devicedir = /opt/puppetlabs/puppet/cache/devices
deviceconfig = /etc/puppetlabs/puppet/device.conf
node_name_value = uaha.unixarena.com
node_name_fact =
statefile = /opt/puppetlabs/puppet/cache/state/state.yaml
clientyamldir = /opt/puppetlabs/puppet/cache/client_yaml
client_datadir = /opt/puppetlabs/puppet/cache/client_data
classfile = /opt/puppetlabs/puppet/cache/state/classes.txt
resourcefile = /opt/puppetlabs/puppet/cache/state/resources.txt
puppetdlog = /var/log/puppetlabs/puppet/puppetd.log
server = uaha.unixarena.com
use_srv_records = false
srv_domain =
ignoreschedules = false
default_schedules = true
noop = false
runinterval = 1800
ca_server = uaha.unixarena.com
ca_port = 8140
preferred_serialization_format = pson
agent_catalog_run_lockfile = /opt/puppetlabs/puppet/cache/state/agent_catalog_run.lock
agent_disabled_lockfile = /opt/puppetlabs/puppet/cache/state/agent_disabled.lock
usecacheonfailure = true
use_cached_catalog = false
ignoremissingtypes = false
ignorecache = false
splaylimit = 1800
splay = false
clientbucketdir = /opt/puppetlabs/puppet/cache/clientbucket
configtimeout = 120
report_server = uaha.unixarena.com
report_port = 8140
report = true
lastrunfile = /opt/puppetlabs/puppet/cache/state/last_run_summary.yaml
lastrunreport = /opt/puppetlabs/puppet/cache/state/last_run_report.yaml
graph = false
graphdir = /opt/puppetlabs/puppet/cache/state/graphs
waitforcert = 120
ordering = manifest
archive_files = true
archive_file_server = uaha.unixarena.com
plugindest = /opt/puppetlabs/puppet/cache/lib
pluginsource = puppet:///plugins
pluginfactdest = /opt/puppetlabs/puppet/cache/facts.d
pluginfactsource = puppet:///pluginfacts
pluginsync = true
pluginsignore = .svn CVS .git
factpath = /opt/puppetlabs/puppet/cache/lib/facter:/opt/puppetlabs/puppet/cache/facts
tags =
evaltrace = false
summarize = false
external_nodes = none
ldapssl = false
ldaptls = false
ldapserver = ldap
ldapport = 389
ldapstring = (&(objectclass=puppetClient)(cn=%s))
ldapclassattrs = puppetclass
ldapstackedattrs = puppetvar
ldapattrs = all
ldapparentattr = parentnode
ldapuser =
ldappassword =
ldapbase =
storeconfigs = true
storeconfigs_backend = puppetdb
max_errors = 10
max_warnings = 10
max_deprecations = 10
strict_variables = false
document_all = false
[root@UA-HA environments]#

We have successfully created new environment called “testing”

Hope this article is informative to you .  Share it ! Comment it !! Be Sociable !!!

The post Puppet Server – Code and Configuration Directories appeared first on UnixArena.

Puppet – Writing a First Manifest – Modules

$
0
0

It’s time to write first manifest on the puppet server. This article is going to brief about writing a custom  puppet script  to automate the installation of httpd/Apache package on Linux servers. Similar way you can automate package installation, updating files, configuring services and many more. Resources are defined using resource  declaration syntax  and stored on file with .pp extension. This file is called manifest.  These manifest must be stored in codedir  to auto load on puppet.


  • Puppet Server : uaha  (RHEL7)
  • Puppet Agent Node: uapa1   (RHEL7)


Let’s write a first manifest.

1.Login to puppet master server as root and check the existing environment.

[root@UA-HA ~]# puppet --version
4.3.1
[root@UA-HA ~]# cd /etc/puppetlabs/code/environments/
[root@UA-HA environments]# ls -lrt
total 0
drwxr-xr-x 4 pe-puppet pe-puppet 70 Feb 8 14:18 production
[root@UA-HA environments]#


2. Navigate to “/etc/puppetlabs/code/environments/production/manifests” directory and edit the site.pp like below.

node default {
 # This is where you can declare classes for all nodes.
package { httpd: ensure => installed; }
}

Here, I have just added the line “package { httpd: ensure => installed; }” in site.pp file. This will ensure that httpd packages will be installed on all the nodes which are configured under production environment.


In my case, Puppet agents are Redhat enterprise Linux and that’s why I have used “httpd” as package name. If you have Debian variant of puppet agents , you must use “apache2”.Using modules , we can solve this kind of discrimination 


3. Login puppet agent node and apply the configuration from puppet master immediately.

[root@uapa1 ~]# puppet agent -t

Info: Using configured environment 'production'
Info: Retrieving pluginfacts
Info: Retrieving plugin
Info: Loading facts
Info: Caching catalog for uapa1
Info: Applying configuration version '1455158556'
Error: Execution of '/usr/bin/yum -d 0 -e 0 -y install httpd' returned 1: Error downloading packages:
httpd-2.4.6-40.el7.x86_64: [Errno 256] No more mirrors to try.
Error: /Stage[main]/Main/Node[default]/Package[httpd]/ensure: change from purged to present failed: Execution of '/usr/bin/yum -d 0 -e 0 -y install httpd' returned 1: Error downloading packages:
httpd-2.4.6-40.el7.x86_64: [Errno 256] No more mirrors to try.
Notice: Applied catalog in 5.20 seconds
[root@uapa1 ~]#

You can see that puppet agent is trying to install “httpd” package but it got failed due to yum repository issue. If you have already configured the valid yum repository , httpd installation should be succeeded.


Once you have configured the yum repository , you could see that package installation got succeeded.

[root@uapa1 ~]# puppet agent -t
Info: Using configured environment 'production'
Info: Retrieving pluginfacts
Info: Retrieving plugin
Info: Loading facts
Info: Caching catalog for uapa1
Info: Applying configuration version '1455160622'
Notice: /Stage[main]/Main/Node[default]/Package[httpd]/ensure: created
Notice: Applied catalog in 6.55 seconds
[root@uapa1 ~]# rpm -qa httpd
httpd-2.4.6-40.el7.x86_64
[root@uapa1 ~]#

You no need to login to puppet agent node to pull the configuration from master. It automatically checks with puppet master server for every 30 minutes and applies the configuration.

Adding codes in manifests directory and site.pp is not sufficient in larger environment.If you use, then it will results to increase the duplicate and complex coding’s. To eliminate this problem , Puppet has concept called modules.


Delete the following line from site.pp file to  demonstrate the module’s part.

package { httpd: ensure => installed; }


What is a module in Puppet?


Module is nothing but a collection of manifests,files,templates,classes etc. We can call a module as  portable manifest.  Module should follow the specific rules to load in puppet automatically. Each and every module in puppet must be constructed by keeping it’s structure in mind. A module must contain all the required files and directories to function properly.

Let’s create a new module on “production” environment.

1.Login to the puppet server and navigate to directory “/etc/puppetlabs/code/environments/production” .

[root@UA-HA production]# cd /etc/puppetlabs/code/environments/production
[root@UA-HA production]# ls -lrt
total 4
-rw-r--r-- 1 pe-puppet pe-puppet 879 Jan 27 10:38 environment.conf
drwxr-xr-x 2 pe-puppet pe-puppet  49 Feb 10 21:51 manifests
drwxr-xr-x 5 root      root       50 Feb 10 23:26 modules
[root@UA-HA production]#


2. Create new module called “httpd” and it’s subdirectories.

[root@UA-HA production]# mkdir -p modules/httpd/{files,templates,manifests,examples}


3. It’s good to have “tree” package on system to view the directory structure like following. Navigate to modules directory and check the tree view for httpd module.

[root@UA-HA modules]# tree httpd/
httpd/
├── examples
├── files
├── manifests
└── templates

4 directories, 0 file
[root@UA-HA modules]#
New module name is “httpd” and we might call this name during the manifest creation. (Directory name)


4. Navigate to manifests directory and create file called init.pp like following.

[root@UA-HA manifests]# cat init.pp
class httpd {
      package { httpd:
        ensure => present,
   }
}
[root@UA-HA manifests]#

We have successfully created manifest to install package “httpd”.


5. Navigate back to “/etc/puppetlabs/code/environments/production/manifests” and create “node.pp” . This file should contain list of nodes where the “httpd” package needs to be installed.

[root@UA-HA manifests]# cat nodes.pp
node uapa1 {
  include httpd
}
[root@UA-HA manifests]#

Here , we are just calling “httpd” module.


My Puppet agent node has registered without FQDN and that’s the reason I have used hostname instead of FQDN.

[root@UA-HA manifests]# puppet cert list --all |grep uapa1
+ "uapa1"                                         (SHA256) 0B:DF:54:97:91:E6:9A:15:71:B8:FF:53:CF:C3:09:C4:3A:0E:EB:66:00:EB:14:3B:49:9A:4B:03:D2:45:48:D4
[root@UA-HA manifests]#


6. Login to puppet agent node and execute the following command to pull the configuration.

[root@uapa1 ~]# puppet agent -t
Info: Using configured environment 'production'
Info: Retrieving pluginfacts
Info: Retrieving plugin
Info: Loading facts
Info: Caching catalog for uapa1
Info: Applying configuration version '1455167528'
Notice: /Stage[main]/Httpd/Package[httpd]/ensure: created
Notice: Applied catalog in 4.50 seconds
[root@uapa1 ~]# rpm -qa httpd
httpd-2.4.6-40.el7.x86_64
[root@uapa1 ~]#

Here you can see that httpd package has been successfully installed on puppet agent node. You can add N-number of puppet agent in node.pp to trigger the installation simultaneously on list of servers.


In up coming articles, we will see some more examples about different resource configuration using modules.

You no need to worry about writing the custom modules . You could find ready made modules in puppet-forge for most of the activities. We will see about puppet-forge later.


Hope this article is informative to you . Share it ! Comment it !! Be Sociable !!!

The post Puppet – Writing a First Manifest – Modules appeared first on UnixArena.

Puppet – Manifest examples – Managing FILES – SERVICES

$
0
0

This article is going to brief about creating new files , directories, changing the file permission, installing package and managing the services using puppet server on puppet agent nodes. For an example, if you want to configure the ntp client on 100’s of servers , you could simply write a small manifest on puppet server to achieve this task. This is applicable  for creating files, directories and changing the file permission etc…


  • Puppet Server: UAHA (RHEL 7.2)
  • Puppet Agent : uapa1  (RHEL 7.2)
  • Environment: Production


Example:1  Creating new file

1.Login to the puppet server as root.


2.Navigate to the production’s modules directory.  (You might have different environment than production ).

[root@UA-HA production]# cd /etc/puppetlabs/code/environments/production
[root@UA-HA production]# ls -lrt
total 4
-rw-r--r-- 1 pe-puppet pe-puppet 879 Jan 27 10:38 environment.conf
drwxr-xr-x 5 root root 50 Feb 10 23:26 modules
drwxr-xr-x 2 pe-puppet pe-puppet 35 Feb 11 00:12 manifests
[root@UA-HA production]# cd modules/
[root@UA-HA modules]# ls -lrt
total 0
drwxr-xr-x 3 root root 22 Feb 8 14:16 helloworld
drwxr-xr-x 6 root root 65 Feb 8 15:15 accounts
drwxr-xr-x 6 root root 65 Feb 10 23:36 httpd
[root@UA-HA modules]#


3. Task – Create new file under /tmp directory on puppet agents nodes using puppet server. To achieve this ,   Create a module called “testfile” with required set of directories. (Module should follow the certain rules)

[root@UA-HA modules]# mkdir -p filetest/{files,templates,manifests}
[root@UA-HA modules]# tree filetest
filetest
├── files
├── manifests
└── templates

3 directories, 0 files


4. Navigate to the manifest directory and write the manifest to create a file on puppet agent nodes.

[root@UA-HA modules]# cd filetest/manifests/
[root@UA-HA manifests]#
[root@UA-HA manifests]# cat init.pp
class filetest {
file { '/tmp/sysctl.conf':
  ensure  => present,
  owner   => 'root',
  group   => 'root',
  mode    => '0777',
  source  => 'puppet:///modules/filetest/sysctl.conf',
   }
}
[root@UA-HA manifests]#


5. Navigate to the “files” directory and create the file called sysctl.conf.

[root@UA-HA manifests]# cd ../files
[root@UA-HA files]#
[root@UA-HA files]# echo "Creating the test file for Puppet demonstration" > sysctl.conf
[root@UA-HA files]# ls -lrt
total 4
-rw-r--r-- 1 root root 48 Feb 14 09:17 sysctl.conf
[root@UA-HA files]#

We have successfully created the module. (To create the “sysctl.conf” file under /tmp location on puppet agent nodes with local source file.)


6. If you want to create the test file across the production environment (All puppet agent nodes), you can call this module in site.pp. Otherwise , you can specify the node names in nodes.pp . Let’s call the “filetest” module on nodes.pp to create the file only on node uapa1.

[root@UA-HA files]# cd ../../../manifests/
[root@UA-HA manifests]# ls -lrt
total 8
-rw-r--r-- 1 pe-puppet pe-puppet 1226 Feb 10 23:44 site.pp
-rw-r--r-- 1 root      root        35 Feb 14 08:12 nodes.pp
[root@UA-HA manifests]#
[root@UA-HA manifests]# cat nodes.pp
node uapa1 {
  include filetest
}
[root@UA-HA manifests]#


7. Login to the puppet agent node “uapa1” and re-run the agent.

[root@uapa1 ntp]# puppet agent -t
Info: Using configured environment 'production'
Info: Retrieving pluginfacts
Info: Retrieving plugin
Info: Loading facts
Info: Caching catalog for uapa1
Info: Applying configuration version '1455462582'
Notice: /Stage[main]/Filetest/File[/tmp/sysctl.conf]/ensure: defined content as '{md5}761b152c34b22b8f6142b9860ec5ede9'
Notice: Applied catalog in 0.68 seconds
[root@uapa1 ntp]#


8. Verify our work.

[root@uapa1 ntp]# cat /tmp/sysctl.conf
Creating the test file for Puppet demonstration
[root@uapa1 ntp]#
[root@uapa1 ntp]# ls -lrt /tmp/sysctl.conf
-rwxrwxrwx 1 root root 48 Feb 14 10:37 /tmp/sysctl.conf
[root@uapa1 ntp]#

We can see that file has been created successfully on the puppet agent node with given permission.

Example:2  Creating new directories:


1.Login to the puppet server and navigate to the production environment’s module directory.

[root@UA-HA modules]# cd /etc/puppetlabs/code/environments/production/modules


2. Create a new module called “testdirs” and required subdirectories.

[root@UA-HA modules]# mkdir -p testdirs/{files,templates,manifests}
[root@UA-HA modules]# tree testdirs/
testdirs/
├── files
├── manifests
└── templates

3 directories, 0 files
[root@UA-HA modules]# pwd
/etc/puppetlabs/code/environments/production/modules
[root@UA-HA modules]#


3.Navigate to “testdirs/manifests” directory and create a manifest.

[root@UA-HA manifests]# cat init.pp
class testdirs {

# create a directory
  file { '/etc/nagios':
    ensure => 'directory',
  }

# a fuller example, including permissions and ownership
  file { '/var/log/nagios':
    ensure => 'directory',
    owner  => 'root',
    group  => 'root',
    mode   => '0777',
  }

}
[root@UA-HA manifests]#

This manifest will create a directory called “nagios” under “/etc/” and “/var/log” directories. For “/var/log/nagios” directory , we are setting the directory owner, group and permissions.


4. Navigate to the “/etc/puppetlabs/code/environments/production/manifests” directory and update nodes.pp to call the newly created module.

[root@UA-HA manifests]# cd ../../../manifests/
[root@UA-HA manifests]# pwd
/etc/puppetlabs/code/environments/production/manifests
[root@UA-HA manifests]# cat nodes.pp
node uapa1 {
  include testdirs
}
[root@UA-HA manifests]#


In this case, “nagios” directories will be just created on puppet agent node “uapa1”.  You can also specify number of nodes using single quotes.

Example:

node 'uapa1','uapa2','uapa3' {
  include testdirs
}


5. Login to the puppet client node and re-run the puppet agent.

[root@uapa1 ntp]# puppet agent -t
Info: Using configured environment 'production'
Info: Retrieving pluginfacts
Info: Retrieving plugin
Info: Loading facts
Info: Caching catalog for uapa1
Info: Applying configuration version '1455467939'
Notice: /Stage[main]/Testdirs/File[/etc/nagios]/ensure: created
Notice: /Stage[main]/Testdirs/File[/var/log/nagios]/ensure: created
Notice: Applied catalog in 0.39 seconds
[root@uapa1 ntp]#


6.Verify our work.

[root@uapa1 ntp]# ls -ld /etc/nagios/
drwxr-xr-x 2 root root 6 Feb 14 11:59 /etc/nagios/
[root@uapa1 ntp]# ls -ld /var/log/nagios/
drwxrwxrwx 2 root root 6 Feb 14 11:59 /var/log/nagios/
[root@uapa1 ntp]#

You could see that both directories are created and “/var/log/nagios” directory has been created with specific permission as we defined in manifest.


Example:3  Configuring NTP clients using puppet server 


1. Assuming that you got a request to configure ntp clients on list of servers.

Let’s create a new module called “nptconfig” with necessary directories.

[root@UA-HA modules]# pwd
/etc/puppetlabs/code/environments/production/modules
[root@UA-HA modules]#
[root@UA-HA modules]# mkdir -p ntpconfig/{files,templates,manifests}
[root@UA-HA modules]# tree ntpconfig/
ntp-config/
├── files
├── manifests
└── templates

3 directories, 0 files
[root@UA-HA modules]#


2. Let’s create the ntp.conf  under “ntpconfig/files” directory. This file will be pushed to the client nodes.

[root@UA-HA files]# cat ntp.conf
server 0.rhel.pool.ntp.org iburst
server 1.rhel.pool.ntp.org iburst
server 2.rhel.pool.ntp.org iburst
server 3.rhel.pool.ntp.org iburst
[root@UA-HA files]#
[root@UA-HA files]# pwd
/etc/puppetlabs/code/environments/production/modules/ntp-config/files
[root@UA-HA files]#


3.Navigate to the “ntpconfig” manifests directory and create a manifest like following.

[root@UA-HA files]# cd ../manifests/
[root@UA-HA manifests]# cat init.pp
class ntpconfig {
service { 'ntpd':
  ensure  => running,
  require => [
    Package['ntp'],
    File['/etc/ntp.conf'],
  ],
}

package { 'ntp':
  ensure => present,
  before => Service['ntpd'],
}

file { '/etc/ntp.conf':
  ensure => file,
  mode   => '0600',
  source => 'puppet:///modules/ntpconfig/ntp.conf',
  before => Service['ntpd'],
}
}
[root@UA-HA manifests]#


You could understand this manifest by reading the code.  However , let me explain it.

  • File name should be end with “.pp” extension. So we have created file called “init.pp” .
  • Module name (ntpconfig) should be specified next to “class” always.
  • Resource “service” is created to ensure “ntpd” daemon is started with required dependencies. (which are nothing but a NTP package and “ntp.conf” configuration file.)
  • Creating second resource “package” to install NTP package. We have also mentioned that it needs to be done before starting the service.
  • Creating third resource “file” to push the pre-configured ntp.conf file to the puppet agent nodes. We have also specified the location of pre-configured  ntp.conf file  on the puppet server.


4. Navigate to production environment’s manifest directory for node declaration.

[root@UA-HA manifests]# cd ../../../manifests/
[root@UA-HA manifests]# ls -lrt
total 8
-rw-r--r-- 1 pe-puppet pe-puppet 1226 Feb 10 23:44 site.pp
-rw-r--r-- 1 root      root        34 Feb 14 11:06 nodes.pp
[root@UA-HA manifests]# vi nodes.pp
[root@UA-HA manifests]# cat nodes.pp
node uapa1 {
  include ntpconfig
}
[root@UA-HA manifests]#
[root@UA-HA manifests]# pwd
/etc/puppetlabs/code/environments/production/manifests
[root@UA-HA manifests]#


5. Login to puppet agent node and re-run the agent .

[root@uapa1 ~]# puppet agent -t
Info: Using configured environment 'production'
Info: Retrieving pluginfacts
Info: Retrieving plugin
Info: Loading facts
Info: Caching catalog for uapa1
Info: Applying configuration version '1455469306'
Notice: /Stage[main]/Ntpconfig/Package[ntp]/ensure: created
Notice: /Stage[main]/Ntpconfig/File[/etc/ntp.conf]/content:
--- /etc/ntp.conf       2015-10-16 04:46:46.000000000 -0400
+++ /tmp/puppet-file20160214-11627-onodvu       2016-02-14 12:21:12.156342677 -0500
@@ -1,58 +1,4 @@
-# For more information about this file, see the man pages
-# ntp.conf(5), ntp_acc(5), ntp_auth(5), ntp_clock(5), ntp_misc(5), ntp_mon(5).
-
-driftfile /var/lib/ntp/drift
-
-# Permit time synchronization with our time source, but do not
-# permit the source to query or modify the service on this system.
-restrict default nomodify notrap nopeer noquery
-
-# Permit all access over the loopback interface.  This could
-# be tightened as well, but to do so would effect some of
-# the administrative functions.
-restrict 127.0.0.1
-restrict ::1
-
-# Hosts on local network are less restricted.
-#restrict 192.168.1.0 mask 255.255.255.0 nomodify notrap
-
-# Use public servers from the pool.ntp.org project.
-# Please consider joining the pool (http://www.pool.ntp.org/join.html).
 server 0.rhel.pool.ntp.org iburst
 server 1.rhel.pool.ntp.org iburst
 server 2.rhel.pool.ntp.org iburst
 server 3.rhel.pool.ntp.org iburst
-
-#broadcast 192.168.1.255 autokey       # broadcast server
-#broadcastclient                       # broadcast client
-#broadcast 224.0.1.1 autokey           # multicast server
-#multicastclient 224.0.1.1             # multicast client
-#manycastserver 239.255.254.254                # manycast server
-#manycastclient 239.255.254.254 autokey # manycast client
-
-# Enable public key cryptography.
-#crypto
-
-includefile /etc/ntp/crypto/pw
-
-# Key file containing the keys and key identifiers used when operating
-# with symmetric key cryptography.
-keys /etc/ntp/keys
-
-# Specify the key identifiers which are trusted.
-#trustedkey 4 8 42
-
-# Specify the key identifier to use with the ntpdc utility.
-#requestkey 8
-
-# Specify the key identifier to use with the ntpq utility.
-#controlkey 8
-
-# Enable writing of statistics records.
-#statistics clockstats cryptostats loopstats peerstats
-
-# Disable the monitoring facility to prevent amplification attacks using ntpdc
-# monlist command when default restrict does not include the noquery flag. See
-# CVE-2013-5211 for more details.
-# Note: Monitoring will not be disabled with the limited restriction flag.
-disable monitor

Notice: /Stage[main]/Ntpconfig/File[/etc/ntp.conf]/content: content changed '{md5}913c85f0fde85f83c2d6c030ecf259e9' to '{md5}d5c4683c4855fea95321374a64628c63'
Notice: /Stage[main]/Ntpconfig/File[/etc/ntp.conf]/mode: mode changed '0644' to '0600'
Notice: /Stage[main]/Ntpconfig/Service[ntpd]/ensure: ensure changed 'stopped' to 'running'
Info: /Stage[main]/Ntpconfig/Service[ntpd]: Unscheduling refresh on Service[ntpd]
Notice: Applied catalog in 15.17 seconds
[root@uapa1 ~]#


6. Verify the NTP status.

[root@uapa1 ~]# ntpq -p
     remote           refid      st t when poll reach   delay   offset  jitter
==============================================================================
*web10.hnshostin 193.67.79.202    2 u    5   64    1   79.417   -3.227   2.114
+ns02.hns.net.in 131.107.13.100   2 u    4   64    1   83.064    0.600   0.419
+125.62.193.121  129.6.15.29      2 u    3   64    1   99.803   27.798   2.151
[root@uapa1 ~]#


7. Verify the ntpd service.

[root@uapa1 ~]# systemctl status ntpd
● ntpd.service - Network Time Service
   Loaded: loaded (/usr/lib/systemd/system/ntpd.service; disabled; vendor preset: disabled)
   Active: active (running) since Sun 2016-02-14 12:21:12 EST; 1min 59s ago
  Process: 11777 ExecStart=/usr/sbin/ntpd -u ntp:ntp $OPTIONS (code=exited, status=0/SUCCESS)
 Main PID: 11778 (ntpd)
   CGroup: /system.slice/ntpd.service
           └─11778 /usr/sbin/ntpd -u ntp:ntp -g

Feb 14 12:21:12 uapa1 ntpd[11778]: Listen normally on 3 br0 192.168.203.134 UDP 123
Feb 14 12:21:12 uapa1 ntpd[11778]: Listen normally on 4 virbr0 192.168.122.1 UDP 123
Feb 14 12:21:12 uapa1 ntpd[11778]: Listen normally on 5 lo ::1 UDP 123
Feb 14 12:21:12 uapa1 ntpd[11778]: Listen normally on 6 br0 fe80::20c:29ff:feda:2ef9 UDP 123
Feb 14 12:21:12 uapa1 ntpd[11778]: Listening on routing socket on fd #23 for interface updates
Feb 14 12:21:12 uapa1 systemd[1]: Started Network Time Service.
Feb 14 12:21:13 uapa1 ntpd[11778]: 0.0.0.0 c016 06 restart
Feb 14 12:21:13 uapa1 ntpd[11778]: 0.0.0.0 c012 02 freq_set kernel 0.000 PPM
Feb 14 12:21:13 uapa1 ntpd[11778]: 0.0.0.0 c011 01 freq_not_set
Feb 14 12:21:14 uapa1 ntpd[11778]: 0.0.0.0 c614 04 freq_mode
[root@uapa1 ~]#

We can see that ntpd service is running fine but “autostart” is disabled . So, this service will not start once you  reboot the system. You can enable the autostart  using “systemctl enable ntpd” command. However , let me push this change from existing puppet module.


8. Navigate back to module manifest directory. Edit init.pp file and add the highlighted line. (enable => “true”,)

[root@UA-HA manifests]# cat init.pp
class ntpconfig {
service { 'ntpd':
  ensure  => running,
  enable  => "true",
  require => [
    Package['ntp'],
    File['/etc/ntp.conf'],
  ],
}

package { 'ntp':
  ensure => present,
  before => Service['ntpd'],
}

file { '/etc/ntp.conf':
  ensure => file,
  mode   => '0600',
  source => 'puppet:///modules/ntpconfig/ntp.conf',
  before => Service['ntpd'],
}
}
[root@UA-HA manifests]#
[root@UA-HA manifests]# pwd
/etc/puppetlabs/code/environments/production/modules/ntpconfig/manifests
[root@UA-HA manifests]#


9. Go back to puppet agent node and just re-run the puppet agent.

[root@uapa1 ~]# puppet agent -t
Info: Using configured environment 'production'
Info: Retrieving pluginfacts
Info: Retrieving plugin
Info: Loading facts
Info: Caching catalog for uapa1
Info: Applying configuration version '1455469846'
Notice: /Stage[main]/Ntpconfig/Service[ntpd]/enable: enable changed 'false' to 'true'
Notice: Applied catalog in 0.96 seconds
[root@uapa1 ~]#


10. Check the service status.

[root@uapa1 ~]# systemctl status ntpd
● ntpd.service - Network Time Service
   Loaded: loaded (/usr/lib/systemd/system/ntpd.service; enabled; vendor preset: disabled)
   Active: active (running) since Sun 2016-02-14 12:21:12 EST; 11min ago
 Main PID: 11778 (ntpd)
   CGroup: /system.slice/ntpd.service
           └─11778 /usr/sbin/ntpd -u ntp:ntp -g

Feb 14 12:21:12 uapa1 ntpd[11778]: Listen normally on 3 br0 192.168.203.134 UDP 123
Feb 14 12:21:12 uapa1 ntpd[11778]: Listen normally on 4 virbr0 192.168.122.1 UDP 123
Feb 14 12:21:12 uapa1 ntpd[11778]: Listen normally on 5 lo ::1 UDP 123
Feb 14 12:21:12 uapa1 ntpd[11778]: Listen normally on 6 br0 fe80::20c:29ff:feda:2ef9 UDP 123
Feb 14 12:21:12 uapa1 ntpd[11778]: Listening on routing socket on fd #23 for interface updates
Feb 14 12:21:12 uapa1 systemd[1]: Started Network Time Service.
Feb 14 12:21:13 uapa1 ntpd[11778]: 0.0.0.0 c016 06 restart
Feb 14 12:21:13 uapa1 ntpd[11778]: 0.0.0.0 c012 02 freq_set kernel 0.000 PPM
Feb 14 12:21:13 uapa1 ntpd[11778]: 0.0.0.0 c011 01 freq_not_set
Feb 14 12:21:14 uapa1 ntpd[11778]: 0.0.0.0 c614 04 freq_mode
[root@uapa1 ~]#

NTP service has been enabled across the system reboot.


Hope this article is informative to you.   Share it ! Comment it !! Be Sociable !!!

The post Puppet – Manifest examples – Managing FILES – SERVICES appeared first on UnixArena.

Puppet – Augeas – Edit System configuration files

$
0
0

This article is going to demonstrates that editing/updating files on puppet agent nodes. In the previous article , we have seen that how to copy the static files from “module/files” directory(Puppet Server) to puppet agent nodes.  But sometimes , you can’t replace the complete file and you may need to edit specific line on that. For example you may just want to add a line to the /etc/hosts file.  This is  the case when you are dealing with  system config files that are part of the OS. For example /etc/ssh/sshd_config and /etc/fstab. Other system administrators  may do the manual changes to those files. So if you ensure the state of this file using static-files/templates, then it will end up constantly over-riding manual changes made by the system administrators. To avoid this ,you need to ensure a file’s state at a more granular line/section level rather than at a file level.

Controlling the state of a certain line or (group of lines) is present in a given file is possible in puppet using Augeas. Augeas is a configuration editing tool. It parses configuration files in their native formats and transforms them into a tree. Configuration changes are made by manipulating this tree and saving it back into native config files.


Augeas

Augeas is standalone tool which is used for querying and editing config files from the command line. “augtool” command line utility will help you to navigate/drill-down to a particular part of a config file.

1.Install augeas tool on puppet agent nodes.

[root@UA-HA ~]# yum install augeas
Loaded plugins: langpacks, product-id, search-disabled-repos, subscription-manager
This system is not registered to Red Hat Subscription Management. You can use subscription-manager to register.
Resolving Dependencies
--> Running transaction check
---> Package augeas.x86_64 0:1.4.0-2.el7 will be installed
--> Finished Dependency Resolution

Dependencies Resolved

==========================================================================================================
 Package         Arch                    Version         Repository                                 Size
==========================================================================================================
Installing:
 augeas         x86_64                 1.4.0-2.el7        repo-update                                38 k

Transaction Summary
==========================================================================================================
Install  1 Package

Total download size: 38 k
Installed size: 62 k
Is this ok [y/d/N]: y
Downloading packages:
Running transaction check
Running transaction test
Transaction test succeeded
Running transaction
  Installing : augeas-1.4.0-2.el7.x86_64                                                                                                                         1/1
  Verifying  : augeas-1.4.0-2.el7.x86_64                                                                                                                         1/1

Installed:
  augeas.x86_64 0:1.4.0-2.el7

Complete!
[root@UA-HA ~]# rpm -qa augeas
augeas-1.4.0-2.el7.x86_64
[root@UA-HA ~]# rpm -ql augeas
/usr/bin/augparse
/usr/bin/augtool
/usr/bin/fadot
/usr/share/man/man1/augparse.1.gz
/usr/share/man/man1/augtool.1.gz
/usr/share/vim/vimfiles/ftdetect/augeas.vim
/usr/share/vim/vimfiles/syntax/augeas.vim
[root@UA-HA ~]#


2.Execute the “augtool” command and see the available options.

[root@UA-HA ~]# augtool
augtool> help

Admin commands:
  help       - print help
  load       - (re)load files under /files
  quit       - exit the program
  retrieve   - transform tree into text
  save       - save all pending changes
  store      - parse text into tree
  transform  - add a file transform

Read commands:
  dump-xml   - print a subtree as XML
  get        - get the value of a node
  label      - get the label of a node
  ls         - list children of a node
  match      - print matches for a path expression
  print      - print a subtree
  errors     - show all errors encountered in processing files
  span       - print position in input file corresponding to tree

Write commands:
  clear      - clear the value of a node
  clearm     - clear the value of multiple nodes
  ins        - insert new node
  insert     - insert new node (alias of 'ins')
  mv         - move a subtree
  move       - move a subtree (alias of 'mv')
  cp         - copy a subtree
  copy       - copy a subtree (alias of 'cp')
  rename     - rename a subtree label
  rm         - delete nodes and subtrees
  set        - set the value of a node
  setm       - set the value of multiple nodes
  touch      - create a new node

Path expression commands:
  defnode    - set a variable, possibly creating a new node
  defvar     - set a variable

Type 'help ' for more information on a command

augtool> quit
[root@UA-HA ~]#


3. Augeas can’t edit all the files. It can edit only those that has a schema (aka lens). There are a set of stock lenses that comes with augeas by default. These lens are stored in “/usr/share/augeas/lenses/dist” directory.

[root@UA-HA ~]# ls -lrt /usr/share/augeas/lenses/dist
total 1068
-rw-r--r--. 1 root root  1966 May 21  2015 wine.aug
-rw-r--r--. 1 root root   450 May 21  2015 securetty.aug
-rw-r--r--. 1 root root   732 May 21  2015 postfix_access.aug
-rw-r--r--. 1 root root  1450 May 21  2015 odbc.aug
-rw-r--r--. 1 root root  2216 May 21  2015 lokkit.aug
-rw-r--r--. 1 root root   780 May 21  2015 inittab.aug
-rw-r--r--. 1 root root   663 May 21  2015 ethers.aug
-rw-r--r--. 1 root root  2852 May 21  2015 dpkg.aug
-rw-r--r--. 1 root root   398 May 21  2015 cobblermodules.aug
-rw-r--r--. 1 root root  2228 May 22  2015 xymon.aug
-rw-r--r--. 1 root root 10361 May 22  2015 xorg.aug
-rw-r--r--. 1 root root  1097 May 22  2015 xendconfsxp.aug
-rw-r--r--. 1 root root  1257 May 22  2015 webmin.aug
-rw-r--r--. 1 root root  2722 May 22  2015 vsftpd.aug
-rw-r--r--. 1 root root   702 May 22  2015 vmware_config.aug
-rw-r--r--. 1 root root  1756 May 22  2015 vfstab.aug
-rw-r--r--. 1 root root  4606 May 22  2015 util.aug
-rw-r--r--. 1 root root  2264 May 22  2015 up2date.aug
-rw-r--r--. 1 root root  1345 May 22  2015 thttpd.aug
-rw-r--r--. 1 root root  2817 May 22  2015 subversion.aug
-rw-r--r--. 1 root root  2260 May 22  2015 stunnel.aug
-rw-r--r--. 1 root root  1245 May 22  2015 splunk.aug
-rw-r--r--. 1 root root  1379 May 22  2015 spacevars.aug
-rw-r--r--. 1 root root  1167 May 22  2015 soma.aug
-rw-r--r--. 1 root root  3228 May 22  2015 solaris_system.aug
-rw-r--r--. 1 root root   747 May 22  2015 smbusers.aug
-rw-r--r--. 1 root root  1119 May 22  2015 simplelines.aug
-rw-r--r--. 1 root root   745 May 22  2015 shells.aug
-rw-r--r--. 1 root root  1306 May 22  2015 sep.aug
-rw-r--r--. 1 root root  1832 May 22  2015 schroot.aug
-rw-r--r--. 1 root root  2017 May 22  2015 rsyncd.aug
-rw-r--r--. 1 root root  3939 May 22  2015 resolv.aug
-rw-r--r--. 1 root root  4863 May 22  2015 reprepro_uploaders.aug
-rw-r--r--. 1 root root  3818 May 22  2015 rabbitmq.aug
-rw-r--r--. 1 root root  6868 May 22  2015 quote.aug
-rw-r--r--. 1 root root   670 May 22  2015 qpid.aug
-rw-r--r--. 1 root root  3190 May 22  2015 puppetfileserver.aug
-rw-r--r--. 1 root root  2001 May 22  2015 puppet_auth.aug
-rw-r--r--. 1 root root  1558 May 22  2015 puppet.aug
-rw-r--r--. 1 root root  1080 May 22  2015 protocols.aug
-rw-r--r--. 1 root root  1460 May 22  2015 postfix_transport.aug
-rw-r--r--. 1 root root  1884 May 22  2015 postfix_master.aug
-rw-r--r--. 1 root root  3947 May 22  2015 phpvars.aug
-rw-r--r--. 1 root root  2977 May 22  2015 pg_hba.aug
-rw-r--r--. 1 root root   638 May 22  2015 pbuilder.aug
-rw-r--r--. 1 root root  1262 May 22  2015 pamconf.aug
-rw-r--r--. 1 root root  1095 May 22  2015 openshift_quickstarts.aug
-rw-r--r--. 1 root root  1052 May 22  2015 openshift_http.aug
-rw-r--r--. 1 root root  2524 May 22  2015 openshift_config.aug
-rw-r--r--. 1 root root  4861 May 22  2015 ntpd.aug
-rw-r--r--. 1 root root  4985 May 22  2015 ntp.aug
-rw-r--r--. 1 root root  2329 May 22  2015 nsswitch.aug
-rw-r--r--. 1 root root  1789 May 22  2015 nrpe.aug
-rw-r--r--. 1 root root  1116 May 22  2015 networks.aug
-rw-r--r--. 1 root root  1732 May 22  2015 netmasks.aug
-rw-r--r--. 1 root root  2182 May 22  2015 monit.aug
-rw-r--r--. 1 root root  1068 May 22  2015 modules_conf.aug
-rw-r--r--. 1 root root   741 May 22  2015 modules.aug
-rw-r--r--. 1 root root  3420 May 22  2015 modprobe.aug
-rw-r--r--. 1 root root  4783 May 22  2015 mke2fs.aug
-rw-r--r--. 1 root root  1272 May 22  2015 memcached.aug
-rw-r--r--. 1 root root 10287 May 22  2015 mdadm_conf.aug
-rw-r--r--. 1 root root  1473 May 22  2015 logwatch.aug
-rw-r--r--. 1 root root   615 May 22  2015 login_defs.aug
-rw-r--r--. 1 root root  1793 May 22  2015 lightdm.aug
-rw-r--r--. 1 root root  7833 May 22  2015 ldif.aug
-rw-r--r--. 1 root root  1965 May 22  2015 json.aug
-rw-r--r--. 1 root root  1482 May 22  2015 inputrc.aug
-rw-r--r--. 1 root root  6365 May 22  2015 inetd.aug
-rw-r--r--. 1 root root  1043 May 22  2015 htpasswd.aug
-rw-r--r--. 1 root root  4426 May 22  2015 hosts_access.aug
-rw-r--r--. 1 root root   422 May 22  2015 hostname.aug
-rw-r--r--. 1 root root  1925 May 22  2015 host_conf.aug
-rw-r--r--. 1 root root   855 May 22  2015 gtkbookmarks.aug
-rw-r--r--. 1 root root  1841 May 22  2015 gdm.aug
-rw-r--r--. 1 root root  1228 May 22  2015 fstab.aug
-rw-r--r--. 1 root root   819 May 22  2015 fonts.aug
-rw-r--r--. 1 root root  9502 May 22  2015 fai_diskconfig.aug
-rw-r--r--. 1 root root  2213 May 22  2015 dput.aug
-rw-r--r--. 1 root root  3701 May 22  2015 debctrl.aug
-rw-r--r--. 1 root root   773 May 22  2015 darkice.aug
-rw-r--r--. 1 root root   459 May 22  2015 cups.aug
-rw-r--r--. 1 root root  3087 May 22  2015 crypttab.aug
-rw-r--r--. 1 root root  4116 May 22  2015 cron.aug
-rw-r--r--. 1 root root   869 May 22  2015 collectd.aug
-rw-r--r--. 1 root root  2293 May 22  2015 cobblersettings.aug
-rw-r--r--. 1 root root  3929 May 22  2015 channels.aug
-rw-r--r--. 1 root root  2432 May 22  2015 cgrules.aug
-rw-r--r--. 1 root root  1574 May 22  2015 carbon.aug
-rw-r--r--. 1 root root  2051 May 22  2015 cachefilesd.aug
-rw-r--r--. 1 root root  3736 May 22  2015 bootconf.aug
-rw-r--r--. 1 root root  4342 May 22  2015 bbhosts.aug
-rw-r--r--. 1 root root  1014 May 22  2015 backuppchosts.aug
-rw-r--r--. 1 root root  1417 May 22  2015 avahi.aug
-rw-r--r--. 1 root root  3391 May 22  2015 automaster.aug
-rw-r--r--. 1 root root  1135 May 22  2015 apt_update_manager.aug
-rw-r--r--. 1 root root  1552 May 22  2015 aptsources.aug
-rw-r--r--. 1 root root  3984 May 22  2015 aptconf.aug
-rw-r--r--. 1 root root   726 May 22  2015 aptcacherngsecurity.aug
-rw-r--r--. 1 root root  1286 May 22  2015 approx.aug
-rw-r--r--. 1 root root  2545 May 22  2015 anacron.aug
-rw-r--r--. 1 root root  1950 May 22  2015 mysql.aug
-rw-r--r--. 1 root root  2123 May 22  2015 yum.aug
-rw-r--r--. 1 root root  6259 May 22  2015 xymon_alerting.aug
-rw-r--r--. 1 root root  6238 May 22  2015 xml.aug
-rw-r--r--. 1 root root  4120 May 22  2015 xinetd.aug
-rw-r--r--. 1 root root   387 May 22  2015 tuned.aug
-rw-r--r--. 1 root root  5790 May 22  2015 systemd.aug
-rw-r--r--. 1 root root  2615 May 22  2015 sysconfig_route.aug
-rw-r--r--. 1 root root  2550 May 22  2015 sysconfig.aug
-rw-r--r--. 1 root root 20119 May 22  2015 sudoers.aug
-rw-r--r--. 1 root root   861 May 22  2015 sssd.aug
-rw-r--r--. 1 root root  2987 May 22  2015 ssh.aug
-rw-r--r--. 1 root root 16330 May 22  2015 squid.aug
-rw-r--r--. 1 root root  1651 May 22  2015 sip_conf.aug
-rw-r--r--. 1 root root  1779 May 22  2015 shellvars_list.aug
-rw-r--r--. 1 root root  2887 May 22  2015 services.aug
-rw-r--r--. 1 root root  1755 May 22  2015 samba.aug
-rw-r--r--. 1 root root  4159 May 22  2015 rx.aug
-rw-r--r--. 1 root root  2062 May 22  2015 rsyslog.aug
-rw-r--r--. 1 root root   788 May 22  2015 rmt.aug
-rw-r--r--. 1 root root  4706 May 22  2015 redis.aug
-rw-r--r--. 1 root root  2035 May 22  2015 pythonpaste.aug
-rw-r--r--. 1 root root  2359 May 22  2015 pylonspaste.aug
-rw-r--r--. 1 root root  1484 May 22  2015 puppetfile.aug
-rw-r--r--. 1 root root  2305 May 22  2015 properties.aug
-rw-r--r--. 1 root root  2085 May 22  2015 postgresql.aug
-rw-r--r--. 1 root root  1295 May 22  2015 postfix_virtual.aug
-rw-r--r--. 1 root root   636 May 22  2015 postfix_sasl_smtpd.aug
-rw-r--r--. 1 root root  1500 May 22  2015 postfix_main.aug
-rw-r--r--. 1 root root  2284 May 22  2015 php.aug
-rw-r--r--. 1 root root  1462 May 22  2015 pgbouncer.aug
-rw-r--r--. 1 root root  2316 May 22  2015 pam.aug
-rw-r--r--. 1 root root  2663 May 22  2015 pagekite.aug
-rw-r--r--. 1 root root  6561 May 22  2015 openvpn.aug
-rw-r--r--. 1 root root  2047 May 22  2015 networkmanager.aug
-rw-r--r--. 1 root root  1604 May 22  2015 nagiosobjects.aug
-rw-r--r--. 1 root root  2138 May 22  2015 nagioscfg.aug
-rw-r--r--. 1 root root  3354 May 22  2015 multipath.aug
-rw-r--r--. 1 root root  1201 May 22  2015 mongodbserver.aug
-rw-r--r--. 1 root root  2911 May 22  2015 mailscanner_rules.aug
-rw-r--r--. 1 root root  1699 May 22  2015 mailscanner.aug
-rw-r--r--. 1 root root  2079 May 22  2015 lvm.aug
-rw-r--r--. 1 root root  4265 May 22  2015 logrotate.aug
-rw-r--r--. 1 root root  2065 May 22  2015 limits.aug
-rw-r--r--. 1 root root  1085 May 22  2015 ldso.aug
-rw-r--r--. 1 root root  6111 May 22  2015 krb5.aug
-rw-r--r--. 1 root root   898 May 22  2015 koji.aug
-rw-r--r--. 1 root root 10456 May 22  2015 keepalived.aug
-rw-r--r--. 1 root root  2977 May 22  2015 kdump.aug
-rw-r--r--. 1 root root  1375 May 22  2015 jmxpassword.aug
-rw-r--r--. 1 root root  1386 May 22  2015 jmxaccess.aug
-rw-r--r--. 1 root root  1552 May 22  2015 jettyrealm.aug
-rw-r--r--. 1 root root   684 May 22  2015 iscsid.aug
-rw-r--r--. 1 root root  2703 May 22  2015 iptables.aug
-rw-r--r--. 1 root root   323 May 22  2015 iproute2.aug
-rw-r--r--. 1 root root  4429 May 22  2015 interfaces.aug
-rw-r--r--. 1 root root 15859 May 22  2015 inifile.aug
-rw-r--r--. 1 root root   485 May 22  2015 hosts.aug
-rw-r--r--. 1 root root  2240 May 22  2015 gshadow.aug
-rw-r--r--. 1 root root  1755 May 22  2015 group.aug
-rw-r--r--. 1 root root  2423 May 22  2015 exports.aug
-rw-r--r--. 1 root root  4161 May 22  2015 erlang.aug
-rw-r--r--. 1 root root  2963 May 22  2015 dns_zone.aug
-rw-r--r--. 1 root root  6713 May 22  2015 dhclient.aug
-rw-r--r--. 1 root root   620 May 22  2015 device_map.aug
-rw-r--r--. 1 root root  1422 May 22  2015 desktop.aug
-rw-r--r--. 1 root root  1546 May 22  2015 cyrus_imapd.aug
-rw-r--r--. 1 root root   824 May 22  2015 cpanel.aug
-rw-r--r--. 1 root root  1570 May 22  2015 clamav.aug
-rw-r--r--. 1 root root  8257 May 22  2015 chrony.aug
-rw-r--r--. 1 root root  3435 May 22  2015 cgconfig.aug
-rw-r--r--. 1 root root 17045 May 22  2015 build.aug
-rw-r--r--. 1 root root  4148 May 22  2015 automounter.aug
-rw-r--r--. 1 root root  1883 May 22  2015 authorized_keys.aug
-rw-r--r--. 1 root root  1831 May 22  2015 aptpreferences.aug
-rw-r--r--. 1 root root  2231 May 22  2015 aliases.aug
-rw-r--r--. 1 root root  1602 May 22  2015 afs_cellalias.aug
-rw-r--r--. 1 root root   864 May 22  2015 activemq_xml.aug
-rw-r--r--. 1 root root  1509 May 22  2015 activemq_conf.aug
-rw-r--r--. 1 root root  3669 May 22  2015 access.aug
-rw-r--r--. 1 root root   871 May 22  2015 fuse.aug
-rw-r--r--. 1 root root   923 Jun  1  2015 sysctl.aug
-rw-r--r--. 1 root root  9346 Jun  1  2015 shellvars.aug
-rw-r--r--. 1 root root  2404 Jun  1  2015 shadow.aug
-rw-r--r--. 1 root root  2925 Jun  1  2015 nginx.aug
-rw-r--r--. 1 root root  1112 Jun  1  2015 mcollective.aug
-rw-r--r--. 1 root root  1309 Jun  1  2015 known_hosts.aug
-rw-r--r--. 1 root root  9707 Jun  1  2015 grub.aug
-rw-r--r--. 1 root root  3609 Jun  1  2015 passwd.aug
-rw-r--r--. 1 root root  3921 Jun  1  2015 httpd.aug
-rw-r--r--. 1 root root  1033 Jul 30  2015 updatedb.aug
-rw-r--r--. 1 root root  7429 Jul 30  2015 syslog.aug
-rw-r--r--. 1 root root  3444 Jul 30  2015 sshd.aug
-rw-r--r--. 1 root root  3864 Jul 30  2015 sshd_140.aug
-rw-r--r--. 1 root root  5231 Jul 30  2015 slapd.aug
-rw-r--r--. 1 root root  5259 Jul 30  2015 slapd_140.aug
-rw-r--r--. 1 root root  1463 Jul 30  2015 simplevars.aug
-rw-r--r--. 1 root root  1130 Jul 30  2015 rhsm.aug
-rw-r--r--. 1 root root  1344 Jul 30  2015 jaas.aug
-rw-r--r--. 1 root root  3435 Jul 30  2015 dovecot.aug
-rw-r--r--. 1 root root  1451 Jul 30  2015 dnsmasq.aug
-rw-r--r--. 1 root root 15855 Jul 30  2015 dhcpd.aug
-rw-r--r--. 1 root root 21299 Jul 30  2015 dhcpd_140.aug
[root@UA-HA ~]#


4. Let’s have a loot at the hosts.aug lens.

[root@UA-HA dist]# cat hosts.aug
(* Parsing /etc/hosts *)

module Hosts =
  autoload xfm

  let word = /[^# \n\t]+/
  let record = [ seq "host" . Util.indent .
                              [ label "ipaddr" . store  word ] . Sep.tab .
                              [ label "canonical" . store word ] .
                              [ label "alias" . Sep.space . store word ]*
                 . Util.comment_or_eol ]

  let lns = ( Util.empty | Util.comment | record ) *

  let xfm = transform lns (incl "/etc/hosts")
[root@UA-HA dist]#


Here , we no need to stretch ourself to understand the above code. Just look at the labels.

Label 1 – IP Address
Label 2 – Canonical Name
Label 3 – Alias.


5. Let’s launch the “augtool” CLI. List the available context.

[root@UA-HA dist]# augtool
augtool> ls /
augeas/ = (none)
files/ = (none)
augtool>


Here , we have “augeas” and “files”. “augeas” refers to the tool’s root and it’s settings.

augtool> ls /augeas/
root = /
context = /files
variables = (none)
version/ = 1.4.0
save = overwrite
span = disable
load/ = (none)
files/ = (none)
augtool>


“files” refers to system hierarchy.

augtool> ls /files/
etc/ = (none)
usr/ = (none)
boot/ = (none)
lib/ = (none)
root/ = (none)
augtool>


6. We will use /etc/hosts file for demonstration. Let’s view the hosts file.

[root@UA-HA ~]# cat /etc/hosts
127.0.0.1   localhost localhost.localdomain localhost4 localhost4.localdomain4
::1         localhost localhost.localdomain localhost6 localhost6.localdomain6
192.168.203.131 UA-HA uaha.unixarena.com  master
192.168.203.134 UA-HA2 uapa1.unixarena.com
192.155.89.90   pm.puppetlabs.com
54.231.16.224   s3.amazonaws.com
[root@UA-HA ~]#


View the same file using augtool.

[root@UA-HA ~]# augtool print /files/etc/hosts
/files/etc/hosts
/files/etc/hosts/1
/files/etc/hosts/1/ipaddr = "127.0.0.1"
/files/etc/hosts/1/canonical = "localhost"
/files/etc/hosts/1/alias[1] = "localhost.localdomain"
/files/etc/hosts/1/alias[2] = "localhost4"
/files/etc/hosts/1/alias[3] = "localhost4.localdomain4"
/files/etc/hosts/2
/files/etc/hosts/2/ipaddr = "::1"
/files/etc/hosts/2/canonical = "localhost"
/files/etc/hosts/2/alias[1] = "localhost.localdomain"
/files/etc/hosts/2/alias[2] = "localhost6"
/files/etc/hosts/2/alias[3] = "localhost6.localdomain6"
/files/etc/hosts/3
/files/etc/hosts/3/ipaddr = "192.168.203.131"
/files/etc/hosts/3/canonical = "UA-HA"
/files/etc/hosts/3/alias[1] = "uaha.unixarena.com"
/files/etc/hosts/3/alias[2] = "master"
/files/etc/hosts/4
/files/etc/hosts/4/ipaddr = "192.168.203.134"
/files/etc/hosts/4/canonical = "UA-HA2"
/files/etc/hosts/4/alias = "uapa1.unixarena.com"
/files/etc/hosts/5
/files/etc/hosts/5/ipaddr = "192.155.89.90"
/files/etc/hosts/5/canonical = "pm.puppetlabs.com"
/files/etc/hosts/6
/files/etc/hosts/6/ipaddr = "54.231.16.224"
/files/etc/hosts/6/canonical = "s3.amazonaws.com"
[root@UA-HA ~]#

Let’s dig more in to the above output.


The below command shows the number of lines in “/etc/hosts” file.

[root@UA-HA ~]# augtool ls /files/etc/hosts
1/ = (none)
2/ = (none)
3/ = (none)
4/ = (none)
5/ = (none)
6/ = (none)
[root@UA-HA ~]#


Let’s view line “4” using augtool. It uses the label to differentiate the  IP address, canonical name and alias.

[root@UA-HA ~]# augtool print /files/etc/hosts/4
/files/etc/hosts/4
/files/etc/hosts/4/ipaddr = "192.168.203.134"
/files/etc/hosts/4/canonical = "UA-HA2"
/files/etc/hosts/4/alias = "uapa1.unixarena.com"
[root@UA-HA ~]#


We can use the get command to filter the IP address.

[root@UA-HA ~]# augtool get /files/etc/hosts/3/ipaddr
/files/etc/hosts/3/ipaddr = 192.168.203.131
[root@UA-HA ~]#


Let’s modify the IP address in line “3” .

[root@UA-HA ~]# augtool set /files/etc/hosts/3/ipaddr 192.168.203.139
Saved 1 file(s)
[root@UA-HA ~]# augtool get /files/etc/hosts/3/ipaddr
/files/etc/hosts/3/ipaddr = 192.168.203.139
[root@UA-HA ~]#


Hope this part  has given an overview of  augeas tool.  In the second part of article ,we will see that how it can be integrated with puppet to edit the config files.


Puppet – Augeas Resource type: (To Edit sshd config)

Augeas is available as puppet resource type to edit the configuration files.  Assume that you got a request from security team to restrict direct “ssh” direct root login on all the servers. Using augeas resource type , we will edit the sshd_config file on puppet agent nodes to complete the task.

1.Login to Puppet server as root.

2.Navigate to production environment’s module directory.

[root@UA-HA ~]# cd /etc/puppetlabs/code/environments/production/modules/
[root@UA-HA modules]# ls -lrt
total 0
drwxr-xr-x 3 root root 22 Feb 8 14:16 helloworld
drwxr-xr-x 6 root root 65 Feb 8 15:15 accounts
drwxr-xr-x 6 root root 65 Feb 10 23:36 httpd
drwxr-xr-x 5 root root 50 Feb 14 07:18 ntpconfig
drwxr-xr-x 5 root root 50 Feb 14 09:02 filetest
drwxr-xr-x 5 root root 50 Feb 14 10:55 testdirs
[root@UA-HA modules]#


3. Create a new module structure for sshd_config changes.

[root@UA-HA modules]# mkdir -p sshdroot/{files,manifests,templates}
[root@UA-HA modules]# tree sshdroot
sshdroot
├── files
├── manifests
└── templates

3 directories, 0 files
[root@UA-HA modules]#


4. Navigate to manifest directory .

[root@UA-HA manifests]# cd sshdroot/manifests
[root@UA-HA manifests]#


5.Create a file called init.pp with following contents.

class sshdroot {

augeas { "sshd_config":
  changes => [
    "set /files/etc/ssh/sshd_config/PermitRootLogin no",
  ],
}

}


6. Navigate back to production environment’s manifest directory to classify the nodes.

[root@UA-HA manifests]# ls -lrt
total 4
-rw-r--r-- 1 root root 124 Feb 15 14:13 init.pp
[root@UA-HA manifests]# pwd
/etc/puppetlabs/code/environments/production/modules/sshdroot/manifests
[root@UA-HA manifests]#
[root@UA-HA manifests]# cd ../../../manifests/
[root@UA-HA manifests]# ls -lrt
total 8
-rw-r--r-- 1 pe-puppet pe-puppet 1226 Feb 10 23:44 site.pp
-rw-r--r-- 1 root      root        35 Feb 14 11:59 nodes.pp
[root@UA-HA manifests]#


7. Edit the node.pp and specify the puppet agent node and call the module “sshdroot”.

[root@UA-HA manifests]# cat nodes.pp
node uapa1 {
  include sshdroot
}
[root@UA-HA manifests]#


8.Login to puppet agent node and check the current sshd_config.

[root@uapa1 ~]# grep Root /etc/ssh/sshd_config
PermitRootLogin yes
[root@uapa1 ~]#


9.Execute the puppet agent command to update the master config. (Or you need to wait for 30 mins for automatic trigger)

[root@uapa1 ~]# puppet agent -t
Info: Using configured environment 'production'
Info: Retrieving pluginfacts
Info: Retrieving plugin
Info: Loading facts
Info: Caching catalog for uapa1
Info: Applying configuration version '1455602675'
Notice: Augeas[sshd_config](provider=augeas):
--- /etc/ssh/sshd_config        2016-02-19 16:53:13.595263754 -0500
+++ /etc/ssh/sshd_config.augnew 2016-02-19 16:55:49.758072581 -0500
@@ -46,7 +46,7 @@
 # Authentication:

 #LoginGraceTime 2m
-PermitRootLogin yes
+PermitRootLogin no
 #StrictModes yes
 #MaxAuthTries 6
 #MaxSessions 10

Notice: /Stage[main]/Sshdroot/Augeas[sshd_config]/returns: executed successfully
Notice: Applied catalog in 7.44 seconds


10. Verify the current settings in sshd_config. You should see that “PermitRootlogin” should be set to “no”.

[root@uapa1 ~]# grep Root /etc/ssh/sshd_config
PermitRootLogin no
# the setting of "PermitRootLogin without-password".
[root@uapa1 ~]#

This is how you need to analysis the augeas config, create the module using augeas resource type and push the changes to puppet agent nodes from puppet server.


Hope this article is informative to you . Share it ! Comment it !! Be Sociable !!!

The post Puppet – Augeas – Edit System configuration files appeared first on UnixArena.


Puppet – How to Classify the Node types ?

$
0
0

We need to classify the nodes  when you have to perform similar operation on different OS variant. For an example, If you want to install Apache package on Linux systems, you need to use package name as “httpd” on Redhat variants  and “apache2” on Debian variants.  In such a cases, you need to tweak your module to detect the OS family using facter and based upon the results , module have to choose either “httpd” or “apache2”. Let’s write a small code to achieve this.


1. Login to the puppet server as root user.

2.Navigate to “production” environment’s module directory.

[root@UA-HA ~]# cd /etc/puppetlabs/code/environments/production/modules/
[root@UA-HA modules]# ls -lrt
total 0
drwxr-xr-x 3 root root 22 Feb  8 14:16 helloworld
drwxr-xr-x 6 root root 65 Feb  8 15:15 accounts
drwxr-xr-x 6 root root 65 Feb 10 23:36 httpd
drwxr-xr-x 5 root root 50 Feb 14 07:18 ntpconfig
drwxr-xr-x 5 root root 50 Feb 14 09:02 filetest
drwxr-xr-x 5 root root 50 Feb 14 10:55 testdirs
drwxr-xr-x 5 root root 50 Feb 15 14:11 sshdroot
[root@UA-HA modules]#


3. Create the new module structure for Apache installation.

[root@UA-HA modules]# mkdir -p  apachehttpd/{files,manifests,templates}
[root@UA-HA modules]#
[root@UA-HA modules]# tree apachehttpd
apachehttpd
├── files
├── manifests
│   └── init.pp
└── templates

3 directories, 1 file
[root@UA-HA modules]#


4.Navigate to manifest directory and create file called init.pp.

[root@UA-HA modules]# cd apachehttpd/manifests/
[root@UA-HA manifests]# vi init.pp
[root@UA-HA manifests]# cat init.pp
class apachehttpd {

$package_name = $osfamily ? {
   'RedHat' => 'httpd',
   'Debian' => 'apache2',
   default  =>  undef,
 }
    # Install Apache package
    package { "$package_name":
        ensure => installed,
        alias  => "apache",
    }

    # Enable Apache service
    service { "$package_name":
        ensure => running,
        enable => true,
        require => Package['apache']
    }

}
[root@UA-HA manifests]#


5. Navigate back to the main manifest directory and call the “apachehttpd” module for node uapa1.

[root@UA-HA manifests]# cd ../../../manifests/
[root@UA-HA manifests]# ls -lrt
total 8
-rw-r--r-- 1 pe-puppet pe-puppet 1226 Feb 10 23:44 site.pp
-rw-r--r-- 1 root      root        34 Feb 16 01:01 nodes.pp
[root@UA-HA manifests]#
[root@UA-HA manifests]# cat nodes.pp
node uapa1 {
  include apachehttpd
}
[root@UA-HA manifests]#


6. Login to puppet agent nodes and run the puppet agent test to see the results immediately.

[root@uapa1 ~]# puppet agent -t
Info: Using configured environment 'production'
Info: Retrieving pluginfacts
Info: Retrieving plugin
Info: Loading facts
Info: Caching catalog for uapa1
Info: Applying configuration version '1455607480'
Notice: /Stage[main]/Apachehttpd/Package[httpd]/ensure: created
Notice: /Stage[main]/Apachehttpd/Service[httpd]/ensure: ensure changed 'stopped' to 'running'
Info: /Stage[main]/Apachehttpd/Service[httpd]: Unscheduling refresh on Service[httpd]
Notice: Applied catalog in 4.02 seconds
[root@uapa1 ~]#


7.Verify our work.

[root@uapa1 ~]# rpm -qa httpd
httpd-2.4.6-40.el7.x86_64
[root@uapa1 ~]# systemctl status httpd
● httpd.service - The Apache HTTP Server
   Loaded: loaded (/usr/lib/systemd/system/httpd.service; enabled; vendor preset: disabled)
   Active: active (running) since Fri 2016-02-19 18:09:42 EST; 1min 13s ago
     Docs: man:httpd(8)
           man:apachectl(8)
 Main PID: 48461 (httpd)
   Status: "Total requests: 0; Current requests/sec: 0; Current traffic:   0 B/sec"
   CGroup: /system.slice/httpd.service
           ├─48461 /usr/sbin/httpd -DFOREGROUND
           ├─48462 /usr/sbin/httpd -DFOREGROUND
           ├─48463 /usr/sbin/httpd -DFOREGROUND
           ├─48464 /usr/sbin/httpd -DFOREGROUND
           ├─48465 /usr/sbin/httpd -DFOREGROUND
           └─48469 /usr/sbin/httpd -DFOREGROUND

Feb 19 18:09:42 uapa1 systemd[1]: Starting The Apache HTTP Server...
Feb 19 18:09:42 uapa1 httpd[48461]: AH00558: httpd: Could not reliably determine the server's fully qualified domain name, using 192.168.203.134. Set th...is message
Feb 19 18:09:42 uapa1 systemd[1]: Started The Apache HTTP Server.
Hint: Some lines were ellipsized, use -l to show in full.
[root@uapa1 ~]#


This is very small demonstration to perform the similar task on different OS variant. Node classification is achieved using “facter” mechanism.


Hope this article is informative to you. Share it! Comment it !! Be Sociable !!!

The post Puppet – How to Classify the Node types ? appeared first on UnixArena.

Puppet – Puppet Forge Modules – Overview

$
0
0

Puppet forge is a module repository for  Puppet Open Source and Puppet Enterprise IT automation software. These modules are written by puppet community members and puppet reviews the module before publishing it. Puppet also supports many of modules in this repository.  Why do we require pre-built puppet modules ?  To simply system administrator work and reduce the coding effort. These pre-built codes will  help you to automate most of the things in short time. In this article ,we will install LVM module from puppet forge and apply it in our environment.


Install Puppet Module from Puppet Forge:

LVM module provides Puppet types and providers to manage Logical Resource Management (LVM) features. This module provides four resource types (and associated providers): volume_group, logical_volume, physical_volume, and filesystem. The basic dependency graph needed to define a working logical volume looks something like:

Filesystem -> logical_volume -> volume_group -> physical_volume(s)


1.Login to the puppet server as root and install the LVM module.

[root@UA-HA manifests]# puppet module install puppetlabs-lvm
Notice: Preparing to install into /etc/puppetlabs/code/environments/production/modules ...
Notice: Downloading from https://forgeapi.puppetlabs.com ...
Notice: Installing -- do not interrupt ...
/etc/puppetlabs/code/environments/production/modules
└─┬ puppetlabs-lvm (v0.7.0)
  └── puppetlabs-stdlib (v4.11.0)
[root@UA-HA manifests]#

You will get the exact command from puppet forge to install specific modules.


2.Navigate to the LVM’s module  directory.

[root@UA-HA manifests]# cd /etc/puppetlabs/code/environments/production/modules
[root@UA-HA modules]# ls -lrt
total 8
drwxr-xr-x 6 root root 4096 Jan 12 06:08 stdlib
drwxr-xr-x 5 root root 4096 Jan 14 06:35 lvm
drwxr-xr-x 3 root root   22 Feb  8 14:16 helloworld
drwxr-xr-x 6 root root   65 Feb  8 15:15 accounts
drwxr-xr-x 6 root root   65 Feb 10 23:36 httpd
drwxr-xr-x 5 root root   50 Feb 14 07:18 ntpconfig
drwxr-xr-x 5 root root   50 Feb 14 09:02 filetest
drwxr-xr-x 5 root root   50 Feb 14 10:55 testdirs
drwxr-xr-x 5 root root   50 Feb 15 14:11 sshdroot
drwxr-xr-x 5 root root   50 Feb 16 02:01 apachehttpd
[root@UA-HA modules]# cd lvm
[root@UA-HA lvm]# ls -lrt
total 56
-rw-r--r-- 1 root root 11368 Jan 14 05:30 README.md
-rw-r--r-- 1 root root   662 Jan 14 05:30 Rakefile
-rw-r--r-- 1 root root 17987 Jan 14 05:30 LICENSE
-rw-r--r-- 1 root root   539 Jan 14 05:30 Gemfile
-rw-r--r-- 1 root root  4251 Jan 14 05:30 CHANGELOG.md
drwxr-xr-x 4 root root    48 Jan 14 06:35 spec
-rw-r--r-- 1 root root  1102 Jan 14 06:35 metadata.json
-rw-r--r-- 1 root root  2854 Jan 14 06:35 checksums.json
drwxr-xr-x 2 root root    82 Feb 16 02:57 manifests
drwxr-xr-x 4 root root    32 Feb 16 02:57 lib
[root@UA-HA lvm]# cd manifests/
[root@UA-HA manifests]#


3. Navigate to the manifest directory and review the current puppet code.

[root@UA-HA lvm]# cd manifests/
[root@UA-HA manifests]# ls -lrt
total 24
-rw-r--r-- 1 root root 4386 Jan 14 05:30 volume.pp
-rw-r--r-- 1 root root  585 Jan 14 05:30 volume_group.pp
-rw-r--r-- 1 root root 3583 Jan 14 05:30 logical_volume.pp
-rw-r--r-- 1 root root  130 Feb 16 03:03 init.pp
[root@UA-HA manifests]#
[root@UA-HA manifests]# cat volume.pp
[root@UA-HA manifests]# cat volume_group.pp
[root@UA-HA manifests]# cat logical_volume.pp
[root@UA-HA manifests]# cat init.pp

These manifest contains the sample codes. You can safely rename the “init.pp” as “init.pp.old” and starting writing custom code.


4. You should know what LUN is free on the puppet agent nodes before writing your own manifest. In my case, “/dev/sdb” is free disk.

[root@UA-HA manifests]# cat init.pp
class lvm {

lvm::volume { 'ualv1':
  ensure => present,
  vg     => 'uavg',
  pv     => '/dev/sdb',
  fstype => 'ext3',
  size   => '100M',
}

}
[root@UA-HA manifests]#

This code will automatically create the volume group , logical volume and ext3 filesystem on that.


5. Navigate back to main manifest directory and edit nodes.pp file to call LVM module for puppet agent node “uapa1”.

[root@UA-HA manifests]# cd ../../../manifests/
[root@UA-HA manifests]# cat nodes.pp
node uapa1 {
  include lvm
}
[root@UA-HA manifests]#


6.Login to puppet agent node(uapa1) and check the current LVM configuration.

[root@uapa1 ~]# fdisk -l /dev/sdb
Disk /dev/sdb: 536 MB, 536870912 bytes, 1048576 sectors
Units = sectors of 1 * 512 = 512 bytes
Sector size (logical/physical): 512 bytes / 512 bytes
I/O size (minimum/optimal): 512 bytes / 512 bytes

[root@uapa1 ~]# vgs
  VG   #PV #LV #SN Attr   VSize   VFree
  rhel   1   2   0 wz--n-  19.51g      0
[root@uapa1 ~]# lvs
  LV    VG   Attr       LSize   Pool Origin Data%  Meta%  Move Log Cpy%Sync Convert
  root  rhel -wi-ao----  17.51g
  swap  rhel -wi-ao----   2.00g
  [root@uapa1 ~]#


7. Run the puppet agent test to apply the configuration immediately. (Puppet agent automatically applies the new configuration for every 30mins)

[root@uapa1 ~]# puppet agent -t
Info: Using configured environment 'production'
Info: Retrieving pluginfacts
Info: Retrieving plugin
Info: Loading facts
Info: Caching catalog for uapa1
Info: Applying configuration version '1455609925'
Notice: /Stage[main]/Lvm/Lvm::Volume[ualv1]/Physical_volume[/dev/sdb]/ensure: created
Notice: /Stage[main]/Lvm/Lvm::Volume[ualv1]/Volume_group[uavg]/ensure: created
Notice: /Stage[main]/Lvm/Lvm::Volume[ualv1]/Logical_volume[ualv1]/ensure: created
Notice: /Stage[main]/Lvm/Lvm::Volume[ualv1]/Filesystem[/dev/uavg/ualv1]/ensure: created
Notice: Applied catalog in 8.09 seconds
[root@uapa1 ~]#


8.Verify our work .

[root@uapa1 ~]# vgs uavg
  VG   #PV #LV #SN Attr   VSize   VFree
  uavg   1   1   0 wz--n- 508.00m 408.00m
[root@uapa1 ~]# lvs -o +devices
  LV    VG   Attr       LSize   Pool Origin Data%  Meta%  Move Log Cpy%Sync Convert Devices
  root  rhel -wi-ao----  17.51g                                                     /dev/sda2(512)
  swap  rhel -wi-ao----   2.00g                                                     /dev/sda2(0)
  ualv1 uavg -wi-a----- 100.00m                                                     /dev/sdb(0)
[root@uapa1 ~]#


Here we can see that “uavg” volume group and “ualv1” logical volume have been created successfully. This is how you need to install the pre-built module from puppet forge and tweak it according to your environment.


Hope this article informative to you . Share it ! Comment it !! Be Sociable !!!


The post Puppet – Puppet Forge Modules – Overview appeared first on UnixArena.

VMware Integrated Openstack – Overview – Part 1

$
0
0

This articles provides the overview of VMware Integrated Openstack (VIO). Openstack is an opensource framework for creating an IAAS (Infrastructure as a service) cloud. It provides a cloud style API to simplify the consumption of virtual infrastructure technologies. Openstack doesn’t not provide any virtual technologies  to create the OS instances.  It always require hypervisors like KVM, XEN and ESXi. Openstack has ability to provide a programmatic API access infrastructure to the private cloud. By providing this pubic cloud capability in the private cloud,  organizations achieves the following benefits .

  • Reduced OpEx.
  • Increased developer productivity
  • Improved control security and governance.
  • Enhanced Operational and SLA control.
  • Vendor-neutral API (Freedom from vendor lock-in)


VMware Integrated Openstack - Overview
Openstack Iaas Cloud


What is the show-stopper for Openstack ?

  • Openstack has multiple components and architecture is very complex.
  • Openstack project is just 5 years old and development is going on aggressively. That’s why product life cycle is very short and you are forced to migrate to the newer releases frequently.
  • Since multiple components are involved in openstack, upgrading to the latest version is quite complex.
  • Openstack compute environment  is completely depends on back-end infrastructure (KVM, XEN or ESXi). KVM and XEN hyper-visors need to short out few issues to make enterprise ready production environment.
  • Very difficult to get the openstack knowledgeable engineers from the market.


What is the best technology to pair with openstack


VMware vSphere is powerful virtualization product. VMware maximize the servers uptime, reduces the planned downtimes , enables the best performance, ensures the availability and provides best efficiency. Adding to that , VMware provides the end to end support for Openstack environment. In the negative side, you can’t use other hypervisors as compute node on VMWare integrated openstack.


The following slide explains the features of VMware products.

Openstack On VMware
Openstack On VMware


Why Openstack on VMware ?

VMware Inc. is one of the important code contributor for openstack development since 2013. VMware provides the platform to explore the openstack environment using the VMware vSphere and other components. VMware ESXi is one of the stable and reliable hyper-visor  in the world. At this point of time , openstack doesn’t offers any intelligent monitoring and troubleshooting functionality. But VMware is offering  products like VMware vRealize suite to fill those gaps.

Openstack SDDC - Openstack API
Openstack SDDC – Openstack API


In the above image, you can see that VMware SDDC has been accessed using the Openstack API. VMware claims that VMware + Openstack is best combination since customers can enjoy the flexibility of openstack with reliability of trusted  infrastructure provided by VMware.  Though VMware Joined the openstack foundation on 2013 as a gold member, Nicira (Acquired by VMware) has created the open vswitch project in 2010 itself before openstack project was launched. In 2011, Openstack project has been created by NASA & Rackspace. In 2012, Openstack networking project “neutron” started and led by Nicira (NSX).  In 2012 , Nicira has become a part of VMware Inc. So far VMware has been contributed more than 40 thousands of lines codes to Openstack and contribution will be more on upcoming days.


The following diagram shows that how VMware products are used for each openstack service API.

  • vSphere (ESXi – Hyper-visor ) – Nova
  • VMware NSX – Neutron (Network)
  • vSphere Datastore (SAN & VSAN) – Storage (Glance/swift)


VMware Integrated Openstack - vSphere NSX Datastore
VMware Integrated Openstack – vSphere NSX Datastore


Adding to the above mentioned architecture,  VMware recommends to include the vRealize Operations , Log insight, vRealize business to simply  the infrastructure operations and management.

Openstack with vRealize and Log insight


Hope this article is informative to you. In the upcoming articles , we will see that how to integrate the openstack on the existing VMware infrastructure.


Share it ! Comment it !! Be Sociable !!!

The post VMware Integrated Openstack – Overview – Part 1 appeared first on UnixArena.

How to break GRUB / Recover Root password on VCSA 6.0 ?

$
0
0

This article will provide the step by step screenshot to recover the VCSA 6.0’s  root password and breaking the GRUB password. VMware vCenter Appliance(VCSA) is a pre-configured Linux VM based on SUSE Linux. If you forget the root password of the appliance, you need to recover the root password like other Linux Operating systems. Recovering root password is very simple if there is no grub password has been setup or if you know the GRUB boot loader password. If you don’t know the grub password, then you need to reset the grub password first by using Redhat or SUSE Linux DVD.


Environment & Software:

  • VMware vCenter Appliance 6.0  (VM)
  • Redhat Enterprise Linux 7.2 or CENT OS 7.2 ISO


Break the GRUB password of VCSA 6.0:

  1. Halt the VCSA 6.0 VM and attach the RHEL 7.0 ISO image in virtual CDROM.
Attach RHEL 7.2 DVD to the VCSA 6.0 VM


2. Boot the VM in RHEL 7.2 DVD (which we have attached). You can alter the boot device priority in BIOS to make VM to boot from DVD. Navigate to “Troubleshooting” and press enter to continue.

Boot the VM from RHEL 7.2 DVD.


3. Select the rescue mode and press enter to continue.

 RHEL7.2 Rescue Mode
RHEL7.2 Rescue Mode


4. Select “Continue” to mount the VCSA 6.0’s  root filesystem in Read/write mode under /mnt/sysimage.  RHEL 7.2 is capable to detect the VCSA’s root volume and mounts it.

VCSA 6.0 Continue to mount in RW mode


5.  VCSA 6.0’s root filesystem is mounted under /mnt/sysimage and you got the shell to play with this.

VCSA 6.0 Rescue Mount


6. Navigate to /mnt/sysimage/boot directory and list the contents.

List the mnt-sysimage contents


7. Navigate to grub directory and list the contents. “menu.lst” is the file which holds the GRUB boot loader password.

VCSA 6.0 List GRUB directroie contents


8. Use “vi” editor to edit the menu.lst file. ( vi menu.lst).

VCSA 6.0 Remove Password line from menu.lst

*Navigate to password line using arrow keys & press “dd”  to remove the complete line. After that just save the file by pressing key sequence  “:wq” .


After the modification,

VCSA 6.0 Password Line Removed
VCSA 6.0 GRUB Password Line Removed


9. Exit the shell (Which will reboot the system automatically.). You need to detach the ISO image from VM hardware settings.

VCSA 6.0 Exit the shell


Once the system is booted from hard disk , Just stop the VCSA in GRUB menu to break the OS root password. You could see that GRUB is not protected with password.


Reset the VCSA 6.0 ‘s root password: 

1.Start the VCSA 6.0 VM and interrupt the GRUB menu by pressing “ESC” key .  Press “e” edit the commands.

GRUB Menu VCSA 6.0
GRUB Menu VCSA 6.0

If you know the GRUB password , you can pass it by press “p” and enter the GRUB password. If you don’t know the GRUB password , you need to follow the above procedure to break the grub password first.


2. Press “e” to edit the commands again for the kernel.

Edit the Kernel Line - VCSA 6.0
Edit the Kernel Line – VCSA 6.0


3. Append “init=/bin/bash” in this step and press enter.

Set the shell to pass to kernel


4. Press “b” to boot the system.

Press b to boot from new kernel value VCSA 6.0
Press b to boot from new kernel value


5. You will get the bash like below.

Single user Shell for VCSA 6.0


6. Set the new root password for VCSA 6.0.

Set new root password


7. Exit the shell using “exit” command.


Once the system is booted , you should be able to login with new root password.

Successful login
Successful login


Hope this article is informative to you. Share it ! Comment it !! Be Sociable !!!

The post How to break GRUB / Recover Root password on VCSA 6.0 ? appeared first on UnixArena.

VMturbo 5.5 – Manage All Hypervisors in One Umbrella

$
0
0

VMturbo operation manager is not just enterprise monitoring software . It controls the virtualization infrastructure by drilling down to the application level and takes real-time decisions. VMturbo controls all the IT stacks like System hardware, Hypervisor, Virtual Machine , Operating System, OS container and applications. VMturbo 5.5 also supports IBM PowerVM along with VMware vSphere , Redhat’s RHEV , Hyper-V Xen-Server virtualization.  To control private could in efficient manner , VMturbo 5.5 can be integrated with vRealize Automation.

Some of the key features of VMturbo 5.5 is listed here.


  • VMturbo is capable to control IT stacks.

VMturbo 5.5 - Manage All Stacks

VMturbo 5.5 – Manage All Stacks


  • VMturbo 5.5 can be integrated with vRealize Automation and it takes the decisions to make the placement of for guaranteed performance.
VMturbo 5.5 - Placement of VM
VMturbo 5.5 – Placement of VM


  • VMturbo’s another great integration is IBM PowerVM. There is no product available in the market to manage all the hypervisor’s in one umbrella other than VMturbo.
VMturbo 5.5 - IBM PowerVM
VMturbo 5.5 – IBM PowerVM


  • VMturbo supports the IBM PowerVM – live mobility partition.
VMturbo 5.5 - IBMPowerVM
VMturbo 5.5 – IBMPowerVM


  • VMturbo manages the industry leading public clouds.
VMturbo 5.5 - Public Cloud Control
VMturbo 5.5 – Public Cloud Control


  • Using VMtrubo insights , you can see the datacenter utilization and merge the public and private cloud.
VMturbo 5.5 - Merge Public & Private cloud
VMturbo 5.5 – Merge Public & Private cloud


For more information about the product, please visit http://vmturbo.com/

The post VMturbo 5.5 – Manage All Hypervisors in One Umbrella appeared first on UnixArena.

Sun Cluster – Zone Cluster on Oracle Solaris – Overview

$
0
0

This article explains about  zone cluster. Zone cluster is created on oracle Solaris hosts using sun cluster aka Oracle Solaris cluster. In Most of the deployments , we might have seen the failover zones (HA Zones) using sun cluster or Veritas cluster (VCS) on Solaris. Comparatively , zone clusters are very less in the industry but used in some of the organization very effectively . You must establish the traditional cluster  between physical nodes in an order to configure a zone cluster. Since cluster applications always run in a zone, the cluster node is always a zone.


The typical 4-Node Sun cluster looks like below. (Prior to configuring zone cluster )

4 Node Cluster
4 Node Cluster


After configuring zone cluster on global cluster,

zone cluster on global cluster

zone cluster on global cluster

The above diagram shows that two zone clusters have been configured on global cluster.

  • Global Cluster –  4 Node Cluster (Node 1, Node 2 , Node 3, Node 4 )
  • Zone Cluster A  –  4 Node Cluster  (Zone A1 , A2 , A3 , A4)
  • Zone Cluster B  –  2 Node Cluster  (Zone B1 , B2)


Zone Cluster Use Cases:

This section demonstrates the utility of zone clusters by examining a variety of use cases, including the following:

  • Multiple organization consolidation


  • Functional consolidation (See the below example)

Here you can see that both test and development systems are in different zone cluster  but in same global cluster.

Functional Consolidation - Sun Cluster
Functional Consolidation – Sun Cluster


  • Multiple-tier consolidation. (See the below example)

In this cluster model,  all the three tiers are in same global cluster but are in different zone cluster.

Multiple-tier consolidation - Sun cluster
Multiple-tier consolidation – Sun cluster
  • Cost containment
  • Administrative workload reduction


Good to know:

Distribution of nodes:  You can’t host multiple zones which are part same cluster on same host. Zones must be distributed across the physical nodes.


Node creation:  You must create at least one zone cluster node at the time that you create the zone cluster. The name of the zone-cluster node must be unique within the zone cluster. The infrastructure automatically creates an underlying non-global zone on each host that supports the zone cluster. Each non-global zone is given the same zone name, which is derived from, and identical to, the name that you assign to the zone cluster when you create the cluster. For example, if you create a zone cluster that is named “uainfrazone”, the corresponding non-global zone name on each host that supports the zone cluster is also “uainfrazone”.


Cluster name: Each zone-cluster name must be unique throughout the cluster of machines that host the global cluster. The zone-cluster name cannot also be used by a non-global zone elsewhere in the cluster of machines, nor can the zone-cluster name be the same as that of a global-cluster node. You cannot use “all” or “global” as a zone-cluster name, because these are reserved names.


Public-network IP addresses: You can optionally assign a specific public-network IP address to each zone-cluster node.


Private hostnames: During creation of the zone cluster, a private hostname is automatically created for each node of the zone cluster, in the same way that hostnames are created in global clusters.


IP type:A zone cluster is created with the shared IP type. The exclusive IP type is not supported for zone clusters.


Hope this article is informative to you. In the next article, we will see that how to configure the zone cluster on existing two node sun cluster (global cluster).

The post Sun Cluster – Zone Cluster on Oracle Solaris – Overview appeared first on UnixArena.

Sun Cluster – How to Configure Zone Cluster on Solaris ?

$
0
0

This article will walk you through the zone cluster deployment on oracle Solaris. The zone cluster consists of a set of zones, where each zone represents a virtual node. Each zone of a zone cluster is configured on a separate machine. As such, the upper bound on the number of virtual nodes in a zone cluster is limited to the number of machines in the global cluster. The zone cluster design introduces a new brand of zone, called the cluster brand. The cluster brand is based on the original native brand type, and adds enhancements for clustering. The BrandZ framework provides numerous hooks where other software can take action appropriate for the brand type of zone. For example, there is a hook for software to be called during the zone boot, and zone clusters take advantage of this hook to inform the cluster software about the boot of the virtual node. Because zone clusters use the BrandZ framework, at a minimum Oracle Solaris 10 5/08 is required.

The system maintains membership information for zone clusters. Each machine hosts a component, called the Zone Cluster Membership Monitor (ZCMM), that monitors the status of all cluster brand zones on that machine. The ZCMM knows which zones belong to which zone clusters.  Zone clusters are considerably simpler than global clusters. For example, there are no quorum devices in a zone cluster, as a quorum device is not needed.

clzonecluster is a utility to create , modify , delete and manage the zone cluster on sun cluster environment.

Zone uses the global zone physical resoruces


Note:
Sun Cluster is a product where zone cluster is one of the cluster type in sun cluster.


Environment:

  • Operating System : Oracle Solaris 10 u9
  • Cluster : Sun Cluster 3.3 (aka Oracle Solaris cluster 3.3)


Prerequisites :

  • Two Oracle Solaris 10 u9 nodes or above
  • Sun Cluster 3.3 package


Step : 1  Create a global cluster:

The following listed articles will help you to install and configure two node sun cluster on oracle Solaris 10.


Step: 2  Create a zone cluster inside the global cluster:

1. Login to one of the cluster node (Global zone).

2. Ensure that node of the global cluster is in cluster mode.

UASOL2:#clnode status
=== Cluster Nodes ===

--- Node Status ---
Node Name                                       Status
---------                                       ------
UASOL2                                          Online
UASOL1                                          Online
UASOL2:#


3. You must keep the zone path ready for local zone installation on both the cluster nodes. Zone path must be identical on both the nodes.  On Node UASOL1 ,

UASOL1:#zfs list |grep /export/zones/uainfrazone
rpool/export/zones/uainfrazone   149M  4.54G   149M  /export/zones/uainfrazone
UASOL1:#

On Node UASOL2,

UASOL2:#zfs list |grep /export/zones/uainfrazone
rpool/export/zones/uainfrazone   149M  4.24G   149M  /export/zones/uainfrazone
UASOL2:#


4. Create a new zone cluster.

Note:
• By default, sparse root zones are created. To create whole root zones, add the -b option to the create command.
• Specifying an IP address and NIC for each zone cluster node is optional.

UASOL1:#clzonecluster configure uainfrazone
uainfrazone: No such zone cluster configured
Use 'create' to begin configuring a new zone cluster.
clzc:uainfrazone> create
clzc:uainfrazone> set zonepath=/export/zones/uainfrazone
clzc:uainfrazone>  add node
clzc:uainfrazone:node> set physical-host=UASOL1
clzc:uainfrazone:node> set hostname=uainfrazone1
clzc:uainfrazone:node> add net
clzc:uainfrazone:node:net> set address=192.168.2.101
clzc:uainfrazone:node:net> set physical=e1000g0
clzc:uainfrazone:node:net> end
clzc:uainfrazone:node> end
clzc:uainfrazone> add sysid
clzc:uainfrazone:sysid> set root_password="H/80/NT4F2H7g"
clzc:uainfrazone:sysid> end
clzc:uainfrazone> verify
clzc:uainfrazone> commit
clzc:uainfrazone> exit
UASOL1:#
  • Cluster Name = uainfrazone
  • Zone Path = /export/zones/uainfrazone
  • physical-host = UASOL1 (Where the uainfrazone1 should be configured)
  • set hostname = uainfrazone1 (zone cluster node name)
  • Zone IP Address (Optional)=192.168.2.101


Here , we have just configured one zone on UASOL1 . Clustering make sense when you configure with two or more nodes. So let me create a one more zone on UASOL2 node in same zone cluster.

UASOL1:#clzonecluster configure uainfrazone
clzc:uainfrazone> add node
clzc:uainfrazone:node> set physical-host=UASOL2
clzc:uainfrazone:node> set hostname=uainfrazone2
clzc:uainfrazone:node> add net
clzc:uainfrazone:node:net> set address=192.168.2.103
clzc:uainfrazone:node:net> set physical=e1000g0
clzc:uainfrazone:node:net> end
clzc:uainfrazone:node> end
clzc:uainfrazone> commit
clzc:uainfrazone> info
zonename: uainfrazone
zonepath: /export/zones/uainfrazone
autoboot: true
hostid:
brand: cluster
bootargs:
pool:
limitpriv:
scheduling-class:
ip-type: shared
enable_priv_net: true
inherit-pkg-dir:
        dir: /lib
inherit-pkg-dir:
        dir: /platform
inherit-pkg-dir:
        dir: /sbin
inherit-pkg-dir:
        dir: /usr
sysid:
        root_password: H/80/NT4F2H7g
        name_service: NONE
        nfs4_domain: dynamic
        security_policy: NONE
        system_locale: C
        terminal: xterm
        timezone: Asia/Calcutta
node:
        physical-host: UASOL1
        hostname: uainfrazone1
        net:
                address: 192.168.2.101
                physical: e1000g0
                defrouter not specified
node:
        physical-host: UASOL2
        hostname: uainfrazone2
        net:
                address: 192.168.2.103
                physical: e1000g0
                defrouter not specified
clzc:uainfrazone> exit
  • Cluster Name = uainfrazone
  • Zone Path = /export/zones/uainfrazone
  • physical-host = UASOL2 (Where the uainfrazone2 should be configured)
  • set hostname = uainfrazone2 (zone cluster node name)
  • Zone IP Address (Optional)=192.168.2.103

The encrypted root password is “root123” .   (Zone’s root password.)


5. Verify the zone cluster.

UASOL2:#clzonecluster verify uainfrazone
Waiting for zone verify commands to complete on all the nodes of the zone cluster "uainfrazone"...
UASOL2:#


6. Check the zone cluster status. At this stage zones are in configured status.

UASOL2:#clzonecluster status uainfrazone

=== Zone Clusters ===

--- Zone Cluster Status ---

Name          Node Name   Zone Host Name   Status    Zone Status
----          ---------   --------------   ------    -----------
uainfrazone   UASOL1      uainfrazone1     Offline   Configured
              UASOL2      uainfrazone2     Offline   Configured

UASOL2:#


7. Install the zones using following command.

UASOL2:#clzonecluster install uainfrazone
Waiting for zone install commands to complete on all the nodes of the zone cluster "uainfrazone"...
UASOL2:#
UASOL2:#zoneadm list -cv
  ID NAME             STATUS     PATH                           BRAND    IP
   0 global           running    /                              native   shared
   - uainfrazone      installed  /export/zones/uainfrazone      cluster  shared
UASOL2:#


Here you can see that uainfrazone is created and installed. You should be able to see the same on UASOL1 as well.

UASOL1:#zoneadm list -cv
  ID NAME             STATUS     PATH                           BRAND    IP
   0 global           running    /                              native   shared
   - uainfrazone      installed  /export/zones/uainfrazone      cluster  shared
UASOL1:#

Note: There is no difference if you run a command from UASOL1 or UASOL2 since both are in cluster.


8.Bring up the zones using clzonecluster . (You should not use zoneadm command to boot the zones)

UASOL1:#clzonecluster boot  uainfrazone
Waiting for zone boot commands to complete on all the nodes of the zone cluster "uainfrazone"...
UASOL1:#
UASOL1:#zoneadm list -cv
  ID NAME             STATUS     PATH                           BRAND    IP
   0 global           running    /                              native   shared
   1 uainfrazone      running    /export/zones/uainfrazone      cluster  shared
UASOL1:#


In UASOL2,

UASOL2:#zoneadm list -cv
  ID NAME             STATUS     PATH                           BRAND    IP
   0 global           running    /                              native   shared
   3 uainfrazone      running    /export/zones/uainfrazone      cluster  shared
UASOL2:#


9. Check the zone cluster status.

UASOL1:#clzonecluster status uainfrazone
=== Zone Clusters ===

--- Zone Cluster Status ---
Name          Node Name   Zone Host Name   Status    Zone Status
----          ---------   --------------   ------    -----------
uainfrazone   UASOL1      uainfrazone1     Offline   Running
              UASOL2      uainfrazone2     Offline   Running
UASOL1:#


10. Zones will reboot automatically for sysconfig. You could see that when you access the zone’s console.

UASOL1:#zlogin -C uainfrazone
[Connected to zone 'uainfrazone' console]                                                                                                                         168/168
Creating new rsa public/private host key pair
Creating new dsa public/private host key pair
Configuring network interface addresses: clprivnet0.

rebooting system due to change(s) in /etc/default/init

Apr 10 13:21:47 Cluster.Framework: cl_execd: Going down on signal 15.

[NOTICE: Zone rebooting]

SunOS Release 5.10 Version Generic_147148-26 64-bit
Copyright (c) 1983, 2013, Oracle and/or its affiliates. All rights reserved.
Hostname: uainfrazone1

uainfrazone1 console login:


11. Check the zone cluster status.

UASOL2:#clzonecluster status
=== Zone Clusters ===

--- Zone Cluster Status ---
Name          Node Name   Zone Host Name   Status   Zone Status
----          ---------   --------------   ------   -----------
uainfrazone   UASOL1      uainfrazone1     Online   Running
              UASOL2      uainfrazone2     Online   Running
UASOL2:#


We have successfully configured the two node zone cluster. What’s Next ? You should login to one of the  zone  and configure the resource group and resources.  Just login to any one of the local zone and check the cluster status.

UASOL2:#zlogin uainfrazone
[Connected to zone 'uainfrazone' pts/2]
Last login: Mon Apr 11 01:58:20 on pts/2
Oracle Corporation      SunOS 5.10      Generic Patch   January 2005
# bash
bash-3.2# export PATH=/usr/cluster/bin:$PATH
bash-3.2# clnode status
=== Cluster Nodes ===

--- Node Status ---
Node Name                                       Status
---------                                       ------
uainfrazone1                                    Online
uainfrazone2                                    Online
bash-3.2#

Similar to this , you could create a N-number of zone cluster under the global cluster. These zone cluster uses the host’s private network and other required resources.   In the next article, we will see that how to configure the resource group on local zone.


Hope this article is informative to you.

The post Sun Cluster – How to Configure Zone Cluster on Solaris ? appeared first on UnixArena.


Sun Cluster – Configuring Resource Group in Zone Cluster

$
0
0

This article will walk you through how to configure a resource group in zone cluster. Unlike traditional cluster, resource group and cluster resources are should be created inside the non-global zone. The required physical or logical resources need to be pinned from the global zone using “clzonecluster”  or “clzc” command.  In this article, we will configure HA filesystem and IP  resource on one of the zone cluster which we have created earlier. Adding to that , you can also configure DB or Application resource for HA.

  • Global Cluster Nodes – UASOL1 & UASOL2
  • zone Cluster Nodes  – uainfrazone1 & uainfrazone2


1.Login to one of the global cluster node.

2.Check the cluster status.

Global Cluster:

UASOL2:#clnode status
=== Cluster Nodes ===
--- Node Status ---
Node Name                                       Status
---------                                       ------
UASOL2                                          Online
UASOL1                                          Online

Zone Cluster :

Login to one of the zone and check the cluster status. (extend the command search path to “/usr/cluster/bin”)

UASOL2:#zlogin uainfrazone
[Connected to zone 'uainfrazone' pts/3]
Last login: Mon Apr 11 02:00:17 on pts/2
Oracle Corporation      SunOS 5.10      Generic Patch   January 2005
# bash
bash-3.2# export PATH=/usr/cluster/bin:$PATH
bash-3.2# clnode status
=== Cluster Nodes ===
--- Node Status ---
Node Name                                       Status
---------                                       ------
uainfrazone1                                    Online
uainfrazone2                                    Online
bash-3.2#

Make sure that both the host names are updated on each nodes “/etc/inet/hosts” file.


3. Login to one of the global zone (Global Cluster) and add the IP detail in zone cluster. (IP which needs to highly available)

UASOL2:#clzc configure uainfrazone
clzc:uainfrazone> add net
clzc:uainfrazone:net> set address=192.168.2.102
clzc:uainfrazone:net> info
net:
        address: 192.168.2.102
        physical: auto
        defrouter not specified
clzc:uainfrazone:net> end
clzc:uainfrazone> commit
clzc:uainfrazone> exit


4 . Create the ZFS pool on shared SAN LUN. So that zpool can be exported and imported other cluster nodes.

UASOL2:#zpool create oradbp1 c2t15d0
UASOL2:#zpool list oradbp1
NAME      SIZE  ALLOC   FREE  CAP  HEALTH  ALTROOT
oradbp1  2.95G  78.5K  2.95G   0%  ONLINE  -
UASOL2:#


Just manually export the zpool on UASOL2 & try to import it on UASOL1.

UASOL2:#zpool export oradbp1
UASOL2:#logout
Connection to UASOL2 closed.
UASOL1:#zpool import oradbp1
UASOL1:#zpool list oradbp1
NAME      SIZE  ALLOC   FREE  CAP  HEALTH  ALTROOT
oradbp1  2.95G   133K  2.95G   0%  ONLINE  -
UASOL1:#

It works. Let’s map this zpool to the zone cluster – uainfrazone.


5. In one of the global cluster node , invoke “clzc” to add the zpool.

UASOL1:#clzc configure uainfrazone
clzc:uainfrazone> add dataset
clzc:uainfrazone:dataset> set name=oradbp1
clzc:uainfrazone:dataset> info
dataset:
        name: oradbp1
clzc:uainfrazone:dataset> end
clzc:uainfrazone> commit
clzc:uainfrazone> exit
UASOL1:#

We have successfully added IP address and dataset on the zone cluster configuration. At this point, you are eligible to use these resource under the zone cluster to configure the cluster resources.


Configure Resource group and cluster Resources on Zone Cluster:

1. Add the IP in /etc/hosts  of the zone cluster nodes (uainfrazone1 & uainfrazone2). We will make this IP as highly available through cluster.

bash-3.2# grep ora /etc/hosts
192.168.2.102   oralsn-ip
bash-3.2#


2. In one of the zone cluster node , Create the cluster resource group with name of “oradb-rg”.

bash-3.2# clrg create -n uainfrazone1,uainfrazone2 oradb-rg
bash-3.2# clrg status

=== Cluster Resource Groups ===
Group Name      Node Name         Suspended     Status
----------      ---------         ---------     ------
oradb-rg        uainfrazone1      No            Unmanaged
                uainfrazone2      No            Unmanaged

bash-3.2#


If you want to create the resource group for “uainfrazone” zone cluster from global zone , you can use the following command. (with -Z “zone-cluster” name)

UASOL2:# clrg create -Z uainfrazone -n uainfrazone1,uainfrazone2 oradb-rg
UASOL2:#clrg status -Z uainfrazone

=== Cluster Resource Groups ===

Group Name              Node Name      Suspended   Status
----------              ---------      ---------   ------
uainfrazone:oradb-rg    uainfrazone1   No          Unmanaged
                        uainfrazone2   No          Unmanaged
UASOL2:#


3. Create the cluster IP resource for oralsn-ip . (Refer step 1)

bash-3.2# clrslh create -g oradb-rg -h oralsn-ip oralsn-ip-rs
bash-3.2# clrs status

=== Cluster Resources ===

Resource Name      Node Name        State       Status Message
-------------      ---------        -----       --------------
oralsn-ip-rs       uainfrazone1     Offline     Offline
                   uainfrazone2     Offline     Offline

bash-3.2#


4. Create the ZFS resource for zpool – oradbp1 (which we have created and assigned this zone cluster in first section of the document)

You must register the ZFS resource type prior to adding the resource in cluster.

bash-3.2# clresourcetype register SUNW.HAStoragePlus
bash-3.2#  clrt list
SUNW.LogicalHostname:4
SUNW.SharedAddress:2
SUNW.HAStoragePlus:10
bash-3.2#


Add the dataset in zone cluster to make HA.

bash-3.2#  clrs create -g oradb-rg -t SUNW.HAStoragePlus -p zpools=oradbp1 oradbp1-rs
bash-3.2# clrs status

=== Cluster Resources ===
Resource Name      Node Name        State       Status Message
-------------      ---------        -----       --------------
oradbp1-rs         uainfrazone1     Offline     Offline
                   uainfrazone2     Offline     Offline

oralsn-ip-rs       uainfrazone1     Offline     Offline
                   uainfrazone2     Offline     Offline

bash-3.2#


5. Bring up the resource group online.

bash-3.2# clrg online -eM oradb-rg
bash-3.2# clrs status

=== Cluster Resources ===

Resource Name      Node Name        State       Status Message
-------------      ---------        -----       --------------
oradbp1-rs         uainfrazone1     Online      Online
                   uainfrazone2     Offline     Offline

oralsn-ip-rs       uainfrazone1     Online      Online - LogicalHostname online.
                   uainfrazone2     Offline     Offline

bash-3.2# uname -a
SunOS uainfrazone2 5.10 Generic_147148-26 i86pc i386 i86pc
bash-3.2#


6. Verify the resource status in uainfrazone1.

bash-3.2# clrg status
=== Cluster Resource Groups ===
Group Name      Node Name         Suspended     Status
----------      ---------         ---------     ------
oradb-rg        uainfrazone1      No            Online
                uainfrazone2      No            Offline

bash-3.2# clrs status
=== Cluster Resources ===
Resource Name      Node Name        State       Status Message
-------------      ---------        -----       --------------
oradbp1-rs         uainfrazone1     Online      Online
                   uainfrazone2     Offline     Offline

oralsn-ip-rs       uainfrazone1     Online      Online - LogicalHostname online.
                   uainfrazone2     Offline     Offline
bash-3.2#
bash-3.2# ifconfig -a
lo0:1: flags=2001000849<UP,LOOPBACK,RUNNING,MULTICAST,IPv4,VIRTUAL> mtu 8232 index 1
        zone uainfrazone
        inet 127.0.0.1 netmask ff000000
e1000g0: flags=9000843<UP,BROADCAST,RUNNING,MULTICAST,IPv4,NOFAILOVER> mtu 1500 index 2
        inet 192.168.2.90 netmask ffffff00 broadcast 192.168.2.255
        groupname sc_ipmp0
e1000g0:1: flags=1000843<UP,BROADCAST,RUNNING,MULTICAST,IPv4> mtu 1500 index 2
        zone uainfrazone
        inet 192.168.2.101 netmask ffffff00 broadcast 192.168.2.255
e1000g0:2: flags=1001040843<UP,BROADCAST,RUNNING,MULTICAST,DEPRECATED,IPv4,FIXEDMTU> mtu 1500 index 2
        zone uainfrazone
        inet 192.168.2.102 netmask ffffff00 broadcast 192.168.2.255
clprivnet0: flags=1008843<UP,BROADCAST,RUNNING,MULTICAST,PRIVATE,IPv4> mtu 1500 index 5
        inet 172.16.2.2 netmask ffffff00 broadcast 172.16.2.255
clprivnet0:3: flags=1008843<UP,BROADCAST,RUNNING,MULTICAST,PRIVATE,IPv4> mtu 1500 index 5
        zone uainfrazone
        inet 172.16.3.66 netmask ffffffc0 broadcast 172.16.3.127
bash-3.2# zfs list
NAME      USED  AVAIL  REFER  MOUNTPOINT
oradbp1  86.5K  2.91G    31K  /oradbp1
bash-3.2#

You can see that ZFS dataset “oradbp1” and IP “192.168.2.102” is up on uainfrazone1.


7. Switch the resource group to uainfrazone2 and check the resource status.

bash-3.2# clrg switch -n uainfrazone2 oradb-rg
bash-3.2# clrg status
=== Cluster Resource Groups ===
Group Name      Node Name         Suspended     Status
----------      ---------         ---------     ------
oradb-rg        uainfrazone1      No            Offline
                uainfrazone2      No            Online

bash-3.2# clrs status
=== Cluster Resources ===
Resource Name      Node Name        State       Status Message
-------------      ---------        -----       --------------
oradbp1-rs         uainfrazone1     Offline     Offline
                   uainfrazone2     Online      Online

oralsn-ip-rs       uainfrazone1     Offline     Offline - LogicalHostname offline.
                   uainfrazone2     Online      Online - LogicalHostname online.

bash-3.2#
bash-3.2#


Verify the result from OS level. Login to uainfrazone2 and check the following to confirm the switch over.

bash-3.2# ifconfig -a
lo0:1: flags=2001000849<UP,LOOPBACK,RUNNING,MULTICAST,IPv4,VIRTUAL> mtu 8232 index 1
        zone uainfrazone
        inet 127.0.0.1 netmask ff000000
e1000g0: flags=9000843<UP,BROADCAST,RUNNING,MULTICAST,IPv4,NOFAILOVER> mtu 1500 index 2
        inet 192.168.2.91 netmask ffffff00 broadcast 192.168.2.255
        groupname sc_ipmp0
e1000g0:1: flags=1000843<UP,BROADCAST,RUNNING,MULTICAST,IPv4> mtu 1500 index 2
        zone uainfrazone
        inet 192.168.2.103 netmask ffffff00 broadcast 192.168.2.255
e1000g0:2: flags=1001040843<UP,BROADCAST,RUNNING,MULTICAST,DEPRECATED,IPv4,FIXEDMTU> mtu 1500 index 2
        zone uainfrazone
        inet 192.168.2.102 netmask ffffff00 broadcast 192.168.2.255
clprivnet0: flags=1008843<UP,BROADCAST,RUNNING,MULTICAST,PRIVATE,IPv4> mtu 1500 index 5
        inet 172.16.2.1 netmask ffffff00 broadcast 172.16.2.255
clprivnet0:3: flags=1008843<UP,BROADCAST,RUNNING,MULTICAST,PRIVATE,IPv4> mtu 1500 index 5
        zone uainfrazone
        inet 172.16.3.65 netmask ffffffc0 broadcast 172.16.3.127
bash-3.2# df -h /oradbp1/
Filesystem             size   used  avail capacity  Mounted on
oradbp1                2.9G    31K   2.9G     1%    /oradbp1
bash-3.2# zfs list
NAME      USED  AVAIL  REFER  MOUNTPOINT
oradbp1  86.5K  2.91G    31K  /oradbp1
bash-3.2#


We have successfully configure the Resource group and made ZFS and IP as highly available (HA) on Oracle Solaris zones via zone cluster concept.  Hope this article is informative to you.  In the next article, we will see that how to add/remove/delete nodes from the zones cluster.

The post Sun Cluster – Configuring Resource Group in Zone Cluster appeared first on UnixArena.

Managing Zone Cluster – Oracle Solaris

$
0
0

This article will talk about managing the Zone Cluster on oracle Solaris. The clzonecluster command supports all zone cluster administrative activity, from creation through modification and control to final destruction. The clzonecluster command supports single point of administration, which means that the command can be executed from any node and operates across the entire cluster. The clzonecluster command builds upon the Oracle Solaris zonecfg and zoneadm commands and adds support for cluster features. We will see that how to add/remove cluster nodes,checking the resource status and listing the resources from the global zone.

Each zone cluster has its own notion of membership. The system maintains membership information for zone clusters. Each machine hosts a component, called the Zone Cluster Membership Monitor (ZCMM), that monitors the status of all cluster brand zones on that machine. The ZCMM knows which zones belong to which zone clusters.Naturally, a zone of a zone cluster can only become operational after the global zone on the hosting machine becomes operational. A zone of a zone cluster will not boot when the global zone is not booted in cluster mode. A zone of a zone cluster can be configured to automatically boot after the machine boots, or the administrator can manually control when the zone boots. A zone of a zone cluster can fail or an administrator can manually halt or reboot a zone. All of these events result in the zone cluster automatically updating its membership.


Viewing the cluster status:

1.Check the zone cluster status from global zone.

To check specific zone cluster status,

UASOL1:#clzc status -v uainfrazone
=== Zone Clusters ===
--- Zone Cluster Status ---
Name             Node Name      Zone Host Name      Status      Zone Status
----             ---------      --------------      ------      -----------
uainfrazone      UASOL1         uainfrazone1        Online      Running
                 UASOL2         uainfrazone2        Online      Running
UASOL1:#


To check all the zone cluster status ,

UASOL1:#clzc status -v
=== Zone Clusters ===

--- Zone Cluster Status ---
Name             Node Name      Zone Host Name      Status      Zone Status
----             ---------      --------------      ------      -----------
uainfrazone      UASOL1         uainfrazone1        Online      Running
                 UASOL2         uainfrazone2        Online      Running


2. Check the resource group status of the zone cluster.

UASOL1:#clrg status -Z uainfrazone

=== Cluster Resource Groups ===
Group Name             Node Name      Suspended   Status
----------             ---------      ---------   ------
uainfrazone:oradb-rg   uainfrazone1   No          Online
                       uainfrazone2   No          Offline

UASOL1:#


To check, all the zone cluster’s resource group status from global zone,

UASOL1:#clrg status -Z all

=== Cluster Resource Groups ===

Group Name             Node Name      Suspended   Status
----------             ---------      ---------   ------
uainfrazone:oradb-rg   uainfrazone1   No          Online
                       uainfrazone2   No          Offline

UASOL1:#


3. Let’s check the zone cluster resource from global zone.

For specific cluster,

UASOL1:#clrs status -Z uainfrazone

=== Cluster Resources ===

Resource Name      Node Name        State       Status Message
-------------      ---------        -----       --------------
oradbp1-rs         uainfrazone1     Online      Online
                   uainfrazone2     Offline     Offline

oralsn-ip-rs       uainfrazone1     Online      Online - LogicalHostname online.
                   uainfrazone2     Offline     Offline


For all zone cluster,

UASOL1:#clrs status -Z all
=== Cluster Resources ===
Resource Name      Node Name        State       Status Message
-------------      ---------        -----       --------------
oradbp1-rs         uainfrazone1     Online      Online
                   uainfrazone2     Offline     Offline

oralsn-ip-rs       uainfrazone1     Online      Online - LogicalHostname online.
                   uainfrazone2     Offline     Offline
UASOL1:#


Stop & Start the zone cluster:

1. Login to the global zone and stop the zone cluster “uainfrazone”.

UASOL1:#clzc  halt uainfrazone
Waiting for zone halt commands to complete on all the nodes of the zone cluster "uainfrazone"...
UASOL1:#clzc status -v
=== Zone Clusters ===

--- Zone Cluster Status ---
Name             Node Name      Zone Host Name      Status      Zone Status
----             ---------      --------------      ------      -----------
uainfrazone      UASOL1         uainfrazone1        Offline     Installed
                 UASOL2         uainfrazone2        Offline     Installed

UASOL1:#


2. Start the zone cluster “uainfrazone”.

UASOL1:#clzc boot  uainfrazone
Waiting for zone boot commands to complete on all the nodes of the zone cluster "uainfrazone"...
UASOL1:#clzc status -v
=== Zone Clusters ===

--- Zone Cluster Status ---
Name             Node Name      Zone Host Name      Status      Zone Status
----             ---------      --------------      ------      -----------
uainfrazone      UASOL1         uainfrazone1        Online      Running
                 UASOL2         uainfrazone2        Online      Running
UASOL1:#zoneadm list -cv
  ID NAME             STATUS     PATH                           BRAND    IP
   0 global           running    /                              native   shared
   3 uainfrazone      running    /export/zones/uainfrazone      cluster  shared
UASOL1:#


3. Would you like to reboot the zone cluster ? Use the following command.

UASOL1:#clzc reboot  uainfrazone
Waiting for zone reboot commands to complete on all the nodes of the zone cluster "uainfrazone"...
UASOL1:#clzc status -v
=== Zone Clusters ===

--- Zone Cluster Status ---
Name             Node Name      Zone Host Name      Status      Zone Status
----             ---------      --------------      ------      -----------
uainfrazone      UASOL1         uainfrazone1        Online      Running
                 UASOL2         uainfrazone2        Online      Running
UASOL1:#


How to add new node to the cluster ?

1. We are assuming that  only one zone node is running and planning to add one more node to the zone cluster.

UASOL1:#clzonecluster status oraweb
=== Zone Clusters ===

--- Zone Cluster Status ---
Name      Node Name   Zone Host Name   Status   Zone Status
----      ---------   --------------   ------   -----------
oraweb    UASOL1      oraweb1          Online   Running
UASOL1:#


2. Here the zone cluster is already in operational and running. In an order to add the additional nodes to this cluster , we need to do add the zone configuration in zone cluster. (clzc & clzonecluster are identical commands. You can use any one of them)

UASOL1:#clzonecluster configure oraweb
clzc:oraweb> add node
clzc:oraweb:node> set physical-host=UASOL2
clzc:oraweb:node> set hostname=oraweb2
clzc:oraweb:node> add net
clzc:oraweb:node:net> set physical=e1000g0
clzc:oraweb:node:net> set address=192.168.2.132
clzc:oraweb:node:net> end
clzc:oraweb:node> end
clzc:oraweb> exit
UASOL1:#clzonecluster status oraweb
=== Zone Clusters ===

--- Zone Cluster Status ---
Name     Node Name   Zone Host Name   Status    Zone Status
----     ---------   --------------   ------    -----------
oraweb   UASOL1      oraweb1          Online    Running
         UASOL2      oraweb2          Offline   Configured

UASOL1:#


3. Install the zone cluster node on UASOL2. (-n Physical-Hostname)

UASOL1:#clzonecluster install  -n UASOL2 oraweb
Waiting for zone install commands to complete on all the nodes of the zone cluster "oraweb"...
UASOL1:#clzonecluster status oraweb

=== Zone Clusters ===

--- Zone Cluster Status ---

Name     Node Name   Zone Host Name   Status    Zone Status
----     ---------   --------------   ------    -----------
oraweb   UASOL1      oraweb1          Online    Running
         UASOL2      oraweb2          Offline   Installed

UASOL1:#


4. Boot the zone cluster node “oraweb2” .

UASOL1:#clzonecluster boot -n UASOL2 oraweb
Waiting for zone boot commands to complete on all the nodes of the zone cluster "oraweb"...
UASOL1:#clzonecluster status oraweb

=== Zone Clusters ===

--- Zone Cluster Status ---

Name     Node Name   Zone Host Name   Status    Zone Status
----     ---------   --------------   ------    -----------
oraweb   UASOL1      oraweb1          Online    Running
         UASOL2      oraweb2          Offline   Running

UASOL1:#

The zone status might show as “offline” and it will become online once the sys-config is done (via automatic reboot).


5. Check the zone status after few minutes.

UASOL1:#clzonecluster status oraweb
=== Zone Clusters ===

--- Zone Cluster Status ---
Name      Node Name   Zone Host Name   Status   Zone Status
----      ---------   --------------   ------   -----------
oraweb    UASOL1      oraweb1          Online   Running
          UASOL2      oraweb2          Online   Running
UASOL1:#


How to remove the zone cluster node ?

1. Check the zone cluster status .

UASOL1:#clzonecluster status oraweb
=== Zone Clusters ===

--- Zone Cluster Status ---
Name      Node Name   Zone Host Name   Status   Zone Status
----      ---------   --------------   ------   -----------
oraweb    UASOL1      oraweb1          Online   Running
          UASOL2      oraweb2          Online   Running
UASOL1:#


2. Stop the zone cluster node which needs to be decommissioned.

UASOL1:#clzonecluster halt -n UASOL1 oraweb
Waiting for zone halt commands to complete on all the nodes of the zone cluster "oraweb"...
UASOL1:#


3. Un-install the zone .

UASOL1:#clzonecluster uninstall  -n UASOL1 oraweb
Are you sure you want to uninstall zone cluster oraweb (y/[n])?y
Waiting for zone uninstall commands to complete on all the nodes of the zone cluster "oraweb"...
UASOL1:#clzonecluster status oraweb
=== Zone Clusters ===

--- Zone Cluster Status ---
Name     Node Name   Zone Host Name   Status    Zone Status
----     ---------   --------------   ------    -----------
oraweb   UASOL1      oraweb1          Offline   Configured
         UASOL2      oraweb2          Online    Running

UASOL1:#


4. Remove the zone configuration from cluster.

UASOL1:#clzonecluster configure  oraweb
clzc:oraweb> remove node physical-host=UASOL1
clzc:oraweb> exit
UASOL1:#clzonecluster status oraweb
=== Zone Clusters ===

--- Zone Cluster Status ---
Name      Node Name   Zone Host Name   Status   Zone Status
----      ---------   --------------   ------   -----------
oraweb    UASOL2      oraweb2          Online   Running
UASOL1:#


clzc or clzonecluster Man help:

UASOL1:#clzc --help
Usage:    clzc  [] [+ |  ...]
          clzc [] -? | --help
          clzc -V | --version

Manage zone clusters for Oracle Solaris Cluster

SUBCOMMANDS:

boot           Boot zone clusters
clone          Clone a zone cluster
configure      Configure a zone cluster
delete         Delete a zone cluster
export         Export a zone cluster configuration
halt           Halt zone clusters
install        Install a zone cluster
list           List zone clusters
move           Move a zone cluster
ready          Ready zone clusters
reboot         Reboot zone clusters
set            Set zone cluster properties
show           Show zone clusters
show-rev       Show release version on zone cluster nodes
status         Status of zone clusters
uninstall      Uninstall a zone cluster
verify         Verify zone clusters

UASOL1:#clzonecluster --help
Usage:    clzonecluster  [] [+ |  ...]
          clzonecluster [] -? | --help
          clzonecluster -V | --version

Manage zone clusters for Oracle Solaris Cluster

SUBCOMMANDS:

boot           Boot zone clusters
clone          Clone a zone cluster
configure      Configure a zone cluster
delete         Delete a zone cluster
export         Export a zone cluster configuration
halt           Halt zone clusters
install        Install a zone cluster
list           List zone clusters
move           Move a zone cluster
ready          Ready zone clusters
reboot         Reboot zone clusters
set            Set zone cluster properties
show           Show zone clusters
show-rev       Show release version on zone cluster nodes
status         Status of zone clusters
uninstall      Uninstall a zone cluster
verify         Verify zone clusters

UASOL1:#


Hope this article is informative to you . Share it ! Comment it !! Be Sociable !!!.

The post Managing Zone Cluster – Oracle Solaris appeared first on UnixArena.

Deploying Openstack on Redhat – Packstack Method (Mitaka)

$
0
0

This article will help you to setup Openstack private cloud on Redhat Enterprise Linux. In this method , I will demonstrate that how to setup openstack environment using packstack. There are many companies are evaluating openstack on their test environments and some people are trying make a proof of concept. Openstack is not just a small piece of software to evaluate in one day. It’s a solid solution which integrates multiple components to offer the private cloud.  Like devstack , Redhat has sponsored project called RDO who develops and support series of openstack deployment scripts which named  as “Packstack”. Packstack uses Puppet client to install and configure the openstack packages to simply the deployment. Packstack method should not be used for production environment. 

Since Redhat bought Ansible tower, I am doubting about the packstack’s future. Redhat has already started the project called TripleO Quickstack for openstack deployment using Ansible in the back-end.

System Requirements :

  • Redhat Enterprise Linux 7.x
  • CPU – VT Enabled Processor
  • Memory – 6 GB
  • Disk Space – 30GB Free
  • Internet Connectivity  to install packages from Repositories.


1.Login  to REHL 7.x server (RHEL 7.2) and disable SELINUX.

[root@rhelopenpack mariadb]# getenforce
Enforcing
[root@rhelopenpack mariadb]#
[root@rhelopenpack mariadb]# setenforce 0
[root@rhelopenpack mariadb]#
[root@rhelopenpack mariadb]# grep  SELINUX /etc/selinux/config
SELINUX=disabled


If you didn’t disable SELINUX, you might error like below while running “packstack –allinone” (During MariaDB/MYSQL setup).
“InnoDB: Error: unable to create temporary file; errno: 13” .
At the same double check the “/tmp” permission as well.

[root@rhelopenpack mariadb]# ls -ld /tmp
drwxrwxrwt. 2 root root 40 May 30 07:02 /tmp
[root@rhelopenpack mariadb]#


2. Here is my system configuration.

##############################REDHAT VERSION###################################
[root@rhelopenpack ~]# cat /etc/redhat-release
Red Hat Enterprise Linux Server release 7.2 (Maipo)
[root@rhelopenpack ~]# uname -a
Linux rhelopenpack 3.10.0-327.el7.x86_64 #1 SMP Thu Oct 29 17:29:29 EDT 2015 x86_64 x86_64 x86_64 GNU/Linux
[root@rhelopenpack ~]#

#########################MEMORY & CPU################
[root@rhelopenpack ~]# free -g
              total        used        free      shared  buff/cache   available
Mem:              7           0           6           0           1           7
Swap:             3           0           3
[root@rhelopenpack ~]# lscpu
Architecture:          x86_64
CPU op-mode(s):        32-bit, 64-bit
Byte Order:            Little Endian
CPU(s):                1
On-line CPU(s) list:   0
Thread(s) per core:    1
Core(s) per socket:    1
Socket(s):             1
NUMA node(s):          1
Vendor ID:             GenuineIntel
CPU family:            6
Model:                 58
Model name:            Intel(R) Pentium(R) CPU G2020 @ 2.90GHz
Stepping:              9
CPU MHz:               2893.449
BogoMIPS:              5786.89
Hypervisor vendor:     VMware
Virtualization type:   full
L1d cache:             32K
L1i cache:             32K
L2 cache:              256K
L3 cache:              3072K
NUMA node0 CPU(s):     0
[root@rhelopenpack ~]#

##################STATIC IP CONFIG##################
[root@rhelopenpack ~]# ifconfig eno16777736
eno16777736: flags=4163<UP,BROADCAST,RUNNING,MULTICAST>  mtu 1500
        inet 192.168.2.210  netmask 255.255.255.0  broadcast 192.168.2.255
        inet6 fe80::20c:29ff:fe72:9d84  prefixlen 64  scopeid 0x20
        ether 00:0c:29:72:9d:84  txqueuelen 1000  (Ethernet)
        RX packets 63464  bytes 87395759 (83.3 MiB)
        RX errors 0  dropped 0  overruns 0  frame 0
        TX packets 37114  bytes 2713180 (2.5 MiB)
        TX errors 0  dropped 0 overruns 0  carrier 0  collisions 0

[root@rhelopenpack ~]#

#############MY LOCAL REPO###################
[root@rhelopenpack ~]# cat /etc/yum.repos.d/redhat7.repo
[redhat7]
name=DVD ISO
baseurl=file:///rhel-repo
enabled=1
gpgcheck=0
#gpgkey=file:///mnt/RPM-GPG-KEY-CentOS-6
[root@rhelopenpack ~]# df -h /rhel-repo
Filesystem      Size  Used Avail Use% Mounted on
/dev/sr0        3.8G  3.8G     0 100% /rhel-repo
[root@rhelopenpack ~]#


3.Choose the Openstack release.

Openstack Release RDO rpm Path
Kilo https://repos.fedorapeople.org/repos/openstack/openstack-kilo/rdo-release-kilo-2.noarch.rpm
Liberty https://repos.fedorapeople.org/repos/openstack/openstack-liberty/rdo-release-liberty-3.noarch.rpm
mitaka https://repos.fedorapeople.org/repos/openstack/openstack-mitaka/rdo-release-mitaka-3.noarch.rpm

4. Install the mitaka RDO rpm .

[root@rhelopenpack ~]# yum install -y https://repos.fedorapeople.org/repos/openstack/openstack-mitaka/rdo-release-mitaka-3.noarch.rpm
Loaded plugins: langpacks, product-id, search-disabled-repos, subscription-manager
This system is not registered to Red Hat Subscription Management. You can use subscription-manager to register.
Examining rdo-release.rpm: rdo-release-mitaka-2.noarch
Marking rdo-release.rpm to be installed
Resolving Dependencies
--> Running transaction check
---> Package rdo-release.noarch 0:mitaka-2 will be installed
--> Finished Dependency Resolution
redhat7                                                                                                                                       | 4.1 kB  00:00:00
redhat7/group_gz                                                                                                                              | 136 kB  00:00:00
redhat7/primary_db                                                                                                                            | 3.6 MB  00:00:00

Dependencies Resolved
==========================================================================================================
 Package             Arch                   Version                Repository               Size
==========================================================================================================
Installing:
 rdo-release                              noarch                              mitaka-2                               /rdo-release                              1.4 k
Transaction Summary
===========================================================================================================
Install  1 Package
Total size: 1.4 k
Installed size: 1.4 k
Downloading packages:
Running transaction check
Running transaction test
Transaction test succeeded
Running transaction
  Installing : rdo-release-mitaka-2.noarch                                                                                                                       1/1
redhat7/productid                                                                                                                             | 1.6 kB  00:00:00
  Verifying  : rdo-release-mitaka-2.noarch                                                                                                                       1/1

Installed:
  rdo-release.noarch 0:mitaka-2

Complete!
[root@rhelopenpack ~]#


5. Install python dependencies .

[root@rhelopenpack ~]# yum install -y ftp://195.220.108.108/linux/centos/7.2.1511/os/x86_64/Packages/python-docutils-0.11-0.2.20130715svn7687.el7.noarch.rpm
[root@rhelopenpack ~]# yum install -y ftp://195.220.108.108/linux/centos/7.2.1511/extras/x86_64/Packages/python-markdown-2.4.1-1.el7.centos.noarch.rpm
[root@rhelopenpack ~]# yum install -y ftp://195.220.108.108/linux/centos/7.2.1511/extras/x86_64/Packages/python-cheetah-2.4.4-5.el7.centos.x86_64.rpm
[root@rhelopenpack ~]# yum install -y http://mirror.centos.org/centos/7/extras/x86_64/Packages/python-werkzeug-0.9.1-2.el7.noarch.rpm
[root@rhelopenpack ~]# yum install -y ftp://195.220.108.108/linux/centos/7.2.1511/os/x86_64/Packages/dnsmasq-utils-2.66-14.el7_1.x86_64.rpm
[root@rhelopenpack ~]# yum install -y ftp://ftp.muug.mb.ca/mirror/centos/7.2.1511/os/x86_64/Packages/python-webtest-1.3.4-6.el7.noarch.rpm
[root@rhelopenpack ~]# yum install -y ftp://195.220.108.108/linux/centos/7.2.1511/os/x86_64/Packages/libxslt-python-1.1.28-5.el7.x86_64.rpm
[root@rhelopenpack ~]# yum install -y ftp://195.220.108.108/linux/centos/7.2.1511/extras/x86_64/Packages/python-flask-0.10.1-4.el7.noarch.rpm^C
[root@rhelopenpack ~]# yum install -y ftp://195.220.108.108/linux/centos/7.2.1511/extras/x86_64/Packages/python-itsdangerous-0.23-2.el7.noarch.rpm
[root@rhelopenpack ~]#
[root@rhelopenpack ~]# yum install -y ftp://195.220.108.108/linux/centos/7.2.1511/os/x86_64/Packages/python-zope-interface-4.0.5-4.el7.x86_64.rpm


6. Install the packstack installer packages.

[root@rhelopenpack ~]# yum install -y openstack-packstack
Loaded plugins: langpacks, product-id, search-disabled-repos, subscription-manager
This system is not registered to Red Hat Subscription Management. You can use subscription-manager to register.
Resolving Dependencies
--> Running transaction check
---> Package openstack-packstack.noarch 0:8.0.0-1.el7 will be installed
--> Processing Dependency: openstack-packstack-puppet = 8.0.0-1.el7 for package: openstack-packstack-8.0.0-1.el7.noarch
--> Processing Dependency: openstack-puppet-modules >= 2014.2.10 for package: openstack-packstack-8.0.0-1.el7.noarch
--> Processing Dependency: python-netaddr for package: openstack-packstack-8.0.0-1.el7.noarch
--> Processing Dependency: PyYAML for package: openstack-packstack-8.0.0-1.el7.noarch
--> Running transaction check
---> Package PyYAML.x86_64 0:3.10-11.el7 will be installed
--> Processing Dependency: libyaml-0.so.2()(64bit) for package: PyYAML-3.10-11.el7.x86_64
---> Package openstack-packstack-puppet.noarch 0:8.0.0-1.el7 will be installed
---> Package openstack-puppet-modules.noarch 1:8.0.4-1.el7 will be installed
--> Processing Dependency: rubygem-json for package: 1:openstack-puppet-modules-8.0.4-1.el7.noarch
---> Package python-netaddr.noarch 0:0.7.18-1.el7 will be installed
--> Running transaction check
---> Package libyaml.x86_64 0:0.1.4-11.el7_0 will be installed
---> Package rubygem-json.x86_64 0:1.7.7-25.el7_1 will be installed
--> Processing Dependency: ruby(rubygems) >= 2.0.14 for package: rubygem-json-1.7.7-25.el7_1.x86_64
--> Processing Dependency: ruby(release) for package: rubygem-json-1.7.7-25.el7_1.x86_64
--> Processing Dependency: libruby.so.2.0()(64bit) for package: rubygem-json-1.7.7-25.el7_1.x86_64
--> Running transaction check
---> Package ruby-libs.x86_64 0:2.0.0.598-25.el7_1 will be installed
---> Package rubygems.noarch 0:2.0.14-25.el7_1 will be installed
--> Processing Dependency: rubygem(io-console) >= 0.4.2 for package: rubygems-2.0.14-25.el7_1.noarch
--> Processing Dependency: rubygem(psych) >= 2.0.0 for package: rubygems-2.0.14-25.el7_1.noarch
--> Processing Dependency: rubygem(rdoc) >= 4.0.0 for package: rubygems-2.0.14-25.el7_1.noarch
--> Processing Dependency: /usr/bin/ruby for package: rubygems-2.0.14-25.el7_1.noarch
--> Running transaction check
---> Package ruby.x86_64 0:2.0.0.598-25.el7_1 will be installed
--> Processing Dependency: rubygem(bigdecimal) >= 1.2.0 for package: ruby-2.0.0.598-25.el7_1.x86_64
---> Package rubygem-io-console.x86_64 0:0.4.2-25.el7_1 will be installed
---> Package rubygem-psych.x86_64 0:2.0.0-25.el7_1 will be installed
---> Package rubygem-rdoc.noarch 0:4.0.0-25.el7_1 will be installed
--> Processing Dependency: ruby(irb) = 2.0.0.598 for package: rubygem-rdoc-4.0.0-25.el7_1.noarch
--> Running transaction check
---> Package ruby-irb.noarch 0:2.0.0.598-25.el7_1 will be installed
---> Package rubygem-bigdecimal.x86_64 0:1.2.0-25.el7_1 will be installed
--> Finished Dependency Resolution

Dependencies Resolved

====================================================================================================================
 Package                              Arch             Version                      Repository                  Size
====================================================================================================================
Installing:
 openstack-packstack                  noarch           8.0.0-1.el7                  openstack-mitaka           242 k
Installing for dependencies:
 PyYAML                               x86_64           3.10-11.el7                  redhat7                    153 k
 libyaml                              x86_64           0.1.4-11.el7_0               redhat7                     55 k
 openstack-packstack-puppet           noarch           8.0.0-1.el7                  openstack-mitaka            17 k
 openstack-puppet-modules             noarch           1:8.0.4-1.el7                openstack-mitaka           3.1 M
 python-netaddr                       noarch           0.7.18-1.el7                 openstack-mitaka           1.3 M
 ruby                                 x86_64           2.0.0.598-25.el7_1           redhat7                     67 k
 ruby-irb                             noarch           2.0.0.598-25.el7_1           redhat7                     88 k
 ruby-libs                            x86_64           2.0.0.598-25.el7_1           redhat7                    2.8 M
 rubygem-bigdecimal                   x86_64           1.2.0-25.el7_1               redhat7                     79 k
 rubygem-io-console                   x86_64           0.4.2-25.el7_1               redhat7                     50 k
 rubygem-json                         x86_64           1.7.7-25.el7_1               redhat7                     75 k
 rubygem-psych                        x86_64           2.0.0-25.el7_1               redhat7                     77 k
 rubygem-rdoc                         noarch           4.0.0-25.el7_1               redhat7                    318 k
 rubygems                             noarch           2.0.14-25.el7_1              redhat7                    212 k

Transaction Summary
======================================================================================================================
Install  1 Package (+14 Dependent packages)

Total download size: 8.6 M
Installed size: 33 M
Downloading packages:
warning: /var/cache/yum/x86_64/7Server/openstack-mitaka/packages/openstack-packstack-puppet-8.0.0-1.el7.noarch.rpm: Header V4 RSA/SHA1 Signature, key ID 764429e6: NOKEY
Public key for openstack-packstack-puppet-8.0.0-1.el7.noarch.rpm is not installed
(1/4): openstack-packstack-puppet-8.0.0-1.el7.noarch.rpm                                                  |  17 kB  00:00:01
(2/4): openstack-packstack-8.0.0-1.el7.noarch.rpm                                             | 242 kB  00:00:01
(3/4): python-netaddr-0.7.18-1.el7.noarch.rpm                                                 | 1.3 MB  00:00:01
(4/4): openstack-puppet-modules-8.0.4-1.el7.noarch.rpm                                                    | 3.1 MB  00:00:07
---------------------------------------------------------------------------------------------------------------------------------------------------------------------
Total                                                                    994 kB/s | 8.6 MB  00:00:08
Retrieving key from file:///etc/pki/rpm-gpg/RPM-GPG-KEY-CentOS-SIG-Cloud
Importing GPG key 0x764429E6:
 Userid     : "CentOS Cloud SIG (http://wiki.centos.org/SpecialInterestGroup/Cloud) <security@centos.org>"
 Fingerprint: 736a f511 6d9c 40e2 af6b 074b f9b9 fee7 7644 29e6
 Package    : rdo-release-mitaka-2.noarch (@/rdo-release)
 From       : /etc/pki/rpm-gpg/RPM-GPG-KEY-CentOS-SIG-Cloud
Running transaction check
Running transaction test
Transaction test succeeded
Running transaction
  Installing : ruby-libs-2.0.0.598-25.el7_1.x86_64                                                  1/15
  Installing : libyaml-0.1.4-11.el7_0.x86_64                                                        2/15
  Installing : ruby-irb-2.0.0.598-25.el7_1.noarch                                                   3/15
  Installing : ruby-2.0.0.598-25.el7_1.x86_64                                                       4/15
  Installing : rubygem-bigdecimal-1.2.0-25.el7_1.x86_64                                             5/15
  Installing : rubygem-io-console-0.4.2-25.el7_1.x86_64                                             6/15
  Installing : rubygem-rdoc-4.0.0-25.el7_1.noarch                                                   7/15
  Installing : rubygem-json-1.7.7-25.el7_1.x86_64                                                   8/15
  Installing : rubygems-2.0.14-25.el7_1.noarch                                                      9/15
  Installing : rubygem-psych-2.0.0-25.el7_1.x86_64                                                  10/15
  Installing : 1:openstack-puppet-modules-8.0.4-1.el7.noarch                                        11/15
  Installing : PyYAML-3.10-11.el7.x86_64                                                            12/15
  Installing : openstack-packstack-puppet-8.0.0-1.el7.noarch                                        13/15
  Installing : python-netaddr-0.7.18-1.el7.noarch                                                   14/15
  Installing : openstack-packstack-8.0.0-1.el7.noarch                                               15/15
  Verifying  : libyaml-0.1.4-11.el7_0.x86_64                                                        1/15
  Verifying  : openstack-packstack-8.0.0-1.el7.noarch                                               2/15
  Verifying  : rubygem-rdoc-4.0.0-25.el7_1.noarch                                                   3/15
  Verifying  : rubygems-2.0.14-25.el7_1.noarch                                                      4/15
  Verifying  : rubygem-psych-2.0.0-25.el7_1.x86_64                                                  5/15
  Verifying  : python-netaddr-0.7.18-1.el7.noarch                                                   6/15
  Verifying  : ruby-2.0.0.598-25.el7_1.x86_64                                                       7/15
  Verifying  : rubygem-bigdecimal-1.2.0-25.el7_1.x86_64                                             8/15
  Verifying  : 1:openstack-puppet-modules-8.0.4-1.el7.noarch                                        9/15
  Verifying  : rubygem-io-console-0.4.2-25.el7_1.x86_64                                             10/15
  Verifying  : rubygem-json-1.7.7-25.el7_1.x86_64                                                   11/15
  Verifying  : PyYAML-3.10-11.el7.x86_64                                                            12/15
  Verifying  : ruby-libs-2.0.0.598-25.el7_1.x86_64                                                  13/15
  Verifying  : openstack-packstack-puppet-8.0.0-1.el7.noarch                                        14/15
  Verifying  : ruby-irb-2.0.0.598-25.el7_1.noarch                                                   15/15

Installed:
  openstack-packstack.noarch 0:8.0.0-1.el7

Dependency Installed:
  PyYAML.x86_64 0:3.10-11.el7                 libyaml.x86_64 0:0.1.4-11.el7_0                 openstack-packstack-puppet.noarch 0:8.0.0-1.el7
  openstack-puppet-modules.noarch 1:8.0.4-1.el7           python-netaddr.noarch 0:0.7.18-1.el7            ruby.x86_64 0:2.0.0.598-25.el7_1
  ruby-irb.noarch 0:2.0.0.598-25.el7_1                    ruby-libs.x86_64 0:2.0.0.598-25.el7_1           rubygem-bigdecimal.x86_64 0:1.2.0-25.el7_1
  rubygem-io-console.x86_64 0:0.4.2-25.el7_1              rubygem-json.x86_64 0:1.7.7-25.el7_1            rubygem-psych.x86_64 0:2.0.0-25.el7_1
  rubygem-rdoc.noarch 0:4.0.0-25.el7_1                    rubygems.noarch 0:2.0.14-25.el7_1

Complete!
[root@rhelopenpack ~]#


7. Let’s start packstack to install and configure openstack on Redhat Enterprise Linux 7.2 .

[root@rhelopenpack ~]#  packstack --allinone
Welcome to the Packstack setup utility

The installation log file is available at: /var/tmp/packstack/20160530-061203-4Z6ly5/openstack-setup.log
Packstack changed given value  to required value /root/.ssh/id_rsa.pub

Installing:
Clean Up                                             [ DONE ]
Discovering ip protocol version                      [ DONE ]
Setting up ssh keys                                  [ DONE ]
Preparing servers                                    [ DONE ]
Pre installing Puppet and discovering hosts' details [ DONE ]
Adding pre install manifest entries                  [ DONE ]
Setting up CACERT                                    [ DONE ]
Adding AMQP manifest entries                         [ DONE ]
Adding MariaDB manifest entries                      [ DONE ]
Adding Apache manifest entries                       [ DONE ]
Fixing Keystone LDAP config parameters to be undef if empty[ DONE ]
Adding Keystone manifest entries                     [ DONE ]
Adding Glance Keystone manifest entries              [ DONE ]
Adding Glance manifest entries                       [ DONE ]
Adding Cinder Keystone manifest entries              [ DONE ]
Checking if the Cinder server has a cinder-volumes vg[ DONE ]
Adding Cinder manifest entries                       [ DONE ]
Adding Nova API manifest entries                     [ DONE ]
Adding Nova Keystone manifest entries                [ DONE ]
Adding Nova Cert manifest entries                    [ DONE ]
Adding Nova Conductor manifest entries               [ DONE ]
Creating ssh keys for Nova migration                 [ DONE ]
Gathering ssh host keys for Nova migration           [ DONE ]
Adding Nova Compute manifest entries                 [ DONE ]
Adding Nova Scheduler manifest entries               [ DONE ]
Adding Nova VNC Proxy manifest entries               [ DONE ]
Adding OpenStack Network-related Nova manifest entries[ DONE ]
Adding Nova Common manifest entries                  [ DONE ]
Adding Neutron VPNaaS Agent manifest entries         [ DONE ]
Adding Neutron FWaaS Agent manifest entries          [ DONE ]
Adding Neutron LBaaS Agent manifest entries          [ DONE ]
Adding Neutron API manifest entries                  [ DONE ]
Adding Neutron Keystone manifest entries             [ DONE ]
Adding Neutron L3 manifest entries                   [ DONE ]
Adding Neutron L2 Agent manifest entries             [ DONE ]
Adding Neutron DHCP Agent manifest entries           [ DONE ]
Adding Neutron Metering Agent manifest entries       [ DONE ]
Adding Neutron Metadata Agent manifest entries       [ DONE ]
Adding Neutron SR-IOV Switch Agent manifest entries  [ DONE ]
Checking if NetworkManager is enabled and running    [ DONE ]
Adding OpenStack Client manifest entries             [ DONE ]
Adding Horizon manifest entries                      [ DONE ]
Adding Swift Keystone manifest entries               [ DONE ]
Adding Swift builder manifest entries                [ DONE ]
Adding Swift proxy manifest entries                  [ DONE ]
Adding Swift storage manifest entries                [ DONE ]
Adding Swift common manifest entries                 [ DONE ]
Adding Provisioning manifest entries                 [ DONE ]
Adding Provisioning Glance manifest entries          [ DONE ]
Adding Provisioning Demo bridge manifest entries     [ DONE ]
Adding Gnocchi manifest entries                      [ DONE ]
Adding Gnocchi Keystone manifest entries             [ DONE ]
Adding MongoDB manifest entries                      [ DONE ]
Adding Redis manifest entries                        [ DONE ]
Adding Ceilometer manifest entries                   [ DONE ]
Adding Ceilometer Keystone manifest entries          [ DONE ]
Adding Aodh manifest entries                         [ DONE ]
Adding Aodh Keystone manifest entries                [ DONE ]
Adding Nagios server manifest entries                [ DONE ]
Adding Nagios host manifest entries                  [ DONE ]
Copying Puppet modules and manifests                 [ DONE ]
Applying 192.168.2.210_prescript.pp
192.168.2.210_prescript.pp:                          [ DONE ]
Applying 192.168.2.210_amqp.pp
Applying 192.168.2.210_mariadb.pp
192.168.2.210_amqp.pp:                               [ DONE ]
192.168.2.210_mariadb.pp:                         [ ERROR ]
Applying Puppet manifests                         [ ERROR ]

ERROR : Error appeared during Puppet run: 192.168.2.210_mariadb.pp
Error: Could not set 'running' on ensure: undefined method `strip' for nil:NilClass at 35:/var/tmp/packstack/7d26de69d45040919acba1d44b7d4946/modules/mysql/manifests/server/service.pp
You will find full trace in log /var/tmp/packstack/20160530-061203-4Z6ly5/manifests/192.168.2.210_mariadb.pp.log
Please check log file /var/tmp/packstack/20160530-061203-4Z6ly5/openstack-setup.log for more information
Additional information:
 * A new answerfile was created in: /root/packstack-answers-20160530-061204.txt
 * Time synchronization installation was skipped. Please note that unsynchronized time on server instances might be problem for some OpenStack components.
 * Warning: NetworkManager is active on 192.168.2.210. OpenStack networking currently does not work on systems that have the Network Manager service enabled.
 * File /root/keystonerc_admin has been created on OpenStack client host 192.168.2.210. To use the command line tools you need to source the file.
 * To access the OpenStack Dashboard browse to http://192.168.2.210/dashboard .
Please, find your login credentials stored in the keystonerc_admin in your home directory.
 * To use Nagios, browse to http://192.168.2.210/nagios username: nagiosadmin, password: 4f9fd2d32b244f8e
[root@rhelopenpack ~]#

Oops!!! We got an error during the setup. I have gone through the trace log file and found that there was write error for mariadb. I have fixed the issue by disabling SELINUX. There is no clean up required since it’s uses the puppet client. You can just re-execute the setup command.


The clean deployment will looks something like below.

[root@rhelopenpack ~]#  packstack --allinone
Welcome to the Packstack setup utility

The installation log file is available at: /var/tmp/packstack/20160530-090407-689htX/openstack-setup.log

Installing:
Clean Up                                             [ DONE ]
Discovering ip protocol version                      [ DONE ]
Setting up ssh keys                                  [ DONE ]
Preparing servers                                    [ DONE ]
Pre installing Puppet and discovering hosts' details [ DONE ]
Adding pre install manifest entries                  [ DONE ]
Setting up CACERT                                    [ DONE ]
Adding AMQP manifest entries                         [ DONE ]
Adding MariaDB manifest entries                      [ DONE ]
Adding Apache manifest entries                       [ DONE ]
Fixing Keystone LDAP config parameters to be undef if empty[ DONE ]
Adding Keystone manifest entries                     [ DONE ]
Adding Glance Keystone manifest entries              [ DONE ]
Adding Glance manifest entries                       [ DONE ]
Adding Cinder Keystone manifest entries              [ DONE ]
Checking if the Cinder server has a cinder-volumes vg[ DONE ]
Adding Cinder manifest entries                       [ DONE ]
Adding Nova API manifest entries                     [ DONE ]
Adding Nova Keystone manifest entries                [ DONE ]
Adding Nova Cert manifest entries                    [ DONE ]
Adding Nova Conductor manifest entries               [ DONE ]
Creating ssh keys for Nova migration                 [ DONE ]
Gathering ssh host keys for Nova migration           [ DONE ]
Adding Nova Compute manifest entries                 [ DONE ]
Adding Nova Scheduler manifest entries               [ DONE ]
Adding Nova VNC Proxy manifest entries               [ DONE ]
Adding OpenStack Network-related Nova manifest entries[ DONE ]
Adding Nova Common manifest entries                  [ DONE ]
Adding Neutron VPNaaS Agent manifest entries         [ DONE ]
Adding Neutron FWaaS Agent manifest entries          [ DONE ]
Adding Neutron LBaaS Agent manifest entries          [ DONE ]
Adding Neutron API manifest entries                  [ DONE ]
Adding Neutron Keystone manifest entries             [ DONE ]
Adding Neutron L3 manifest entries                   [ DONE ]
Adding Neutron L2 Agent manifest entries             [ DONE ]
Adding Neutron DHCP Agent manifest entries           [ DONE ]
Adding Neutron Metering Agent manifest entries       [ DONE ]
Adding Neutron Metadata Agent manifest entries       [ DONE ]
Adding Neutron SR-IOV Switch Agent manifest entries  [ DONE ]
Checking if NetworkManager is enabled and running    [ DONE ]
Adding OpenStack Client manifest entries             [ DONE ]
Adding Horizon manifest entries                      [ DONE ]
Adding Swift Keystone manifest entries               [ DONE ]
Adding Swift builder manifest entries                [ DONE ]
Adding Swift proxy manifest entries                  [ DONE ]
Adding Swift storage manifest entries                [ DONE ]
Adding Swift common manifest entries                 [ DONE ]
Adding Provisioning manifest entries                 [ DONE ]
Adding Provisioning Glance manifest entries          [ DONE ]
Adding Provisioning Demo bridge manifest entries     [ DONE ]
Adding Gnocchi manifest entries                      [ DONE ]
Adding Gnocchi Keystone manifest entries             [ DONE ]
Adding MongoDB manifest entries                      [ DONE ]
Adding Redis manifest entries                        [ DONE ]
Adding Ceilometer manifest entries                   [ DONE ]
Adding Ceilometer Keystone manifest entries          [ DONE ]
Adding Aodh manifest entries                         [ DONE ]
Adding Aodh Keystone manifest entries                [ DONE ]
Adding Nagios server manifest entries                [ DONE ]
Adding Nagios host manifest entries                  [ DONE ]
Copying Puppet modules and manifests                 [ DONE ]
Applying 192.168.2.210_prescript.pp
192.168.2.210_prescript.pp:                          [ DONE ]
Applying 192.168.2.210_amqp.pp
Applying 192.168.2.210_mariadb.pp
192.168.2.210_amqp.pp:                               [ DONE ]
192.168.2.210_mariadb.pp:                            [ DONE ]
Applying 192.168.2.210_apache.pp
192.168.2.210_apache.pp:                             [ DONE ]
Applying 192.168.2.210_keystone.pp
Applying 192.168.2.210_glance.pp
Applying 192.168.2.210_cinder.pp
192.168.2.210_keystone.pp:                           [ DONE ]
192.168.2.210_glance.pp:                             [ DONE ]
192.168.2.210_cinder.pp:                             [ DONE ]
Applying 192.168.2.210_api_nova.pp
192.168.2.210_api_nova.pp:                           [ DONE ]
Applying 192.168.2.210_nova.pp
192.168.2.210_nova.pp:                               [ DONE ]
Applying 192.168.2.210_neutron.pp
192.168.2.210_neutron.pp:                            [ DONE ]
Applying 192.168.2.210_osclient.pp
Applying 192.168.2.210_horizon.pp
192.168.2.210_osclient.pp:                           [ DONE ]
192.168.2.210_horizon.pp:                            [ DONE ]
Applying 192.168.2.210_ring_swift.pp
192.168.2.210_ring_swift.pp:                         [ DONE ]
Applying 192.168.2.210_swift.pp
192.168.2.210_swift.pp:                              [ DONE ]
Applying 192.168.2.210_provision.pp
Applying 192.168.2.210_provision_glance
192.168.2.210_provision.pp:                          [ DONE ]
192.168.2.210_provision_glance:                      [ DONE ]
Applying 192.168.2.210_provision_bridge.pp
192.168.2.210_provision_bridge.pp:                   [ DONE ]
Applying 192.168.2.210_gnocchi.pp
192.168.2.210_gnocchi.pp:                            [ DONE ]
Applying 192.168.2.210_mongodb.pp
Applying 192.168.2.210_redis.pp
192.168.2.210_mongodb.pp:                            [ DONE ]
192.168.2.210_redis.pp:                              [ DONE ]
Applying 192.168.2.210_ceilometer.pp
192.168.2.210_ceilometer.pp:                         [ DONE ]
Applying 192.168.2.210_aodh.pp
192.168.2.210_aodh.pp:                               [ DONE ]
Applying 192.168.2.210_nagios.pp
Applying 192.168.2.210_nagios_nrpe.pp
192.168.2.210_nagios.pp:                             [ DONE ]
192.168.2.210_nagios_nrpe.pp:                        [ DONE ]
Applying Puppet manifests                            [ DONE ]
Finalizing                                           [ DONE ]

 **** Installation completed successfully ******

Additional information:
 * A new answerfile was created in: /root/packstack-answers-20160530-090408.txt
 * Time synchronization installation was skipped. Please note that unsynchronized time on server instances might be problem for some OpenStack components.
 * File /root/keystonerc_admin has been created on OpenStack client host 192.168.2.210. To use the command line tools you need to source the file.
 * To access the OpenStack Dashboard browse to http://192.168.2.210/dashboard .
Please, find your login credentials stored in the keystonerc_admin in your home directory.
 * To use Nagios, browse to http://192.168.2.210/nagios username: nagiosadmin, password: 932aea84b2a34c66
 * The installation log file is available at: /var/tmp/packstack/20160530-090407-689htX/openstack-setup.log
 * The generated manifests are available at: /var/tmp/packstack/20160530-090407-689htX/manifests
[root@rhelopenpack ~]#

During the deployment , if you get an error related to neutron DB, just drop “neutron” database and rerun the deployment.

[root@rhelopenpack ~]# mysql
Welcome to the MariaDB monitor.  Commands end with ; or \g.
Your MariaDB connection id is 2302
Server version: 10.1.12-MariaDB MariaDB Server

Copyright (c) 2000, 2016, Oracle, MariaDB Corporation Ab and others.

Type 'help;' or '\h' for help. Type '\c' to clear the current input statement.

MariaDB [(none)]> show databases;
+--------------------+
| Database           |
+--------------------+
| cinder             |
| glance             |
| gnocchi            |
| information_schema |
| keystone           |
| mysql              |
| neutron            |
| nova               |
| nova_api           |
| performance_schema |
| test               |
+--------------------+
11 rows in set (0.00 sec)

MariaDB [(none)]> DROP DATABASE neutron;
    
Query OK, 35 rows affected (0.28 sec)

MariaDB [(none)]> show databases;
+--------------------+
| Database           |
+--------------------+
| cinder             |
| glance             |
| gnocchi            |
| information_schema |
| keystone           |
| mysql              |
| nova               |
| nova_api           |
| performance_schema |
| test               |
+--------------------+
10 rows in set (0.00 sec)

MariaDB [(none)]> exit
Bye
[root@rhelopenpack ~]#


7. Openstack credentials are stored in “/root/keystonerc_admin” .

[root@rhelopenpack ~]# more /root/keystonerc_admin
unset OS_SERVICE_TOKEN
export OS_USERNAME=admin
export OS_PASSWORD=0a7df9aab54b4644
export OS_AUTH_URL=http://192.168.2.210:5000/v2.0
export PS1='[\u@\h \W(keystone_admin)]\$ '

export OS_TENANT_NAME=admin
export OS_REGION_NAME=RegionOne
[root@rhelopenpack ~]#


8. Access the dashboard using given URL “http://192.168.2.210/dashboard”.

openstack on Redhat Linux


We have successfully deployed Openstack on Redhat Enterprise Linux 7.2. Just go through this article to know that how to launch the cloud OS instances.

Hope this article is informative to you . Share it ! Comment it !! Be Sociable !!!

The post Deploying Openstack on Redhat – Packstack Method (Mitaka) appeared first on UnixArena.

How to Migrate the servers to Public cloud ? Cloudscraper

$
0
0

There are many companies are benefited using the cloud and cloud related services. small and mid-size companies are prefer to use the pubic cloud services from Amazon web services and Microsoft Azure to reduce the operating and ownership cost. If anyone like to migrate the existing server to the public cloud, they need do lot of prep work and it’s really painful task.  Cloudscraper is a software to perform server migrations in simple, fast, reliable, and inexpensive way from your datacenter to public clouds. Cloudscraper replicates existing workloads, Windows and Linux, to AWS or Microsoft Azure.


Migrate IAAS cloudscraper


Installation:

Install the cloudscraper agent on your existing physical, virtual servers which needs to be migrated to cloud.


Cloning :

Cloudscraper clones your existing physical, virtual servers to the cloud.


No Outage:

When you use cloudscraper , it’s not going to make any changes on (source) running server . Your applicaiton can continue to run when the migration is happening.


Secure:

Data is transfered to your cloud account via secure connection. Your server data is uploaded directly to the cloud. No 3rd parties involved, Cloudscraper doesn’t transmits any server data to us. It’s just you and your cloud provider.


Network aware:

Works for static and dynamic networks. cloudscraper  support both EC2 Classic public cloud, VPC hybrid cloud, and Azure Virtual Networks.


Migrate Linux to Amazon EC2

Let’s see that how we can Migrate Linux  server to Amazon EC2.


1.Register to Cloudscraper SaaS web version and wait for credentials email.

Cloudscraper SaaS web version


2.Login to cloud scraper web panel.

Login to Cloudscraper Panel


3. Download and install cloudscrapper agent on linux server which you are going to migrate to cloud.

Copy the Linux commands and execute it


Cloudscraper Linux agent installer will prompt for your Cloudscraper Web Panel credentials in order to get connected to it.  Once connected Linux agent will appear online in the Web Panel.

Select tasks to see the agent status


4. Get the AWS Access Keys  fromhttps://portal.aws.amazon.com/gp/aws/securityCredentials web page.

Get the Access Key ID from Amazone EC2


5. Start the migration from Cloudscraper web page.

Trigger the Migration


6. Configure the migration by entering your AWS keys, choose region, click “Run”.

Enter EC2 Region and AWS access key


7.  Cloudscraper will never save your Secret Access Key. It is used for logging into Amazon AWS to upload your server image. Wait till image created and data is uploaded.  Cloudscraper Web Panel will update you on the progress.

 Note: it takes approx 3 hours to upload 10 Gb system image. So choose what to transfer wisely. (Again Its depends on your internet bandwidth too)


8. Once the upload is completed, you could login to AWS portal and start the AWS instance . You could access the Linux machine using  secure keys.


Hope this article is informative to you . If you need any more details about cloudscrapper , please reach out to migrate2IASS. 

The post How to Migrate the servers to Public cloud ? Cloudscraper appeared first on UnixArena.

Let’s Start exploring the Docker – Container World

$
0
0

Virtualization industry is bringing up many interesting and yet useful products in the market to reduce the IT cost.  VMware revolution demonstrated that how to utilize  the hardware effectively using hypervisor and other sibling products.  Similarly openstack development also going on aggressive pace to reduce the virtualization product cost by utilizing  opensource technologies. Docker was no where in the competition but suddenly it created buzz in the IT industry.  Docker concept is opposite to other existing hypervisor based virtualization technologies. Docker allows you to package an application with all of its dependencies into a standardized unit for software development.

Docker containers wrap up a piece of software in a complete filesystem that contains everything it needs to run: code, run-time, system tools, system libraries – anything you can install on a server. This guarantees that it will always run the same, regardless of the environment it is running in.


Let’s have a look at the docker architecture.

Docker - Architecture
Docker – Architecture


Docker Engine (daemon) runs on the docker host along with docker client.  Docker client is used to launch  the docker container . Container is nothing but a  ready-made image which is available in docker repository. There are 14k applications are readily available in docker repository.


How it is different from hardware virtualization ?

There are two type of Hardware virtualization  exists in the market .

  1. Electrically partitioning the system
  2. Hyper-visor based virtualization.

Example : 

Electrically Partitioning Hardware:  (Hart Partitions)

  • Oracle – Dynamic Domains
  • HP – N-Par

Hyper-visor Based virtualization: (Soft Partitions)

  • Oracle – LDOM
  • IBM LPAR
  • HP UX- IVM
  • VMware ESXi


Let’s see that how Docker is different from the Hyper-visor based virtualization.

VMware vSphere vs  Docker

hypervisor - Vmware vs Docker
Hyper-visor – VMware vs Docker


If you compare the above image , we can see that docker engine is replacing the hypervisor layer. Docker engine shares the kernel with container and you no need to create the additional Guest OS layer  unlike VMware. This is similar to oracle Solaris zones and Linux container (lxc) but not exactly  same.


Sharing the Binary and Libraries :

Adding to that Docker also shares the Bins/Libs across the container.

Docker shares Bins Libs


Moving container across the cloud:

Docker engines provides the portability across all the platform. This flexibility allows us to move the container from one cloud to another cloud.

Docker - Fly to any cloud
Docker – Fly to any cloud


In the upcoming articles , we will explore more about docker deployment and migration.Follow us on Social networks to get regular updates.

The post Let’s Start exploring the Docker – Container World appeared first on UnixArena.

Viewing all 369 articles
Browse latest View live


<script src="https://jsc.adskeeper.com/r/s/rssing.com.1596347.js" async> </script>