Quantcast
Channel: Lingesh, Author at UnixArena
Viewing all 369 articles
Browse latest View live

NAKIVO Backup & Replication for Amazon EC2 – Overview

$
0
0

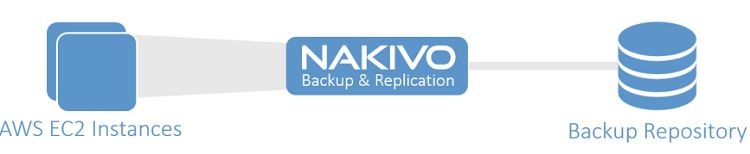
NAKIVO Backup & Replication v6 has been released with capability of supporting native backup and replication of AWS EC2 instances. NAKIVO Backup & Replication v5 supports only VMware vSPhere. There are lot happy customers who benefited using NAKIVO Backup & Replication v5 including companies like elogic , afrihost and systemc. Nakivo impressed most of the customer with easy web interface, data compression, De-duplication  and network acceleration technologies to speed up the WAN backups . NAKIVO Backup & Replication provides wonderful web-interface for reporting and NAKIVO alerts can be configured via email. NAKIVO’s continuous product development is one of the most important factor to choose this product. NAKIVO Backup & Replication started supporting VMware vSphere 6.0 within few weeks after the release.

NAKIVO Backup & Replication v6 has been release many more features including support of Amazone AWS EC2. Let’s explore the NAKIVO Backup & Replication for Amazon EC2.


NAKIVO – Amazon EC2 support


  • Backup:

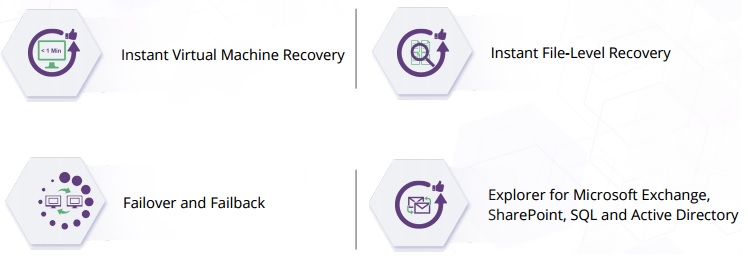
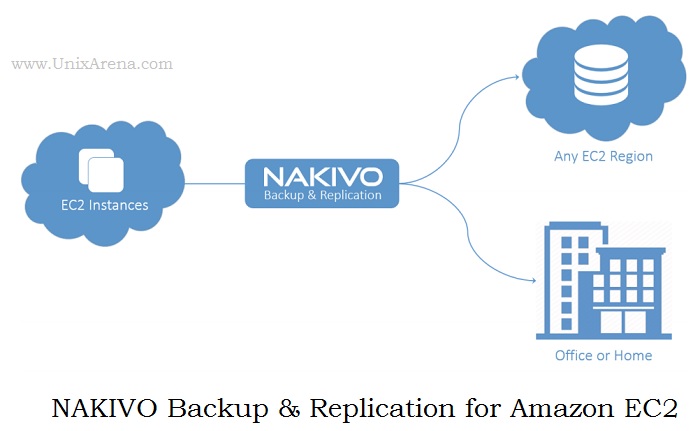
    • Save backups of your AWS EC2 instances within the same region, across regions, or offsite. Note that NAKIVO supports file recovery , application object recovery and full recovery.
NAKIVO B&R for AWS
NAKIVO B&R for AWS


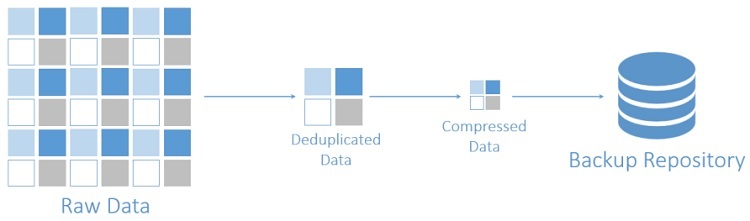
  • AWS EC2 Backup Deduplication

    • NAKIVO Backup & Replication automatically deduplicates all AWS EC2 backups across entire backup repository. It also compress the deduplicated blocked to ensure that the least amount of space is used by the backup repository.
NAKIVO B&R for AWS - Deduplication & Compression
NAKIVO B&R for AWS – Deduplication & Compression


  • Network Acceleration : 

    • NAKIVO Backup & Replication can use compression and traffic reduction techniques to speed up data transfer. On average, this results in a network load reduction of 50% and a data transfer acceleration of 2X when running backup across WAN.
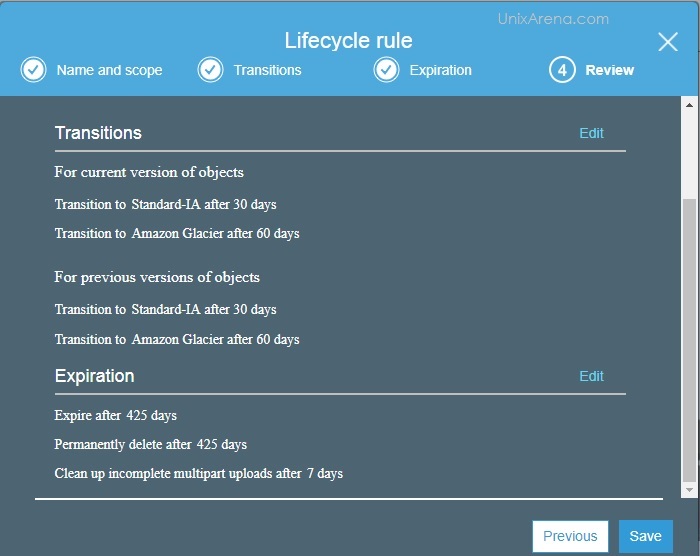
NAKIVO B&R for AWS - Network Accelartion
NAKIVO B&R for AWS – Network Accelartion


  • Backup copy  :

    • A special job type that enables copying backups between backup repositories. You can store a primary backup of your EC2 environment in the same region, and archive it to other region or offsite. There might be a chance that AWS EC2 backups can be damaged, accidentally deleted, or become unavailable due to various reasons. Backup Copy jobs, send copies to different regions, accounts, or to your office or home, copy an entire backup repository or only selected backups, or even set a different backup retention policy for your backup copies. These archive backup can be retrieved on need basis. This is similar to Veritas Netbackup vault but in simple way.
NAKIVO B&R for AWS - Backup Copy
NAKIVO B&R for AWS – Backup Copy


  • Replication:

    • Synchronize your instances into a ready-to-use AMIs in the same or different region. You can recover a full instance within minutes. AWS EC2 instance replication supports live applications with VSS. AWS EC2 instance replication creates and maintains identical copies of your Amazon instances (aka replicas). For each instance replica, you can save up to 30 recovery points. In case source instances are lost or damaged, you can instantly recover by powering on instance replicas.


  • Granular recovery:
    • Recover individual files, Exchange emails and Active Directory objects.You can easily browse, search, forward, and download files and objects right within the product Web interface, without recovering the full AWS EC2 instance first. This feature is purely agentless and works out of the box for both Windows-based and Linux-based instances
NAKIVO B&R for AWS - Instant Granular Recovery
NAKIVO B&R for AWS – Instant Granular Recovery


  • Full recovery:

    • If a backed up AWS EC2 instance is accidentally damaged or deleted, you can recover the instance from its backup in just a few clicks, regardless of where your backup repository is located. The instance will be recovered in exactly the same state as it was during the backup and will appear in the region that you select for recovery.
NAKIVO B&R for AWS - Full Recovery
NAKIVO B&R for AWS – Full Recovery


  • Application-aware Data Protection

    • NAKIVO Backup & Replication performs application-aware backup of Windows-based and Linux-based AWS EC2 instances when  you use the following applications and databases. This ensures that application and database data is always stay consistent.
      • Microsoft  Exchange
      • Active Directory
      • MS SQL
      • Oracle
      • Microsoft SharePoint
      • Other supported applications.


  • Multi-threading 

    • This feature allows you to run multiple backup and replication, and recovery jobs simultaneously, which speeds up data processing and shortens the time windows allocated to data protection.


  • Web-UI:

    • The simple and intuitive Web interface enables managing all aspects of data protection at any time and from anywhere, on a tablet. This saves hours of time spent on backup administration.


Adding to the above listed features,

NAKIVO Backup & Replication can automatically create, encrypt, and upload support bundles to a NAKIVO support server. This helps NAKIVO team to quickly identify and resolve support issues. It also supports HTTP APIs automation which enable you to automate and orchestrate instance backup, replication, and recovery. This can reduce the data protection cost. NAKIVO Backup & Replicaition supports NAS storage from Synology and Western digital. To know more about NAKIVO Backup & Replication for AWS , Please visit http://nakivo.com.


All the images and notes were taken from http://nakivo.com/. 

The post NAKIVO Backup & Replication for Amazon EC2 – Overview appeared first on UnixArena.


Deploying NAKIVO Backup & Replication V6 for VMware – Part 1

$
0
0

This article is going to demonstrate the deployment of NAKIVO Backup & Replication V6. Nakivo is very easy to deploy, doesn’t need any separate Windows management server since it can run purely as a pre-built virtual appliance. NAKIVO Backup & Replication provides image-based VMware VM backup.  For each VM backup, you can save up to 1,000 recovery points and rotate them on a daily, weekly, monthly, and yearly basis. All backup jobs are forever-incremental and use VMware Changed Block Tracking to quickly identify changed data, which results in fast backups.  To save storage space, all VM backups are automatically compressed and deduplicated across entire backup repository.

NAKIVO Backup & Replication requires 2 CPU cores and 4 GB RAM. The product can be installed on:

Linux:

  • Ubuntu 12.04 Server (x64)
  • Red Hat Enterprise Linux 6.3 (x64)
  • SUSE Linux Enterprise 11 SP2 (x64)

Windows:

  • Windows Server 2012 R2 Standard
  • Windows Server 2012 Standard
  • Windows Server 2008 R2 Standard
  • Windows 8 Professional (x64)
  • Windows 7 Professional (x64)


NAKIVO also provides VMware virtual Appliance . We can simply download and import a pre-configured VMware Virtual Appliance on vCenter.


1.Download NAKIVO_Backup_Replication_VA_v6.0.1.12926_Full_Solution_NFR from NAKIVO.


2. Login vsphere Web-client to deploy the NAKIVO virtual Appliance v6.


3. Navigate to the hosts & clusters . Select the cluster and right click to select “Deploy OVF Template”.

Deploy OVF Template of NAKIVO v6


4. Browse the directory and select the downloaded file “NAKIVO_Backup_Replication_VA_v6.0.1.12926_Full_Solution_NFR.ova”

Browse the OVA file & select


5. Review the OVF template details. In Description, you find the appliance login credentials.

Review the OVF details - NAKIVO 3
Review the OVF details – NAKIVO


6. Accept the license .

Accept the License
Accept the License


7. Select the datacenter.

Select the datacenter


8. Select the virtual disk format and Datastore.

Select the datastore


9. Select the VM network.

Select the VM network


10 . Click finish to complete the deployment wizard.

Click Finish to complete the wizard


11. Once the appliance is deployed, You can see the appliance like below.

NAKIVO B&R VA
NAKIVO B&R VA


We have successfully deployed the NAKIVO Backup & Replication V6 for VMware. In the upcoming article, we will see that how to connect appliance with vCenter to perform the VM backup and recovery.

The post Deploying NAKIVO Backup & Replication V6 for VMware – Part 1 appeared first on UnixArena.

Post Deployment – NAKIVO Backup & Replication V6 for VMware – Part 2

$
0
0

This article will explain more about the post deployment of NAKIVO Backup & Replication V6 for VMware. During the post deployment , you can configure the hostname , Backup Storage, Timezone.  NAKIVO console also provides as option to update the NAKIVO  software and monitor the system performance. Once you have done the basic settings like hostname, backup storage and timezone, you can launch the NAKIVO’s web-portal to add the vCenter server to configure the backup.

Post Deployment of NAKIVO v6:

1.Login to the VMware vSphere web-client .

2. Power on the NAKIVO Backup & Replication VA.

NAKIVO B&R VA
NAKIVO B&R VA


3.Once the appliance is up , you will get console like below. Just select “Network Settings” & press enter to modify the hostname & IP details.

NAKIVO Backup & Replication VA


4. Navigate to the hostname and set the new hostname.  You can also modify the network settings. Here I have disabled the DHCP and set the static IP address.

NAKIVO Backup & Replication set static IP


5. From the main menu, if you select backup storage , you will get screen like below. Here only one disk has been configured as backup repository. It provides option to add newly attached disks to the backup repository.

NAKIVO Backup & Replication - Backup Storage
NAKIVO Backup & Replication – Backup Storage


6. You can set the desired timezone. Select “Change time zone” to modify the timezone.

NAKIVO Backup & Replication Change Timezone


7. Select the appropriate geographic area.

NAKIVO Backup & Replication - Timezone
NAKIVO Backup & Replication – Timezone


8.Select the timezone.

NAKIVO Backup & Replication - Timezone
NAKIVO Backup & Replication – Timezone


9. In the main console, you can find the NAKIVO’s System Performance.  It provides the VA’s performance statistics .

NAKIVO Backup & Replication - System Performanace
NAKIVO Backup & Replication – System Performance


Just select the “System Performance” and press enter to see the system performance.

NAKIVO Backup & Replication - System Performance
NAKIVO Backup & Replication – System Performance


10. From the main menu, select “Exit to System console” to get the OS login prompt. You can login to the virtual appliance using root user credentials.

Exit the System console

Exit the System console


11. By default, NAKIVO’s web portal uses port 4443. (https://192.168.2.7:4443) . The initial web page login will allow you to configure new user name & password.

NAKIVO Backup & Replication - Webconsole
NAKIVO Backup & Replication – Web-console


We have successfully deployed NAKIVO  Backup & Replication. In the upcoming articles ,we will see that how to we can use NAKIVO to migrate the instance from VMware vSphere to Amazon EC2.

The post Post Deployment – NAKIVO Backup & Replication V6 for VMware – Part 2 appeared first on UnixArena.

Pandora FMS – Opensource Enterprise Monitoring System

$
0
0

Pandora  Flexible Monitoring System – Pandora FMS is designed to adapt to every role and to every organization. Its main aim is to be flexible enough to manage and control the complete infrastructure, without further need to invest more time or money into another monitoring tool.  FMS is not just for next generation monitoring system. It supports legacy operating systems, Network devices without additional configuration. Pandora FMS uses  SNMP v1 ,v2,v3 or via TCP protocol probes (snmp, ftp, dns, http, https, etc), ICMP or UDP  for monitoring.


Pandora FMS Features

  • Autodiscovery. On a local network, Pandora’s plug-in agents permit hard disk, partition, and database detection in the Pandora server, among many other features by default.
  • Autoexploration. By using the web-based interface of Pandora FMS, we can detect active systems, and catalogue them according to the target’s operating system. By applying a profile, Pandora is able to commence monitoring the discovered targets. It can even detect the topology of the network and create a web-based map based on route distribution.
  • Monitoring. The Agents of Pandora FMS are the most powerful in the market. They are capable of obtaining information – from the execution of a command to the call, at its most basic level- on the Windows API: Events, logs, numerical data, process stages, memory and CPU consumption. Pandora avails of a default monitors’ library, but one of the greatest advantages of Pandora is the ability to quickly add, edit and create new monitors.
  • Remote access. The agents themselves can activate services, delete temporary files or execute processes. Commands can also be executed remotely from the console, like stopping or starting services. Furthermore, it’s possible to program tasks that require periodical execution. It’s also possible to use Pandora FMS as the launch-point to access Windows machines remotely (via VNC), to access web or Unix systems through Telnet, or SSH from the Pandora web interface.
  • Alerts and Notifications. Notification are just as important as failure detection. Pandora FMS gives you an almost infinite variety of notification methods and formats. This includes, but is not limited to escalation, correlation of alerts and prevention and mitigation of cascading events.
  • Analysis and Visualization. Monitoring is not just receiving a trap or visualizing a failing service. Within the Pandora environment, monitoring is also a method to present forecast reports, correlated summary charts of long term gathered data, and to generate user portals, delegate reports to third parties or to define its own charts and tables. Pandora incorporates all of these tools within a Web interface.
  • Inventory Creation. Contrary to other solutions where the idea of CMDB is just an afterthought, to Pandora it is an active option. The inventory is flexible and dynamic (it can auto-discover, accepts remote input, etc.) It can notify observers of changes (e.g. uninstalled software) or simply be used to make listings.


The Pandora FMS Architecture

Pandora FMS is modular and decentralized. The most important component is the database, where everything is stored. Pandora FMS supports MySQL , PostgreSQL and Oracle databases.  Each component of Pandora FMS can be replicated and works in a pure HA environment, be it passive, active or in a clustered environment (Active/Active with load balancing). There are also descriptions for methods to setup a high availability SQL backend.


Pandora FMS Architecture


Under Pandora FMS, there are twelve different servers in total, specialized in and responsible for the various tasks necessary to make Pandora what it is today.

  • Data Server
  • Network Server
  • SNMP Server
  • WMI Server
  • Recon Server
  • Plugin Server
  • Prediction Server
  • web server
  • Export Server
  • Inventory Server
  • Event Correlation Server
  • Enterprise Network Server for SNMP and ICMP
  • Satellite server


Network Server Architecture: 

Pandora FMS Network Server


Pandora FMS Software Client Agent:

A software agent installed on a remote node is completely different from the one on the Pandora server or within Pandora’s network console. The software agent gathers information local to the node from the engine where it’s executed, gathering information on the node by commands.

Pandora FMS agent
Pandora FMS agent


Pandora FMS also support HA in Active/Passive mode and Clustered Active/Active mode.

Pandora FMS HA
Pandora FMS HA


In the upcoming articles, we will see that how to deploy Pandora FMS server and how to add the clients to it. For more information, please visit https://pandorafms.com.

The post Pandora FMS – Opensource Enterprise Monitoring System appeared first on UnixArena.

Configuring NFS HA using Redhat Cluster – Pacemaker on RHEL 7

$
0
0

This article will help you to setup High Availability NFS server using Pacemaker on Redhat Enterprise Linux 7. From the scratch ,we will build the pacemaker blocks which includes package installation , configuring the HA resources, fencing etc. NFS shares are used for setting up the home directories and sharing the same content across multiple servers. NFS HA will suit for customers who can’t afford NAS storage. You might have followed Pacemaker articles on UnixArena where we have setup Failover KVM VM and GFS earlier. If not , please go through it to understand the various component of pacemaker and how it works. This article is not going to cover in-depth.


NFS HA - Pacemaker UnixArena
NFS HA – Pacemaker UnixArena


Assumptions:

  • Two servers installed with RHEL 7.x (Hosts- UA-HA1 / UA-HA2)
  • Access to Redhat Repository or Local Repository to install packages.
  • SELINUX & Firewalld can be turned off.


1. Login to the each node as root user and install the package .

# yum install pcs fence-agents-all


2. Disable SELINUX on both the nodes.

# setenforce 0
setenforce: SELinux is disabled
# cat /etc/selinux/config |grep SELINUX |grep -v "#"
SELINUX=disabled
SELINUXTYPE=targeted


3. Disable firewalld on both the hosts

UA-HA# systemctl stop firewalld.service
UA-HA# systemctl disable firewalld.service
UA-HA# iptables --flush
UA-HA#


4. Enable and Start the Services on both the Nodes.

# systemctl start pcsd.service
# systemctl enable pcsd.service
# systemctl status pcsd.service


5. On each nodes, set the password for hauser.

# passwd hacluster
Changing password for user hacluster.
New password:
Retype new password:
passwd: all authentication tokens updated successfully.


6.Login to any of the cluster node and authenticate “hacluster” user.

# pcs cluster auth UA-HA1 UA-HA2


7. Create a new cluster using pcs command. The cluster name is “UACLS”.

# pcs cluster setup --name UACLS UA-HA1 UA-HA2


8. Start the cluster using pcs command. “–all” will start the cluster on all the configured nodes.

# pcs cluster start –all


9. Check the corosync communication status.This command output should show that which IP has been used for heartbeat. Refer configure-redundant-corosync
# corosync-cfgtool –s


10. Disable STONITH to avoid issues while configuring the resources. Once we complete the cluster setup, we will enable the fencing back.

#pcs property set stonith-enabled=false
#pcs property show stonith-enabled


10. Configure the fencing (STONITH) using ipmilan.

# pcs stonith create UA-HA1_fen fence_ipmilan pcmk_host_list="UA-HA1" ipaddr=192.168.10.24 login=root  passwd=test123 lanplus=1 cipher=1 op monitor interval=60s
#pcs stonith create UA-HA2_fen fence_ipmilan pcmk_host_list="UA-HA2" ipaddr=192.168.10.25 login=root  passwd=test123 lanplus=1 cipher=1 op monitor interval=60s

These IP’s are IDRAC console IP used for fencing.


11. Verify the cluster configuration.

# crm_verify -L –V


12. Configure the volume group and Logical volume.

# vgcreate UAVG1 /dev/disk_name1
# vgcreate UAVG2 /dev/disk_#name2

# lvcreate -L sizeM -n /dev/UAVG1/UAVOL1
# lvcreate -L sizeM -n /dev/UAVG2/UAVOL2


12. Create a filesystem. (Let’s go with XFS)

#mkfs.xfs /dev/UAVG1/UAVOL1
#mkfs.xfs /dev/UAVG2/UAVOL2


13. Modify LVM configuration similar to below. Assuming that all the volume groups are used in cluster. If you have root vg , you need to specify in lvm.conf for automatic import.

# grep use_lvmetad /etc/lvm/lvm.conf |grep -v "#"
use_lvmetad = 0


14.Configure symmetric cluster property and check the status.

# pcs property set symmetric-cluster=true
[root@UA-HA1 tmp]# pcs status
Cluster name: UACLS
Stack: corosync
Current DC: UA-HA2 (2) - partition with quorum
2 Nodes configured
2 Resources configured

Online: [ UA-HA1 UA-HA2 ]

Full list of resources:

 UA-HA1_fen   (stonith:fence_ipmilan):        Started UA-HA2
 UA-HA2_fen   (stonith:fence_ipmilan):        Started UA-HA1

PCSD Status:
  UA-HA1: Online
  UA-HA2: Online

Daemon Status:
  corosync: active/enabled
  pacemaker: active/enabled
  pcsd: active/enabled
[root@UA-HA1 tmp]# pcs stonith show
 UA-HA1_fen   (stonith:fence_ipmilan):        Started
 UA-HA2_fen   (stonith:fence_ipmilan):        Started
[root@UA-HA1 tmp]#


15.Configure VG & Mount resources .

#pcs resource create UAVG1_res LVM volgrpname="UAVG1" exclusive=true  --group UANFSHA
#pcs resource create UAVOL1_res Filesystem  device="/dev/UAVG1/UAVOL1" directory="/cm/shared" fstype="xfs" --group UANFSHA


#pcs resource create UAVG2_res LVM volgrpname="UAVG2" exclusive=true --group  UANFSHA
#pcs resource create UAVOL2_res Filesystem  device="/dev/UAVG2/UAVOL2" directory="/global/home" fstype="xfs" --group UANFSHA


16.Configure VIP for NFS share. This IP will be used on NFS client to mount the shares.

# pcs resource create ClusterIP ocf:heartbeat:IPaddr2 ip=192.168.2.90  nic="eth0" cidr_netmask=24 op monitor interval=30s --group UANFSHA


17. Configure NFS server resources.

[root@UA-HA1 ~]# pcs resource create NFS-D nfsserver nfs_shared_infodir=/global/nfsinfo nfs_ip=192.168.2.90  --group UANFSHA


18.Check the cluster status.

[root@UA-HA1 ~]# pcs status
Cluster name: UACLS
Last updated: Tue Aug 16 12:39:22 2016
Last change: Tue Aug 16 12:39:19 2016 via cibadmin on UA-HA1
Stack: corosync
Current DC: UA-HA1 (1) - partition with quorum
Version: 1.1.10-29.el7-368c726
2 Nodes configured
8 Resources configured

Online: [ UA-HA1 UA-HA2 ]

Full list of resources:

 UA-HA1_fen   (stonith:fence_ipmilan):        Started UA-HA1
 UA-HA2_fen   (stonith:fence_ipmilan):        Started UA-HA1
 Resource Group: UANFSHA
     UAVG1_res  (ocf::heartbeat:LVM):   Started UA-HA1
     UAVG2_res  (ocf::heartbeat:LVM):   Started UA-HA1
     UAVOL1_res  (ocf::heartbeat:Filesystem):    Started UA-HA1
     UAVOL2_res  (ocf::heartbeat:Filesystem):    Started UA-HA1
     ClusterIP  (ocf::heartbeat:IPaddr2):       Started UA-HA1
     NFS-D      (ocf::heartbeat:nfsserver):     Started UA-HA1 


19. Configure the HA NFS shares.

[root@UA-HA1 ~]# pcs resource create nfs-cm-shared exportfs clientspec=192.168.2.0/255.255.255.0 options=rw,sync,no_root_squash directory=/SAP_SOFT fsid=0 --group UANFSHA
[root@UA-HA1 ~]# pcs resource create nfs-global-home  exportfs clientspec=10.248.102.0/255.255.255.0 options=rw,sync,no_root_squash directory=/users1/home fsid=1 --group UANFSHA


20.Final cluster status will looks like similar to the following.

[root@UA-HA1 ~]# pcs status
Cluster name: UACLS
Last updated: Tue Aug 16 12:52:43 2016
Last change: Tue Aug 16 12:51:56 2016 via cibadmin on UA-HA1
Stack: corosync
Current DC: UA-HA1 (1) - partition with quorum
Version: 1.1.10-29.el7-368c726
2 Nodes configured
10 Resources configured


Online: [ UA-HA1 UA-HA2 ]

Full list of resources:

 UA-HA1_fen   (stonith:fence_ipmilan):        Started UA-HA1
 UA-HA2_fen   (stonith:fence_ipmilan):        Started UA-HA1
 Resource Group: UANFSHA
     UAVG1_res  (ocf::heartbeat:LVM):   Started UA-HA1
     UAVG2_res  (ocf::heartbeat:LVM):   Started UA-HA1
     UAVOL1_res  (ocf::heartbeat:Filesystem):    Started UA-HA1
     UAVOL2_res  (ocf::heartbeat:Filesystem):    Started UA-HA1
     ClusterIP  (ocf::heartbeat:IPaddr2):       Started UA-HA1
     NFS-D      (ocf::heartbeat:nfsserver):     Started UA-HA1
     nfs-cm-shared      (ocf::heartbeat:exportfs):      Started UA-HA1
     nfs-global-home    (ocf::heartbeat:exportfs):      Started UA-HA1


21. Configure resource dependencies.

[root@UA-HA1 ~]# pcs constraint order start UAVG1_res then UAVOL1_res
[root@UA-HA1 ~]# pcs constraint order start UAVG2_res then UAVOL2_res
[root@UA-HA1 ~]# pcs constraint order start UAVOL1_res then ClusterIP
[root@UA-HA1 ~]# pcs constraint order start UAVOL2_res then ClusterIP 
[root@UA-HA1 ~]# pcs constraint order start ClusterIP then NFS-D
[root@UA-HA1 ~]# pcs  constraint order start NFS-D then nfs-cm-shared
[root@UA-HA1 ~]# pcs  constraint order start NFS-D then nfs-global-home
[root@UA-HA1 ~]# pcs constraint
Location Constraints:
  Resource: UANFSHA
    Enabled on: UA-HA1 (role: Started)
Ordering Constraints:
  start UAVG1_res then start UAVOL1_res
  start UAVG2_res then start UAVOL2_res
  start UAVOL1_res then start ClusterIP
  start UAVOL2_res then start ClusterIP
  start ClusterIP then start NFS-D
  start NFS-D then start nfs-cm-shared
  start NFS-D then start nfs-global-home
Colocation Constraints:
[root@UA-HA1 ~]#


22. You can also verify the NFS shares using the following command. (Have to execute where the resources are running currently)

[root@UA-HA1 ~]# showmount -e 192.168.2.90
Export list for 192.168.2.90:
/SAP_SOFT   192.168.2.0/255.255.255.0
/users1/home 192.168.2.0/255.255.255.0
[root@UA-HA1 ~]#

[root@UA-HA1 ~]# ifconfig eth0
ib0: flags=4163<UP,BROADCAST,RUNNING,MULTICAST>  mtu 2044
        inet 192.168.2.90  netmask 255.255.255.0  broadcast 0.0.0.0
        inet6 fe80::7efe:9003:a7:851  prefixlen 64  scopeid 0x20


23. Enable the STONITH.

#pcs property set stonith-enabled=true
#pcs property show stonith-enabled


24. Login to NFS clients and mount the shares .

# mkdir /users1/home 
# mkdir /SAP_SOFT
# mount -t nfs -o vers=4 192.168.2.90:/SAP_SOFT  /SAP_SOFT
# mount -t nfs -o vers=4 192.168.2.90:/users1/home  /users1/home

We have successfully setup high availability NFS server v4 using pacemaker cluster suite on Redhat Enterprise Linux 7.x.

If you have any trouble with resources , use the following command to clear the state. Resource might be automatically banned if its faulted more than one twice.

 [root@UA-HA1 init.d]# pcs resource clear UANFSHA

Hope this article is informative to you. Share it ! Comment it ! Be Sociable !!!

The post Configuring NFS HA using Redhat Cluster – Pacemaker on RHEL 7 appeared first on UnixArena.

What is Amazon AWS ? Why Should learn ? – Part 1

$
0
0

AWS stands for Amazon web services which offers public cloud to their customers (Established in 2006). This project has been started to target small organization, startup companies, short term projects and  for companies who don’t want to invest money for IT infrastructure. AWS is one of the fastest growing public cloud in the world. Currently, AWS at their peak because more and more organizations are outsourcing their IT to amazon AWS (which includes many fortune 500 companies). Most of the industries are trying to reduce the IT cost and IT companies are forced to reduce the support cost by doing automation and IOT. As a result of this , system administrator might loose their job if they continue to work on legacy hardware and technologies . It’s a right time to look new opportunities in cloud and cloud related technologies.  Amazon AWS is the market leader in the public cloud and the AWS skilled engineers demand is growing rapidly.

These amazon AWS article series is going to provide simple tutorial to learn AWS quickly.


Quick history of AWS:

  • Chirs Pinman & Benjamin Black present a paper on what Amazon’s own internal infrastructure should look like in 2003. They have Suggested selling it as a service and prepared a business case
  • SQS launched in 2004.
  • AWS officially launched in 2006.
  • In 2010, all of amazon.com moved to AWS.
  • In 2013, AWS Certifications have been Launched
  • In 2015,  AWS ‘s revenue is 6$ billion dolor USD per annum and growing close to 90% year on year.
  • As per gartner report, 90% of public cloud is hosted on Amazon AWS and 5 % on Microsoft Azure and remaining 5% shared by other public cloud offering companies.
  • Amazon AWS has been named as a leader in IAAS for 5th consecutive year.


How Amazon is meeting tight SLA  of 99.87% ?

Amazon has setup multiple  data-centers on different geographic locations and these are called “Region” . In each region , they have setup multiple data-centers and these are called “Availability zone” in AWS world. In-case, if we have failure on one availability zone, the other datacenter will be available to take over. That’s the reason, less than 50 minutes per month or 9 hrs in a year downtime SLA is able to meet by amazon.

  • Region – Geographic location.
  • AZ  – Availability zone (Nothing but a Data-center )
  • Egde Location – users access services  (CloudFront CDN)


How to choose the region ?

It’s always to recommended to choose the region which is near to the customer location to avoid the latency. Lets have some look on the existing regions and availability zone on important locations. Here you can see that each region  has multiple availability zones and N-number of Edge location.

north-america-dc-amazon


europe-middle-east-africa-amazon-dc
Europe-middle-east-Africa-amazon-dc


asia-pacific-amazon-dc
Asia-pacific-amazon-dc


Amazon AWS offers:

Compute:

  • Amazon EC2
  • Amazon EC2 Container Registry
  • Amazon EC2 Container Service
  • AWS Elastic Beanstalk
  • AWS Lambda
  • Auto Scaling
  • Elastic Load Balancing
  • Amazon VPC


Storage & Content Delivery:

AWS offers a complete range of cloud storage services to support both application and archival compliance requirements. Select from object, file, and block storage services as well as cloud data migration options to start designing the foundation of your cloud IT environment.

  • Amazon S3
  • Amazon CloudFront
  • Amazon EBS
  • Amazon Elastic File System
  • Amazon Glacier
  • AWS Import/Export Snowball
  • AWS Storage Gateway

Database

AWS offers a wide range of database services to fit your application requirements. These database services are fully managed and can be launched in minutes with just a few clicks. AWS database services include Amazon Relational Database Service (Amazon RDS), with support for six commonly used database engines.

  • Amazon RDS
  • AWS Database Migration Service
  • Amazon DynamoDB
  • Amazon ElastiCache
  • Amazon Redshift


Networking

AWS networking products enable you to isolate your cloud infrastructure, scale your request handling capacity, and connect your physical network to your private virtual network. AWS networking products work together to meet the needs of your application. For example, Elastic Load Balancing works with Amazon Virtual Private Cloud (VPC) to provide robust networking and security features.

  • Amazon VPC
  • AWS Direct Connect
  • Elastic Load Balancing
  • Amazon Route 53


Analytics

AWS offers a comprehensive set of services to handle every step of the analytics process chain including data warehousing, business intelligence, batch processing, stream processing, machine learning, and data workflow orchestration. These services are powerful, flexible, and yet simple to use, enabling organizations to put their raw data to work quickly and easily.

  • Amazon EMR
  • AWS Data Pipeline
  • Amazon Elasticsearch Service
  • Amazon Kinesis
  • Amazon Machine Learning
  • Amazon Redshift
  • Amazon QuickSight


Enterprise Applications

AWS offers on-demand enterprise applications in few clicks.

  • Amazon WorkSpaces (Desktop computing service)
  • Amazon WorkDocs (Enterprise storage service)
  • Amazon WorkMail  (Email Service )


Internet of Things

AWS IoT allows you to easily connect devices to the cloud and to other devices. AWS IoT supports HTTP, WebSockets, and MQTT, a lightweight communication protocol specifically designed to tolerate intermittent connections, minimize the code footprint on devices, and reduce network bandwidth requirements.

  • AWS IoT


Mobile Services

AWS provides a range of services to help you develop mobile apps that can scale to hundreds of millions of users, and reach global audiences. With AWS, you can quickly and easily add mobile features to your app, including user authentication, data storage, content delivery, backend logic, analytics dashboards, and push notifications – all from a single, integrated console.

  • AWS Mobile Hub
  • Amazon API Gateway
  • Amazon Cognito
  • AWS Device Farm
  • Amazon Mobile Analytics
  • AWS Mobile SDK
  • Amazon SNS


Developer Tools

  • AWS CodeCommit
  • AWS CodeDeploy
  • AWS CodePipeline
  • AWS Command Line Tool


Management Tools

AWS provides a broad set of services that help IT administrators, systems administers, and developers more easily manage and monitor their AWS infrastructure. Using these fully-managed services, you can automatically provision, configure, and manage your AWS resources at scale. You can also monitor infrastructure logs and metrics using real-time dashboards and alarms. AWS also helps you monitor, track, and enforce compliance and security.

  • Amazon CloudWatch
  • AWS CloudFormation
  • AWS CloudTrail
  • AWS Command Line Tool
  • AWS Config
  • AWS Management Console
  • AWS OpsWorks
  • AWS Service Catalog
  • Trusted Advisor


Security and Identity

  • AWS Identity and Access Management (IAM)
  • AWS Certificate Manager
  • AWS CloudHSM
  • AWS Directory Service
  • Amazon Inspector
  • AWS Key Management Service
  • AWS WAF


Application Services

  • Amazon API Gateway
  • Amazon AppStream
  • Amazon CloudSearch
  • Amazon Elastic Transcoder
  • Amazon FPS
  • Amazon SES
  • Amazon SNS
  • Amazon SQS
  • Amazon SWF


Game Development

  • Amazon Lumberyard


Software

  • AWS Marketplace


How to learn AWS ? 

To learn Amazon AWS, you need the following.


In the upcoming articles will walk you through the step by step procedure to learn AWS including the account setup. The amazon free tier account require your credit to launch the free instance. Stay tunned with UnixArena.

Hope this article is informative to you . Share it !  Comment it !!  Be Sociable !!!

The post What is Amazon AWS ? Why Should learn ? – Part 1 appeared first on UnixArena.

Start Amazon AWS with IAM – Part 2

$
0
0

Let’s start the amazon AWS journey with IAM service. IAM (Identity Access Management) is web service which provides the access to Amazon AWS console and helps you securely control access to AWS resources for your users. If you would like to start learning about AWS , IAM is the first component which is exposed at the beginning of AWS journey. Identity Access Management allows you to manage users and their level of access to the AWS console. It is important to understand IAM and how it works  for administrating a companies AWS account in real life. You use IAM to control who can use your AWS resources (authentication) and what resources they can use and in what ways (authorization).


AWS - IAM
AWS – IAM


IAM provides/supports:

  • Centralized Control of AWS account
  • Integrates with Many different AWS Services
  • Granular Permissions
  • Identity Fedraration which includes Active Directroy/ LDAP.
  • Multifactor Authentication
  • Provide temporary access for users/devices and services where necessary
  • Allows you to set up your own password rotation policy
  • Shared  Access to your AWS account
  • Supports PCI DSS compliance.


You need to understand few terms about IAM . This is not different from what we have seen in Unix account management/ Windows AD account management.

Users

An IAM user is an entity that you create in AWS to represent the person or service that uses it to interact with AWS. A user in AWS consists of a name and credentials.

aws-iam-users
aws-iam-users


Groups:

An IAM group is a collection of IAM users. Groups let you specify permissions for multiple users, which can make it easier to manage the permissions for those users. A Collection of users under one of permissions or access to specific set of up resources.

IAM - Groups
IAM – Groups


Roles:

An IAM role is similar to a user, in that it is an AWS identity with permission policies that determine what the identity can and cannot do in AWS. However, instead of being uniquely associated with one person, a role is intended to be assumable by anyone who needs it.  You create roles and can then assign them to AWS resources.

aws-iam-roles
aws-iam-roles


Polices:

To assign permissions to a user, group, role, or resource, you create a policy, which is a document that explicitly lists permissions.Policies are documents that are created using JSON. A policy consists of one or morestatements, each of which describes one set of permissions.

IAM - Policy
IAM – Policy


Hope you have basic idea about the Amazon AWS IAM . Off-course reading the theory will not give you any sort of confidence on AWS. In the upcoming article ,we will see that how to get access to free Amazon AWS account . You need to provide the credit card details in an order to get the AWS account even though single instance is free for one year.

Note: Notes and Images are taken from Amazon.com. 

Share it ! Comment it !! Be Sociable .

The post Start Amazon AWS with IAM – Part 2 appeared first on UnixArena.

Setup Amazon AWS – Free Tier Account – Part 3

$
0
0

Amazon AWS offers free tier account to experience their services for one year without any charges . The customers who have doubt about amazon offerings , they can simply sign-up and start testing the capability of AWS. You could also test your applications using free tier account. But you needs to be very careful on the resource usage. When you elapse the free resource usage limit, amazon will simply charge you from credit card without giving any warning. You have to keep eye on resource usages and billing . There is a way to configure the billing alerts which we will see later part of AWS tutorial.

This article also guides you to create free tier amazon AWS account.

Here is the some of the important services which is available on AWS free tier account.

  • Compute
  • Storage & Content Delivery
  • Database
  • Analytics
  • Mobile Services
  • Internet of Things
  • Developer Tools
  • Management Tools
  • Security & Identity
  • Application Services


Limitation of AWS Free Tier account: 

There is a limitation with free tier account when it comes to resource utilization.

Compute:

amazon-aws-free-tier-compute


Only Cent OS, Debian & Ubuntu operating systems instances are eligible to run on Free tier account. All the Windows variants are not eligible for the free tier


Storage:

amazon-aws-free-tier-storage


Database:

amazon-aws-Free tier database


Analytics:

amazon-aws-free-tier-analytics


The other free tier services also have some sort of restriction on free tier AWS account. You can find more information on Amazon AWS website.


Creating the Amazon AWS Free-Tier account: 

Creating Amazon AWS free tier account is very simple.

  1. Sign up for an AWS account.
sign-up-aws-account
sign-up-aws-account


2. Create the account password.

enter-name-account-password


3.  Enter your billing address .

enter-contact-information-and-create-account


4. Enter your credit card information. You will not be charged unless your usage exceeds the free tier limits.

enter-credit-card - info
enter-credit-card – info


5. Enter PAN card details and continue.

enter-pan-details
enter-pan-details


6. Enter you mobile number for identity verification and click on call me now.

identity-verification


7. You will be getting automated voice call from Amazon webservices to enter the 4 digit PIN which you will get on the screen.  (Once you click on “Call Me Now button, it display 4 digit PIN)

identity-verification


8. Select the basic support plan which is free.

Amazon Support Plans


9. Your registration is completed successfully. You should be able to login to the AWS console now.

AWS  registration-complete
AWS registration-complete


In the upcoming article, we will launch free  EC2 Cloud instances after logging in to AWS console.

Hope this article is informative to you . Share it ! Comment it !! Be Sociable !!!

The post Setup Amazon AWS – Free Tier Account – Part 3 appeared first on UnixArena.


VMware Cloud on Amazon AWS – The Hybrid Cloud

$
0
0

The Amazon Web services and VMware had announced their cloud technologies collaboration on last Thursday 13th Oct 2016.  We never expected such a collaboration since both are market competitor and once sworn enemies. The following statement made by  VMware President in 2013 about Amazon.

“I look at this audience, and I look at VMware and the brand reputation we have in the enterprise, and I find it really hard to believe that we cannot collectively beat a company that sells books ,” said Eschenbach about amazon

But now they are become partners and offering true hybrid cloud using their cutting technologies. This collaborations will definitely add more woes  for other cloud players like Microsoft Azure, Google Computing Platform and IBM. Amazon web services had a clear advantages over anyone from this collaboration including VMware. Because VMware has their own Cloud offering “VMware vCloud Air ” but now most of the customers would like to prefer Amazon AWS over vCloud Air since AWS has datacenters in 35 Availability Zones across 13 different locations around the world.

VMware Cloud on Amazon AWS : 

VMware Cloud on Amazon AWS is a vSphere-based cloud service. This new service will bring enterprise-class Software-Defined Data Center (SDDC) software to the AWS cloud world. The enterprise customers will be able to run any application across vSphere-based private, public and hybrid cloud environments. It will be delivered, sold and supported by VMware as an on-demand, elastically scalable service and customers will be able to leverage the global footprint and breadth of services from Amazon AWS.

The service will integrate the capabilities of our flagship compute, storage and network virtualization products (vSphere, Virtual SAN and NSX) along with vCenter management, and optimize it to run on next-generation elastic, bare-metal, Amazon AWS infrastructure. This will enable customers to rapidly deploy secure, enterprise-grade AWS cloud-based resources that are operationally consistent with vSphere-based clouds. The result is a comprehensive turnkey service that works seamlessly with both on-premises private clouds and advanced AWS services.

components-of-vmware-cloud
Components-of-VMware-Cloud


VMware vSphere on AWS :

This new offering is a native, fully managed VMware environment on the AWS Cloud that can be accessed on an hourly, on-demand basis or in subscription form. It includes the same core VMware technologies that customers run in their data Centers today including vSphere Hypervisor (ESXi), Virtual SAN (vSAN), and the NSX network virtualization platform and is designed to provide a clean, seamless experience.


1. Create a VMware AWS account.

vmware-cloud-on-aws-create-vmware-cloud
VMware-cloud-on-AWS-create-vmware-cloud


2. Choose a region near to your On-premise datacenter.

vmware-cloud-on-aws-choose-a-region


3. Choose a size based on your requirement.

choose-a-size - VMware Cloud size
choose-a-size – VMware Cloud size


4. Choose payment method.

choose-payment-method


5. Review and check-out .

review-and-checkout
review-and-checkout


6. AWS VMware Cloud is getting ready for you.


vmware-cloud-prepare


Once the datacenter is ready , you will get option to launch  vCenter by clicking “open vCenter”.


Amazon and VMware offers to link the on-premise vCenter with Amazon AWS vCenter. So that you can leverage of VMware features like vMotion and Storage vMotion.

components-of-vmware-cloud


7. Here you can see the newly created VMware Cloud on AWS.

vmware-cloud-aws-datacenter


8. On-premise VMware vSphere Datacenter.

on-premise-datacenter-vmware-vsphere


9. Assuming that On-premise datacenter is running out resources and would like to migrate some of the workload to AWS VMware cloud.  Select the On-premise VM and migrate to VMware cloud – AWS datacenter.

migrate-vm-instance-to-aws-cloud


10. Choose both compute and storage to migrate to AWS VMware Cloud.

choose-both-compute-and-storage-for-migration


11. Select cluster from AWS VMware Cloud for compute.

select-the-compute-resource


12.select the AWS VMware cloud datastore (Based on VSAN).

select-datastore on AWS


13. select the VMware cloud network.

select-network on AWS VMware cloud


14. Click Finish to initiate the VM migration from on-premise datacenter to AWS VMware Cloud.

click-finish-to-complete-the-migration


15. Here you can see the VM migration.

migration-in-progress


DRS vs Elastic DRS: 


VMware offers distributed resource scheduler (DRS) to balance loads across the cluster.

drs-distributed-resource-scheduler-on-primesie-datacenter


Let’s assume that One of the ESXi hypervisor  overloaded.

drs-distributed-resource-scheduler-on-primesie-datacenter


VMware vSphere DRS will automatically move the VM’s within the ESXi cluster to balance the load. If you do not have enough ESXi hypervisors ,  We can leverage the Elastic Distributed Resource Scheduler to provision the additional bare-metal ESXi hypervisor to balance the work loads.


elastic-distributed-resource-scheduler


AWS Services on VMware Cloud:

Due to this collaboration, we have option to leverage the AWS services on VMware environment,

aws-services-on-vmware-vsphere


There is no doubt that customers will be benefited due to this collaboration . Lets wait and see that how the existing VMware customers are going to use AWS .

The post VMware Cloud on Amazon AWS – The Hybrid Cloud appeared first on UnixArena.

Vembu BDR suite – Backup Solution – Overview (Part 1)

$
0
0

Vembu BDR Suite is a emerging backup solution for highly virtualized  environments. It’s a universal backup solution catering to the backup, recovery and disaster recovery needs of diverse and heterogeneous IT environments. Users with VMware and Hyper-V data center environment can now provide their data centers the utmost protection they deserve with Vembu VMBackup. Optional Cloud Disaster Recovery provides the ability to have data redundancy and disaster recovery in the event of data center downtime. Vembu BDR suite is an one stop solution to all your backup and DR needs catering to every requirement of small and midsize businesses.

 Vembu fills a purpose here to be the best of breed technology in providing manageable solution in affordable cost for both VMware vSphere and Microsoft Hyper-V virtual machines along with the applications that resides in the system and also it offers optional Cloud Disaster Recovery.

Product Version :  Vembu BDR Suite 3.6.0

  • Here is some of the key offerings by Vembu BDR:
vembu-bdr-offerings
vembu-bdr-offerings


  • Industry’s best RTO & RPO:

Vembu offers Industry best RTO which is less than 15 minutes.

vembu-rpo-rto
vembu-rpo-rto


  • VembuHIVE™ file system for Efficient Storage Management

Vembu BDR Backup Server utilizes VembuHIVE™ file system to effectively manage storage repositories. VembuHIVE™ is an efficient cloud file system designed for large-scale backup and disaster recovery application with support for advanced use-cases. VembuHIVE™ can be defined as a File System for File Systems.

  • Supports SAN, NAS and DAS
  • Automatically scale up/out the storage devices
  • In-built version control and error correction
  • In-built Compression & Encryption
vembu-bdr-efficient-storage-management


Architecture – VMware Backup:

Let’s have closure look of the Vembu Architecture for VMware vSphere backup Solution.

  • Vembu VMBackup agent will communicate with VMware ESXi production storage and backup the VM data
  • Vembu VMBackup works as a proxy between ESXi host and Vembu BDR Backup Server
  • VM data will be compressed and encrypted on-fly
  • VM data will be compressed and encrypted at rest on Storage Repositories
vembu-backup-for-vmware-vsphere


Architecture – VMware Replication:

  • Vembu VMBackup agent will communicate with VMware ESXi production storage and replicate the VM data to another ESXi host
  •  Vembu VMBackup works as a proxy between both the ESXi hosts
  • Replicated VM will be in power-off mode
  •  Supports VM Failover and Failback
vembu-bdr-vmware-vsphere-replication


  • Agentless VM Backup & Replication
  •  Host level VMware Backup & Replication designed to protect vSphere and vCenter environments using the VMware vStorage APIs (VADP)
  •  CBT enabled incremental data transfer using VMware VADP
  • Application-aware image processing for Microsoft application VMs  VMware Hot-Add and SAN transport mode for LAN free data transfer.


Architecture – Hyper-V Backup:

  • Vembu VMBackup Client/Proxy is a transport software, which sits on the source Hyper-V Server and is used to process the VM data
  • Vembu VMBackup Client works as a proxy between Hyper-V Server and Vembu BDR Backup Server
  • Vembu VMBackup Client/Proxy backs up the VM data from the storage location and compresses, encrypts and delivers it to the Vembu BDR Backup server’s storage repository.
hyper-v-backup-using-vmbackup

Hyper-v Full Backup – Great Integration with VSS:

  • During initial full backup from host machine, Microsoft VSS services initiates the snapshot in the configured guest machine through “Hyper-V integration services”.
  • Once the snapshot completes, Vembu VMBackup Client/Proxy will read VHD files and transfer the data to the storage repository.
full-backup-hyper-v- Vembu BDR


Changed Block Tracking:

  • After full backup, Vembu VMBackup CBT driver starts tracking VHD files associated with the guest machine
  •  All changes in VHD files are efficiently tracked by the driver
  • When a incremental is scheduled, the block level changes alone will get backed up. This improves the incremental performance and consistency of backup.
vembu-cbt-drive-tracking


Hope this article gives you a fair idea about Vembu BDR suite  offerings and high level architecture.  In the upcoming article , we will see that how to setup Vembu on-premise datacenter.

The post Vembu BDR suite – Backup Solution – Overview (Part 1) appeared first on UnixArena.

Vembu BDR Backup Server – On-Premises Deployment – Part 2

$
0
0

This article is going to demonstrates deployment of Vembu BDR  Backup Server on Window server 2012. Vembu BDR Backup server  installation is very simple and quick.  Vembu BDR Backup Server and OffsiteDR Server can be installed on physical or virtual machines  depends on size of the environment. Small business may use virtual machine for Vembu BDR backup server and OffsiteDR server but  physical machine for Vembu BDR backup server and OffsiteDR server to get instant boot feature.

  • Instant VM recovery
  • Restore processes
  • VembuHIVE File System
  • Backup storage management, compression/encryption and 4-tier verification
  • Every backup related information is stored and formatted using MySQL and MongoDB

                              BDR Backup Server – System Requirements 

OS Microsoft Windows Server 2012 R2
Microsoft Windows Server 2008 R2
Microsoft Windows Server 2012
Linux Ubuntu LTS 12.04
Linux Ubuntu LTS 14.04
Instant Boot Infrastructure VMware vSphere
Microsoft Hyper-V
KVM Hypervisor
Memory 8 GB
CPU Quad Core Xenon Processor
Meta Data Storage 10% of the planned total backup data size
Network Card 1 Gbps & above
Browser IE v11
Firefox v28 & above
Chrome v34 & above

Supported Platforms:

     Virtual Infrastructure

       Version

Platform VMware vSphere 6.0
VMware vSphere 5.x
VMware vSphere 4.x
Hypervisor ESX(i) 6.0
ESX(i) 5.x
ESX(i) 4.x
Management Server vCenter Server 6.0
vCenter Server 5.x
vCenter Server 4.x

Virtual Machine Specification and Requirement

VM Specification

                                                Requirement

Virtual Hardware Virtual hardware of all types and versions are supported, which includes support to virtual disks larger than 2 TB. (i.e) Support extends upto recent addition- 62TB VMDK. VMware does not support snapshotting VMs with disks engaged in SCSI bus sharing; Such VMs are not supported by Vembu VMBackup.RDM virtual disks in physical mode, Independent disks, and disks connected via in-guest iSCSI initiator are not supported, and are skipped from processing automatically. Network shares and mount points targeted to 3rd party storage devices are also skipped as these volumes/disks are not visible in the VM configuration file.
OS All VMware supported operating systems. Application-aware processing support from Microsoft Windows 2003 SP1 and later.
Software VMware Tools (optional). VMware Tools are required for following operations: application-aware processing and file-level restore from Microsoft Windows guest OS. All latest OS service packs and patches (required for application-aware processing)


On-premises Deployment:

On-premises deployment is one of the most common deployment method for SMB. We can  Backup VMs, Physical Machines and applications to the local storage repositories using this method.  LAN can be used for the data transport between Vembu clients and Vembu BDR server.


On-premises Deployment


Let’s Deploy Vembu Backup Server on Windows  Server 2012:

1. Download  and Install Microsoft Visual C++ 2013 Redistributable x64 which is dependency for Vembu Suite.

Microsoft-visual-c-2013


2. Download Vembu BDR Backup Server suite.  (you can download without sign-up also from Vembu site )


3. Execute the vembu-bdr-backup-server-3-6-0 which you have downloaded.

vembu-bdr-backup-server-3-6-0


4. Accept the product license.

accpet-the-license
accept-the-license


5. Select the MySQL RDBMS and connector.

install-mysql-rdbms-and-connector


6. The default installation and storage repositories are set to C drive. Always choose customize during the product installation.

vembu-bdr-configurations-setttings
vembu-bdr-configurations-settings


7. Select the MySQL install location and Database storage location. Store the database in different drive than C:

installation-location-vembu


8. Choose the Vembu BDR Backup server install location.

Vembu BDR install location


9. Select the Vembu Storage repository.

choose-the-backup-repository


10. Here is the port and web console login  configuration.

Vembu Port - Admin credentials
Vembu Port – Admin credentials


Port

                                     Use

TCP Port 32004

For processing Backup/Restore/Delete/Replication requests

HTTP Port 6060, 6061

For processing WebService requests

TCP Port 32005

For UI Communication

HTTPS TCP 443

For Esx(i) Communication

TCP Port 902

Data Transfer to ESX(i) host


11. Click install to trigger the installation.

vembu-bdr-runs-as-windows-service


12. Click Finish to complete the Vembu BDR installation.

complete-the-wizard
complete-the-wizard


13. Launch Vembu Backup console using server IP address and port 6061.

webconsole-vembu-bdr-data-backup


14. Select the timezone .

select-timezone-vembu-bdr


15. Enter a unique Vembu BDR ID.

enter-unique-bdr-id
enter-unique-bdr-id


16. Here is the wonderful vembu BDR backup console.

vembu-bdr-backup-console


We have successfully deployed on-premise Vembu BDR Backup Server. In the upcoming articles , we will see the different type of deployments and the various backup methods.


Share it !   Comment it !!  Be Social!!!

The post Vembu BDR Backup Server – On-Premises Deployment – Part 2 appeared first on UnixArena.

Amazon AWS Dashboard and Setup IAM – Part 4

$
0
0

This article will walk you through the Amazon AWS dashboard along with setting up  IAM  (Identity Access Management ).  It has legacy and modern dashboards which can be set by users at their convenient. I will be using latest dashboard during this tutorial. Once you have signed in to AWS console , you need to setup IAM to enable more security features to your account. The root account is simply the account created when first setup your AWS account and it has complete Admin access. So its essential to enable security features like MFA (Multi-Factor-Authentication) and configuring additional root users on that account.  IAM consists users, groups , polices documents  and roles. This is similar to users management on any Unix or windows operating system.

Let’s walk you through the virtual LAB.

AWS – Web Console 

1.Login to Amazon AWS console using email account.

sign-in-to-amazon-aws-console


2. Once you have logged in , setup the near by AWS region for better performance. By default, AWS selects Oregon region and I have set it to “Asia Pacific (Mumbai)” which is near to my location.

select-near-by-region


3. Here is the AWS console Home Page. You could only see “solutions” are displaying in home console instead of AWS services when you compare to old console.

amazon-console-home-page


4. To see all the AWS services, click on “All services” which is below to the search bar. You could also click on “Services” from menu to see the available AWS services.

amazon-aws-all-services-link


5. Click on “IAM” from “Security & Identity” tab  to enable security features to the root account. The below video will help you understand how IAM works and why it’s so important in AWS .


Setup IAM (Identity Access Management)

Action items: 

  • Customize the direct Console URL.
  • Enhance Account  Security.


Customize the direct Console URL 

1. Here is the “IAM”  Management console for brand new AWS accounts. AWS offers the direct console access to access every account. You can set the preferred URL for your account.  Click on “customize”  to setup new URL for direct console.

iam-console-link-customize


2. Enter new custom URL part.

new-direct-console-url
New-direct-console-url


3. Here is the new direct console URL for your AWS account.

new-direct-console-url


Enhance Account  Security:

Action items : 

  • Activate MFA on your root account
  • Create individual IAM users
  • Users group to assign permissions
  • Apply an IAM policy


Activate MFA on your root account:


1. Select “Activate MFA on your root account”  tab and Click on Manage MFA .

manage-mfa-aws
manage-mfa-aws


2. Select the MFA type as virtual. Hardware MFA device require physical RSA token or similar to that.

select-virtual-mfa-device-aws


3. Follow the link to see the supported devices for virtual MFA. Click  on Next to step to continue.

manage-mfa-devcies
manage-mfa-devices


4. Here is your QR.

qr-codes-AWS
qr-codes-AWS


5. Here is the supported MFA applications for AWS.

supported-virtual-mfa-applications


5. Take your  smart phone and install “Google Authenticator” . If you have Android smart phone, download fro google play.


6. Choose SCAN QR in google authenticator  and scan the QR code which is displaying in your laptop. (Refer Step 4)


7. Enter the Authentication code 1 from Google Authenticator app.

qr-code-and-enter-authentication-code-1-2


You must enter code2 which is next available random codes from google authenticator. Once it’s done, Activate Virtual MFA.


8. On Successful activation, You will get message like below.

mfa-device-successfully-setup


9. Refresh the screen to see the latest security status.

Security Status - IAM - AWS
Security Status – IAM – AWS


We will continue the following actions demonstrations on upcoming articles.

  • Create individual IAM users
  • Users group to assign permissions
  • Apply an IAM policy


Hope this article is informative to you . Share it ! Comment it !! Be Sociable !!!

The post Amazon AWS Dashboard and Setup IAM – Part 4 appeared first on UnixArena.

AWS IAM – Users – Group – Policies- Management – Part 5

$
0
0

AWS IAM (Identity Access Management) allows you to create the new users , groups and delegates the roles to users and groups using policy documents. AWS policy documents are written in simple JSON (JavaScript Object Notation) language and it’s easy to understand. The policies  are readily available and we are not expected to write JSON (JavaScript Object Notation) scripts. This article will walk you through creating the new users account , groups and attaching polcies to groups. It will also demonstrates that how to attach the policies to the individual users and groups. In the IAM setup part, the following actions needs to be completed to enable all 5 security features to the AWS account.


  • Delegate your root access keys (It will be marked as green as part of account setup)
  • Activate MFA on your root account  (Completed  – Refer part 4 )
  • Create individual IAM users (Part 5 )
  • Users group to assign permissions  (Part 5 )
  • Apply an IAM policy  (Part 5 )


Let’s begin the AWS LAB.

1. Login to AWS console and Navigate to IAM from security & identity tab. (Refer Part 4)

Security Status - IAM - AWS
Security Status – IAM – AWS

Click on Manage users.


2.Click on Add user tab.

add-user-console-aws


3. Enter the user name . Click on “Add another user” link to add multiple users at same time.

enter-the-iam-users-names


4. Select the access type for users. You have option to auto-generate the account password and force to change at first login.

select-the-access-type-for-new-users


5. We shall create the group later. Just click on “Next” to review the accounts.

click-next-to-review


6. Review the accounts and click “Create Users” to create the account.

review-the-accounts-and-create-users


7.Download the CSV file which contains the user secret access keys and passwords. There is no way to fetch those keys and passwords once you close the wizard. You might need to re-generate it from root account  if you lost the credentials.

download-users-credentials-and-secret-access-key


8.Here is the list of users which we have created.

users-list- AWS IAM
users-list- AWS IAM

We have successfully created users on AWS IAM.


9. Let’s begin to mange the groups.

manage-groups-AWS IAM


10.Click on Create New group tab .

aws-iam-groups
aws-iam-groups


11. Enter the group name.

enter-the-new-group-name-iam-aws


12.We will attach the policies later if required.

skip attach-policy
skip attach-policy


13. Review and create the group.

review-and-create-the-group-iam-aws


14. Here is the newly created group.

iam-aws-group-listing


We have successfully created new group on AWS IAM.


Adding users to GROUP:

Let’s add the newly created users to group UASUPPORT.

1. Select the group and click on group action. Select “Add users to group”.

add-users-to-group
add-users-to-group


2. Select users which are need to be part of “UASUPPORT”  group and click on  “Add users”

select-users-for-group


3. Here you can see that all three users are added to the group.

users-added-in-group


Attach polices to group: 

Attaching policies to group is best practice instead of directly attaching to individual users. That’s the reason we have skipped attaching the policy while creating the users. Let’s see how we can attach the administrator policy to group UASUPPORT.

1.Click on Policies. Search for “AdminstratorAccess” policy  and select it. From the “Policy Actions” menu , click on Attach .

attach-policy-administrator-access


2.Select group and click on  “Attach policy”.

attach-policy-to-group


3.Here you can see that group “UASUPPORT”  has been successfully attached policy “Administrator Access” . Now all the users under that group will equivalent to root users.

policies-listing
policies-listing


Let’s have a closer look on policy documents.

1.Click on the policy name (AdministratorAccess).

just-look-at-the-json-coding-policy


2. Just click on Attached Entities to see where these policy is used.

policy-attached-entities


Apply IAM Password Policy:

Let’s configure the password policy.

applu-an-iam-password-policy
apply-an-IAM-password-policy


Click on Manage password policy which will take you to the below screen.  You can configure according to your requirement. I have highlighted my changes in the password policy.

iam-password-policy
iam-password-policy


Just go back to IAM dashboard and look at the security status. You should see something like below.

security-status-green


We have successfully setup AWS IAM . You could test the user login credentials using direct URL which we have customized earlier . In the upcoming article, we will dig in to S3 (AWS Storage servcie).

The post AWS IAM – Users – Group – Policies- Management – Part 5 appeared first on UnixArena.

Amazon AWS – S3 Storage Overview – Part 6

$
0
0

S3 – Simple storage service – S3 is a safe place to store your files. Its an Object based storage system and the data is spread across multiple devices and multiple amazon facilities. S3 Storage is highly  secure,reliable,  Scalable Object storage service. Amazon provides simple web interfaces to S3 storage and retrieve any amount of data from anywhere on the web.  S3 has been built to provide 99.99% availability and Amazon Guarantee that. Amazon Grantees  99.999999999% durability for data which is stored on S3 cloud Storage. Amazon S3 follows “Read after write consistency” for PUTS of new Objects to ensure the data consistency. At the same time, the overwrite PUTS & DELETES.

S3 can’t be used to install operating system or database and you need block based storage for those. Here is the few examples for the object based storage and block based storage in traditional environments.

  • Object Based Storage :  NFS , CIFS , SMBFS ..etc..
  • Block based Storage : ext3, ext4 , ZFS , vxfs , XFS ..etc.


Key Points about S3:

  • S3 is an object based storage systems
  • S3 will allow to upload / Download the files from anywhere in web.
  • Files size can be from 0KB to 5TB
  • It’s a unlimited storage space
  • Files are stored in buckets. Buckets are nothing but a directory .
  • S3 is a universal namespaces. So the bucket name must be unique.
  • The successful file upload code is 200.
  • It provides 99.99% availability
  • Amazon guarantee’s  99.999999999%  reliability
  • Tiered Storage Available for life cycle management.


S3 Object Parameters:

  • Key – File name of the Object Name
  • Value – Actual Data – Made up a sequence of data.
  • Version ID – File versioning .
  • Metadata – Data about the date your are writing the file.
  • Sub Resources – Access Control Lists


S3  – Storage Classes:

  1. S3 Standard – 99.99% Availability + 99.999999999% Durability
  2. s3  Standard – IA  (Infrequently Accessed Data) – Lower Fee than s3
  3. S3 – Reduced Redundancy Storage – 99.99% Availability + 99.99 Durability
  4. S3 Glacier – Very Cheap but used only for archival. It take 4 to 5hrs to retrieve the data.


S3 - Tier Table

S3 – Tier Table


Standard Standard IA Glacier

S3 vs Glacier

Transfer Acceleration:

Amazon S3 Transfer Acceleration enables fast, easy and secure transfer of files over long distances between client and s3 bucket. Transfer Acceleration takes advantages of Amazon Cloud-front’s globally distributed edge location, data is routed to Amazon S3 over an optimised network path.

Amazon charges based on ,

  • Amount of Storage  that you consume.
  • No of Requests that you place in S3 to retrieve the data.
  • Storage Management Prizing
  • Data Transfer prizing
  • Transfer Acceleration


Hope this article covered the basics of S3 Amazon object storage. In the upcoming article ,we will see that how to use s3 object storage.


Share it ! Comment it ! Be Sociable !!!

The post Amazon AWS – S3 Storage Overview – Part 6 appeared first on UnixArena.

Amazon AWS – Create a S3 Storage Bucket – Part 7

$
0
0

This article will walk through that how to create S3  object storage bucket in Amazon AWS portal. S3 is multipurpose object storage with plenty of features and storage options for as we discussed in last article. Buckets are globally unique containers for everything that you store in Amazon S3. That said you have to create the bucket with unique name. Otherwise, you will get an error stating that bucket is already exists in the global name space. Buckets have configuration properties, including their geographical region, who has access to the objects in the bucket, and other metadata, such as the storage class of the objects in the bucket. Once the bucket is created, you can upload the files to the bucket but by default files will be in private mode.  You need to adjust the file permission based on your needs.

Amazon S3 - Explain
Amazon S3 – Explain


Let’s see that how to create the AWS S3 bucket and upload the file publicly accessible permission.


1.Login to Amazon AWS console.

sign-in-to-amazon-aws-console


2. Once you have singed to the AWS console , Please click on services.

AWS Management Console


3.  Click on Storage s3 to launch the storage management console.

AWS - S3 Storage Management
AWS – S3 Storage Management


4. Create a own & unique storage bucket.

AWS S3 - Create new Storage Bucket
AWS S3 – Create new Storage Bucket


5. Enter the unique bucket name and select near by region for better performance.

Enter Bucket Name and Select Region - AWS
Enter Bucket Name and Select Region – AWS


6. Set the S3 Bucket properties.  In the wizard, you could enable versioning , logging for the bucket. You could also use tag to track the S3 bucket usage and cost.

Set Properties for the object - S3 AWS
Set Properties for the object – S3 AWS


7. Set the s3 bucket object and object permission . You could also grant or deny access for public access.

Permission - S3 Bucket AWS
Permission – S3 Bucket AWS


8. Review the new bucket permission and  proprieties.  Click on “Create Bucket”

Review and Create new S3 Bucket


9. Once the bucket is created , you can see the bucket is listed in S3 console. Click on the bucket

Bucket Listing - AWS S3
Bucket Listing – AWS S3


10. Add files to the newly created bucket.

Add Files to Bucket
Add Files to Bucket


11. Here i have uploaded a image file called ” VMware vSphere SRM” .

Upload Files - AWS S3
Upload Files – AWS S3


12. Manage the object permission. Here I haven’t granted  the permission to the public.

Set the Object permission - S3 AWS
Set the Object permission – S3 AWS


13. Select the storage type. We have already discussed about the various type of storage on this AWS series. You could also have option to enable the encryption for the object.

Select the storage class & Encryption


14. Review the object permission and upload it .

Review and upload the file


15. Here you can see that file has been uploaded successfully. Click on the image to check the URL for the object.

File Uploaded Successfully - S3 AWS
File Uploaded Successfully – S3 AWS


We have created new S3 Bucket and uploaded the file successfully.


Let’s do small test by accessing the file.

1.  Once you have clicked the file, you can get the file URL .

File Overview and URL


2. Access the file link. Since, we have deny the public access while uploading the file, nobody can view this file.

Access the File URL
Access the File URL


3. Let’s grant the access to the public to view the file. Select the permission tab and click on “everyone” in public access tab.

S3 AWS - Public Access
S3 AWS – Public Access


4. Select “Read Object” and save it .

World Wide Read Access to Object


5. Go back to the browser and access the object link again. You can see that file is readable for public.

Public Access - Object - AWS S3
Public Access – Object – AWS S3


6. You could also encrypt the object anytime by accessing the properties tab.

Object Properties - AWS S3
Object Properties – AWS S3


Hope this basic AWS s3 demonstration help you to  learn S3 yourself . In upcoming artciles, we will see more about Amazon AWS storage services .


Share it ! Comment it !! Be Sociable !!!

The post Amazon AWS – Create a S3 Storage Bucket – Part 7 appeared first on UnixArena.


Amazon AWS – S3 Lifecycle Storage Management with Glacier

$
0
0

Amazon AWS – S3 (Simple Storage System) provides the lifecycle storage management system to reduce the operating cost by moving the data in to different storage  classes (“S3 – IA” & “Glacier- Archive” are cheaper storage compare to S3). At the same time , AWS also provides the robust automatic system which enables to move the data from one storage to another using the defined rules (XML format). There are two important actions performed by lifecycle management system.


  • Transition actions:

Moving the objects from one storage to another storage based on the rules which you have created. For an example, if you would like to move the files which 30 days older from s3 standard to S3 – IA storage , you could define in rules. Rest of the things will be taken care by AWS.

  • Expiration actions:

You could set the expiry date for the objects which are no longer required after certain period. Amazon S3 deletes the expired objects on your behalf.


Where to utilize the Amazon S3 Lifecycle Management ?

  • Application logs which are required after certain period of time.
  • Documents which are accessed for limited period of time. After that, these documents are less frequently accessed.
  • Health care records, financial documents and data that must be retained for regulatory compliance.


Note: Glacier is not available in the following highlighted datacenters.  So Please do not create S3 bucket on these datacenters if you are planning to use lifecycle management.

Glacier DataCenter options


Let’s see the demonstration of Amazon S3 Lifecycle Management:

1.  Navigate to S3  and see the existing bucket.

Bucket Listing
Bucket Listing


2. Navigate to the bucket properties tab. Enable the versioning for the bucket.

Enable Versioning - AWS S3
Enable Versioning – AWS S3


3. Click on the versioning  (Disabled – Radio button) to enable it .

Enable Versioning - AWS S3 3
Enable Versioning – AWS S3 3


4. Navigate to bucket management tab and Click on “Add Life Cycle Rule”  .

Add Lifecycle Rule -S3


5. Enter the life cycle rule name.

Enter Lifecycle Rule Name


6. Click on “Current Version” to configure the object  transition.

Configure Transition - S3 - Lifecycle Management
Configure Transition – S3 – Lifecycle Management


The following diagram would make you understand better.

  • Transition to STANDARD-IA storage after 30 days .
Diagram - Move objects after 30 days to Standard - IA
Diagram – Move objects after 30 days to Standard – IA


  • Transition to Amazon Glacier after 60 days .
Diagram - Move objects after 60 days to Glacier
Diagram – Move objects after 60 days to Glacier


7 . Click on “Previous Version” to configure the object  transition.

Configure Transition - For Previous version Object
Configure Transition – For Previous version Object


Please refer the following diagrams.

  • Transition to STANDARD-IA storage after 30 days for previous version items  .
Diagram - Previous Version  - Life Cycle.
Diagram – Previous Version – Life Cycle.


  • Transition previous version items to Amazon Glacier after 60 days .
Diagram - Previous Version Archive to Glacier
Diagram – Previous Version Archive to Glacier


8. Configure the object expiry for both current and previous versions.

Configure object expiration


The below flow charts will explain better.

Delete the files after 425 days
Delete the files after 425 days – Current version 
Delete the files after 425 days - Previous version
Delete the files after 425 days – Previous version


9. You could also have option to clean up the incomplete uploads to save the storage space.

Delete the incomplete multi-part uploads


10. Review the life cycle rule for bucket “unixarena” & save it .

Review S3 Lifecycle Rule


We have successfully configured the Amazon S3 Lifecycle rule.  Hope this article is informative to you .

Share it ! Comment it !! Be Sociable !!!

The post Amazon AWS – S3 Lifecycle Storage Management with Glacier appeared first on UnixArena.

Amazon AWS – Elastic Compute Cloud (EC2) – Overview – Part 9

$
0
0

Amazon AWS offers compute space in the cloud.  Elastic Compute Cloud (EC2) is a web service that provides re-sizeable compute capacity in the cloud on demand basis. To setup the on-premise computing will take minimum couple of months to make it operational. But in the cloud service based computing will be available in few minutes.

Here is the list of Amazon’s  EC2 different prizing models offered by:

=  > On Demand instances
= > Capacity Reserved Instance
= > Spot instances
= > Dedicated hosts


On Demand instances:

In  On Demand instance type prizing mode, you will be only paying for the EC2 instances that you use.  Recently Amazon  have introduced the per second billing for EC2 instances unlike hourly basis charges. On this prizing model , you no need to plan for the spikes and utilization. You will be paying how much resource you use.

Earlier  Pricing is per instance-hour consumed for each instance, from the time an instance is launched until it is terminated or stopped. Each partial instance-hour consumed will be billed as a full hour.

Use cases : Un-predictable work loads, No upfront fee cases, Testing application on amazon instance for first time and temporary instances.


EC2 Reserved Instances:

EC2 reserved instances allows you to reserve the capacity for more predictable workloads. Off-course on demand instance also will serve the required capacity but you will get up to 75% discount by using the reserved instances . The prizing also depends on instance type , availability zone, capacity and platform. Any factor decides the prizing is committing the resources for certain period. If you reserve the instance for an year , you will get up to 54% discount and if you reserve the instance for for three year , you will get update to 60% discount. Paying full upfront  fee will have more saving than paying monthly basis.

EC2 RI offers the market place to sell the reserved instances to third party if you not using it .

Use cases: Predictable workloads and forecast instance tenure. Application that requires reserved capacity. Users who can pay up-front fee that can reduce the instance cost further.


Spot instances:

You can  bid on spare Amazon EC2 computing capacity for cheaper prizing using Amazon EC2 Spot instances. The Spot instance prize fluctuates based on the supply and demand of available unused Amazon EC2 capacity.  If you are planning to get the spot instance, you need to specify the maximum amount you are willing to pay for the instance.  once the ec2 spot instance is launched , it will allow to run until the spot instance prize is not exceeding the prize you have defined. If the spot prize goes up than your  defined prize, instance will be terminated automatically.

Amazon guarantees that you will not be charged for more than what you have bid. At the same time , instances will not be terminated if the bid prize is higher than the spot instance prize. You must specify the end duration of the instances.

If the Spot price exceeds your specified price, your instance will receive a two-minute notification before it is terminated, and you will not be charged for the partial hour that your instance has run.

Please refer the following link to know the current spot instance prizing.

https://aws.amazon.com/ec2/spot/pricing/


Use cases : Application that have flexible start and stop times. Applications which can’t afford standard Amazon instance fee. Research companies data simulation with low cost.


Dedicated hosts

Dedicated hosts are mostly used to fulfill the corporate compliance and regulatory requirements. This will also help you to use your existing server-bound software licenses. It can be purchased on On-demand prizing model . You will have great visibility to place the amazon instances when you have dedicated hosts available. You have visibility of the number of sockets and physical cores that support your instances on a Dedicated Host. This will help to manage the software licensing.


EC2 Instances  Types:

Amazon offers different type of instances based on your workload. Here is the list of instance type currently available in latest generation of EC2.


Instance Family Current Generation Instance Types Purpose
General purpose t2.nano         m3.medium
t2.micro        m3.large
t2.small         m3.xlarge
t2.medium    m3.xlarge
t2.large          m4.large
t2.xlarge        m4.xlarge
t2.2xlarge      m4.2xlarge
m4.4xlarge
m4.10xlarge
m4.16xlarge
T –  Webservers & small DB servers
M – Application Servers .
Compute optimized c3.large
c3.xlarge
c3.2xlarge
c3.4xlarge
c3.8xlarge
c4.large
c4.xlarge
c4.2xlarge
c4.4xlarge
c4.8xlarge
C- CPU intensive Applications and databases
Memory optimized r3.large                 x1.16xlarge
r3.xlarge               x1.32xlarge
r3.2xlarge            x1e.32xlarge
r3.4xlarger
3.8xlarge
r4.large
r4.xlarge
r4.2xlarge
r4.4xlarge
r4.8xlarge
r4.16xlarge
R – Memory Intensive Applications
X-  SAP HANA & Apache Spark .
Storage optimized i2.xlarge              d2.2xlarge
i2.2xlarge           d2.4xlarge
i2.4xlarge           d2.8xlarge
i2.8xlarge
i3.large
i3.xlarge
i3.2xlarge
i3.4xlarge
i3.8xlarge
i3.16xlarge
D – Hadoop instances , Fileservers , Datawarehousing
I – High Speed Storage SSD – NoSQL & Datawarehousing
Accelerated computing g2.2xlarge    p2.xlarge        f1.2xlarge
g2.8xlarge    p2.8xlarge     f1.16xlarge
g3.4xlarge    p2.16xlarge
g3.8xlarge
g3.16xlarge
F- Hardware Accelaration for your code.
P – Graphsics related applications , Machine learning
G – Graphics intensive , 3D accelration


We have seen the different Amazon EC2 prizing model and various instance types on this article. In the upcoming article ,we will see that how to launch the EC2 instance from Amazon web portal.

Stay tuned with UnixArena.  Share it ! Comment it !! Be Sociable !!!

The post Amazon AWS – Elastic Compute Cloud (EC2) – Overview – Part 9 appeared first on UnixArena.

Amazon AWS – Elastic Block Store – EBS – Overview – Part 10

$
0
0

This article will walk through about Elastic Block Store (EBS)  volume and it’s use cases. The last article walk through about EC2 and different prizing options and various type of EC2 instances available in Amazon Public cloud. Before launching the first EC2 instance , you must know about EBS and it’s use. Amazon EBS is persistent block storage volume which is mostly used to install the operating system, install the database and wherever the block level storage is required. It can also be the primary choice for low latency interactive applications that demand high IOPS and predictable performance.  Each Amazon EBS volume is automatically replicated within its Availability Zone to protect you from hardware failure (Ex: Disk , Storage array), offering high availability.


Here is the list of Amazon EBS volumes available :

  • EBS General Purpose SSD (gp2) Volumes
  • EBS Provisioned IOPS SSD (io1) Volumes
  • EBS Throughput Optimized HDD (st1) Volumes
  • EBS Cold HDD (sc1) Volume
  • EBS Snapshots


EBS General Purpose SSD (gp2) Volumes:

EBS general purpose volumes are most often used in Amazon EC2 since its balances both prize and performances. It uses SSD in the backed, so the hardware failure are very rare. The solid state drives will always provides the reliable performance over the traditional HDD’s.  Volumes is charged by the amount you provision in GB per month, prorated to the hour, until you release the storage. I/O is included in the price of the volumes, so you pay only for each GB of storage that you provision it.

Charges  = Pay only for the Number of GB that you have provision.


EBS Provisioned IOPS SSD (io1) Volumes:

What is different here from  the EBS general purpose SSD volumes ? If you need more than 10,000 IPOS , you need to choose “EBS provisioned IOPS SSD” volumes. It have capability to serve up to 20,000 IOPS which is much more faster than GP2 volumes.  On this volume , amazon charges for number of IOPS you make on this volume. This volume will fit for busy databases where it requires more IPOS .

Charges = Number of GB that you have provision + Per provisioned IOPS-month.


 EBS Throughput Optimized HDD (st1) Volumes:

It uses spinning disks in the backed and cost of the volume will be lesser than the SSD one. There is no additional charges for IOPS.  I/O is included in the price of the volumes, so you pay only for each GB of storage that you provision it. Its a low cost storage option and it can be used for Big data, Data warehousing , Log processing . You can’t use HDD volumes as boot volumes for any type of instances.

Charges  = Pay only for the Number of GB that you have provision.


EBS Cold HDD (sc1) Volume:

Its lowest cost storage volume where its used for infrequent data (Ex: File server, archival data ) access type.  I/O is included in the price of the volumes, so you pay only for each GB of storage that you provision it.

Charges  = Pay only for the Number of GB that you have provision.


Quick Summary:

AWS EBS storage Types


EBS Snapshots:

EBS snapshots is nothing but storing the EBS volume snapshot on S3 bucket. For the first time snapshot , it save the complete volume in S3 bucket. Amazon charges only for the incremental snapshots you store there after. If you have more data changes on the volume , the snapshot size will increase.  Copying the EBS snapshots is charged for the data transferred across the AWS regions.

EBS volumes and Snapshot


Hope you might get idea about the EBS storage and various type of EBS storage options are  available in Amazon Web services. In the upcoming article, we will demonstrate that how to launch the EC 2 instance in AWS cloud.

The post Amazon AWS – Elastic Block Store – EBS – Overview – Part 10 appeared first on UnixArena.

Amazon AWS – Launching EC2 Cloud Instance – Part 11

$
0
0

This article will walk through to create the first AWS instance and launch it. We will also see that how to access the AWS instance from internet.  Configure the virtual firewall to protect the instance from different external attacks by restricting the number of allowed ports. You could also protect the instance against the accidental termination. By adding more tags to the instances, you could easily determine the cost and  department.

Let’s start the demonstration.

1. Login to the amazon AWS console.

2. From the AWS services , please click on EC2.

EC2 Amazon AWS
EC2 Amazon AWS


3. You could check the EC2 service status on your zone.

AWS - Service Health
AWS – Service Health


4. Click on “Launch instance” tab .

Launch Instance - AWS
Launch Instance – AWS


5. Select the any one of the Free Tier eligible image.  (If you don’t want to be charged.)

Select Free Tier eligible instance - Amazon Linux
Select Free Tier eligible instance – Amazon Linux


6. Choose an AWS EC2 instance type.

Choose AWS Instance Type


7. Configure instance details like network and other optional settings.

Configure Instance Details - AWS
Configure Instance Details – AWS


8.This section is required if you need to add additional storage.

Add Storage - AWS Instance
Add Storage – AWS Instance


9. Add the required tags.

Add Tags to the AWS Instance


10. Configure the security groups. Since its first instance,  I haven;t configure the additional security. It’s open to the internet on port 22.

Configure Security Group - AWS instance
Configure Security Group – AWS instance


11. Review and launch the AWS EC2 instance.

Review Instance Launch - AWS
Review Instance Launch – AWS


12. Create a new key pair and download it.

Create a new key pair and Launch instance


13. On the successful launch of the instance , you could see like below.

Launch Status - AWS EC2
Launch Status – AWS EC2


14. If you click that instance id , you can see the instance status.

AWS instance status
AWS instance status


15. In the instance description  section , you could see that public IP and DNS for the instance.

AWS EC2 Details
AWS EC2 Details


Using the Public  IP, You should be able to connect the instance from internet. In the next article, we will see that how to connect to the instance using the private key from windows laptop.


Share it ! Comment it !! Be Sociable !!!

The post Amazon AWS – Launching EC2 Cloud Instance – Part 11 appeared first on UnixArena.

Amazon AWS – Connect to AWS instance using Putty – Part 12

$
0
0

This article will walk through to connect to the AWS cloud instance using putty software from windows laptop. If you use MAC OS or Linux OS , you could easily connect to the AWS instance using the downloaded *.pem key file from AWS Portal. pem key file format is not supported in windows ssh client – Putty. You must need to convert the pem file as ppk file using the putty keygen. Let’s quickly see that how to convert the private key which is in pem format to ppk format using putty keygen. At the last section , we will use the ppk file on putty ssh client to establish the session with Amazon AWS instance.


1. Download the putty keygen from internet if you don’t have it already.


2. Open the putty keygen . Click on “Load” tab.

Putty KeyGen
Putty KeyGen


3. Select the downloaded pem file.  (If putty keygen is just looking ppk file, just select “All files”  )

Load the Downloaded Pem Key file


4. Save the private key which is converted in ppk format.

Save private key - AWS
Save private key – AWS


5. Open putty ssh client and enter the AWS EC2 instance public IP. Do not click on “open” tab.

Enter the AWS EC2 Instance IP


6. Load the private key (which is converted using puttygen) from SSH tab. Click on Open.

Load the private Key prior to open the session


7. Try to login as ec2-user. If you try with root user, you will get warning message like below.

Login as ec2-user
Login as ec2-user


8. You could use “sudo su – ” to gain the root access for the instance.

All the pubic could instances are using the private  to add the additional security. Using the similar method, you should be able to connect to any public could instances once you have the public IP and private key file. Hope this article is informative to you.

Share it ! Comment it !! Be  Sociable !!!

The post Amazon AWS – Connect to AWS instance using Putty – Part 12 appeared first on UnixArena.

Viewing all 369 articles
Browse latest View live


<script src="https://jsc.adskeeper.com/r/s/rssing.com.1596347.js" async> </script>