NetApp FAS unified storage arrays available in wide range of configurations to meet the current business needs. Clustered Data ONTAP operating system is available for all the FAS unified storage arrays. Each of the Netapp FAS platforms can be configured with SATA, SAS, or SSD disk shelves, and shelves can be mixed. This allows you to scale performance and capacity independently. Using NetApp FlexArray technology, you could integrate the third party storage arrays in Clustered Data ONTAP as backed storage. Let’s have look at some of the NetApp FAS Series.
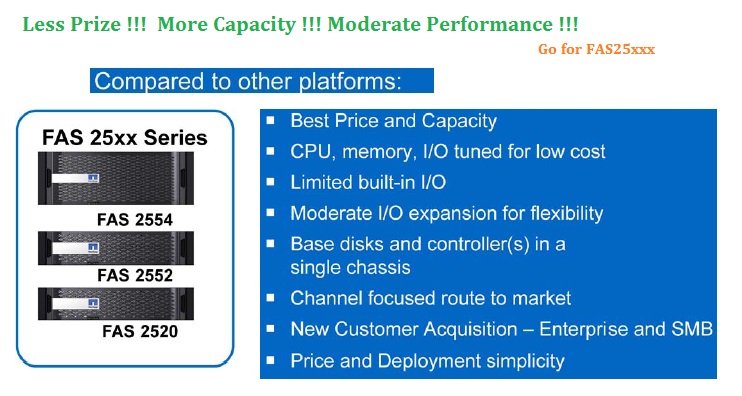
NetApp focuses on two platform architectures, one for the enterprise market segment and one for the entry level.
The Enterprise focus is with system performance and scalability (cost is a lower priority), improving serviceability, supporting controller upgrades in place (within a family and between generations) and building towards a future that includes hot-swap IO.
The Entry level focus will have a greater priority on balancing the performance of the systems with their cost, one delivering integrated controller and storage, providing more size optimized platforms, and improving simplicity.
NetApp’s Enterprise level FAS series starts with FAS8xxx and Entry level FAS series starts with FAS2xxx.
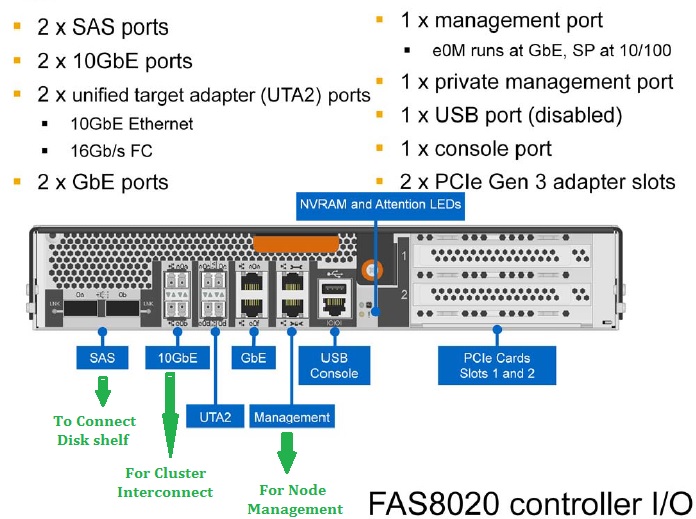
The below snapshots provides the available ports on FAS 8020 controller.
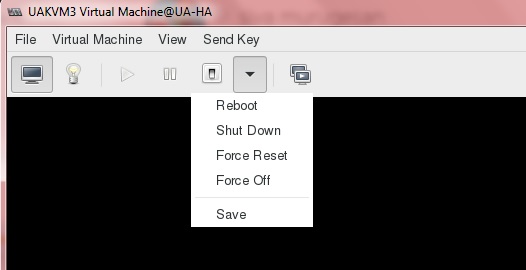
FAS 8020 NetApp Controller
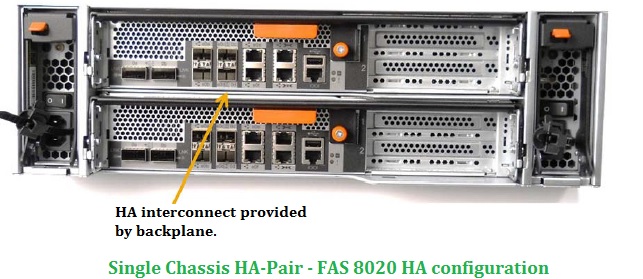
The above diagram shows the single FAS controller. Typically FAS 8020 HA configuration will look like below. In a single-chassis HA pair, both controllers are in the same chassis. The HA interconnect is provided by the internal backplane. No external HA interconnect cabling is required.
Single Chassis HA-Pair
Note: HA Interconnect and Cluster interconnect are not the same.
In Clustered DATA ONTAP , We will be aggregating many nodes in to one single cluster. In the upcoming article we will see about clustering.
There is a huge difference between DATA ONTAP 7 Mode and C-Mode on data access methods. In 7-Mode, we will be having HA pair controllers to access the data. When the request comes , it will go to any one of the HA controllers. But in C-Mode , Multiple controllers will be aggregated in the cluster and the request might land on any of the controller irrespective of storage origin. The requested data will go through the cluster-interconnect if the LIF is not hosted on same storage node. In this article ,we will see the Clustered DATA ONTAP architecture and data access methods.
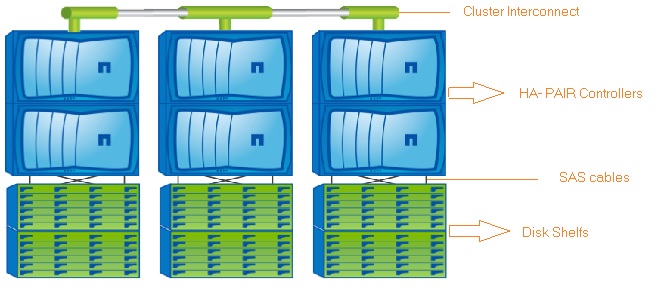
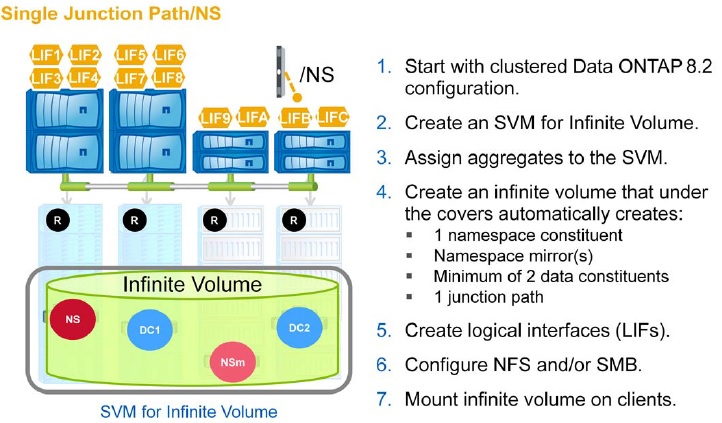
1. How Typical Clustered DATA ONTAP six node cluster looks like ?
In the following diagram , we can see that 3 HA pair controllers formed the 6 Node clusters.
NetApp 6 Node cluster
The NetApp storage system architecture includes multiple components: storage controllers, high-availability
interconnect, multipath high-availability storage connections, disk shelves, system memory, NVRAM, Flash Cache modules, solid-state drive (SSD) aggregates, hard-disk-drive (HDD) aggregates, and flash pools. Storage systems that run the clustered Data ONTAP operating system also include cluster-interconnect and multiple cluster nodes.
Note: HA Pair = Two controllers interconnect using backplane on single chassis .
2. What are the protocols are supported on NetApp controllers ?
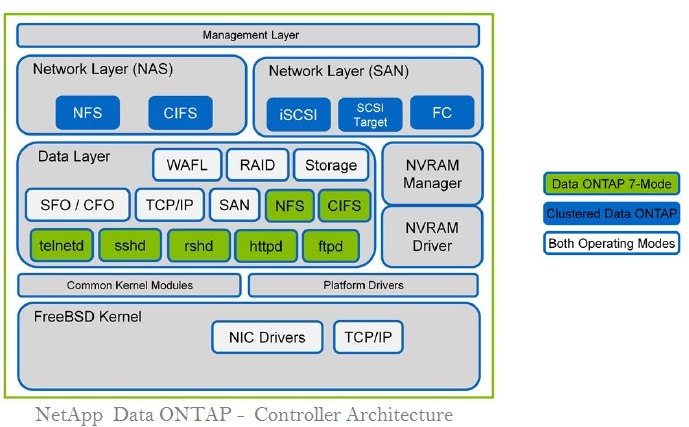
The Data ONTAP architecture consists of multiple layers, which are built on top of the FreeBSD Unix operating system. Above the FreeBSD Unix kernel is the data layer that includes the WAFL (Write Anywhere File Layout) file system, RAID,storage, failover, and the protocols for Data ONTAP operating in 7-Mode. Also above the FreeBSD kernel is the NVRAM driver and manager. Above these layers is the NAS and SAN networking layer, which includes protocol support for clustered Data ONTAP. Above the networking layer is the Data ONTAP management layer.
NetApp Data ONTAP – Controller Architecture
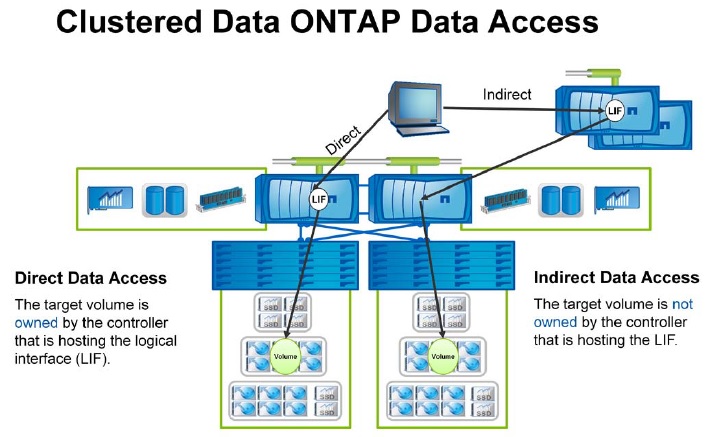
3. What is the two different type of data access on Clustered Data ONTAP ?
Direct Access (7-Mode & C-Mode)
In-direct Access (Only on C-Mode)
Both clustered Data ONTAP and Data ONTAP operating in 7-Mode support direct data access; however, only
clustered Data ONTAP supports indirect data access.
Clustered Data ONTAP Data Access
Scenario :1
Direct Access : – When the client is trying to access the data and LIF is sitting on the node which own the storage disks shelf.
Scenario :2
In-Direct Access: – When the client is trying to access the data and LIF is sitting on the node which doesn’t own the storage disks shelf. In this case, data will pass through the cluster interconnect.
Indirect data access enables you to scale workloads across multiple nodes. The latency between direct and indirect data access is negligible, provided that CPU headroom exists. Throughput can be affected by indirect data access, because additional processing might be required to move data over the cluster-interconnect.
Data Access type is protocol dependent. SAN data access can be direct or indirect depending on path selected by
Asymmetric Logical Unit Access (ALUA). NFS data access can be direct or indirect, except that pNFS is always direct.
CIFS data access can be either direct or indirect.
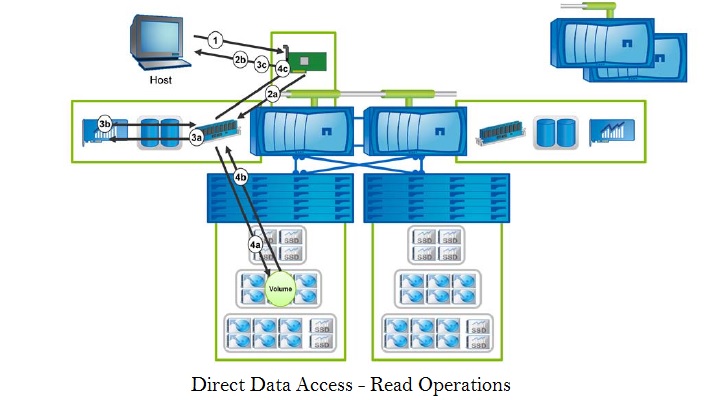
Let’s have a closer look of Direct Data Access .
Direct Data Access – Read Operations
1. The read request is sent from the host to the storage system via a network interface card (NIC) (For ISCSI/NFS/CIFS) or a host bus adapter (HBA) (For FC-SAN).
2. If the read is in system memory, it is sent data to the host; otherwise, keep looking for the data in the storage.
3. Flash Cache is checked (if it is present) and, if the blocks are present, they are brought into memory and then sent
to the host; otherwise, keep looking for the data within the storage.
4. Finally the block is read from storage, brought into memory, and then sent to the host.
Let’s have a closer look of Indirect Data Access .
Indirect Data Access – read Operations
Read operations for indirect data access take the following path through the storage system:
1. The read request is sent from the host to the storage system via a NIC (NFS/CIFS/ISCSI)or an HBA(SAN-FC).
2. The read request is sent to the storage controller that owns the volume.
3. If the read is in system memory, it is sent to the host; otherwise, keep looking for the data on that storage controller.
4. Flash Cache (if it is present) is checked and, if the blocks are present, they are brought into memory and then sent
to the host; otherwise, keep looking for the data.
5. Finally the block is read from storage, brought into memory, and then sent to the host.
Hope this article is informative to you. In the next artcile ,we will see about the write operation on Netapp Clustered DATA ONTAP.
This article is going to explain about the Netapp write operations. In Clustered Data ONTAP , write request might land on any of the cluster node irrespective of the storage owners. So that data write operations will be either direct access or indirect access. The Write requests will not send to the disks immediately until CP ( consistency point) occurs . NVRAM is another component of Netapp which keeps the redo logs. NVRAM provides a safety net for the time between the acknowledgement of a client-write request and the commitment of the data to disk.
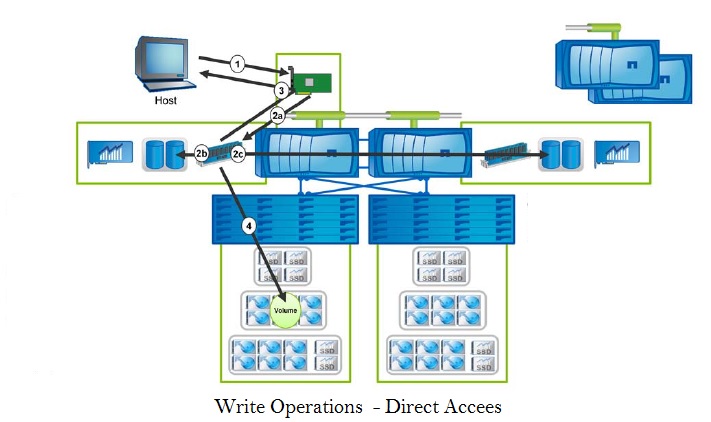
WRITE Operation (Direct Data Access):
NetApp – Write Operations – Direct Access
Write operations for direct access take the following path through the storage system:
The write request is sent to the storage system from the host via a NIC or an HBA.
The write is simultaneously processed into system memory and logged in NVRAM and in the NVRAM mirror the partner node of the HA pair.
The write is acknowledged to the host.
The write is sent to storage in a consistency point (CP).
WRITE OPERATIONS (INDIRECT DATA ACCESS)
NetApp – Write Operations – Indirect Data Access
Write operations for indirect data access take the following path through the storage system:
The write request is sent to the storage system from the host via a NIC or an HBA.
The write is processed and redirected (via the cluster-interconnect) to the storage controller that owns the volume.
The write is simultaneously processed into system memory and logged in NVRAM and in the NVRAM mirror of the partner node of the HA pair.
The write is acknowledged to the host.
The write is sent to storage in a CP.
WRITE OPERATIONS (FLASH POOL SSD CACHE):
NetApp Write Operations – Flash pool SSD cache
Write operations that involve the SSD cache take the following path through the storage system:
The write request is sent to the storage system from the host via a NIC or an HBA.
The write is simultaneously processed into system memory and logged in NVRAM and in the NVRAM mirror of the partner node of the HA pair.
The write is acknowledged to the host.
The system determines whether the random write is a random overwrite.
A random overwrite is sent to the SSD cache; a random write is sent to the HDD.
Writes that are sent to the SSD cache are eventually evicted from the cache to the disks, as determined by the
eviction process).
Consistency Point (CP):
Consistency point will occurs on following scenarios:
The write requests will send to the memory (which act as write cache) and once the NVRAM buffers fills up , it will flush the write to the disk.
A Ten second timer runs out.
A Resource is exhausted or hits a predefined scenario, and it is time to flush the writes to disk.
What will happen if the back to back CP happens ?
As an NVRAM first buffer reaches its capacity , it signals to memory to flush the writes to the disk.
If the second buffer reaches capacity while writes are still being sent to disk from first buffer , the CP can’t occur . The CP can occur only after the first flush of writes is complete.
NVRAM :
The write requests will sent to disk from memory (Not from NVRAM) in a CP . So NVRAM is not a write buffer.
It is battery backed Memory to keep the redo logs in-case of system power failure or crash.
Double-buffered journal of write operations
It is mirrored between storage controller in a HA Pair.
Writes in system memory that are logged in NVRAM. It mirrored and persistent.
It is used only for writes not for reads
It stores redo log or short term translation logs which is typically less than 20 seconds.
It is used only on system crash or power failure. Otherwise , it will not looked at again.
It enables rapid acknowledgement of client-write requests.
It is very fast and will not cause any performance issues.
Hope this article is informative to you . Share it ! Comment !! Be Sociable !!!
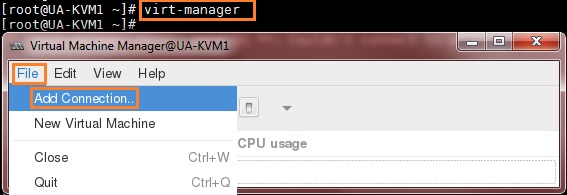
This article will demonstrates that how to configure the NetApp (Clustered ONTAP) two node cluster. Since I am going to use the simulator for this demonstration, we can’t virtualize the HA pair controllers. I will use two separate nodes to form the cluster with switch-less configuration(Assuming that direct cluster inter-connect cabling is done between nodes). In an order to form the cluster , we need to create the cluster on first node and join the remaining nodes. We have to make sure that all the systems are in sync with NTP source to prevents CIFS and Kerberos failures.
Note: Both the controllers are booted in C-Mode.
Creating the cluster on the first node:
1.Login to the first controller using serial console or IP address if you have already configure the Node IP. In this case, I have connected the first node using serial port.
2. Login as admin with no password.
3. Once you have reached the node shell , execute command “cluster setup” .
::> cluster setup
4. You will get wizard like below. Enter “create” to create a new cluster.
Welcome to the cluster setup wizard.

You can enter the following commands at any time:
  "help" or "?" - if you want to have a question clarified,
  "back" - if you want to change previously answered questions, and
  "exit" or "quit" - if you want to quit the cluster setup wizard.
     Any changes you made before quitting will be saved.

You can return to cluster setup at any time by typing "cluster setup".
To accept a default or omit a question, do not enter a value.


Do you want to create a new cluster or join an existing cluster? {create, join}: create
5.When prompted about using the node as a single node cluster, reply no because this will be a
multi-node cluster.
Do you intend for this node to be used as a single node cluster? {yes, no} [no]:
no
6.Since its a simulator,We are going to accept the default. Enter yes to accept the default values for cluster network configuration.
System Defaults:
Private cluster network ports [e0a,e0b].
Cluster port MTU values will be set to 1500.
Cluster interface IP addresses will be automatically generated.
Do you want to use these defaults? {yes, no} [yes]: yes
7.Enter the cluster Name .
Step 1 of 5: Create a Cluster
You can type "back", "exit", or "help" at any question.

Enter the cluster name: NetUA
8. Enter the license key for the node.
Enter the cluster base license key: XXXXXXXXXXXXXXXXXXXXXXXXX

Creating cluster NetUA

Network set up .....
9. Just press “Enter” to continue if you don;t want to add additional license keys at this moment.
Step 2 of 5: Add Feature License Keys
You can type "back", "exit", or "help" at any question.

Enter an additional license key []:
10. Set the Cluster vServer admin password.
Step 3 of 5: Set Up a Vserver for Cluster Administration
You can type "back", "exit", or "help" at any question.

Enter the cluster administrator's (username "admin") password:

Retype the password:

New password must be at least 8 characters long.

You can type "back", "exit", or "help" at any question.

Enter the cluster administrator's (username "admin") password:

Retype the password:
11.Enter the port and IP details for the cluster LIF.
Enter the cluster management interface port [e0c]:
Enter the cluster management interface IP address: 192.168.0.101
Enter the cluster management interface netmask: 255.255.255.0
Enter the cluster management interface default gateway: 192.168.0.1

A cluster management interface on port e0c with IP address 192.168.0.101 has been created.  You can use this address to connect to and manage the cluster.
12. Enter the DNS details and Name server IP.
Enter the DNS domain names: learn.netapp.local
Enter the name server IP addresses: 192.168.0.11
DNS lookup for the admin Vserver will use the learn.netapp.local domain.
13. We will skip the SFO since simulator will not support this feature.
Step 4 of 5: Configure Storage Failover (SFO)
You can type "back", "exit", or "help" at any question.


SFO will not be enabled on a non-HA system.
14. Set the Node location.
Step 5 of 5: Set Up the Node
You can type "back", "exit", or "help" at any question.

Where is the controller located []: BLR
15. Configure the node Management LIF.
Enter the node management interface port [e0f]:
Enter the node management interface IP address: 192.168.0.91
Enter the node management interface netmask: 255.255.255.0
Enter the node management interface default gateway: 192.168.0.1
A node management interface on port e0f with IP address 192.168.0.91 has been created.
16. After configuring the node management LIF, it will automatically logoff.
Cluster setup is now complete.

To begin storing and serving data on this cluster, log in to the command-line
interface (for example, ssh admin@192.168.0.101) and complete the following
additional tasks if they have not already been completed:

- Join additional nodes to the cluster by running "cluster setup" on
  those nodes.
- For HA configurations, verify that storage failover is enabled by
  running the "storage failover show" command.
- Create a Vserver by running the "vserver setup" command.


In addition to using the CLI to perform cluster management tasks, you can manage
your cluster using OnCommand System Manager, which features a graphical user
interface that simplifies many cluster management tasks. This software is
available from the NetApp Support Site.

Exiting the cluster setup wizard.

Fri Nov 27 21:35:23 UTC 2015
17. Login back as admin with newly created password and check the cluster status.
login: admin
Password:
NetUA::>
NetUA::> cluster show
Node                  Health  Eligibility
--------------------- ------- ------------
NetUA-01              true    true

NetUA::>
We have successfully created new cluster using first controller .
Joining the second node on Cluster:
1.Login to the second controller using serial console or IP address if you have already configure the Node IP. In this case, I have connected the second node using serial port.
2. Login as admin with no password.
3. Once you have reached the node shell , execute command “cluster setup” .
::> cluster setup
4. You will wizard like below. Enter “join” to join with newly created cluster.
Welcome to the cluster setup wizard.

You can enter the following commands at any time:
  "help" or "?" - if you want to have a question clarified,
  "back" - if you want to change previously answered questions, and
  "exit" or "quit" - if you want to quit the cluster setup wizard.
     Any changes you made before quitting will be saved.

You can return to cluster setup at any time by typing "cluster setup".
To accept a default or omit a question, do not enter a value.


Do you want to create a new cluster or join an existing cluster? {create, join}: join
5. Accept the defaults and continue.
System Defaults:
Private cluster network ports [e0a,e0b].
Cluster port MTU values will be set to 1500.
Cluster interface IP addresses will be automatically generated.

Do you want to use these defaults? {yes, no} [yes]: yes

It can take several minutes to create cluster interfaces...
6.System will automatically scan using the cluster interconnect and it will provide the cluster name to join.
Step 1 of 3: Join an Existing Cluster
You can type "back", "exit", or "help" at any question.

Enter the name of the cluster you would like to join [NetUA]:
NetUA

Joining cluster NetUA

Starting cluster support services ....

This node has joined the cluster NetUA.
7. System will automatically skips the SFO.
Step 2 of 3: Configure Storage Failover (SFO)
You can type "back", "exit", or "help" at any question.


SFO will not be enabled on a non-HA system.
8. Configure the node management LIF.
Step 3 of 3: Set Up the Node
You can type "back", "exit", or "help" at any question.

Enter the node management interface port [e0f]:
Enter the node management interface IP address: 192.168.0.92
Enter the node management interface netmask [255.255.255.0]:
Enter the node management interface default gateway [192.168.0.1]:

A node management interface on port e0f with IP address 192.168.0.92 has been created.
9. Once you have completed the node management LIF configuration, system will automatically logoff.
Cluster setup is now complete.

To begin storing and serving data on this cluster, log in to the command-line
interface (for example, ssh admin@192.168.0.101) and complete the following
additional tasks if they have not already been completed:

- Join additional nodes to the cluster by running "cluster setup" on
  those nodes.
- For HA configurations, verify that storage failover is enabled by
  running the "storage failover show" command.
- Create a Vserver by running the "vserver setup" command.


In addition to using the CLI to perform cluster management tasks, you can manage
your cluster using OnCommand System Manager, which features a graphical user
interface that simplifies many cluster management tasks. This software is
available from the NetApp Support Site.

Exiting the cluster setup wizard.

Fri Nov 27 21:43:52 UTC 2015
login:
10. Login to the node 2 using user “admin” and check the cluster status.
login: admin
Password:
NetUA::> cluster show
Node                  Health  Eligibility
--------------------- ------- ------------
NetUA-01              true    true
NetUA-02              true    true
2 entries were displayed.

NetUA::>
11. Check the network configuration on Node2.
NetUA::> network interface show
            Logical    Status     Network            Current       Current Is
Vserver     Interface  Admin/Oper Address/Mask       Node          Port    Home
----------- ---------- ---------- ------------------ ------------- ------- ----
NetUA
            cluster_mgmt up/up    192.168.0.101/24   NetUA-01      e0c     true
NetUA-01
            clus1        up/up    169.254.81.224/16  NetUA-01      e0a     true
            clus2        up/up    169.254.220.127/16 NetUA-01      e0b     true
            mgmt1        up/up    192.168.0.91/24    NetUA-01      e0f     true
NetUA-02
            clus1        up/up    169.254.124.94/16  NetUA-02      e0a     true
            clus2        up/up    169.254.244.74/16  NetUA-02      e0b     true
            mgmt1        up/up    192.168.0.92/24    NetUA-02      e0f     true
7 entries were displayed.

NetUA::>
12. Check the network configuration on Node1.
NetUA::> network interface show
            Logical    Status     Network            Current       Current Is
Vserver     Interface  Admin/Oper Address/Mask       Node          Port    Home
----------- ---------- ---------- ------------------ ------------- ------- ----
NetUA
            cluster_mgmt up/up    192.168.0.101/24   NetUA-01      e0c     true
NetUA-01
            clus1        up/up    169.254.81.224/16  NetUA-01      e0a     true
            clus2        up/up    169.254.220.127/16 NetUA-01      e0b     true
            mgmt1        up/up    192.168.0.91/24    NetUA-01      e0f     true
NetUA-02
            clus1        up/up    169.254.124.94/16  NetUA-02      e0a     true
            clus2        up/up    169.254.244.74/16  NetUA-02      e0b     true
            mgmt1        up/up    192.168.0.92/24    NetUA-02      e0f     true
7 entries were displayed.

NetUA::>
We have successfully setup the two node NetApp cluster.
Hope this article is informative to you. Share it ! Comment it !! Be Sociable !!!
In NetApp Data ONTAP , you must buy license keys to enable the additional features. NetApp Data ONTAP 8.2 onwards ,all the licesne keys are 28 characters in length. In Clustered Data ONTAP , you must keep the license entitlement same across the all the nodes. This will ensure that fail-over will happen without any issues. In this article we are going to see that how to manage the license codes on NetApp Clustered Data ONTAP 8.2. This includes Add/Remove/display the license keys using the cluster shell.
NetApp On-Command graphical utility will help you to manage the license keys from graphical window. Cluster – > Cluster_name- > Configuration – > System Tools – > License
Note: – NetApp License are based on the system serial number.
1.Login to the cluster Management LIF as admin user. (ssh session)
Cluster Management LIF – Netapp
Once you have logged in , you will get the cluster shell like below.
login as: admin
Using keyboard-interactive authentication.
Password:
NetUA::>
2.Check the cluster serial number.
NetUA::> cluster identity show

          Cluster UUID: 69a95be8-XXXX-11e5-8987-XXXXXXXXXXXXXX
          Cluster Name: NetUA
 Cluster Serial Number: 1-80-XXXXXX
      Cluster Location: BLR
       Cluster Contact:

NetUA::>
3. Check the Netapp controllers serial number, use the following command.
NetUA::> system node show -fields node,serialnumber
node     serialnumber
-------- ------------
NetUA-01 40XX432-XX-X
NetUA-02 40XX389-XX-X
2 entries were displayed.

NetUA::>
4. Navigate to the license hierarchy and check the available options.
NetUA::> license

NetUA::system license> ?
  add                         Add one or more licenses
  clean-up                    Remove unnecessary licenses
  delete                      Delete a license
  show                        Display licenses
  status>                     Display license status

NetUA::system license>
Note: To know the available option, just type “?” in the cluster shell at any time.
Checking the License status:
1. Check the currently installed licenses. At this time ,we just have the base license installed on the system.
NetUA::system license> show

Serial Number: 1-80-XXXXXXX
Owner: NetUA
Package           Type    Description           Expiration
----------------- ------- --------------------- --------------------
Base              license Cluster Base License  -

NetUA::system license>
2. To see the available features that can enable and complete license summary, use the following command.
1. Let’s add the license for iSCSI and check the status.
NetUA::system license> add -license-code XXXXKTJWXXXXBGXAGAAAAAAXXXX
License for package "iSCSI" and serial number "1-81-0000000000000004079432749" i                                                                     nstalled successfully.
(1 of 1 added successfully)

NetUA::system license> status show
Package            Licensed Method  Expiration
-----------------  ---------------  --------------------
Base               license          -
NFS                none             -
CIFS               none             -
iSCSI              license          -
FCP                none             -
CDMI               none             -
SnapRestore        none             -
SnapMirror         none             -
FlexClone          none             -
SnapVault          none             -
SnapLock           none             -
SnapManagerSuite   none             -
SnapProtectApps    none             -
V_StorageAttach    none             -
SnapLock_Enterprise
                   none             -
Insight_Balance    none             -
16 entries were displayed.

NetUA::system license>
The previous command summary states that iSCSI feature is enabled. We have two nodes in the cluster. Is it enabled for both the nodes ? Let’s check
NetUA::system license> show

Serial Number: 1-80-000008
Owner: NetUA
Package           Type    Description           Expiration
----------------- ------- --------------------- --------------------
Base              license Cluster Base License  -

Serial Number: 1-81-0000000000000004079432749
Owner: NetUA-01
Package           Type    Description           Expiration
----------------- ------- --------------------- --------------------
iSCSI             license iSCSI License         -
2 entries were displayed.

NetUA::system license>
We can see that iSCSI feature is just enabled for NetUA-01 node. We must enable the iSCSI feature for node 2 as well.Let’s add the license key for Node 2.
NetUA::system license> add -license-code XXXXLUNFXMXXXXEZFAAAAAAXXXX
License for package "iSCSI" and serial number "1-81-0000000000000004034389062" installed successfully.
(1 of 1 added successfully)


NetUA::system license> show

Serial Number: 1-80-000008
Owner: NetUA
Package           Type    Description           Expiration
----------------- ------- --------------------- --------------------
Base              license Cluster Base License  -

Serial Number: 1-81-0000000000000004034389062
Owner: NetUA-02
Package           Type    Description           Expiration
----------------- ------- --------------------- --------------------
iSCSI             license iSCSI License         -

Serial Number: 1-81-0000000000000004079432749
Owner: NetUA-01
Package           Type    Description           Expiration
----------------- ------- --------------------- --------------------
iSCSI             license iSCSI License         -
3 entries were displayed.

NetUA::system license>
We can see that iSCSI feature has been enabled for both the cluster nodes.
2. To add the multiple license keys , use the following command.
NetUA::system license> add -license-code XXXXXXXWOZNBBGXAGAAAAAAAXXXXX,XXXXXXNFXMSMUCEZFAAAAAAAXXXX
License for package "SnapMirror" and serial number "1-81-0000000000000004079432749" installed successfully.
License for package "SnapMirror" and serial number "1-81-0000000000000004034389062" installed successfully.
(2 of 2 added successfully)


NetUA::system license> show

Serial Number: 1-80-000008
Owner: NetUA
Package           Type    Description           Expiration
----------------- ------- --------------------- --------------------
Base              license Cluster Base License  -

Serial Number: 1-81-0000000000000004034389062
Owner: NetUA-02
Package           Type    Description           Expiration
----------------- ------- --------------------- --------------------
SnapMirror        license SnapMirror License    -

Serial Number: 1-81-0000000000000004079432749
Owner: NetUA-01
Package           Type    Description           Expiration
----------------- ------- --------------------- --------------------
SnapMirror        license SnapMirror License    -
3 entries were displayed.

NetUA::system license>
To Remove the NetApp feature License:
1. To remove the license keys , you must specify the node’s serial number in which you want to remove the feature. Here we are removing the iSCSI license on both the nodes.
NetUA::system license> delete -serial-number 1-81-0000000000000004079432749 -package iSCSI

Warning: The following license will be removed:
         iSCSI               1-81-0000000000000004079432749
Do you want to continue? {y|n}: y

NetUA::system license> show

Serial Number: 1-80-000008
Owner: NetUA
Package           Type    Description           Expiration
----------------- ------- --------------------- --------------------
Base              license Cluster Base License  -

Serial Number: 1-81-0000000000000004034389062
Owner: NetUA-02
Package           Type    Description           Expiration
----------------- ------- --------------------- --------------------
iSCSI             license iSCSI License         -
2 entries were displayed.

NetUA::system license> delete -serial-number 1-81-0000000000000004034389062 -package iSCSI

Warning: The following license will be removed:
         iSCSI               1-81-0000000000000004034389062
Do you want to continue? {y|n}: y

NetUA::system license> show

Serial Number: 1-80-000008
Owner: NetUA
Package           Type    Description           Expiration
----------------- ------- --------------------- --------------------
Base              license Cluster Base License  -

NetUA::system license>
How to clean-up the unused and expired license on NetApp ?
You can delete the un-used and expired license using the delete command. But in huge environment, we have option to clean-up the unused and expired license in one shot.
1. Just type clean-up and use the “?” to see the available options.
2. Let’s simulate for unused license keys on our cluster.
NetUA::system license> clean-up -simulate true -unused
The following licenses can be cleaned up:

Serial number: 1-81-2580252174352410562389062
Owner: none
Package                   Reason
------------------------- -----------------------------------------------------
iSCSI                     Serial number is not used by any node in the cluster

NetUA::system license>
The above listed license can be cleaned up since its not used for any nodes.
3.To check the expired licence , use the following command.
NetUA::system license> clean-up -simulate true -expired
No license to clean-up.
NetUA::system license>
4. Let’s clean-up the unused license . (Based on Step 2)
The one of the most famous proverb about the Unix systems is – “Where there is a shell there’s a way” . If you want to directly interact with system kernel, you need a shell. NetApp Clustered Data ONTAP uses the Free BSD operating system on the controllers. You can manage the resources from cluster shell (CLI) or OnCommand GUI . The CLI and the GUI provide access to the same information, and you can use both to manage the same resources within a cluster. Command line is always remains powerful than GUI.
The hierarchical command structure consists of command directories and commands. A command directory might contain commands, more command directories, or both. In this way, command directories resemble file system directories and file structures. Command directories provide groupings of similar commands. For example, all commands for storage-related actions fall somewhere within the storage command directory. Within that directory are directories for disk commands and aggregate commands.
Shells:
Cluster Shell – ng shell which is used to manage the entire cluster.
Node shell – A subset of the Data ONTAP 7G and Data ONTAP 7-Mode commands. Using node shell, you can manage a single node.
System Shell – You have option to access the BSD shell of the controller.
Cluster Shell:
The cluster shell is accessible from a cluster management logical interface (LIF).
root user is not permitted .
The admin user is predefined with a password that is chosen during the cluster setup
ssh is the default method for non-console logins.
Let’s access the cluster shell using the cluster management LIF. (ssh to the cluster IP)
1.Use the cluster management LIF to login to the cluster shell.
login as: admin
Using keyboard-interactive authentication.
Password:
NetUA::>
2. Just enter the “?” to know the available commands.
NetUA::> ?
  up                          Go up one directory
  cluster>                    Manage clusters
  dashboard>                  Display dashboards
  event>                      Manage system events
  exit                        Quit the CLI session
  history                     Show the history of commands for this CLI session
  job>                        Manage jobs and job schedules
  lun>                        Manage LUNs
  man                         Display the on-line manual pages
  network>                    Manage physical and virtual network connections
  qos>                        QoS settings
  redo                        Execute a previous command
  rows                        Show/Set the rows for this CLI session
  run                         Run interactive or non-interactive commands in the node shell
  security>                   The security directory
  set                         Display/Set CLI session settings
  sis                         Manage volume efficiency
  snapmirror>                 Manage SnapMirror
  statistics>                 Display operational statistics
  storage>                    Manage physical storage, including disks, aggregates, and failover
  system>                     The system directory
  top                         Go to the top-level directory
  volume>                     Manage virtual storage, including volumes, snapshots, and mirrors
  vserver>                    Manage Vservers

NetUA::>
3.Just navigate to the cluster directory and see the available options.
NetUA::cluster> ?
  contact-info>               Manage contact information for the cluster.
  create                      Create a cluster
  date>                       Manage cluster's date and time setting
  ha>                         Manage high-availability configuration
  identity>                   Manage the cluster's attributes, including name and serial number
  join                        Join an existing cluster using the specified member's IP address
  modify                      Modify cluster node membership attributes
  peer>                       Manage cluster peer relationships
  setup                       Setup wizard
  show                        Display cluster node members
  statistics>                 Display cluster statistics

NetUA::cluster>
4. Cluster shell has three privilege levels.
* admin
* advanced
* diag
To change the privilege level from “admin” to “advanced” , use the following command.
NetUA::cluster> set -privilege advanced

Warning: These advanced commands are potentially dangerous; use them only when directed to do so by NetApp personnel.
Do you want to continue? {y|n}: y
To change the current mode to “diag”, use the following command.
NetUA::cluster*> set -privilege diag

Warning: These diagnostic commands are for use by NetApp personnel only.
Do you want to continue? {y|n}: y

NetUA::cluster*>
* – Indicates that shell is in advanced mode or diag mode.
To change shell mode to “admin” , use the following command.
NetUA::cluster*> set -privilege admin

NetUA::cluster>
Node Shell:
The node shell can be accessed within the cluster.
You can access the node shell in interactive mode or directly execute the commands from the cluster shell.
This is similar to 7-Mode CLI
Scope is limited to one node at a time.
Useful to get he data about the node.
visibility to only those objects that are attached to the given controller. (disks , aggregates , volumes)
1. To access the Node shell in interactive mode, use the following command. You can back to cluster shell any time by pressing control+D .
NetUA::> system node run -node NetUA-01
Type 'exit' or 'Ctrl-D' to return to the CLI
NetUA-01> hostname
NetUA-01
NetUA-01>
2. To access the Node shell within the cluster shell ,
NetUA::> system node run -node NetUA-01 hostname
NetUA-01
NetUA::>
3.Node shell is very useful to see the node related configuration.
NetUA-01> sysconfig
        NetApp Release 8.2 Cluster-Mode: Tue May 21 05:58:22 PDT 2013
        System ID: 4079432749 (NetUA-01)
        System Serial Number: 4079432-74-9 (NetUA-01)
        System Storage Configuration: Multi-Path
        System ACP Connectivity: NA
        slot 0: System Board
                Processors:         2
                Memory Size:        1599 MB
                Memory Attributes:  None
        slot 0: 10/100/1000 Ethernet Controller V
                e0a MAC Address:    00:0c:29:e5:c3:ce (auto-1000t-fd-up)
                e0b MAC Address:    00:0c:29:e5:c3:d8 (auto-1000t-fd-up)
                e0c MAC Address:    00:0c:29:e5:c3:e2 (auto-1000t-fd-up)
                e0d MAC Address:    00:0c:29:e5:c3:ec (auto-1000t-fd-up)
                e0e MAC Address:    00:0c:29:e5:c3:f6 (auto-1000t-fd-up)
                e0f MAC Address:    00:0c:29:e5:c3:00 (auto-1000t-fd-up)
NetUA-01>
System Shell:
The system shell is accessed from the cluster shell or the from the node using “diag” user.
User “diag” must be unlocked to access the system shell.
You will get the BSD Unix prompt once you have logged in as diag.
You can use the system shell to access the BSD environment that the Data ONTAP operating system runs in. You should access the system shell only under the supervision of NetApp technical support. You can access the system shell only as the “diag” user and only from within the cluster shell. Root access to the system shell is not available from Data ONTAP clusters.
NetUA::> security login password -username diag

Enter a new password:
Enter it again:

NetUA::>
4. Try to access the system shell of node1.
NetUA::> system node systemshell -node NetUA-01

Error: "systemshell" is not a recognized command

NetUA::>
System couldn’t find the systemshell command. To access the systemshell , you must be in the advanced shell.
5.Set the privileged level to advanced.
NetUA::> set advanced

Warning: These advanced commands are potentially dangerous; use them only when directed to do so by NetApp personnel.
Do you want to continue? {y|n}: y

NetUA::*>
6. Try to access the system shell of node1 using diag user.
NetUA::*> system node systemshell -node NetUA-01

Data ONTAP/amd64 (NetUA-01) (pts/3)

login: diag
Password:
Last login: Thu Sep 26 10:17:55 from localhost


Warning:  The system shell provides access to low-level
diagnostic tools that can cause irreparable damage to
the system if not used properly.  Use this environment
only when directed to do so by support personnel.

NetUA-01%
Storage systems should provide the fault tolerance if any disk failures occurs in disk-shelf’s. NetApp uses the RAID-DP technology to provide the fault tolerance. A RAID group includes several disks that are linked together in a storage system. Although there are different implementations of RAID, Data ONTAP supports only RAID 4 and RAID-DP. Data ONTAP classifies disks as one of four types for RAID: data, hot spare, parity, or double-parity. The RAID disk type is determined by how RAID is using a disk.
Data disk
A data disk is part of a RAID group and stores data on behalf of the client.
Hot spare disk
A hot spare disk does not hold usable data but is available to be added to a RAID group in an aggregate. Any functioning disk that is not assigned to an aggregate, but is assigned to a system, functions as a hot spare disk.
Parity disk
A parity disk stores data reconstruction within a RAID group.
Double-parity disk
A double-parity disk stores double-parity information within RAID groups if NetApp RAID software, double-parity (RAID-DP) is enabled.
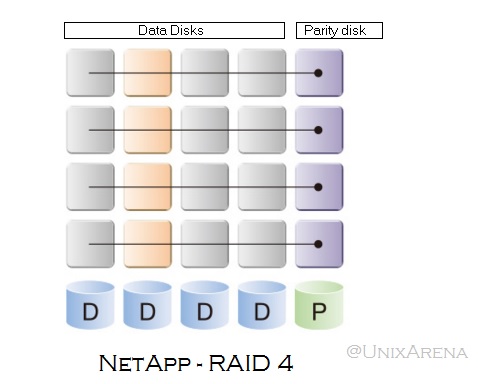
RAID-4 :
RAID-4 Protects the data from single disk failure. It requires minimum three disk to configure. (2 – Data disks & 1 – Parity disk)
Using RAID 4, if one disk block goes bad, the parity disk in that disk’s RAID group is used to recalculate the data in the failed block, and then the block is mapped to a new location on the disk. If an entire disk fails, the parity disk prevents any data from being lost. When the failed disk is replaced, the parity disk is used to automatically recalculate its contents. This is sometimes referred to as row parity.
NetApp RAID 4
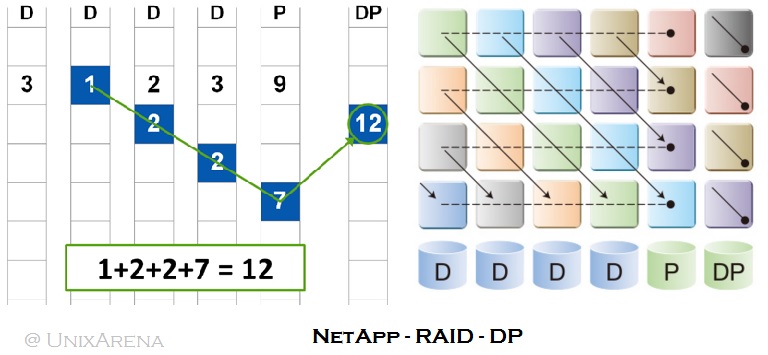
RAID-DP:
RAID-DP technology protects against data loss due to a double-disk failure within a RAID group.
Each RAID-DP group contains the following:
Three data disks
One parity disk
One double-parity disk
RAID-DP employs the traditional RAID 4 horizontal row parity. However, in RAID-DP, a diagonal parity stripe is
calculated and committed to the disks when the row parity is written.
NetApp RAID-DP
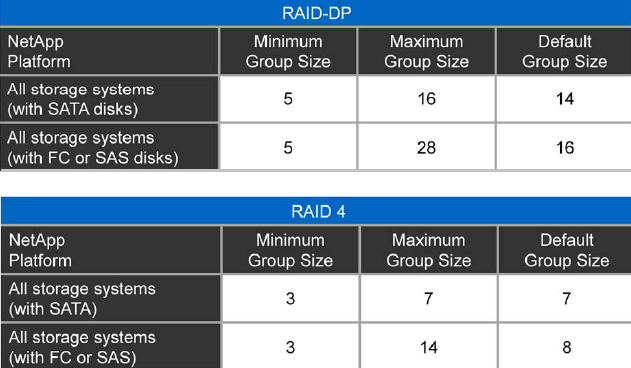
RAID GROUP MAXIMUMS:
Here is the RAID group Maximums for NetApp Storage systems. RAID groups can include anywhere from 3 to 28 disks, depending on the platform and RAID type. For best performance and reliability, NetApp recommends using the default RAID group size.
NetApp RAID Maximums
Aggregates:
An aggregate is virtual layer of RAID groups. RAID is built using the bunch of physical disks . Aggregates can use RAID-4 raid groups or RAID-DP raid groups. These aggregates can be taken over by the HA partner if the controller fails. Aggregates can be grown up by adding the physical disks to it (In the back-end , it will form the RAID groups). There are two type of aggregates possible in NetApp.
32-Bit Aggregate
64-Bit Aggregate
At any time, you can convert the 32-Bit Aggregate to 64-Bit aggregate without any downtime. 64-Bit aggregate supports more than 16TB of storage.
Let’s see the storage aggregate commands.
1.Login to the NetApp Cluster’s LIF.
2.List the available storage aggregates on the system.
NetUA::> storage aggregate show
Aggregate     Size Available Used% State   #Vols  Nodes            RAID Status
--------- -------- --------- ----- ------- ------ ---------------- ------------
aggr0_01     900MB   43.54MB   95% online       1 NetUA-01         raid_dp,
                                                                   normal
aggr0_02     900MB   43.54MB   95% online       1 NetUA-02         raid_dp,
                                                                   normal
2 entries were displayed.

NetUA::>
3.List the Provisioned volumes with aggregate names . vol0 resides on aggregate “aggr0_01”.
NetUA::> volume show
Vserver   Volume       Aggregate    State      Type       Size  Available Used%
--------- ------------ ------------ ---------- ---- ---------- ---------- -----
NetUA-01  vol0         aggr0_01     online     RW      851.5MB    431.0MB   49%
NetUA-02  vol0         aggr0_02     online     RW      851.5MB    435.9MB   48%
2 entries were displayed.

NetUA::>
4.List the available disks on Node NetUA-01. Here you can see that what are the disks are part of aggregate.
5.Let’s look at the specific aggregate’s configuration.
NetUA::> stor aggr show -aggr aggr0_01
  (storage aggregate show)

                                         Aggregate: aggr0_01
                                    Checksum Style: block
                                   Number Of Disks: 3
                                             Nodes: NetUA-01
                                             Disks: NetUA-01:v5.16,
                                                    NetUA-01:v5.17,
                                                    NetUA-01:v5.18
                           Free Space Reallocation: off
                                         HA Policy: cfo
                Space Reserved for Snapshot Copies: -
                                    Hybrid Enabled: false
                                    Available Size: 43.49MB
                                  Checksum Enabled: true
                                   Checksum Status: active
                                  Has Mroot Volume: true
                     Has Partner Node Mroot Volume: false
                                           Home ID: 4079432749
                                         Home Name: NetUA-01
                           Total Hybrid Cache Size: 0B
                                            Hybrid: false
                                      Inconsistent: false
                                 Is Aggregate Home: true
                                     Max RAID Size: 16
       Flash Pool SSD Tier Maximum RAID Group Size: -
                                          Owner ID: 4079432749
                                        Owner Name: NetUA-01
                                   Used Percentage: 95%
                                            Plexes: /aggr0_01/plex0
                                       RAID Groups: /aggr0_01/plex0/rg0 (block)
                                       RAID Status: raid_dp, normal
                                         RAID Type: raid_dp
                                           Is Root: true
      Space Used by Metadata for Volume Efficiency: 0B
                                              Size: 900MB
                                             State: online
                                         Used Size: 856.5MB
                                 Number Of Volumes: 1
                                      Volume Style: flex

NetUA::>
aggr0_01 is configured using “/aggr0_01/plex0/rg0” .
Let’s have a close look of rg0.
NetUA::> system node run -node NetUA-01 aggr status aggr0_01 -r

Aggregate aggr0_01 (online, raid_dp) (block checksums)
  Plex /aggr0_01/plex0 (online, normal, active)
    RAID group /aggr0_01/plex0/rg0 (normal, block checksums)

      RAID Disk Device  HA  SHELF BAY CHAN Pool Type  RPM  Used (MB/blks)    Phys (MB/blks)
      --------- ------  ------------- ---- ---- ---- ----- --------------    --------------
      dparity   v5.16   v5    ?   ?   FC:B   -  FCAL 15000 1020/2089984      1027/2104448
      parity    v5.17   v5    ?   ?   FC:B   -  FCAL 15000 1020/2089984      1027/2104448
      data      v5.18   v5    ?   ?   FC:B   -  FCAL 15000 1020/2089984      1027/2104448

NetUA::>
Aggregate Name = aggr0_01
Node Name = NetUA-01
We have explored more things about existing aggregate. Let’s see that how to create the new aggregate.
Creating the New Aggregate:
1. To create the aggregate with name “NetUA01_aggr1” on node “NetUA-01” with 5 FCAL disks , use the following command.
NetUA::>  storage aggregate show
Aggregate     Size Available Used% State   #Vols  Nodes            RAID Status
--------- -------- --------- ----- ------- ------ ---------------- ------------
NetUA01_aggr1
            4.39GB    4.39GB    0% online       0 NetUA-01         raid_dp,
                                                                   normal
aggr0_01     900MB   43.51MB   95% online       1 NetUA-01         raid_dp,
                                                                   normal
aggr0_02     900MB   43.54MB   95% online       1 NetUA-02         raid_dp,
                                                                   normal
3 entries were displayed.
3. Verify the newly added disks.
NetUA::> aggr show -aggr NetUA01_aggr1

Aggregate: NetUA01_aggr1
Checksum Style: block
Number Of Disks: 7
Nodes: NetUA-01
Disks: NetUA-01:v4.16,
NetUA-01:v5.19,
NetUA-01:v4.17,
NetUA-01:v5.20,
NetUA-01:v4.18,
NetUA-01:v5.21,
NetUA-01:v4.19
Free Space Reallocation: off
HA Policy: sfo
Space Reserved for Snapshot Copies: -
Hybrid Enabled: false
Available Size: 4.39GB
Checksum Enabled: true
Checksum Status: active
Has Mroot Volume: false
Has Partner Node Mroot Volume: false
Home ID: 4079432749
Home Name: NetUA-01
Total Hybrid Cache Size: 0B
Hybrid: false
Inconsistent: false
Is Aggregate Home: true
Max RAID Size: 16
Flash Pool SSD Tier Maximum RAID Group Size: -
Owner ID: 4079432749
Owner Name: NetUA-01
Used Percentage: 0%
Plexes: /NetUA01_aggr1/plex0
RAID Groups: /NetUA01_aggr1/plex0/rg0 (block)
RAID Status: raid_dp, normal
RAID Type: raid_dp
Is Root: false
Space Used by Metadata for Volume Efficiency: 0B
Size: 4.39GB
State: online
Used Size: 180KB
Number Of Volumes: 0
Volume Style: flex

NetUA::>
4. Check the RAID status.
NetUA::> system node run -node NetUA-01 aggr status NetUA01_aggr1 -r

Aggregate NetUA01_aggr1 (online, raid_dp) (block checksums)
  Plex /NetUA01_aggr1/plex0 (online, normal, active)
    RAID group /NetUA01_aggr1/plex0/rg0 (normal, block checksums)

      RAID Disk Device  HA  SHELF BAY CHAN Pool Type  RPM  Used (MB/blks)    Phys (MB/blks)
      --------- ------  ------------- ---- ---- ---- ----- --------------    --------------
      dparity   v4.16   v4    ?   ?   FC:B   -  FCAL 15000 1020/2089984      1027/2104448
      parity    v5.19   v5    ?   ?   FC:B   -  FCAL 15000 1020/2089984      1027/2104448
      data      v4.17   v4    ?   ?   FC:B   -  FCAL 15000 1020/2089984      1027/2104448
      data      v5.20   v5    ?   ?   FC:B   -  FCAL 15000 1020/2089984      1027/2104448
      data      v4.18   v4    ?   ?   FC:B   -  FCAL 15000 1020/2089984      1027/2104448
      data      v5.21   v5    ?   ?   FC:B   -  FCAL 15000 1020/2089984      1027/2104448
      data      v4.19   v4    ?   ?   FC:B   -  FCAL 15000 1020/2089984      1027/2104448

NetUA::>
We have just created the aggregate layer. In the upcoming articles, we will see that how to create the vserver and flex volumes.
In NetApp Storage system, RAID feature will provide the fault tolerance in-case of any disk failures. But what will happen if the controller(node) itself fails ? NetApp ships the controllers as HA pairs (Two controllers in one chassis ). If one node fails , automatically other controller will take over the storage. Enabling storage failover (SFO) is done within pairs, regardless of how many nodes are in the cluster. For SFO (storage failover), the HA pairs must be of the same model. The cluster itself can contain a mixture of models, but each HA pair must be homogeneous. The version of the Data ONTAP operating system must be the same on both nodes of the HA pair, except for the short period of time during which the pair is upgraded. Two HA interconnect cables are required to connect the NVRAM cards (except for FAS and V-Series 32×0 models with single-enclosure HA). The storage failover(SFO) can be enabled on either node in the pair. Storage Failover(SFO) can be initiated from any node in the cluster.
Cluster high availability (HA) is activated automatically when you enable storage failover on clusters that consist of two nodes, and you should be aware that automatic giveback is enabled by default. On clusters that consist of more than two nodes, automatic giveback is disabled by default, and cluster HA is disabled automatically.
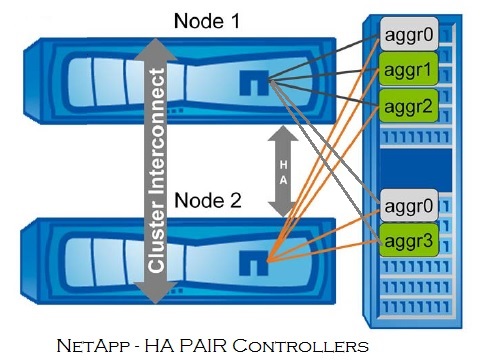
Let’s have closer look at HA Pairs:
HA pair controllers are connected to each other through an HA interconnect. This allows one node to serve data that
resides on the disks of its failed partner node. Each node continually monitors its partner, mirroring the data for each other’s nonvolatile memory (NVRAM or NVMEM). The interconnect is internal and requires no external cabling if both controllers are in the same chassis.
NetApp HA Pairs
HA pairs are components of the cluster, and both nodes in the HA pair are connected to other nodes in the cluster
through the data and cluster networks. But only the nodes in the HA pair can take over each other’s storage. Non-HA nodes are not supported in a cluster that contains two or more nodes. Although single-node clusters are supported, joining two single-node clusters to create one cluster is not supported, unless you wipe clean one of the single-node clusters and join it to the other to create a two-node cluster that consists of an HA pair.
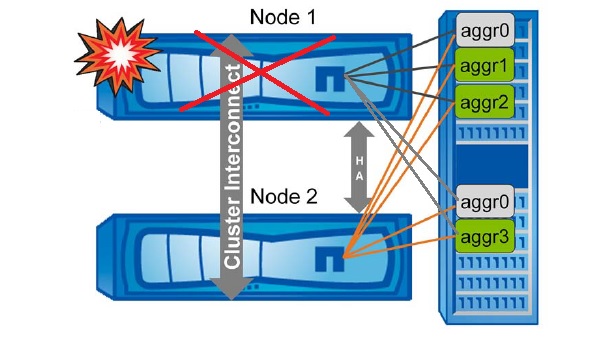
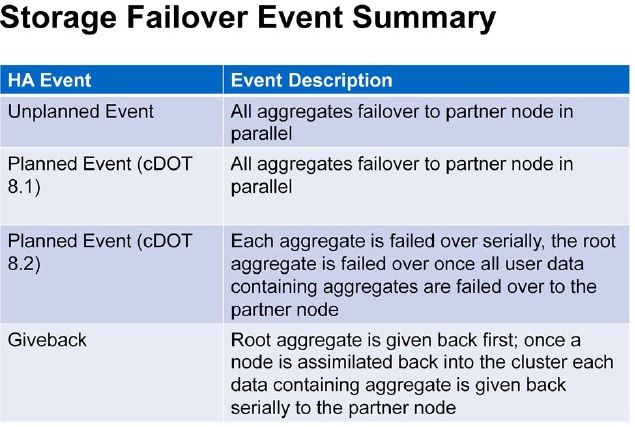
Let’s see that what will happen during the unplanned event,
Assume that Node1 and Node 2 own their root and data aggregates.
If Node1 fails ,
Node2 takeover root and data aggregates of Node1 .
Unplanned SFO Netapp
When a node fails, an unplanned event or automatic takeover is initiated (8.2 and prior). Ownership of data aggregates is changed to the HA partner. After the ownership is changed, the partner can read and write to the volumes on the partner’s data aggregates. Ownership of aggr0 disks remain with the failed node, but the partner takes over control of the aggregate which can be mounted from the partner for diagnostic purposes.
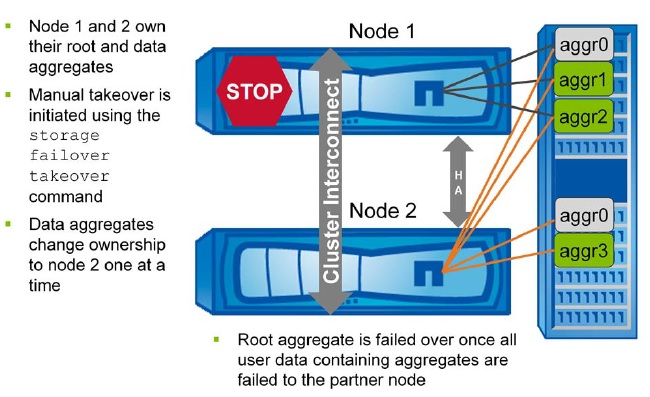
Giveback :
Automatic or Manual giveback is initiated with storage failover giveback command.
Aggr0 is given back to node 1 to boot the node.
Data aggregate giveback occurs one aggregate at a time.
Giveback is initiated by the storage failover giveback command or by automatic giveback if the system is configured for it. The node must have access to its root volume on aggr0 to fully boot. The CFO HA policy ensures that aggr0 is given back immediately to the allow the node to boot. After the node has fully booted, the partner node returns ownership of the data aggregates one at a time until giveback is complete. You can monitor the progress of the giveback with the storage failover show-giveback command. I/O resumes for each aggregate when giveback is complete for that aggregate, thereby reducing the overall outage window of each aggregate.
Aggregation Relocation: (ARL)
Aggregate relocation operations take advantage of the HA configuration to move the ownership of storage aggregates
within the HA pair. Aggregate relocation occurs automatically during manually initiated takeover and giveback operations to reduce downtime during maintenance. Aggregate relocation can be initiated manually for load balancing. Aggregate relocation cannot move ownership of the root aggregate.
During a manually initiated takeover, before the target controller is taken over, ownership of each aggregate that belongs to the target controller is moved to the partner controller one aggregate at a time. When giveback is initiated, the ownership is automatically moved back to the original node. To suppress aggregate relocation during the takeover, use the -bypass-optimization parameter with the storage failover takeover command.
Planned Event in ONTAP 8.2 with ARL:
When a node takes over its partner, it continues to serve and update data in the partner’s aggregates and volumes. To do this, it takes ownership of the partner’s data aggregates, and the partner’s LIFs migrate according to network interface failover rules.
ONTAP 8.2 ARL
What is the difference between NetApp CFO and SFO ?
Root Aggregates are always assigned to CFO (controller Failover) policy.
Data Aggregates are assigned to SFO (Storage Failover policy)
Check the HA Pair status :
cluster::> storage failover show
                    Takeover
Node      Partner   Possible State
--------- --------- -------- --------------------------------
A         B         true     Connected to B
B         A         true     Connected to A
Check the aggregate’s failover policy on the cluster nodes.
Aggr0_xx represents the root volume of controller node.So the failover policy will be set to CFO always. All the data aggregate storage policy has been set to SFO.
Note:We should not store any data volumes on aggr0.
The following commands will help you to identify the failover policy for specific node.
NetUA::> storage failover show -node NetUA-01
NetUA::> storage failover show -node NetUA-02
NetUA-01 & NetUA-02 are HA node names.
To disables auto giveback on the HA nodes, use the following command.
You can use either one of the above command to take over the NetUA-02 node’s storage.
Please read the failover man page carefully to know the available option .
Note: { -ofnode {|local} - Node to Takeover
This specifies the node that is taken over. It is shut down and its partner takes over its storage.

| -bynode {|local} } - Node Initiating Takeover
This specifies the node that is to take over its partner's storage.

[-option ] - Takeover Option
This optionally specifies the style of takeover operation. Possible values include the following:

[-bypass-optimization {true|false}] - Bypass Takeover Optimization
If this is an operator-initiated planned takeover, this parameter specifies whether the takeover optimization is bypassed. This parameter defaults to false.

[-skip-lif-migration [true]] - Skip LIF Migration
This parameter specifies that LIF migration prior to takeover is skipped. Without this parameter, the command attempts to synchronously migrate data and cluster management LIFs away from the node prior to its takeover. If the migration fails or times out, the takeover is aborted.

o normal - Specifies a normal takeover operation; that is, the partner is given the time to close its storage resources gracefully before
the takeover operation proceeds. This is the default value.

o immediate - Specifies an immediate takeover. In an immediate takeover, the takeover operation is initiated before the partner is given the time to close its storage resources gracefully. The use of this option results in an immediate takeover which does not do a clean shutdown. In case of NDU this can result in a NDU failure.

Attention: If this option is specified, negotiated takeover optimization is bypassed even if the -bypass-optimization option is set to false.

o allow-version-mismatch - If this value is specified, the takeover operation is initiated even if the partner is running a version of software that is incompatible with the version running on the node. In this case, the partner is given the time to close its storage resources gracefully before the takeover operation proceeds. Use this value as part of a non-disruptive upgrade procedure.

o force - If this value is specified, the takeover operation is initiated even if the node detects an error that normally prevents a takeover operation from occurring. This value is available only at the advanced privilege level and higher.

Attention: If this option is specified, negotiated takeover optimization is bypassed even if the -bypass-optimization option is set to false.
Caution: The use of this option can potentially result in data loss. If the HA interconnect is detached or inactive, or the contents of the failover partner's NVRAM cards are unsynchronized, takeover is normally disabled. Using the -force option enables a node to take over its partner's storage despite the unsynchronized NVRAM, which can contain client data that can be lost upon storage takeover.
SFO summary – NetApp
Hope you got the fair idea about the storage failover on NetApp clustered Data ONTAP.
NetApp Clustered data ONTAP consists three type of vServers, which is helping in managing the node, cluster and data access to the clients.
Node Vserver – Responsible to Manage the nodes. It automatically creates when the node joins the cluster.
Admin Vserver – Responsible to Manage the entire cluster. It automatically creates during the cluster setup.
Data Vserver – cluster administrator must create data Vservers and add volumes to these Vservers to facilitate data access from the cluster. A cluster must have at least one data Vserver to serve data to its clients.
A Data virtual storage server (Vserver) contains data volumes and one or more LIFs through which it serves data to the clients. Data vServer can contain the Flex Volume or Infinite volume. The data vServer securely isolates the shared virtualized data storage and network, and appears as a single dedicated server to its clients. Each Vserver has a separate administrator authentication domain and can be managed independently by a Vserver administrator. A cluster can have one or more Vservers with FlexVol volumes and Vservers with Infinite Volumes.
Vserver:
1.Login to the cluster LIF and check the existing Vserver.
NetUA::> vserver show
                    Admin     Root                  Name    Name
Vserver     Type    State     Volume     Aggregate  Service Mapping
----------- ------- --------- ---------- ---------- ------- -------
NetUA       admin   -         -          -          -       -
NetUA-01    node    -         -          -          -       -
NetUA-02    node    -         -          -          -       -
3 entries were displayed.

NetUA::>
The existing Vservers are created once you configure the cluster. We need to configure the data Vserver for clients.
2.Check the existing volumes on the cluster.
NetUA::> volume show
Vserver   Volume       Aggregate    State      Type       Size  Available Used%
--------- ------------ ------------ ---------- ---- ---------- ---------- -----
NetUA-01  vol0         aggr0_01     online     RW      851.5MB    421.8MB   50%
NetUA-02  vol0         aggr0_02     online     RW      851.5MB    421.0MB   50%
2 entries were displayed.

NetUA::>
3. Check the available aggregates on the cluster.
NetUA::> storage aggregate show
Aggregate     Size Available Used% State   #Vols  Nodes            RAID Status
--------- -------- --------- ----- ------- ------ ---------------- ------------
NetUA01_aggr1
            4.39GB    4.39GB    0% online       0 NetUA-01         raid_dp,
                                                                   normal
aggr0_01     900MB   43.54MB   95% online       1 NetUA-01         raid_dp,
                                                                   normal
aggr0_02     900MB   43.54MB   95% online       1 NetUA-02         raid_dp,
                                                                   normal
3 entries were displayed.

NetUA::>
4.Create a data Vserver named ua_vs1 and provide the root volume name as “ua_vs1_root”.
9. How to access this data Vserver ? To access the SVM (data Vserver), you need to create the data LIF . Let’s create the NAS data LIF for SVM ua_vs1 . The NFS & CIFS clients will use this IP to access the shares.
NetUA::> net int create -vserver ua_vs1 -lif uadata1 -role data -home-node NetUA-01  -home-port e0c -address 192.168.0.123 -netmask 255.255.255.0
  (network interface create)

NetUA::>
10. Review the newly created data LIF for “ua_vs1” SVM.
NetUA::> net int show
  (network interface show)
            Logical    Status     Network            Current       Current Is
Vserver     Interface  Admin/Oper Address/Mask       Node          Port    Home
----------- ---------- ---------- ------------------ ------------- ------- ----
NetUA
            cluster_mgmt up/up    192.168.0.101/24   NetUA-01      e0f     false
NetUA-01
            clus1        up/up    169.254.81.224/16  NetUA-01      e0a     true
            clus2        up/up    169.254.220.127/16 NetUA-01      e0b     true
            mgmt1        up/up    192.168.0.91/24    NetUA-01      e0f     true
NetUA-02
            clus1        up/up    169.254.124.94/16  NetUA-02      e0a     true
            clus2        up/up    169.254.244.74/16  NetUA-02      e0b     true
            mgmt1        up/up    192.168.0.92/24    NetUA-02      e0f     true
ua_vs1
            uadata1      up/up    192.168.0.123/24   NetUA-01      e0c     true
8 entries were displayed.

NetUA::>
11.To see the detailed information of LIF, use the following command.
NetUA::> net int show -vserver ua_vs1 -lif uadata1
  (network interface show)

                    Vserver Name: ua_vs1
          Logical Interface Name: uadata1
                            Role: data
                   Data Protocol: nfs, cifs, fcache
                       Home Node: NetUA-01
                       Home Port: e0c
                    Current Node: NetUA-01
                    Current Port: e0c
              Operational Status: up
                 Extended Status: -
                         Is Home: true
                 Network Address: 192.168.0.123
                         Netmask: 255.255.255.0
             Bits in the Netmask: 24
                 IPv4 Link Local: -
              Routing Group Name: d192.168.0.0/24
           Administrative Status: up
                 Failover Policy: nextavail
                 Firewall Policy: data
                     Auto Revert: false
   Fully Qualified DNS Zone Name: none
         DNS Query Listen Enable: false
             Failover Group Name: system-defined
                        FCP WWPN: -
                  Address family: ipv4
                         Comment: -

NetUA::>
12. NFS and CIFS clients might be in the other network than the DATA LIF network. So you might require to configure the default router for data LIF to reach the NFS & CIFS clients. Review the automatically created routing groups.
NetUA::> network routing-groups show
          Routing
Vserver   Group     Subnet          Role         Metric
--------- --------- --------------- ------------ -------
NetUA
          c192.168.0.0/24
                    192.168.0.0/24  cluster-mgmt      20
NetUA-01
          c169.254.0.0/16
                    169.254.0.0/16  cluster           30
          n192.168.0.0/24
                    192.168.0.0/24  node-mgmt         10
NetUA-02
          c169.254.0.0/16
                    169.254.0.0/16  cluster           30
          n192.168.0.0/24
                    192.168.0.0/24  node-mgmt         10
ua_vs1
          d192.168.0.0/24
                    192.168.0.0/24  data              20
6 entries were displayed.

NetUA::>
13.View the static routes that were automatically created for you within their respective routing groups.
As per the above output, ua_vs1 LIF can be failover to NetUA-01’s other NIC if ant failure happens to the current network interface and It will failover to NetUA-02 if node NetUA-01 is down.
Let’s do the manual failover for ua_vs1’s data LIF.
NetUA::> net int migrate -vserver ua_vs1 -lif uadata1 -dest-port e0c -dest-node NetUA-02
(network interface migrate)
NetUA::> net int show
(network interface show)
Logical Status Network Current Current Is
Vserver Interface Admin/Oper Address/Mask Node Port Home
----------- ---------- ---------- ------------------ ------------- ------- ----
NetUA
cluster_mgmt up/up 192.168.0.101/24 NetUA-01 e0f false
NetUA-01
clus1 up/up 169.254.81.224/16 NetUA-01 e0a true
clus2 up/up 169.254.220.127/16 NetUA-01 e0b true
mgmt1 up/up 192.168.0.91/24 NetUA-01 e0f true
NetUA-02
clus1 up/up 169.254.124.94/16 NetUA-02 e0a true
clus2 up/up 169.254.244.74/16 NetUA-02 e0b true
mgmt1 up/up 192.168.0.92/24 NetUA-02 e0f true
ua_vs1
uadata1 up/up 192.168.0.123/24 NetUA-02 e0c false
8 entries were displayed.
NetUA::>
Here you can see that LIF has been moved from NetUA-01 to NetUA-02. You can see the “Is Home” has been set to false for data LIF.
The failover will happen in fraction of seconds. So there won’t be any impact expected. The fail-back will happen based auto-revert option.
You can modify the auto-revert flag using the following command. If Auto-revert is set to true, LIF will automatically fail-back to home node. (If the node back’s to online).
You can bring the LIF back to home node using the following command.
NetUA::> network interface revert -vserver ua_vs1 -lif uadata1
NetUA::> net int show
  (network interface show)
            Logical    Status     Network            Current       Current Is
Vserver     Interface  Admin/Oper Address/Mask       Node          Port    Home
----------- ---------- ---------- ------------------ ------------- ------- ----
NetUA
            cluster_mgmt up/up    192.168.0.101/24   NetUA-01      e0f     false
NetUA-01
            clus1        up/up    169.254.81.224/16  NetUA-01      e0a     true
            clus2        up/up    169.254.220.127/16 NetUA-01      e0b     true
            mgmt1        up/up    192.168.0.91/24    NetUA-01      e0f     true
NetUA-02
            clus1        up/up    169.254.124.94/16  NetUA-02      e0a     true
            clus2        up/up    169.254.244.74/16  NetUA-02      e0b     true
            mgmt1        up/up    192.168.0.92/24    NetUA-02      e0f     true
ua_vs1
            uadata1      up/up    192.168.0.123/24   NetUA-01      e0c     true
8 entries were displayed.

NetUA::>
Hope this article is informative to you . In the upcoming article , we will wee more about the Netapp’s Volumes.(Flex volume, Infinite volume & Flex-cache volumes) .
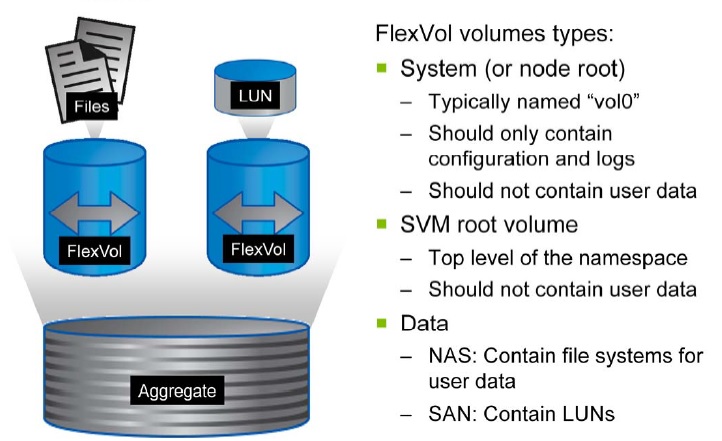
In NetApp , Volumes are used to store the system data, filesystem and clients data. By default, node’s operating system (mroot) is installed on volume “vol0”. Volumes are created on top of aggregates and vol0 resides on aggr0 by default. The “volume create” command creates a volume on a specified Vserver and storage aggregate. NetApp offerers there type of volumes to meet the customers requirement.
FlexVol Volume
Infinite Volume
FlexCache Volume
FlexVol Volumes:
Clustered Data ONTAP flexible volumes are functionally equivalent to flexible volumes in the Data ONTAP 7-Mode
and the Data ONTAP 7G operating system. However, clustered Data ONTAP systems use flexible volumes differently than Data ONTAP 7-Mode and Data ONTAP 7G systems do. Because Data ONTAP clusters are inherently flexible (particularly because of the volume move capability), volumes are deployed as freely as UNIX directories and
Windows folders are deployed to separate logical groups of data.
Volumes can be created and deleted, mounted and unmounted, moved around, and backed up as needed. To take
advantage of this flexibility, cluster deployments typically use many more volumes than traditional Data ONTAP 7G
deployments use. In a high-availability ( HA) pair, aggregate and volume limits apply to each node individually, so the overall limit for the pair is effectively doubled.
NetApp SVM FlexVol
Let’s create a new FlexVolume on ua_vs1 SVM(Vserver).
1. Login to the cluster management LIF as admin.
2. Create a new volume on aggregate “NetUA01_aggr1” in Vserver “ua_vs1” with the size of 100MB.
5. To view the full detail of the volume, use the following command.
NetUA::> vol show -vserver ua_vs1  -volume uavol1
  (volume show)

                                 Vserver Name: ua_vs1
                                  Volume Name: uavol1
                               Aggregate Name: NetUA01_aggr1
                                  Volume Size: 100MB
                           Volume Data Set ID: 1026
                    Volume Master Data Set ID: 2147484674
                                 Volume State: online
                                  Volume Type: RW
                                 Volume Style: flex
                       Is Cluster-Mode Volume: true
                        Is Constituent Volume: false
                                Export Policy: default
                                      User ID: 0
                                     Group ID: 1
                               Security Style: unix
                             UNIX Permissions: ---rwxr-xr-x
                                Junction Path: /uavol1
                         Junction Path Source: RW_volume
                              Junction Active: true
                       Junction Parent Volume: ua_vs1_root
                                      Comment:
                               Available Size: 94.88MB
                              Filesystem Size: 100MB
                      Total User-Visible Size: 95MB
                                    Used Size: 124KB
                              Used Percentage: 5%
         Volume Nearly Full Threshold Percent: 95%
                Volume Full Threshold Percent: 98%
         Maximum Autosize (for flexvols only): 120MB
       Autosize Increment (for flexvols only): 5MB
                             Minimum Autosize: 100MB
           Autosize Grow Threshold Percentage: 85%
         Autosize Shrink Threshold Percentage: 50%
                                Autosize Mode: off
         Autosize Enabled (for flexvols only): false
          Total Files (for user-visible data): 3033
           Files Used (for user-visible data): 96
                        Space Guarantee Style: volume
                    Space Guarantee in Effect: true
            Snapshot Directory Access Enabled: true
                 Space Reserved for Snapshots: 5%
                        Snapshot Reserve Used: 0%
                              Snapshot Policy: default
                                Creation Time: Sat Dec 05 17:53:43 2015
                                     Language: C.UTF-8
                                 Clone Volume: false
                   Antivirus On-Access Policy: default
                                    Node name: NetUA-01
                                NVFAIL Option: off
                    Is File System Size Fixed: false
                                Extent Option: off
                Reserved Space for Overwrites: 0B
                           Fractional Reserve: 100%
                  Snapshot Cloning Dependency: off
            Primary Space Management Strategy: volume_grow
                     Read Reallocation Option: off
             Inconsistency in the File System: false
                 Is Volume Quiesced (On-Disk): false
               Is Volume Quiesced (In-Memory): false
    Volume Contains Shared or Compressed Data: false
            Space Saved by Storage Efficiency: 0B
       Percentage Saved by Storage Efficiency: 0%
                 Space Saved by Deduplication: 0B
            Percentage Saved by Deduplication: 0%
                Space Shared by Deduplication: 0B
                   Space Saved by Compression: 0B
        Percentage Space Saved by Compression: 0%
                                   Block Type: 64-bit
                  FlexCache Connection Status: -
                             Is Volume Moving: false
               Flash Pool Caching Eligibility: read-write
Flash Pool Write Caching Ineligibility Reason: -
                   Managed By Storage Service: -
Create Namespace Mirror Constituents For SnapDiff Use: -
                      Constituent Volume Role: -
                        QoS Policy Group Name: -
              Is Volume Move in Cutover Phase: false
      Number of Snapshot Copies in the Volume: 0

NetUA::>
This FlexVol volume can be export to NFS clients directly. For CIFS clients, you need to create the shares.
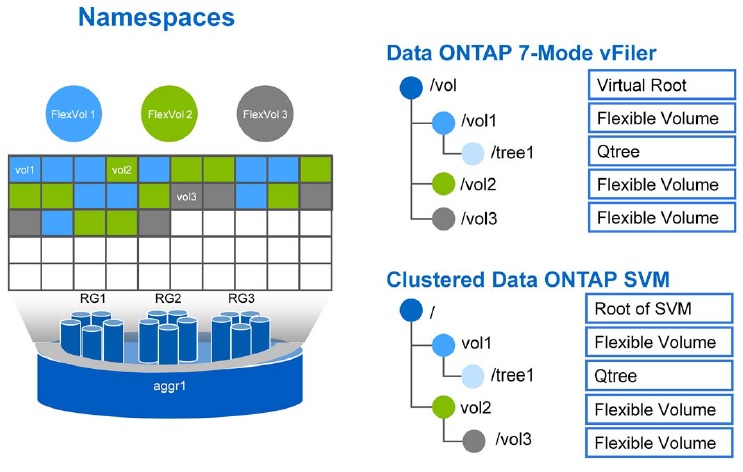
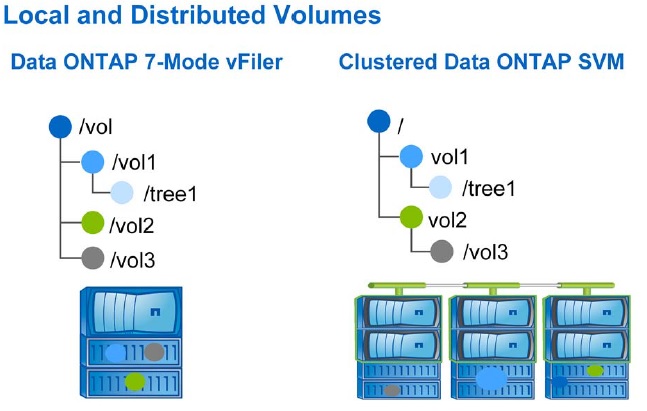
7-Mode Volume vs C-Mode Volume:
C-Mode Namespaces allows to mount the volume on top of another volume.
7-Mode volume vs C-Mode Volumes
Volumes are distributed across the node.
Distributed volumes on C-Mode
Junctions are conceptually similar to UNIX mount points. In UNIX, a disk can be divided into partitions, and then those partitions can be mounted at multiple places relative to the root of the local file system, including in a hierarchical manner. Likewise, the flexible volumes in a Data ONTAP cluster can be mounted at junction points within other volumes to form a single namespace that is distributed throughout the cluster. Although junctions appear as directories, junctions have the basic functionality of symbolic links. A volume is not visible in the namespace of its Vserver until the volume is mounted within the namespace.
You need to junction path to mount the volumes on NFS clients.
Example:
root@uacloud:~# mount -t nfs 192.168.0.123:/uavol1_new /uavol1
192.168.0.123 is Vserver LIF
/uavol1_new is volume Junction Path.
FlexCache Volumes:
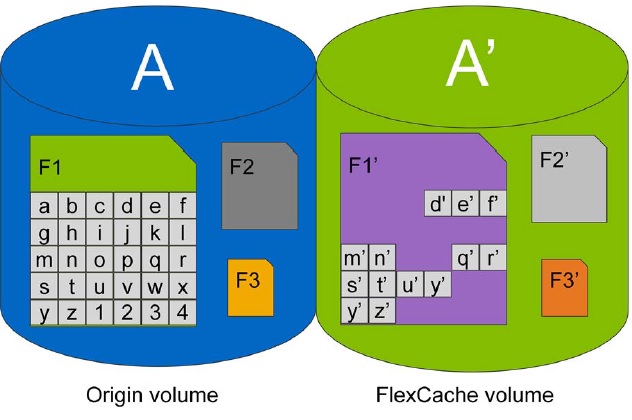
A FlexCache volume is a sparsely-populated volume on a cluster node, that is backed by a FlexVol volume. It is usually created on a different node within the cluster. A FlexCache volume provides access to data in the origin volume without requiring that all the data be in the sparse volume. You can use only FlexVol volumes to create FlexCache volumes. However, many of the regular FlexVol volume features are not supported on FlexCache volumes, such as Snapshot copy creation, deduplication, compression, FlexClone volume creation, volume move, and volume copy. You can use FlexCache volumes to speed up access to data, or to offload traffic from heavily accessed volumes. FlexCache volumes help improve performance, especially when clients need to access the same data repeatedly, because the data can be served directly without having to access the source. Therefore, you can use FlexCache volumes to handle system workloads that are read-intensive. Cache consistency techniques help in ensuring that the data that is served by the FlexCache volumes remains consistent with the data in the origin volumes.
FlexCache Volume
Reason to Deploy Flexcahe:
Decrease IO latency
Increase IOPS
Balance Resources
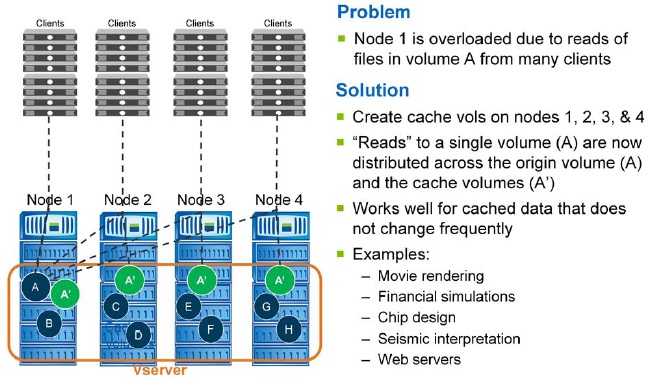
Flex Cache – Scenario
The cache volumes are a part of the same namespace as the origin volume.
An incoming file operation may be served from the cache volume or from the origin volume depending on which LIF is used for the operation. If a cache volume exists on the node containing the LIF that gets the incoming request, the operation may be served from the cache volume on that node.
FlexCache is suitable for work loads that are read intensive and for data that does not change frequently.
Pulls the data on demand
Just caches the data blocks requested. Unlike load sharing mirrors, FlexCache only caches the data blocks that are accessed. A cache is populated only when there is a request for the data.
It supports NFS v3/v4 and SMB 1.0/2.0/3.0
Clients are not aware of which volume (origin or FlexCache) is serving the data.
Let’s assume that uavol1 is experiencing some performance issue. To improve the read performance of uavol1, just create a flexcache.
2.Create the flexcache volume for uavol1. The following command create the cache volumes on all the cluster nodes if you didn’t specify the node names.
NetUA::> volume flexcache create -vserver ua_vs1  -origin-volume uavol1

Successfully created cache volume "uavol1_cache_NetUA01_aggr1" in aggregate "NetUA01_aggr1".
Successfully created cache volume "uavol1_cache_NetUA01_aggr2" in aggregate "NetUA01_aggr2".
The origin volume "uavol1" is now cached on all qualifying aggregates in the cluster.

NetUA::>
3. Verify the newly created flex cache volumes.
NetUA::> vol show
    show           show-footprint show-space

NetUA::> vol show
  (volume show)
Vserver   Volume       Aggregate    State      Type       Size  Available Used%
--------- ------------ ------------ ---------- ---- ---------- ---------- -----
NetUA-01  vol0         aggr0_01     online     RW      851.5MB    359.4MB   57%
NetUA-02  vol0         aggr0_02     online     RW      851.5MB    412.6MB   51%
ua_vs1    ua_vs1_root  NetUA01_aggr1
                                    online     RW         20MB    18.88MB    5%
ua_vs1    uavol1       NetUA01_aggr1
                                    online     RW        100MB    94.87MB    5%
ua_vs1    uavol1_cache_NetUA01_aggr1
                       NetUA01_aggr1
                                    online     DC         20MB    19.90MB    0%
ua_vs1    uavol1_cache_NetUA01_aggr2
                       NetUA01_aggr2
                                    online     DC         20MB    19.90MB    0%
6 entries were displayed.
4. If you would like to check the active flex cache on the cluster , use the following command.
NetUA::> volume flexcache show
        --------------------Cache-------------- Conn.- -----Origin-----------
Vserver Volume Aggregate Size  State  Available Status Volume Aggregate State
------- ------ --------- ----- ------ --------- ------ ------ --------- -----
ua_vs1  uavol1_cache_NetUA01_aggr1
               NetUA01_aggr1
                          20MB online   19.90MB     ok uavol1 NetUA01_aggr1
                                                                        online
        uavol1_cache_NetUA01_aggr2
               NetUA01_aggr2
                          20MB online   19.90MB     ok uavol1 NetUA01_aggr1
                                                                        online
2 entries were displayed.

NetUA::>
5. To list the specific volume and related objects, use the following command.
NetUA::> volume show -vserver ua_vs1  -volume uavol1*
Vserver   Volume       Aggregate    State      Type       Size  Available Used%
--------- ------------ ------------ ---------- ---- ---------- ---------- -----
ua_vs1    uavol1       NetUA01_aggr1
                                    online     RW        100MB    94.87MB    5%
ua_vs1    uavol1_cache_NetUA01_aggr1
                       NetUA01_aggr1
                                    online     DC         20MB    19.90MB    0%
ua_vs1    uavol1_cache_NetUA01_aggr2
                       NetUA01_aggr2
                                    online     DC         20MB    19.90MB    0%
3 entries were displayed.

NetUA::>
6. You have option to filter the volumes using type.
NetUA::> volume show -type ?
  RW                          read-write volume
  LS                          load-sharing volume
  DP                          data-protection volume
  TMP                         temporary volume
  DC                          data-cache volume

NetUA::> volume show -vserver ua_vs1  -volume uavol1*
NetUA::> volume show -type  DC
Vserver   Volume       Aggregate    State      Type       Size  Available Used%
--------- ------------ ------------ ---------- ---- ---------- ---------- -----
ua_vs1    uavol1_cache_NetUA01_aggr1
                       NetUA01_aggr1
                                    online     DC         20MB    19.90MB    0%
ua_vs1    uavol1_cache_NetUA01_aggr2
                       NetUA01_aggr2
                                    online     DC         20MB    19.90MB    0%
2 entries were displayed.

NetUA::> volume show -type  RW
Vserver   Volume       Aggregate    State      Type       Size  Available Used%
--------- ------------ ------------ ---------- ---- ---------- ---------- -----
NetUA-01  vol0         aggr0_01     online     RW      851.5MB    359.0MB   57%
NetUA-02  vol0         aggr0_02     online     RW      851.5MB    411.7MB   51%
ua_vs1    ua_vs1_root  NetUA01_aggr1
                                    online     RW         20MB    18.88MB    5%
ua_vs1    uavol1       NetUA01_aggr1
                                    online     RW        100MB    94.87MB    5%
4 entries were displayed.

NetUA::>
7.Flex Cache volumes uses the same name space of Flex-volume (original volume)
8. To see the flex cache-policy for all the Vservers, you need to gain the advanced privileges.
NetUA::> set advanced

Warning: These advanced commands are potentially dangerous; use them only when directed to do so by NetApp personnel.
Do you want to continue? {y|n}: y

NetUA::*> volume show
    show           show-footprint show-space
NetUA::*> volume flexcache
    cache-policy create       delete       show

NetUA::*> volume flexcache cache-policy show
          Policy     File   Dir    Meta   Symbol Other  Delegation  Prefer
Vserver   Name       TTL    TTL    TTL    TTL    TTL    LRU timeout LocalCache
--------- ---------- ------ ------ ------ ------ ------ ----------- ----------
ua_vs1    default    0      0      15     0      0      3600        false

NetUA::*>
INFINITE VOLUME:
SVMs with Infinite Volume can contain only one infinite volume to serve data. Each SVM with Infinite Volume includes only one junction path, which has a default value of /NS. The junction provides a single mount point for the large namespace provided by the SVM with Infinite Volume. You cannot add more junctions to an SVM with Infinite Volume. However, you can increase the size of the infinite volume. SVMs with Infinite Volume can contain only files. They provide file-level data access by using NFS and CIFS (SMB 1.0) protocols. SVMs with Infinite Volume cannot contain LUNs and do not provide block-level data access.
NetApp Create the Infinite Volume
Namespace mirror is a type of data protection mirror. It is not a load-sharing or FlexCache device. The namespace mirror is not an active namespace constituent. It cannot serve the incoming requests until it is promoted to a namespace constituent, in case the namespace constituent is not available.
Infinite Volume – Namespace
Let’s Configure the Infinite volume.
1.Login to the cluster LIF as admin
2.Create a Vserver to host an infinite volume.
NetUA::*> vserver create -vserver infisvm -rootvolume infisvm_root -aggregate NetUA01_aggr2 -ns-switch file -nm-switch file -rootvolume-security-style unix -language C -is-repository true
[Job 165] Job succeeded:                                                                                                                             Vserver creation completed
NetUA::*>
NetUA::*> vserver show
                    Admin     Root                  Name    Name
Vserver     Type    State     Volume     Aggregate  Service Mapping
----------- ------- --------- ---------- ---------- ------- -------
NetUA       admin   -         -          -          -       -
NetUA-01    node    -         -          -          -       -
NetUA-02    node    -         -          -          -       -
infisvm     data    running   infisvm_   NetUA01_   file    file
                              root       aggr2
ua_vs1      data    running   ua_vs1_    NetUA01_   file    file
                              root       aggr1
5 entries were displayed.

NetUA::*> vserver show infisvm

                                    Vserver: infisvm
                               Vserver Type: data
                               Vserver UUID: 30bd38e7-9d13-11e5-b3cd-123478563412
                                Root Volume: infisvm_root
                                  Aggregate: NetUA01_aggr2
                        Name Service Switch: file
                        Name Mapping Switch: file
                                 NIS Domain: -
                 Root Volume Security Style: unix
                                LDAP Client: -
               Default Volume Language Code: C
                            Snapshot Policy: default-1weekly
                                    Comment:
                 Antivirus On-Access Policy: repos_disabled_antivirus_onaccess_policy
                               Quota Policy: default
                List of Aggregates Assigned: -
 Limit on Maximum Number of Volumes allowed: unlimited
                        Vserver Admin State: running
                          Allowed Protocols: nfs, cifs
                       Disallowed Protocols: fcp, iscsi, ndmp
            Is Vserver with Infinite Volume: true
                           QoS Policy Group: -

NetUA::*>
3. Create a 6-GB infinite volume. You must be in “Advanced” privileges mode to create the infinite volume.
You should be able to access the SVM “infisvm” from the NFS or CIFS clients . To mount the infinite volume , you must configure the export policy. We will see more about export policy in up coming article.
Hope this article is informative to you. Share it ! Comment it !! Be Sociable !!!.
Export polices are used to restrict the NFS/CIFS access to the volumes to clients that match specific parameters. Export polices contains one or more rules that process each client access request . A Vserver can contain multiple export polices and each volume can be associate with desired export polices to provide the access to the clients. By default each Vserver with flex volume has a default export policy that contains no rules. When you create a Vserver with FlexVol volume, the SVM(Vserver) automatically creates a default export policy called “default” for the root volume of the Vserver. You must create one or more rules for the default export policy before clients can access data on the Vserver. Alternatively, you can create a custom export policy with rules. You can modify and rename the default export policy, but you cannot delete the default export policy.
You must have VServer and Volumes to assign the export policy.
Let’s create the new export policy and assign to the existing volumes.
1. Login to the cluster LIF as admin user.
2. List the existing data Vserver.
NetUA::> vserver show -type data
                    Admin     Root                  Name    Name
Vserver     Type    State     Volume     Aggregate  Service Mapping
----------- ------- --------- ---------- ---------- ------- -------
infisvm     data    running   infisvm_   NetUA01_   file    file
                              root       aggr2
ua_vs1      data    running   ua_vs1_    NetUA01_   file    file
                              root       aggr1
2 entries were displayed.

NetUA::>
3.List the data volumes from the existing data Vserver.
These following information required to mount the volume on NFS clients .
Find the “ua_vs1” LIF IP address to mount the volume on NFS client.
NetUA::> net int show -vserver ua_vs1
  (network interface show)
            Logical    Status     Network            Current       Current Is
Vserver     Interface  Admin/Oper Address/Mask       Node          Port    Home
----------- ---------- ---------- ------------------ ------------- ------- ----
ua_vs1
            uadata1      up/up    192.168.0.123/24   NetUA-01      e0c     true

NetUA::>
root@uacloud:~# mount -t nfs 192.168.0.123:/uavol1_new /uavol1
mount.nfs: access denied by server while mounting 192.168.0.123:/uavol1_new
root@uacloud:~#
Error: mount.nfs: access denied by server while mounting XXX.XXX.XXX.XXX:/volume_name.
Most of the time , you will face this issue when you are not setting the policy to the Vserver root volume.
Just login to the Cluster LIF as admin and set the policy for Vserver root volume too.
NetApp is a unified storage. It supports both NAS and SAN protocols. SAN is a block-based storage system that uses FC, Fibre Channel over Ethernet (FCoE), and iSCSI protocols to make data available over the network. Starting with the Data ONTAP 8.1 operating system, clustered Data ONTAP systems began supporting SANs on clusters of up to four nodes. In the Data ONTAP 8.2 operating system, SAN is supported in clusters of up to eight nodes.
NetApp Unified Storage
NetApp supports the following protocols .
FC
FCoE
iSCSI
NetApp SAN Protocols
In Clustered Data ONTAP,
NAS supports up to 12 HA pair and supports NFS,pNFS and CIFS.
SAN supports up to 4 HA pairs and supports FC, FCoE and iSCSI.
Typical FC Network – NetApp SAN Environment:
There are multiple ways to connect the initiators and targets together. Which is the best? Answer: Depends on your architectural requirements. Usually in an enterprise environment, switches are used to provide connections to the host initiators and storage targets.
NetApp FC Network
Typical iSCSI Network – NetApp SAN Environment:
NetApp iSCSI Environment
How to configure the iSCSI vServer and Create the LUNs ?
NetUA::> lun create -vserver uaiscsi -volume netvol1 -lun lun0 -size 1GB -ostype linux  -space-reserve disabled

Created a LUN of size 1g (1073741824)

NetUA::>
NetUA::> lun show -vserver uaiscsi
Vserver   Path                            State   Mapped   Type        Size
--------- ------------------------------- ------- -------- -------- --------
uaiscsi   /vol/netvol1/lun0               online  unmapped linux         1GB

NetUA::>
We have successfully created a LUN on NetApp Storage.
10. Create the iSCSI target.
NetUA::> vserver iscsi create -vserver uaiscsi -target-alias uaiscsi -status-admin up

NetUA::> vserver iscsi show
           Target                           Target                       Status
Vserver    Name                             Alias                        Admin
---------- -------------------------------- ---------------------------- ------
uaiscsi    iqn.1992-08.com.netapp:sn.f1f7f2449dee11e5b3cd123478563412:vs.8
                                            uaiscsi                      up

NetUA::>
11. Create a new portset for Vserver “uaiscsi”.
NetUA::> portset create -vserver uaiscsi  -portset uaiscsips -protocol iscsi
NetUA::> portset show -vserver uaiscsi -portset uaiscsips

    Vserver Name: uaiscsi
    Portset Name: uaiscsips
        LIF Name: -
        Protocol: iscsi
 Number Of Ports: 0
Bound To Igroups: -

NetUA::>
12. Check the LIF name of “uaiscsi” Vserver and map the LIF to portset.
NetUA::> net int show uaiscsi1
  (network interface show)
            Logical    Status     Network            Current       Current Is
Vserver     Interface  Admin/Oper Address/Mask       Node          Port    Home
----------- ---------- ---------- ------------------ ------------- ------- ----
uaiscsi
            uaiscsi1     up/up    192.168.0.131/24   NetUA-01      e0e     true

NetUA::>
NetUA::> portset add -vserver uaiscsi -portset uaiscsips -port-name uaiscsi1
NetUA::>
NetUA::> portset show -vserver uaiscsi -portset uaiscsips

    Vserver Name: uaiscsi
    Portset Name: uaiscsips
        LIF Name: uaiscsi1
        Protocol: iscsi
 Number Of Ports: 1
Bound To Igroups:
NetUA::>
13. Create a initiator group and map newly created portset “uaiscsips” to it.
NetUA::> igroup add -vserver uaiscsi -igroup uaiscsi3 -initiator iqn.1993-08.org.debian:01:21a0d3d79b9f
NetUA::> igroup show -vserver uaiscsi
Vserver   Igroup       Protocol OS Type  Initiators
--------- ------------ -------- -------- ------------------------------------
uaiscsi   uaiscsi3     iscsi    linux    iqn.1993-08.org.debian:01:21a0d3d79b9f

NetUA::>
Configure the iSCSI initiator on Linux Host (Ubuntu):
1. Login to the Linux host.
2. Install iscsi package .
root@uacloud:~# apt-get install open-iscsi
3.Try to access the iSCSI target.
root@uacloud:~# iscsiadm -m discovery -t st -p 192.168.0.131
iscsiadm: cannot make connection to 192.168.0.131: Connection refused
iscsiadm: cannot make connection to 192.168.0.131: Connection refused
iscsiadm: cannot make connection to 192.168.0.131: Connection refused
iscsiadm: cannot make connection to 192.168.0.131: Connection refused
iscsiadm: cannot make connection to 192.168.0.131: Connection refused
iscsiadm: cannot make connection to 192.168.0.131: Connection refused
iscsiadm: connection login retries (reopen_max) 5 exceeded
iscsiadm: Could not perform SendTargets discovery: encountered connection failure
root@uacloud:~#
IP Address – NetApp Vserver LIF . (Refer step 12).
If you are not configured the portset and initiator target group properly, you may get errors like above.
(iscsiadm: cannot make connection to IP_Address: Connection refused)
If you have configured correctly,you can see like following.
NetApp Clustered Data ONTAP is one of the emerging technology in the storage market. Cloud technologies demonstrated that how to reduce the IT operation cost by utilizing commodity hardware. This was the wake call for many of the proprietary hardware vendors in the market to provide the cheapest and reliable solution to the customer. So NetApp has wake of so early and decided to change the complete storage architecture from 7-Mode to Clustered Mode. NetApp Cluster Mode ONTAP works in distributed storage model and thanks to spinnaker networks for this solution (Spinnaker networks was acquired by NetApp).
NetApp Clustered Data ONTAP is designed to meet the current demands and future cloud solutions.
This tutorial’s targeted audience are system administrators and storage administrators who have prior knowledge on other SAN/NAS products.
Linux is not a windows operating system to install the security patches and other bug fix patches for every week. At the same time , it’s not like an Unix operating system where you no need to patch it for years. You should plan to patch the Redhat Linux yearly twice to eliminate the security holes and bug fixes. Redhat recommends to connect the systems to their repository to update the system without much pain. But customers don’t want to keep the systems in direct internet facing for any reason. Some of the customers will use internet proxy service to get the systems connected with Redhat repository and some of them are rich to afford Redhat satellite server facility. What about the companies who are concerned about security and cost ? Redhat provides the options of those people to update the system using offline method.
This article is going to demonstrate the offline patching method for RHEL 7. Redhat will automatically upgrade to the minor version.
Operating System: RHEL 7.0
Full OS update:(Package update , kernel update and security update)
Note: In this method, whole operating system will be upgraded to the latest minor versions. In this case, system will upgrade to RHEL 7.2.
1. You must have valid redhat subscription to download the latest DVD from Redhat.
2.Download the latest Redhat Enterprise Linux Server 7.x (RHEL 7.x Binary DVD) ISO from Redhat portal.
3.Copy the RHEL 7.x Binary ISO to the system which you want to update(patch) it.
4. Mount the ISO .
[root@UA-HA ~]# mkdir /repo
[root@UA-HA ~]# mount -o loop rhel-server-7.2-x86_64-dvd.iso /repo
[root@UA-HA ~]# ls -lrt /repo
total 872
-r--r--r--.  1 root root  18092 Mar  6  2012 GPL
-r--r--r--.  1 root root   8266 Apr  4  2014 EULA
-r--r--r--.  1 root root   3211 Oct 23 09:25 RPM-GPG-KEY-redhat-release
-r--r--r--.  1 root root   3375 Oct 23 09:25 RPM-GPG-KEY-redhat-beta
-r--r--r--.  1 root root    114 Oct 30 10:54 media.repo
-r--r--r--.  1 root root   1568 Oct 30 11:03 TRANS.TBL
dr-xr-xr-x.  2 root root   4096 Oct 30 11:03 repodata
dr-xr-xr-x. 24 root root   6144 Oct 30 11:03 release-notes
dr-xr-xr-x.  2 root root 835584 Oct 30 11:03 Packages
dr-xr-xr-x.  2 root root   2048 Oct 30 11:03 LiveOS
dr-xr-xr-x.  2 root root   2048 Oct 30 11:03 isolinux
dr-xr-xr-x.  3 root root   2048 Oct 30 11:03 images
dr-xr-xr-x.  3 root root   2048 Oct 30 11:03 EFI
dr-xr-xr-x.  4 root root   2048 Oct 30 11:03 addons
[root@UA-HA ~]#
5. Check the current version of Redhat and kernel version.
[root@UA-HA ~]# cat /etc/redhat-release
Red Hat Enterprise Linux Server release 7.0 (Maipo)
[root@UA-HA ~]# uname -mrs
Linux 3.10.0-123.el7.x86_64 x86_64
[root@UA-HA ~]#
6.Remove the existing yum repository. (Re-configure it later if you need those)
[root@UA-HA yum.repos.d]# yum repolist
Loaded plugins: langpacks, product-id, subscription-manager
This system is not registered to Red Hat Subscription Management. You can use subscription-manager to register.
repo id                                                                       repo name                                                                        status
repo                                                                          repo-update                                                                        4,305
repolist: 4,305
[root@UA-HA yum.repos.d]# cd
[root@UA-HA ~]#
9. Clean the cache,dbcache, expire-cache, headers and metadata. Perform the repo metadata clean up.
[root@UA-HA ~]# yum clean all
Loaded plugins: langpacks, product-id, search-disabled-repos, subscription-manager
This system is not registered to Red Hat Subscription Management. You can use subscription-manager to register.
Cleaning repos: repo-update
Cleaning up everything
[root@UA-HA ~]#
10. Update the system using “yum update” command.
[root@UA-HA ~]# yum update -y
Loaded plugins: langpacks, product-id, subscription-manager
This system is not registered to Red Hat Subscription Management. You can use subscription-manager to register.
Resolving Dependencies
--> Running transaction check
---> Package ModemManager-glib.x86_64 0:1.1.0-6.git20130913.el7 will be updated
---> Package ModemManager-glib.x86_64 0:1.1.0-8.git20130913.el7 will be an update
---> Package NetworkManager.x86_64 1:0.9.9.1-13.git20140326.4dba720.el7 will be obsoleted
---> Package NetworkManager.x86_64 1:1.0.6-27.el7 will be obsoleting
--> Processing Dependency: NetworkManager-libnm(x86-64) = 1:1.0.6-27.el7 for package: 1:NetworkManager-1.0.6-27.el7.x86_64
--> Processing Dependency: libnm.so.0(libnm_1_0_0)(64bit) for package: 1:NetworkManager-1.0.6-27.el7.x86_64
^C[root@UA-HA ~]#
11. Reboot the system using init 6.
12. Login to the system and check the kernel version.
[root@UA-HA ~]# uname -mrs
Linux 3.10.0-327.el7.x86_64 x86_64
[root@UA-HA ~]#
13. Check the /etc/redhat-release file.
[root@UA-HA ~]# cat /etc/redhat-release
Red Hat Enterprise Linux Server release 7.2 (Maipo)
[root@UA-HA ~]#
We can see that system has been updated successfully.
System Packages Bug fix, Security updates & Enhancement Updates Only: (No Kernel Update)
Some of the customers would like to stay with same kernel but would like to update the bug fixes and security updates. In that case, you can simply exclude the kernel.
There are two ways to exclude the kernel update. Method :1
Update the /etc/yum.conf to exclude the kernel update permanently.
While updating the system , you can just use the exclude option.
[root@UA-HA ~]# yum update --exclude=kernel*
Loaded plugins: langpacks, product-id, subscription-manager
This system is not registered to Red Hat Subscription Management. You can use subscription-manager to register.
Resolving Dependencies
--> Running transaction check
---> Package ModemManager-glib.x86_64 0:1.1.0-6.git20130913.el7 will be updated
---> Package ModemManager-glib.x86_64 0:1.1.0-8.git20130913.el7 will be an update
---> Package NetworkManager.x86_64 1:0.9.9.1-13.git20140326.4dba720.el7 will be obsoleted
---> Package NetworkManager.x86_64 1:1.0.6-27.el7 will be obsoleting
Only Kernel Update:
1. List the available kernel updates .
[root@UA-HA yum.repos.d]# yum list updates 'kernel*'
Loaded plugins: langpacks, product-id, subscription-manager
This system is not registered to Red Hat Subscription Management. You can use subscription-manager to register.
Updated Packages
kernel.x86_64                                                                     3.10.0-327.el7                                                          repo-update
kernel-tools.x86_64                                                               3.10.0-327.el7                                                          repo-update
kernel-tools-libs.x86_64                                                          3.10.0-327.el7                                                          repo-update
[root@UA-HA yum.repos.d]#
2. Check the currently installed kernel.
[root@UA-HA yum.repos.d]# rpm -q kernel
kernel-3.10.0-123.el7.x86_64
[root@UA-HA yum.repos.d]# yum list installed 'kernel*'
Loaded plugins: langpacks, product-id, subscription-manager
This system is not registered to Red Hat Subscription Management. You can use subscription-manager to register.
Installed Packages
kernel.x86_64 3.10.0-123.el7 @anaconda/7.0
kernel-tools.x86_64 3.10.0-123.el7 @anaconda/7.0
kernel-tools-libs.x86_64 3.10.0-123.el7 @anaconda/7.0
[root@UA-HA yum.repos.d]#
3. Update only the system kernel.
[root@UA-HA ~]# yum update 'kernel*'
Loaded plugins: langpacks, product-id, subscription-manager
This system is not registered to Red Hat Subscription Management. You can use subscription-manager to register.
Resolving Dependencies
--> Running transaction check
---> Package kernel.x86_64 0:3.10.0-327.el7 will be installed
--> Processing Dependency: dracut >= 033-283 for package: kernel-3.10.0-327.el7.x86_64
--> Processing Dependency: linux-firmware >= 20150904-43 for package: kernel-3.10.0-327.el7.x86_64
---> Package kernel-tools.x86_64 0:3.10.0-123.el7 will be updated
---> Package kernel-tools.x86_64 0:3.10.0-327.el7 will be an update
---> Package kernel-tools-libs.x86_64 0:3.10.0-123.el7 will be updated
---> Package kernel-tools-libs.x86_64 0:3.10.0-327.el7 will be an update
--> Running transaction check
---> Package dracut.x86_64 0:033-161.el7 will be updated
--> Processing Dependency: dracut = 033-161.el7 for package: dracut-network-033-161.el7.x86_64
--> Processing Dependency: dracut = 033-161.el7 for package: dracut-config-rescue-033-161.el7.x86_64
---> Package dracut.x86_64 0:033-359.el7 will be an update
--> Processing Dependency: systemd >= 219 for package: dracut-033-359.el7.x86_64
---> Package libertas-sd8686-firmware.noarch 0:20140213-0.3.git4164c23.el7 will be obsoleted
---> Package libertas-sd8787-firmware.noarch 0:20140213-0.3.git4164c23.el7 will be obsoleted
---> Package libertas-usb8388-firmware.noarch 2:20140213-0.3.git4164c23.el7 will be obsoleted
---> Package linux-firmware.noarch 0:20140213-0.3.git4164c23.el7 will be updated
---> Package linux-firmware.noarch 0:20150904-43.git6ebf5d5.el7 will be obsoleting
--> Running transaction check
---> Package dracut-config-rescue.x86_64 0:033-161.el7 will be updated
---> Package dracut-config-rescue.x86_64 0:033-359.el7 will be an update
---> Package dracut-network.x86_64 0:033-161.el7 will be updated
---> Package dracut-network.x86_64 0:033-359.el7 will be an update
---> Package systemd.x86_64 0:208-11.el7 will be updated
--> Processing Dependency: systemd = 208-11.el7 for package: libgudev1-208-11.el7.x86_64
--> Processing Dependency: systemd = 208-11.el7 for package: systemd-python-208-11.el7.x86_64
--> Processing Dependency: systemd = 208-11.el7 for package: systemd-sysv-208-11.el7.x86_64
---> Package systemd.x86_64 0:219-19.el7 will be an update
--> Processing Dependency: systemd-libs = 219-19.el7 for package: systemd-219-19.el7.x86_64
--> Processing Dependency: kmod >= 18-4 for package: systemd-219-19.el7.x86_64
--> Running transaction check
---> Package kmod.x86_64 0:14-9.el7 will be updated
---> Package kmod.x86_64 0:20-5.el7 will be an update
---> Package libgudev1.x86_64 0:208-11.el7 will be updated
---> Package libgudev1.x86_64 0:219-19.el7 will be an update
---> Package systemd-libs.x86_64 0:208-11.el7 will be updated
---> Package systemd-libs.x86_64 0:219-19.el7 will be an update
---> Package systemd-python.x86_64 0:208-11.el7 will be updated
---> Package systemd-python.x86_64 0:219-19.el7 will be an update
---> Package systemd-sysv.x86_64 0:208-11.el7 will be updated
---> Package systemd-sysv.x86_64 0:219-19.el7 will be an update
--> Processing Conflict: systemd-219-19.el7.x86_64 conflicts initscripts < 9.49.28-1 --> Restarting Dependency Resolution with new changes.
--> Running transaction check
---> Package initscripts.x86_64 0:9.49.17-1.el7 will be updated
---> Package initscripts.x86_64 0:9.49.30-1.el7 will be an update
--> Finished Dependency Resolution
Dependencies Resolved
=================================================================================================================
Package Arch Version Repository Size
=================================================================================================================
Installing:
kernel x86_64 3.10.0-327.el7 repo-update 33 M
linux-firmware noarch 20150904-43.git6ebf5d5.el7 repo-update 24 M
replacing libertas-sd8686-firmware.noarch 20140213-0.3.git4164c23.el7
replacing libertas-sd8787-firmware.noarch 20140213-0.3.git4164c23.el7
replacing libertas-usb8388-firmware.noarch 2:20140213-0.3.git4164c23.el7
Updating:
initscripts x86_64 9.49.30-1.el7 repo-update 429 k
kernel-tools x86_64 3.10.0-327.el7 repo-update 2.4 M
kernel-tools-libs x86_64 3.10.0-327.el7 repo-update 2.3 M
Updating for dependencies:
dracut x86_64 033-359.el7 repo-update 311 k
dracut-config-rescue x86_64 033-359.el7 repo-update 49 k
dracut-network x86_64 033-359.el7 repo-update 90 k
kmod x86_64 20-5.el7 repo-update 114 k
libgudev1 x86_64 219-19.el7 repo-update 64 k
systemd x86_64 219-19.el7 repo-update 5.1 M
systemd-libs x86_64 219-19.el7 repo-update 356 k
systemd-python x86_64 219-19.el7 repo-update 97 k
systemd-sysv x86_64 219-19.el7 repo-update 52 k
Transaction Summary
==================================================================================================================
Install 2 Packages
Upgrade 3 Packages (+9 Dependent packages)
Total download size: 68 M
Is this ok [y/d/N]: y
Downloading packages:
------------------------------------------------------------------------------------------------------------------
Total 86 MB/s | 68 MB 00:00:00
Running transaction check
Running transaction test
Transaction test succeeded
Running transaction
Warning: RPMDB altered outside of yum.
Updating : systemd-libs-219-19.el7.x86_64 1/30
Updating : systemd-219-19.el7.x86_64 2/30
Updating : dracut-033-359.el7.x86_64 3/30
Updating : kmod-20-5.el7.x86_64 4/30
Updating : initscripts-9.49.30-1.el7.x86_64 5/30
Updating : kernel-tools-libs-3.10.0-327.el7.x86_64 6/30
Installing : linux-firmware-20150904-43.git6ebf5d5.el7.noarch 7/30
Installing : kernel-3.10.0-327.el7.x86_64 8/30
Updating : kernel-tools-3.10.0-327.el7.x86_64 9/30
Updating : dracut-config-rescue-033-359.el7.x86_64 10/30
Updating : dracut-network-033-359.el7.x86_64 11/30
Updating : systemd-sysv-219-19.el7.x86_64 12/30
Updating : systemd-python-219-19.el7.x86_64 13/30
Updating : libgudev1-219-19.el7.x86_64 14/30
Cleanup : systemd-sysv-208-11.el7.x86_64 15/30
Cleanup : dracut-network-033-161.el7.x86_64 16/30
Cleanup : dracut-config-rescue-033-161.el7.x86_64 17/30
Erasing : libertas-sd8787-firmware-20140213-0.3.git4164c23.el7.noarch 18/30
Erasing : libertas-sd8686-firmware-20140213-0.3.git4164c23.el7.noarch 19/30
Erasing : 2:libertas-usb8388-firmware-20140213-0.3.git4164c23.el7.noarch 20/30
Cleanup : linux-firmware-20140213-0.3.git4164c23.el7.noarch 21/30
Cleanup : dracut-033-161.el7.x86_64 22/30
Cleanup : systemd-python-208-11.el7.x86_64 23/30
Cleanup : initscripts-9.49.17-1.el7.x86_64 24/30
Cleanup : libgudev1-208-11.el7.x86_64 25/30
Cleanup : systemd-208-11.el7.x86_64 26/30
Cleanup : kernel-tools-3.10.0-123.el7.x86_64 27/30
Cleanup : kernel-tools-libs-3.10.0-123.el7.x86_64 28/30
Cleanup : kmod-14-9.el7.x86_64 29/30
Cleanup : systemd-libs-208-11.el7.x86_64 30/30
Verifying : dracut-config-rescue-033-359.el7.x86_64 1/30
Verifying : linux-firmware-20150904-43.git6ebf5d5.el7.noarch 2/30
Verifying : dracut-network-033-359.el7.x86_64 3/30
Verifying : kernel-tools-3.10.0-327.el7.x86_64 4/30
Verifying : kmod-20-5.el7.x86_64 5/30
Verifying : systemd-sysv-219-19.el7.x86_64 6/30
Verifying : libgudev1-219-19.el7.x86_64 7/30
Verifying : systemd-219-19.el7.x86_64 8/30
Verifying : kernel-3.10.0-327.el7.x86_64 9/30
Verifying : dracut-033-359.el7.x86_64 10/30
Verifying : systemd-libs-219-19.el7.x86_64 11/30
Verifying : kernel-tools-libs-3.10.0-327.el7.x86_64 12/30
Verifying : initscripts-9.49.30-1.el7.x86_64 13/30
Verifying : systemd-python-219-19.el7.x86_64 14/30
Verifying : kernel-tools-3.10.0-123.el7.x86_64 15/30
Verifying : kmod-14-9.el7.x86_64 16/30
Verifying : dracut-config-rescue-033-161.el7.x86_64 17/30
Verifying : systemd-sysv-208-11.el7.x86_64 18/30
Verifying : systemd-python-208-11.el7.x86_64 19/30
Verifying : libertas-sd8787-firmware-20140213-0.3.git4164c23.el7.noarch 20/30
Verifying : 2:libertas-usb8388-firmware-20140213-0.3.git4164c23.el7.noarch 21/30
Verifying : dracut-033-161.el7.x86_64 22/30
Verifying : initscripts-9.49.17-1.el7.x86_64 23/30
Verifying : systemd-libs-208-11.el7.x86_64 24/30
Verifying : systemd-208-11.el7.x86_64 25/30
Verifying : dracut-network-033-161.el7.x86_64 26/30
Verifying : libertas-sd8686-firmware-20140213-0.3.git4164c23.el7.noarch 27/30
Verifying : libgudev1-208-11.el7.x86_64 28/30
Verifying : linux-firmware-20140213-0.3.git4164c23.el7.noarch 29/30
Verifying : kernel-tools-libs-3.10.0-123.el7.x86_64 30/30
Installed:
kernel.x86_64 0:3.10.0-327.el7 linux-firmware.noarch 0:20150904-43.git6ebf5d5.el7
Updated:
initscripts.x86_64 0:9.49.30-1.el7 kernel-tools.x86_64 0:3.10.0-327.el7 kernel-tools-libs.x86_64 0:3.10.0-327.el7
Dependency Updated:
dracut.x86_64 0:033-359.el7 dracut-config-rescue.x86_64 0:033-359.el7 dracut-network.x86_64 0:033-359.el7 kmod.x86_64 0:20-5.el7
libgudev1.x86_64 0:219-19.el7 systemd.x86_64 0:219-19.el7 systemd-libs.x86_64 0:219-19.el7 systemd-python.x86_64 0:219-19.el7
systemd-sysv.x86_64 0:219-19.el7
Replaced:
libertas-sd8686-firmware.noarch 0:20140213-0.3.git4164c23.el7 libertas-sd8787-firmware.noarch 0:20140213-0.3.git4164c23.el7
libertas-usb8388-firmware.noarch 2:20140213-0.3.git4164c23.el7
Complete!
[root@UA-HA ~]#
4. Reboot the system.
In grub , you can see that system is booting in new kernel.
GRUB Menu – RHEL 7
5. Login to the system again and check the kernel version.
[root@UA-HA ~]# uname -mrs
Linux 3.10.0-327.el7.x86_64 x86_64
[root@UA-HA ~]#
We can see that system kernel has been upgraded to latest version.
Install Only the Security updates: (No update for kernel & packages)
Use the following command to update only the security updates.
KVM is free open source full virtualization solution for Linux on x86 hardware. After the cloud revolution, KVM(Kernel Based Virtual Machine) Virtualization is a hot topic in the industry. Most of the cloud technologies will prefer to use the KVM hypervisors over XEN due to it’s simplicity. Redhat and Ubuntu’s default hypervisor is KVM. Contrast to these vendors, Oracle Linux uses XEN Virtualization. More information about KVM can be obtain from linux-kvm.org.
KVM consists of a loadable kernel module, kvm.ko, that provides the core virtualization infrastructure and a processor specific module, kvm-intel.ko (Intel) or kvm-amd.ko (AMD). These modules allows kernel to become a hypervisor. kvm.ko kernel module is responsible to exposing “/dev/kvm” which is used by various programs including libvirt.
KVM has initially developed by Qumranet that was acquired by Red Hat in 2008.
Prerequisites for KVM:
1. Processors with virtualization technology. Accelerate the virtualization guests.
Intel – Intel-VT
AMD – AMD-V (SVM)
2. Enable the CPU VT technology on the BIOS.
3. Linux kernel must be greater than 2.6.20 .
4. Access to the repository to install the necessary KVM packages.
5. Shared Storage. (NFS, SAN , NAS)
Supported Guests on KVM:
Linux – Most of the linux flavours are supported
Windows – Most of the windows guests are supported including desktops and servers.
Unix – BSD , Solaris
Supported Architecture:
KVM supports both 32-bit & 64-bit guest operating systems. To host the 64-Bit guests , the host system should be 64-bit and VT enabled.
KVM Maximums:
Redhat RHEL KVM Maximums
Maximum number of concurrently running virtual guests is 4 . But it is not a KVM limitation. Redhat protect the number of virtual guests using the license methods.
Paravirtualization vs HVM (Native Hardware Virtualization)
KVM supports paravirtualization typically supports the following components.
Networking
Block Devices
Graphics
Memory
Paravirtualization supported on Linux, BSD and windows guests. It improves the performances considerably compare to HVM.
Networking:
KVM supports the following network features. NAT: – NAT provides the outbound network access to the KVM guests. In other words, guest machine can access the outside world but external network system can’t reach the guests. This is the default network for KVM. Bridges: – Bridge provide the access to public and private network. KVM guests can be access from outside the host machine unlike NAT.
KVM Environment:
The KVM environment is maintained in /var/lib/libvirt. This includes the ISO images for the installation , actual VM guest images and network configurations.
[root@UA-HA libvirt]# ls -lrt
total 4
drwx------. 2 root root    6 Oct  8 09:14 lxc
drwx--x--x. 2 root root    6 Oct  8 09:14 images
drwx--x--x. 2 root root    6 Oct  8 09:14 filesystems
drwx--x--x. 2 root root    6 Oct  8 09:14 boot
drwx------. 2 root root    6 Dec 13 00:30 network
drwxr-x--x. 7 qemu qemu   69 Dec 13 00:30 qemu
drwxr-xr-x. 2 root root 4096 Dec 13 13:12 dnsmasq
[root@UA-HA libvirt]#
KVM configuration files are stored in /etc/libvirt/ directory.
[root@UA-HA libvirt]# cd /etc/libvirt/
[root@UA-HA libvirt]# ls -lrt
total 56
-rw-r--r--. 1 root root  2134 Oct  8 09:14 virtlockd.conf
-rw-r--r--. 1 root root  2169 Oct  8 09:14 qemu-lockd.conf
-rw-r--r--. 1 root root 18987 Oct  8 09:14 qemu.conf
drwx------. 3 root root    21 Oct  8 09:14 qemu
-rw-r--r--. 1 root root  1176 Oct  8 09:14 lxc.conf
-rw-r--r--. 1 root root   518 Oct  8 09:14 libvirt.conf
-rw-r--r--. 1 root root 15070 Oct  8 09:14 libvirtd.conf
drwx------. 2 root root  4096 Dec 13 00:25 nwfilter
[root@UA-HA libvirt]#
Hope this article is informative to you. Share it ! Comment it !! Be Sociable !!!
This article will demonstrates that how to install the KVM (kernel-based virtual Machines) packages on Redhat enterprise Linux 7.2 . We must have “yum repository” to install the KVM packages and it’s dependencies. There are many GUI tools available to manage the KVM. VMM (Virtual Machine Manager) is famous GUI tool which was developed by Redhat. The following table provides the KVM package names and key role of each packages. “virt-manager” and “virt-install” can be installed on any of the Linux host to manage the KVM hypervisor hosts.
KVM is a Linux kernel module that allows a user space program access to the hardware virtualization features of Intel and AMD processors. With the helf of KVM kernel modules, guests run as ordinary user-space processes. KVM uses QEMU for I/O hardware emulation. QEMU is a user-space emulator that can emulate a variety of guest processors on host processors with decent performance. Using the KVM kernel module allows it to approach native speeds. KVM is managed via the libvirt API and tools. (Example: virsh, virtinstall and virt-clone )
Package Name
Description
qemu-kvm
Provides kvm.ko & kvm_intel kernel Modules . Core part of the KVM
qemu-kvm-common
Various BIOS and Network scripts .
qemu-img
Disk image manager on the host Red Hat Enterprise Linux system.
bridge-utils
Provides the bridges to pyshcial interfaces and VM interfaces
virt-manager
GUI to manage the KVM guests. Allow users to interactive with libvirtd and
kernel to provide the faciltiy to create the virtual guests
virt-install
It’s key CLI package. Provides the binaries “virt-install” , “virt-clone”, “virt-image” and “virt-convert”.
libvirt
The libvirt package provides the libvirtd daemon that handles the library calls,
manages virtual machines and controls the hypervisor.
libvirt-python
The libvirt-python package contains a module that permits applications written in the Python
programming language to use the interface supplied by the libvirt API.
libvirt-client
The libvirt-client package provides the client-side APIs and libraries for accessing libvirt servers.
The libvirt-client package includes the virsh command line tool to manage and control virtual
machines and hypervisors from the command line or a special virtualization shell.
libguestfs-tools
libguestfs is a set of tools for accessing and modifying virtual machine (VM) disk images. It can access alomost any disk image including Vmware’s VMDK & Hyper-V disk format.
1. Check the host processors VT technology. If you don’t find vmx or svm in cpuinfo, verify that Virtualization Technology (VT) is enabled in your server’s BIOS.
4. virt-Manager provides the GUI to manage the KVM. You can install virt-manager anywhere either on hosts or remote systems. (This is like a vSphere Client in VMware)
[root@UA-HA ~]# yum install virt-manager
Loaded plugins: langpacks, product-id, search-disabled-repos, subscription-manager
This system is not registered to Red Hat Subscription Management. You can use subscription-manager to register.
Resolving Dependencies
--> Running transaction check
---> Package virt-manager.noarch 0:1.2.1-8.el7 will be installed
--> Processing Dependency: libvirt-glib >= 0.0.9 for package: virt-manager-1.2.1-8.el7.noarch
--> Processing Dependency: dbus-x11 for package: virt-manager-1.2.1-8.el7.noarch
--> Processing Dependency: dconf for package: virt-manager-1.2.1-8.el7.noarch
--> Processing Dependency: gnome-icon-theme for package: virt-manager-1.2.1-8.el7.noarch
--> Processing Dependency: gtk-vnc2 for package: virt-manager-1.2.1-8.el7.noarch
--> Processing Dependency: gtk3 for package: virt-manager-1.2.1-8.el7.noarch
--> Processing Dependency: pygobject3 for package: virt-manager-1.2.1-8.el7.noarch
--> Processing Dependency: spice-gtk3 for package: virt-manager-1.2.1-8.el7.noarch
--> Processing Dependency: vte3 for package: virt-manager-1.2.1-8.el7.noarch
--> Running transaction check
---> Package dbus-x11.x86_64 1:1.6.12-13.el7 will be installed
---> Package dconf.x86_64 0:0.22.0-2.el7 will be installed
---> Package gnome-icon-theme.noarch 0:3.12.0-1.el7 will be installed
---> Package gtk-vnc2.x86_64 0:0.5.2-7.el7 will be installed
--> Processing Dependency: gvnc = 0.5.2-7.el7 for package: gtk-vnc2-0.5.2-7.el7.x86_64
--> Processing Dependency: libcairo-gobject.so.2()(64bit) for package: gtk-vnc2-0.5.2-7.el7.x86_64
--> Processing Dependency: libgvnc-1.0.so.0()(64bit) for package: gtk-vnc2-0.5.2-7.el7.x86_64
---> Package gtk3.x86_64 0:3.14.13-16.el7 will be installed
--> Processing Dependency: adwaita-icon-theme for package: gtk3-3.14.13-16.el7.x86_64
--> Processing Dependency: libatk-bridge-2.0.so.0()(64bit) for package: gtk3-3.14.13-16.el7.x86_64
--> Processing Dependency: libcolord.so.2()(64bit) for package: gtk3-3.14.13-16.el7.x86_64
--> Processing Dependency: libjson-glib-1.0.so.0()(64bit) for package: gtk3-3.14.13-16.el7.x86_64
--> Processing Dependency: librest-0.7.so.0()(64bit) for package: gtk3-3.14.13-16.el7.x86_64
---> Package libvirt-glib.x86_64 0:0.1.9-1.el7 will be installed
---> Package pygobject3.x86_64 0:3.14.0-3.el7 will be installed
--> Processing Dependency: pycairo(x86-64) for package: pygobject3-3.14.0-3.el7.x86_64
---> Package spice-gtk3.x86_64 0:0.26-5.el7 will be installed
--> Processing Dependency: spice-glib(x86-64) = 0.26-5.el7 for package: spice-gtk3-0.26-5.el7.x86_64
--> Processing Dependency: libspice-client-glib-2.0.so.8(SPICEGTK_1)(64bit) for package: spice-gtk3-0.26-5.el7.x86_64
--> Processing Dependency: libcacard.so.0()(64bit) for package: spice-gtk3-0.26-5.el7.x86_64
--> Processing Dependency: libpulse-mainloop-glib.so.0()(64bit) for package: spice-gtk3-0.26-5.el7.x86_64
--> Processing Dependency: libspice-client-glib-2.0.so.8()(64bit) for package: spice-gtk3-0.26-5.el7.x86_64
---> Package vte3.x86_64 0:0.36.4-1.el7 will be installed
--> Processing Dependency: vte-profile for package: vte3-0.36.4-1.el7.x86_64
--> Running transaction check
---> Package adwaita-icon-theme.noarch 0:3.14.1-1.el7 will be installed
--> Processing Dependency: adwaita-cursor-theme = 3.14.1-1.el7 for package: adwaita-icon-theme-3.14.1-1.el7.noarch
---> Package at-spi2-atk.x86_64 0:2.8.1-4.el7 will be installed
--> Processing Dependency: at-spi2-core >= 2.7.5 for package: at-spi2-atk-2.8.1-4.el7.x86_64
--> Processing Dependency: libatspi.so.0()(64bit) for package: at-spi2-atk-2.8.1-4.el7.x86_64
---> Package cairo-gobject.x86_64 0:1.14.2-1.el7 will be installed
---> Package colord-libs.x86_64 0:1.2.7-2.el7 will be installed
--> Processing Dependency: libgusb.so.2()(64bit) for package: colord-libs-1.2.7-2.el7.x86_64
---> Package gvnc.x86_64 0:0.5.2-7.el7 will be installed
---> Package json-glib.x86_64 0:1.0.2-1.el7 will be installed
---> Package libcacard.x86_64 10:1.5.3-105.el7 will be installed
---> Package pulseaudio-libs-glib2.x86_64 0:6.0-7.el7 will be installed
---> Package pycairo.x86_64 0:1.8.10-8.el7 will be installed
---> Package rest.x86_64 0:0.7.92-3.el7 will be installed
---> Package spice-glib.x86_64 0:0.26-5.el7 will be installed
---> Package vte-profile.x86_64 0:0.38.3-2.el7 will be installed
--> Running transaction check
---> Package adwaita-cursor-theme.noarch 0:3.14.1-1.el7 will be installed
---> Package at-spi2-core.x86_64 0:2.8.0-6.el7 will be installed
--> Processing Dependency: libXevie.so.1()(64bit) for package: at-spi2-core-2.8.0-6.el7.x86_64
---> Package libgusb.x86_64 0:0.1.6-3.el7 will be installed
--> Running transaction check
---> Package libXevie.x86_64 0:1.0.3-7.1.el7 will be installed
--> Finished Dependency Resolution
Dependencies Resolved
=====================================================================================================================================================================
Package Arch Version Repository Size
=====================================================================================================================================================================
Installing:
virt-manager noarch 1.2.1-8.el7 repo-update 628 k
Installing for dependencies:
adwaita-cursor-theme noarch 3.14.1-1.el7 repo-update 128 k
adwaita-icon-theme noarch 3.14.1-1.el7 repo-update 11 M
at-spi2-atk x86_64 2.8.1-4.el7 repo-update 73 k
at-spi2-core x86_64 2.8.0-6.el7 repo-update 151 k
cairo-gobject x86_64 1.14.2-1.el7 repo-update 25 k
colord-libs x86_64 1.2.7-2.el7 repo-update 174 k
dbus-x11 x86_64 1:1.6.12-13.el7 repo-update 46 k
dconf x86_64 0.22.0-2.el7 repo-update 157 k
gnome-icon-theme noarch 3.12.0-1.el7 repo-update 9.7 M
gtk-vnc2 x86_64 0.5.2-7.el7 repo-update 38 k
gtk3 x86_64 3.14.13-16.el7 repo-update 3.8 M
gvnc x86_64 0.5.2-7.el7 repo-update 89 k
json-glib x86_64 1.0.2-1.el7 repo-update 123 k
libXevie x86_64 1.0.3-7.1.el7 repo-update 18 k
libcacard x86_64 10:1.5.3-105.el7 repo-update 227 k
libgusb x86_64 0.1.6-3.el7 repo-update 33 k
libvirt-glib x86_64 0.1.9-1.el7 repo-update 84 k
pulseaudio-libs-glib2 x86_64 6.0-7.el7 repo-update 27 k
pycairo x86_64 1.8.10-8.el7 repo-update 157 k
pygobject3 x86_64 3.14.0-3.el7 repo-update 16 k
rest x86_64 0.7.92-3.el7 repo-update 62 k
spice-glib x86_64 0.26-5.el7 repo-update 350 k
spice-gtk3 x86_64 0.26-5.el7 repo-update 51 k
vte-profile x86_64 0.38.3-2.el7 repo-update 6.0 k
vte3 x86_64 0.36.4-1.el7 repo-update 337 k
Transaction Summary
=====================================================================================================================================================================
Install 1 Package (+25 Dependent packages)
Total download size: 28 M
Installed size: 49 M
Is this ok [y/d/N]: y
Downloading packages:
---------------------------------------------------------------------------------------------------------------------------------------------------------------------
Total 47 MB/s | 28 MB 00:00:00
Running transaction check
Running transaction test
Transaction test succeeded
Running transaction
Installing : cairo-gobject-1.14.2-1.el7.x86_64 1/26
Installing : 10:libcacard-1.5.3-105.el7.x86_64 2/26
Installing : pulseaudio-libs-glib2-6.0-7.el7.x86_64 3/26
Installing : spice-glib-0.26-5.el7.x86_64 4/26
Installing : rest-0.7.92-3.el7.x86_64 5/26
Installing : vte-profile-0.38.3-2.el7.x86_64 6/26
Installing : dconf-0.22.0-2.el7.x86_64 7/26
Installing : pycairo-1.8.10-8.el7.x86_64 8/26
Installing : pygobject3-3.14.0-3.el7.x86_64 9/26
Installing : libgusb-0.1.6-3.el7.x86_64 10/26
Installing : colord-libs-1.2.7-2.el7.x86_64 11/26
Installing : json-glib-1.0.2-1.el7.x86_64 12/26
Installing : libXevie-1.0.3-7.1.el7.x86_64 13/26
Installing : at-spi2-core-2.8.0-6.el7.x86_64 14/26
Installing : at-spi2-atk-2.8.1-4.el7.x86_64 15/26
Installing : 1:dbus-x11-1.6.12-13.el7.x86_64 16/26
Installing : adwaita-cursor-theme-3.14.1-1.el7.noarch 17/26
Installing : adwaita-icon-theme-3.14.1-1.el7.noarch 18/26
Installing : gtk3-3.14.13-16.el7.x86_64 19/26
Installing : spice-gtk3-0.26-5.el7.x86_64 20/26
Installing : vte3-0.36.4-1.el7.x86_64 21/26
Installing : gvnc-0.5.2-7.el7.x86_64 22/26
Installing : gtk-vnc2-0.5.2-7.el7.x86_64 23/26
Installing : libvirt-glib-0.1.9-1.el7.x86_64 24/26
Installing : gnome-icon-theme-3.12.0-1.el7.noarch 25/26
Installing : virt-manager-1.2.1-8.el7.noarch 26/26
Verifying : spice-glib-0.26-5.el7.x86_64 1/26
Verifying : gnome-icon-theme-3.12.0-1.el7.noarch 2/26
Verifying : spice-gtk3-0.26-5.el7.x86_64 3/26
Verifying : colord-libs-1.2.7-2.el7.x86_64 4/26
Verifying : libvirt-glib-0.1.9-1.el7.x86_64 5/26
Verifying : pulseaudio-libs-glib2-6.0-7.el7.x86_64 6/26
Verifying : adwaita-icon-theme-3.14.1-1.el7.noarch 7/26
Verifying : gvnc-0.5.2-7.el7.x86_64 8/26
Verifying : adwaita-cursor-theme-3.14.1-1.el7.noarch 9/26
Verifying : 1:dbus-x11-1.6.12-13.el7.x86_64 10/26
Verifying : gtk3-3.14.13-16.el7.x86_64 11/26
Verifying : libXevie-1.0.3-7.1.el7.x86_64 12/26
Verifying : json-glib-1.0.2-1.el7.x86_64 13/26
Verifying : virt-manager-1.2.1-8.el7.noarch 14/26
Verifying : libgusb-0.1.6-3.el7.x86_64 15/26
Verifying : at-spi2-core-2.8.0-6.el7.x86_64 16/26
Verifying : pygobject3-3.14.0-3.el7.x86_64 17/26
Verifying : pycairo-1.8.10-8.el7.x86_64 18/26
Verifying : dconf-0.22.0-2.el7.x86_64 19/26
Verifying : vte-profile-0.38.3-2.el7.x86_64 20/26
Verifying : gtk-vnc2-0.5.2-7.el7.x86_64 21/26
Verifying : at-spi2-atk-2.8.1-4.el7.x86_64 22/26
Verifying : cairo-gobject-1.14.2-1.el7.x86_64 23/26
Verifying : rest-0.7.92-3.el7.x86_64 24/26
Verifying : 10:libcacard-1.5.3-105.el7.x86_64 25/26
Verifying : vte3-0.36.4-1.el7.x86_64 26/26
Installed:
virt-manager.noarch 0:1.2.1-8.el7
Dependency Installed:
adwaita-cursor-theme.noarch 0:3.14.1-1.el7 adwaita-icon-theme.noarch 0:3.14.1-1.el7 at-spi2-atk.x86_64 0:2.8.1-4.el7 at-spi2-core.x86_64 0:2.8.0-6.el7
cairo-gobject.x86_64 0:1.14.2-1.el7 colord-libs.x86_64 0:1.2.7-2.el7 dbus-x11.x86_64 1:1.6.12-13.el7 dconf.x86_64 0:0.22.0-2.el7
gnome-icon-theme.noarch 0:3.12.0-1.el7 gtk-vnc2.x86_64 0:0.5.2-7.el7 gtk3.x86_64 0:3.14.13-16.el7 gvnc.x86_64 0:0.5.2-7.el7
json-glib.x86_64 0:1.0.2-1.el7 libXevie.x86_64 0:1.0.3-7.1.el7 libcacard.x86_64 10:1.5.3-105.el7 libgusb.x86_64 0:0.1.6-3.el7
libvirt-glib.x86_64 0:0.1.9-1.el7 pulseaudio-libs-glib2.x86_64 0:6.0-7.el7 pycairo.x86_64 0:1.8.10-8.el7 pygobject3.x86_64 0:3.14.0-3.el7
rest.x86_64 0:0.7.92-3.el7 spice-glib.x86_64 0:0.26-5.el7 spice-gtk3.x86_64 0:0.26-5.el7 vte-profile.x86_64 0:0.38.3-2.el7
vte3.x86_64 0:0.36.4-1.el7
Complete!
[root@UA-HA ~]#
[root@UA-HA ~]#
5.Optionally , you can install virt-top to check the resource utilization on the hosts node.
[root@UA-HA ~]# yum install virt-top.x86_64
Loaded plugins: langpacks, product-id, search-disabled-repos, subscription-manager
This system is not registered to Red Hat Subscription Management. You can use subscription-manager to register.
Resolving Dependencies
--> Running transaction check
---> Package virt-top.x86_64 0:1.0.8-8.el7 will be installed
--> Finished Dependency Resolution

Dependencies Resolved

=====================================================================================================================================================================
 Package                               Arch                                Version                                    Repository                                Size
=====================================================================================================================================================================
Installing:
 virt-top                              x86_64                              1.0.8-8.el7                                repo-update                              400 k

Transaction Summary
=====================================================================================================================================================================
Install  1 Package

Total download size: 400 k
Installed size: 1.4 M
Is this ok [y/d/N]: y
Downloading packages:
Running transaction check
Running transaction test
Transaction test succeeded
Running transaction
  Installing : virt-top-1.0.8-8.el7.x86_64                                                                                                                       1/1
  Verifying  : virt-top-1.0.8-8.el7.x86_64                                                                                                                       1/1

Installed:
  virt-top.x86_64 0:1.0.8-8.el7

Complete!
[root@UA-HA ~]#
6. Install virt-viewer to view the guest VNC console.
[root@UA-HA ~]# yum install virt-viewer
Loaded plugins: langpacks, product-id, search-disabled-repos, subscription-manager
This system is not registered to Red Hat Subscription Management. You can use subscription-manager to register.
Resolving Dependencies
--> Running transaction check
---> Package virt-viewer.x86_64 0:2.0-6.el7 will be installed
--> Processing Dependency: libgovirt.so.2(GOVIRT_0.2.0)(64bit) for package: virt-viewer-2.0-6.el7.x86_64
--> Processing Dependency: libgovirt.so.2(GOVIRT_0.2.1)(64bit) for package: virt-viewer-2.0-6.el7.x86_64
--> Processing Dependency: libgovirt.so.2(GOVIRT_0.3.1)(64bit) for package: virt-viewer-2.0-6.el7.x86_64
--> Processing Dependency: libgovirt.so.2()(64bit) for package: virt-viewer-2.0-6.el7.x86_64
--> Running transaction check
---> Package libgovirt.x86_64 0:0.3.3-1.el7 will be installed
--> Finished Dependency Resolution

Dependencies Resolved

===========================================================================================================================
 Package                       Arch                     Version                        Repository                     Size
===========================================================================================================================
Installing:
 virt-viewer                   x86_64                   2.0-6.el7                      repo-update                   339 k
Installing for dependencies:
 libgovirt                     x86_64                   0.3.3-1.el7                    repo-update                    63 k

Transaction Summary
===========================================================================================================================
Install  1 Package (+1 Dependent package)

Total download size: 402 k
Installed size: 1.4 M
Is this ok [y/d/N]: y
Downloading packages:
---------------------------------------------------------------------------------------------------------------------------
Total                                                                                      5.4 MB/s | 402 kB  00:00:00
Running transaction check
Running transaction test
Transaction test succeeded
Running transaction
  Installing : libgovirt-0.3.3-1.el7.x86_64                                                                            1/2
  Installing : virt-viewer-2.0-6.el7.x86_64                                                                            2/2
  Verifying  : virt-viewer-2.0-6.el7.x86_64                                                                            1/2
  Verifying  : libgovirt-0.3.3-1.el7.x86_64                                                                            2/2

Installed:
  virt-viewer.x86_64 0:2.0-6.el7

Dependency Installed:
  libgovirt.x86_64 0:0.3.3-1.el7

Complete!
[root@UA-HA ~]#
We have successfully installed the kvm packages and supported tools.
Hope this article is informative to you . Share it ! Comment it !! Be Sociable !!!
KVM hosts needs to be prepared to store and provide the network access to the guest machines. In last article ,we have seen KVM package installation and VMM(virtual Machine Manager) package installation. Once you have installed the packages, you need to create the filesystem to store the virtual machines images (var/lib/libvirt/images which is the default storage path). If you are planning to move the VM’s from one host to another host , you need a shared filesystem (NFS) or shared storage (SAN). To access the guest in external network , you must configure the bridge on host. This article is going to demonstrate the bridge creation and creating the storage pool to store the virtual machines and ISO images.
Host – The hypervisor or physical server where all VMs are installed.
VMs (Virtual Machines) or Guests – Virtual servers that are installed on top of a physical server.
Host Operating System (Hypervisor) – RHEL 7.2
Configure the New Bridge on host (Hypervisor):
Bridge configuration is required to provide the autonomous network access to the guests.
3.Re-configure the primary interface to enable the bridging. Navigate to the network configuration directory and update the “ifcfg-xxxxxx” file like following.
[root@UA-HA ~]# cd /etc/sysconfig/network-scripts/
[root@UA-HA network-scripts]# vi ifcfg-eno16777736
[root@UA-HA network-scripts]# cat ifcfg-eno16777736
HWADDR="00:0C:29:2D:3F:CE"
TYPE="Ethernet"
ONBOOT="yes"
BRIDGE=br0
[root@UA-HA network-scripts]#
4. Create the bridge configuration file like the following.
7. Restart the network services to activate the bridge configuration.
[root@UA-HA ~]# systemctl restart network
[root@UA-HA ~]# systemctl status network
● network.service - LSB: Bring up/down networking
   Loaded: loaded (/etc/rc.d/init.d/network)
   Active: active (exited) since Mon 2015-12-14 06:26:08 EST; 11s ago
     Docs: man:systemd-sysv-generator(8)
  Process: 38831 ExecStop=/etc/rc.d/init.d/network stop (code=exited, status=0/SUCCESS)
  Process: 39021 ExecStart=/etc/rc.d/init.d/network start (code=exited, status=0/SUCCESS)

Dec 14 06:26:07 UA-HA systemd[1]: Starting LSB: Bring up/down networking...
Dec 14 06:26:08 UA-HA network[39021]: Bringing up loopback interface:  Could not load file '/etc/sysconfig/network-scripts/ifcfg-lo'
Dec 14 06:26:08 UA-HA network[39021]: Could not load file '/etc/sysconfig/network-scripts/ifcfg-lo'
Dec 14 06:26:08 UA-HA network[39021]: Could not load file '/etc/sysconfig/network-scripts/ifcfg-lo'
Dec 14 06:26:08 UA-HA network[39021]: Could not load file '/etc/sysconfig/network-scripts/ifcfg-lo'
Dec 14 06:26:08 UA-HA network[39021]: [  OK  ]
Dec 14 06:26:08 UA-HA network[39021]: Bringing up interface eno16777736:  [  OK  ]
Dec 14 06:26:08 UA-HA network[39021]: Bringing up interface br0:  [  OK  ]
Dec 14 06:26:08 UA-HA systemd[1]: Started LSB: Bring up/down networking.
[root@UA-HA ~]#
[root@UA-HA ~]# brctl show
bridge name     bridge id               STP enabled     interfaces
br0             8000.000c292d3fce       no              eno16777736
virbr0          8000.52540016bc24       yes             virbr0-nic
[root@UA-HA ~]#
We have successfully created the bridge to provide the access to the guests.
Configure the Storage Pool:
There is no limitations to keep the guests in the shared filesystem. But however if you keep the guests in shared filesystem , you can easily migrate the VM’s from one host to another. The latest KVM version supports the Live VM migration(This is similar to vMotion in VMware ). The default storage pool path is /var/lib/libvirt/images.
In my tutorial, I am going to use NFS as shared filesystem.
1. My NFS server IP is 192.168.203.1 . Mount the new NFS share on mountpoint /var/lib/libvirt/images.
[root@UA-HA ~]# df -h /var/lib/libvirt/images
Filesystem            Size  Used Avail Use% Mounted on
192.168.203.1:/D/NFS  149G  121G   29G  82% /var/lib/libvirt/images
[root@UA-HA ~]#
2. List the storage pool.
[root@UA-HA ~]# virsh pool-list
 Name                 State      Autostart
-------------------------------------------

[root@UA-HA ~]#
3. Create the new storage pool with name of “default”.
[root@UA-HA ~]# virsh pool-build default
Pool default built

[root@UA-HA ~]#
4. Start the storage pool.
[root@UA-HA ~]# virsh pool-start default
Pool default started

[root@UA-HA ~]#
[root@UA-HA ~]# virsh pool-list
 Name                 State      Autostart
-------------------------------------------
 default              active     yes

[root@UA-HA ~]#
5. Check the storage pool info.
[root@UA-HA ~]# virsh pool-info default
Name:           default
UUID:           3599dd8a-edef-4c00-9ff5-6d880f1ecb8b
State:          running
Persistent:     yes
Autostart:      yes
Capacity:       148.46 GiB
Allocation:     120.35 GiB
Available:      28.11 GiB

[root@UA-HA ~]#

The storage pool information will match with the NFS mount.  (Actually calculates the "/var/lib/libvirt/images" available disk space.)
[root@UA-HA ~]# df -h /var/lib/libvirt/images
Filesystem            Size  Used Avail Use% Mounted on
192.168.203.1:/D/NFS  149G  121G   29G  82% /var/lib/libvirt/images
[root@UA-HA ~]#
We have prepared the host to create the new virtual machines. In the next article, we will see that how to create the new guest using CLI.
Provisioning new VM’s (guests) using “virt-install” binary is straight forward. virt-install can be run in interactive or non-interactive mode. This command have more options but easy to remember since those are very meaningful. This article is going to demonstrate the VM creation using virt-install tool in non-interactive mode. You can also use GUI (VMM – Virtual Machine Manager ) to provision the VM.
Let’s prepare the VM details before kick of the virt-install.
VM Name
UAKVM1
Network
bridge:br0
RAM
1024
CPU
1
DISK
4GB
CD-ROM
/var/tmp/rhel-server-7.2-x86_64-dvd.iso
1. Login to the KVM host as root user with X11 forwarding enabled. I am using MobaXterm 8.2 Personal Edition to connect the KVM host with ssh session.
     ┌────────────────────────────────────────────────────────────────────┐
     │                         • MobaXterm 8.2 •                          │
     │            (SSH client, X-server and networking tools)             │
     │                                                                    │
     │ ➤ SSH session to root@192.168.203.134                              │
     │   • SSH compression : ✔                                            │
     │   • SFTP Browser    : ✔                                            │
     │   • X11-forwarding  : ✔  (remote display is forwarded through SSH) │
     │   • DISPLAY         : ✔  (automatically set on remote server)      │
     │                                                                    │
     │ ➤ For more info, ctrl+click on help or visit our website           │
     └────────────────────────────────────────────────────────────────────┘

Last login: Mon Dec 14 17:04:24 2015 from 192.168.203.1
[root@UA-HA ~]#
2. Here is the supported OS variant on KVM hypervisors. (Most recent list)
win7                 : Microsoft Windows 7
vista                : Microsoft Windows Vista
winxp64              : Microsoft Windows XP (x86_64)
winxp                : Microsoft Windows XP
win2k                : Microsoft Windows 2000
win2k8               : Microsoft Windows Server 2008
win2k3               : Microsoft Windows Server 2003
openbsd4             : OpenBSD 4.x
freebsd8             : FreeBSD 8.x
freebsd7             : FreeBSD 7.x
freebsd6             : FreeBSD 6.x
solaris9             : Sun Solaris 9
solaris10            : Sun Solaris 10
opensolaris          : Sun OpenSolaris
netware6             : Novell Netware 6
netware5             : Novell Netware 5
netware4             : Novell Netware 4
msdos                : MS-DOS
generic              : Generic
debianwheezy         : Debian Wheezy
debiansqueeze        : Debian Squeeze
debianlenny          : Debian Lenny
debianetch           : Debian Etch
fedora18             : Fedora 18
fedora17             : Fedora 17
fedora16             : Fedora 16
fedora15             : Fedora 15
fedora14             : Fedora 14
fedora13             : Fedora 13
fedora12             : Fedora 12
fedora11             : Fedora 11
fedora10             : Fedora 10
fedora9              : Fedora 9
fedora8              : Fedora 8
fedora7              : Fedora 7
fedora6              : Fedora Core 6
fedora5              : Fedora Core 5
mageia1              : Mageia 1 and later
mes5.1               : Mandriva Enterprise Server 5.1 and later
mes5                 : Mandriva Enterprise Server 5.0
mandriva2010         : Mandriva Linux 2010 and later
mandriva2009         : Mandriva Linux 2009 and earlier
rhel7                : Red Hat Enterprise Linux 7
rhel6                : Red Hat Enterprise Linux 6
rhel5.4              : Red Hat Enterprise Linux 5.4 or later
rhel5                : Red Hat Enterprise Linux 5
rhel4                : Red Hat Enterprise Linux 4
rhel3                : Red Hat Enterprise Linux 3
rhel2.1              : Red Hat Enterprise Linux 2.1
sles11               : Suse Linux Enterprise Server 11
sles10               : Suse Linux Enterprise Server
opensuse12           : openSuse 12
opensuse11           : openSuse 11
ubuntutrusty         : Ubuntu 14.04 LTS (Trusty Tahr)
ubuntusaucy          : Ubuntu 13.10 (Saucy Salamander)
ubunturaring         : Ubuntu 13.04 (Raring Ringtail)
ubuntuquantal        : Ubuntu 12.10 (Quantal Quetzal)
ubuntuprecise        : Ubuntu 12.04 LTS (Precise Pangolin)
ubuntuoneiric        : Ubuntu 11.10 (Oneiric Ocelot)
ubuntunatty          : Ubuntu 11.04 (Natty Narwhal)
ubuntumaverick       : Ubuntu 10.10 (Maverick Meerkat)
ubuntulucid          : Ubuntu 10.04 LTS (Lucid Lynx)
ubuntukarmic         : Ubuntu 9.10 (Karmic Koala)
ubuntujaunty         : Ubuntu 9.04 (Jaunty Jackalope)
ubuntuintrepid       : Ubuntu 8.10 (Intrepid Ibex)
ubuntuhardy          : Ubuntu 8.04 LTS (Hardy Heron)
virtio26             : Generic 2.6.25 or later kernel with virtio
generic26            : Generic 2.6.x kernel
generic24            : Generic 2.4.x kernel
Note: In this setup , I have installed the virt-install & virt-manager packages on KVM hypervisor node itself.
3. Create the new KVM virtual machine using the following command.
Are you confused with many options ? It’s very simple.
  Options     | Values                | Description
====================================================================================
--connect     |qemu:///system         | Connect to the localhost KVM
--virt-type   |kvm                    | Specify the virtualization type as kvm or Xen
--network     |bridge:br0             | Specify the bridge for network connectivity
-name         |UAKVM2                 | Virtual Machine Name
--description |First RHEL7 KVM Guest  | Provide the VM description
--os-variant  |rhel7                  | Provide the OS-variant name
--ram         |1024                   | Set the VM memory to 1GB
--vcpus       |1	              | Set the No.of.CPU cores
-disk         |4		      | Specify the virtual disk size in GB
--os-type     |linux		      | Specify the OS type
--graphics    |vnc,password=123456    | Specify the graphics type & VNC password
--cdrom       |/path_to_iso           | Specify the RHEL 7 ISO image path
If you do not have the ISO image locally, you can specify the http link using -location option.
4. The above command will automatically open a graphical VNC window for the guest.
UAKVM2 Guest VNC window
5. Enter the password what you have given in the virt-install command.
7. If you didn’t get the VNC session pop-up automatically, just execute the “virt-viewer” command. This should bring up the running machines list to connect the VM’s console.
[root@UA-HA ~]# virt-viewer
UAKVM2 console
8. In the KVM hypervisor, you can list the VM’s using “virsh list” command.
[root@UA-HA images]# virsh list
 Id    Name                           State
----------------------------------------------------
 15    UAKVM2                         running

[root@UA-HA images]#
9. To see the VM’s resource utilization from the KVM host view , use virt-top command.
virt-top 00:23:28 - x86_64 2/2CPU 2594MHz 3784MB
2 domains, 1 active, 1 running, 0 sleeping, 0 paused, 1 inactive D:0 O:0 X:0
CPU: 1.3%  Mem: 1024 MB (1024 MB by guests)

   ID S RDRQ WRRQ RXBY TXBY %CPU %MEM    TIME   NAME
   15 R    0    1    0    0  1.3 27.0   1:20.30 UAKVM2
    -                                           (UAKVM1)
10. If you want to halt the VM, use the “virsh destroy” command to stop the VM.
11.List the VM’s again. The halted VM’s are not listed in “virsh list” command. You must use the “–all” option to see the stopped VM’s.
[root@UA-HA images]# virsh list
 Id    Name                           State
----------------------------------------------------

[root@UA-HA images]# virsh list  --all
 Id    Name                           State
----------------------------------------------------
 -     UAKVM2                         shut off

[root@UA-HA images]#
12. To power on/start the VM , use the following command.
[root@UA-HA images]# virsh start UAKVM2
Domain UAKVM2 started

[root@UA-HA images]# virsh list
 Id    Name                           State
----------------------------------------------------
 16    UAKVM2                         running

[root@UA-HA images]#
Explorer VM files:
1. The KVM guest’s configuration file will be created in the following path.
[root@UA-HA libvirt]# cd /etc/libvirt/qemu/
[root@UA-HA qemu]# ls -lrt
total 8
drwx------. 3 root root   40 Dec 14 09:13 networks
-rw-------. 1 root root 3854 Dec 15 00:19 UAKVM2.xml
[root@UA-HA qemu]#
2. Use the following command to view the XML configuration file for the Guest VM.
Virt-Manager is powerful GUI tool to manage the multiple KVM hosts and it’s associated VM’s. It support’s XEN virtualization too. It can be installed on KVM hypervisor hosts or on centralized management host to manage the multiple hyper-visors from one place. Using virt-manager, you can start, pause(suspend), shutdown VMs, display VM details (Ex: VCPUs, memory, disk space), add devices to VMs, clone the VM’s and create a new VMs. The latest version provides the interface to migrate the running VM from KVM host to another if we use the shared storage pool(Live migration).
Let’s launch the virt-manager.
Launching the virt-manger from KVM hosts:
1.Login to the KVM host as root user . (Make sure X11 forwarding is enabled & you have installed the terminal emulation software : Ex: Moba Xterm)
2. Execute virt-manager command to launch the GUI.
virt-Manager
3. Click the highlighted icon to create the new VM. (See the above screenshot).
4. Specify the installation source method. Let me use the local ISO image.
Select the KVM guest Installation source method
5. Specify the ISO image path .
Specify the ISO image location – KVM guest
6. Allocate the resources for KVM guest. (Ex: vCPU’s & Memory)
Set the resource limits – KVM
7. Create the virtual disk for Guest installation (root disk of the guest OS).
Specify the disk image size – KVM Guest
8. Enter the VM name and specify the bridge which we have created earlier (Refer the KVM tutorial) to provide the external network access to the Guest.
Enter the VM name and specify bridge
9. Click finish to create the VM.
KVM – Guest Domain creation
once the VM is created, you will get the console like below.
KVM Guest console
You can complete the VM installation.
10 .To view the KVM guest hardware details , click on the highlighted icon.
To see the VM hardware details – KVM
You can also add the new virtual hardware using the above window. (Adding new disks , NIC etc..)
11. KVM also provides the force VM power off option. (Just like removing the power card in physical server.)
KVM guest – Force power off Option
12. KVM support snapshots . virt-manager provides the interfaces to take the running machine snapshots.
Take the snapshot of KVM guest
Click on the “+” icon to create the snapshot for VM.
Guest Snapshot name
13. VMM (Virtual Machine Manager) also provides the interface to migrate or clone the VM . Just click VM’s Virtual Machine tab.
KVM Guest – Migrate clone Delete
14. You can launch the VM’s console any time by just double clicking the listed VM.
Virtual Machine Manager (VMM or virt-Manager) is GUI tool to manage the KVM hypervisors. This tool can be installed on KVM hosts or in remote system to manage the VM’s. When I tired to access the virt-manager via SSH X11 forwarding on RHEL 7.2 , I got the GUI without any fonts (or with junk letters). Redhat should make the required fonts packages to link “virt-manager” package dependencies to prevent the problem.
Screenshot:
Virt-Manager with Junk Letters
To fix the issue, you must install the required fonts for VMM. In RHEL 7.2 , I have installed the following fonts which has fixed my issue.
[root@UA-KVM1 ~]# yum install ghostscript-fonts.noarch urw-fonts.noarch
Loaded plugins: product-id, search-disabled-repos, subscription-manager
This system is not registered to Red Hat Subscription Management. You can use subscription-manager to register.
Resolving Dependencies
--> Running transaction check
---> Package ghostscript-fonts.noarch 0:5.50-32.el7 will be installed
---> Package urw-fonts.noarch 0:2.4-16.el7 will be installed
--> Finished Dependency Resolution
Dependencies Resolved
=====================================================================================================================================================================
Package Arch Version Repository Size
=====================================================================================================================================================================
Installing:
ghostscript-fonts noarch 5.50-32.el7 repo-update 324 k
urw-fonts noarch 2.4-16.el7 repo-update 3.0 M
Transaction Summary
=====================================================================================================================================================================
Install 2 Packages
Total download size: 3.4 M
Installed size: 4.8 M
Is this ok [y/d/N]: y
Downloading packages:
(1/2): ghostscript-fonts-5.50-32.el7.noarch.rpm | 324 kB 00:00:00
(2/2): urw-fonts-2.4-16.el7.noarch.rpm | 3.0 MB 00:00:00
---------------------------------------------------------------------------------------------------------------------------------------------------------------------
Total 12 MB/s | 3.4 MB 00:00:00
Running transaction check
Running transaction test
Transaction test succeeded
Running transaction
Installing : urw-fonts-2.4-16.el7.noarch 1/2
Installing : ghostscript-fonts-5.50-32.el7.noarch 2/2
Verifying : ghostscript-fonts-5.50-32.el7.noarch 1/2
Verifying : urw-fonts-2.4-16.el7.noarch 2/2
Installed:
ghostscript-fonts.noarch 0:5.50-32.el7 urw-fonts.noarch 0:2.4-16.el7
Complete!
[root@UA-KVM1 ~]#
Just tried to re-launch the virt-manager.
KVM virt-manager Fonts issue Fixed
Hope this article informative to you . Share it ! Comment it !! Be Sociable !!!