This article will guide you to configure the Image service on Openstack. Openstack image service has been development and maintained in the name of Glance. Glance service enables users/customers to discover , register and retrieve virtual machine images. Virtual machine images can be stored in normal file-systems like ext3 ,ext4 or it can be stored it in object storage systems like swift. In this article , we will use the local file-system as glance storage. Image service consists below listed components.
glance-api : Accepts Image API calls for vm image discovery, retrieval, and storage.
glance-registry. Stores images, processes, and retrieves metadata about images. Metadata includes items such as size and type.
Database – Glance service require database to store the image metadata. You can either use MySQL or SQlite database.
Storage repository – Image service (glance) supports many storage repositories including normal file-systems , Object storage, RADOS block devices , HTTP and Amazon S3 .
In short, openstack Glance service works like a registry service for virtual disk images. Using glance service, openstack users can add new instance images (Ex:RHEL , SUSE , Windows Server , Ubunutu) , snapshot of image from existing instance and launch the instance using the snapshot.
In our environment , Controller node will host the glance service. So login to the Openstack controller node and begin the glance installation.
Install the Image Service:
1.Install glance image service components on openstack controller node.
root@OSCTRL-UA:/var/lib# apt-get install glance python-glanceclient
Reading package lists... Done
Building dependency tree
Reading state information... Done
The following extra packages will be installed:
  glance-api glance-common glance-registry python-boto python-cinderclient
  python-concurrent.futures python-glance python-glance-store python-httplib2
  python-ipaddr python-json-patch python-json-pointer python-jsonpatch
  python-oslo.vmware python-osprofiler python-retrying python-simplegeneric
  python-simplejson python-suds python-swiftclient python-warlock python-wsme
Suggested packages:
  python-ceph
The following NEW packages will be installed:
  glance glance-api glance-common glance-registry python-boto
  python-cinderclient python-concurrent.futures python-glance
  python-glance-store python-glanceclient python-httplib2 python-ipaddr
  python-json-patch python-json-pointer python-jsonpatch python-oslo.vmware
  python-osprofiler python-retrying python-simplegeneric python-simplejson
  python-suds python-swiftclient python-warlock python-wsme
0 upgraded, 24 newly installed, 0 to remove and 17 not upgraded.
Need to get 1,667 kB of archives.
After this operation, 12.3 MB of additional disk space will be used.
Do you want to continue? [Y/n] Y
Get:23 http://in.archive.ubuntu.com/ubuntu/ trusty/main python-concurrent.futures all 2.1.6-3 [32.8 kB]
Get:24 http://in.archive.ubuntu.com/ubuntu/ trusty/main python-httplib2 all 0.8-2build1 [35.4 kB]
Fetched 1,667 kB in 12s (136 kB/s)
Selecting previously unselected package python-simplejson.
(Reading database ... 95790 files and directories currently installed.)
Preparing to unpack .../python-simplejson_3.3.1-1ubuntu6_amd64.deb ...
Unpacking python-simplejson (3.3.1-1ubuntu6) ...
Selecting previously unselected package python-cinderclient.
Preparing to unpack .../python-cinderclient_1%3a1.1.0-0ubuntu1~cloud0_all.deb ...
Unpacking python-cinderclient (1:1.1.0-0ubuntu1~cloud0) ...
Selecting previously unselected package python-glance-store.
Preparing to unpack .../python-glance-store_0.1.8-1ubuntu2~cloud0_all.deb ...
Unpacking python-glance-store (0.1.8-1ubuntu2~cloud0) ...
Selecting previously unselected package python-json-pointer.
Preparing to unpack .../python-json-pointer_1.0-2build1_all.deb ...
Unpacking python-json-pointer (1.0-2build1) ...
Selecting previously unselected package python-jsonpatch.
Preparing to unpack .../python-jsonpatch_1.3-4_all.deb ...
Unpacking python-jsonpatch (1.3-4) ...
Selecting previously unselected package python-json-patch.
Preparing to unpack .../python-json-patch_1.3-4_all.deb ...
Unpacking python-json-patch (1.3-4) ...
Selecting previously unselected package python-suds.
Setting up python-swiftclient (1:2.3.0-0ubuntu1~cloud0) ...
Setting up python-glance (1:2014.2.3-0ubuntu1~cloud1) ...
Setting up glance-common (1:2014.2.3-0ubuntu1~cloud1) ...
Adding system user `glance' (UID 112) ...
Adding new user `glance' (UID 112) with group `glance' ...
Not creating home directory `/var/lib/glance'.
Setting up glance-api (1:2014.2.3-0ubuntu1~cloud1) ...
glance-api start/running, process 4146
Setting up glance-registry (1:2014.2.3-0ubuntu1~cloud1) ...
glance-registry start/running, process 4181
Setting up python-glanceclient (1:0.14.0-0ubuntu1~cloud0) ...
Processing triggers for ureadahead (0.100.0-16) ...
Setting up glance (1:2014.2.3-0ubuntu1~cloud1) ...
root@OSCTRL-UA:/var/lib#
2. Edit the glance-api & glance-registry configuration files to update the MySQL DB information. As I said earlier, glance service required DB to storage the information. please refer part 2 to see the password database.
3.Configure the glance image service to use RabbitMQ (Message Broker). Update the RabbitMQ host , password information on glance-api.conf. For pre-configured password , please refer part 2.
4. Create the Database & users for Glance on mysql.
root@OSCTRL-UA:~# mysql -u root -pstack
Welcome to the MySQL monitor.  Commands end with ; or \g.
Your MySQL connection id is 36
Server version: 5.5.44-0ubuntu0.14.04.1 (Ubuntu)

Copyright (c) 2000, 2015, Oracle and/or its affiliates. All rights reserved.

Oracle is a registered trademark of Oracle Corporation and/or its
affiliates. Other names may be trademarks of their respective
owners.

Type 'help;' or '\h' for help. Type '\c' to clear the current input statement.

mysql> CREATE DATABASE glance;
Query OK, 1 row affected (0.00 sec)

mysql> GRANT ALL PRIVILEGES ON glance.* TO 'glance'@'localhost' IDENTIFIED BY 'glancedb123';
Query OK, 0 rows affected (0.01 sec)

mysql> GRANT ALL PRIVILEGES ON glance.* TO 'glance'@'%' IDENTIFIED BY 'glancedb123';
Query OK, 0 rows affected (0.00 sec)

mysql> exit
Bye
5. Create the necessary tables for glance service using the below command.
root@OSCTRL-UA:~# su -s /bin/sh -c "glance-manage db_sync" glance
root@OSCTRL-UA:~#
Preparing keystone service for glance:
6. Export the variable or create the file like below & source it. (To reduce the command length. Otherwise you need to provide the below credentials on all the commands)
10. Set the flavour as keystone on both glance configuration files.
root@OSCTRL-UA:~# grep -A8 paste_deploy /etc/glance/glance-registry.conf
[paste_deploy]
# Name of the paste configuration file that defines the available pipelines
#config_file = glance-registry-paste.ini

# Partial name of a pipeline in your paste configuration file with the
# service name removed. For example, if your paste section name is
# [pipeline:glance-registry-keystone], you would configure the flavor below
# as 'keystone'.
flavor=keystone
root@OSCTRL-UA:~#


root@OSCTRL-UA:~# grep -A8 paste_deploy /etc/glance/glance-api.conf
[paste_deploy]
# Name of the paste configuration file that defines the available pipelines
#config_file = glance-api-paste.ini

# Partial name of a pipeline in your paste configuration file with the
# service name removed. For example, if your paste section name is
# [pipeline:glance-api-keystone], you would configure the flavor below
# as 'keystone'.
flavor=keystone
root@OSCTRL-UA:~#
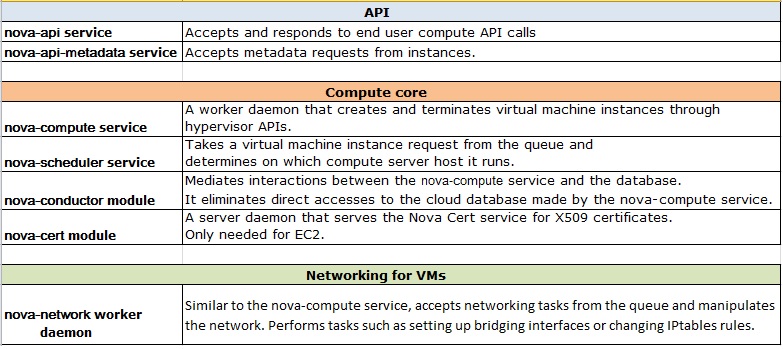
Openstack Compute service is the heart of IaaS (Infrastructure as Service) . Compute nodes are use to create the virtual instance and manage cloud computing systems. Openstack compute node (nova) interacts with keystone service for identity , communicates with glance for server OS images , works with Horizon to provide the dashboard for user access and administration. OpenStack Compute can scale horizontally on standard hardware (x86) by installing hyper-visors(Ex: KVM, Xen , VMware ESXi, Hyper-V ). Unlike other openstack services , Compute services has many modules, API’s and services. Here is the consolidated list of those.
Compute ServicesCompute Services
The Compute service relies on a hypervisor to run virtual machine instances. OpenStack can use various hypervisors, but this guide uses KVM.
Configure the controller node for Compute services:
1. Login to the openstack controller node & install the compute packages which are necessary for controller node.
root@OSCTRL-UA:~# apt-get install nova-api nova-cert nova-conductor nova-consoleauth nova-novncproxy nova-scheduler python-novaclient
Reading package lists... Done
Building dependency tree
Reading state information... Done
The following extra packages will be installed:
  libblas3 libgfortran3 libjs-swfobject liblapack3 libquadmath0 nova-common
  novnc python-amqplib python-cliff python-cliff-doc python-cmd2 python-ecdsa
  python-jinja2 python-m2crypto python-neutronclient python-nova python-novnc
  python-numpy python-oslo.rootwrap python-paramiko python-pyasn1
  python-pyparsing python-rfc3986 websockify
Suggested packages:
  python-amqplib-doc python-jinja2-doc gcc gfortran python-dev python-nose
  python-numpy-dbg python-numpy-doc doc-base
The following NEW packages will be installed:
  libblas3 libgfortran3 libjs-swfobject liblapack3 libquadmath0 nova-api
  nova-cert nova-common nova-conductor nova-consoleauth nova-novncproxy
  nova-scheduler novnc python-amqplib python-cliff python-cliff-doc
  python-cmd2 python-ecdsa python-jinja2 python-m2crypto python-neutronclient
  python-nova python-novaclient python-novnc python-numpy python-oslo.rootwrap
  python-paramiko python-pyasn1 python-pyparsing python-rfc3986 websockify
0 upgraded, 31 newly installed, 0 to remove and 17 not upgraded.
Need to get 7,045 kB of archives.
After this operation, 46.0 MB of additional disk space will be used.
Do you want to continue? [Y/n] y
Get:1 http://in.archive.ubuntu.com/ubuntu/ trusty-updates/main libquadmath0 amd64 4.8.4-2ubuntu1~14.04 [126 kB]
2. Compute services stores information on Database to retrieve the data quickly. Configure the Compute service with database credentials. Add the below entry in nova.conf file.
root@OSCTRL-UA:~# mysql -u root -pstack
Welcome to the MySQL monitor.  Commands end with ; or \g.
Your MySQL connection id is 51
Server version: 5.5.44-0ubuntu0.14.04.1 (Ubuntu)

Copyright (c) 2000, 2015, Oracle and/or its affiliates. All rights reserved.

Oracle is a registered trademark of Oracle Corporation and/or its
affiliates. Other names may be trademarks of their respective
owners.

Type 'help;' or '\h' for help. Type '\c' to clear the current input statement.

mysql> CREATE DATABASE nova;
Query OK, 1 row affected (0.00 sec)

mysql> GRANT ALL PRIVILEGES ON nova.* TO 'nova'@'localhost' IDENTIFIED BY 'novadb123';
Query OK, 0 rows affected (0.00 sec)

mysql> GRANT ALL PRIVILEGES ON nova.* TO 'nova'@'%' IDENTIFIED BY 'novadb123';
Query OK, 0 rows affected (0.00 sec)

mysql> exit
Bye
root@OSCTRL-UA:~#
7. Create the Compute service tables on Mysql. (nova).
root@OSCTRL-UA:~# su -s /bin/sh -c "nova-manage db sync" nova
2015-09-28 04:26:33.366 20105 INFO migrate.versioning.api [-] 215 -> 216...
2015-09-28 04:26:37.482 20105 INFO migrate.versioning.api [-] done
2015-09-28 04:26:37.483 20105 INFO migrate.versioning.api [-] 216 -> 217...
2015-09-28 04:26:37.487 20105 INFO migrate.versioning.api [-] done
2015-09-28 04:26:37.488 20105 INFO migrate.versioning.api [-] 217 -> 218...
2015-09-28 04:26:37.492 20105 INFO migrate.versioning.api [-] done
2015-09-28 04:26:37.493 20105 INFO migrate.versioning.api [-] 218 -> 219...
2015-09-28 04:26:37.497 20105 INFO migrate.versioning.api [-] done
2015-09-28 04:26:37.498 20105 INFO migrate.versioning.api [-] 219 -> 220...
2015-09-28 04:26:37.503 20105 INFO migrate.versioning.api [-] done
2015-09-28 04:26:37.504 20105 INFO migrate.versioning.api [-] 220 -> 221...
2015-09-28 04:26:37.509 20105 INFO migrate.versioning.api [-] done
2015-09-28 04:26:37.510 20105 INFO migrate.versioning.api [-] 221 -> 222...
2015-09-28 04:26:37.515 20105 INFO migrate.versioning.api [-] done
2015-09-28 04:26:37.516 20105 INFO migrate.versioning.api [-] 222 -> 223...
2015-09-28 04:26:37.520 20105 INFO migrate.versioning.api [-] done
2015-09-28 04:26:37.521 20105 INFO migrate.versioning.api [-] 223 -> 224...
2015-09-28 04:26:37.525 20105 INFO migrate.versioning.api [-] done
2015-09-28 04:26:37.526 20105 INFO migrate.versioning.api [-] 224 -> 225...
2015-09-28 04:26:37.531 20105 INFO migrate.versioning.api [-] done
2015-09-28 04:26:37.531 20105 INFO migrate.versioning.api [-] 225 -> 226...
2015-09-28 04:26:37.538 20105 INFO migrate.versioning.api [-] done
2015-09-28 04:26:37.538 20105 INFO migrate.versioning.api [-] 226 -> 227...
2015-09-28 04:26:37.545 20105 INFO migrate.versioning.api [-] done
2015-09-28 04:26:37.546 20105 INFO migrate.versioning.api [-] 227 -> 228...
2015-09-28 04:26:37.575 20105 INFO migrate.versioning.api [-] done
2015-09-28 04:26:37.576 20105 INFO migrate.versioning.api [-] 228 -> 229...
2015-09-28 04:26:37.605 20105 INFO migrate.versioning.api [-] done
2015-09-28 04:26:37.606 20105 INFO migrate.versioning.api [-] 229 -> 230...
2015-09-28 04:26:37.654 20105 INFO migrate.versioning.api [-] done
2015-09-28 04:26:37.654 20105 INFO migrate.versioning.api [-] 230 -> 231...
2015-09-28 04:26:37.702 20105 INFO migrate.versioning.api [-] done
2015-09-28 04:26:37.703 20105 INFO migrate.versioning.api [-] 231 -> 232...
2015-09-28 04:26:37.962 20105 INFO migrate.versioning.api [-] done
2015-09-28 04:26:37.963 20105 INFO migrate.versioning.api [-] 232 -> 233...
2015-09-28 04:26:38.006 20105 INFO migrate.versioning.api [-] done
2015-09-28 04:26:38.006 20105 INFO migrate.versioning.api [-] 233 -> 234...
2015-09-28 04:26:38.042 20105 INFO migrate.versioning.api [-] done
2015-09-28 04:26:38.043 20105 INFO migrate.versioning.api [-] 234 -> 235...
2015-09-28 04:26:38.048 20105 INFO migrate.versioning.api [-] done
2015-09-28 04:26:38.049 20105 INFO migrate.versioning.api [-] 235 -> 236...
2015-09-28 04:26:38.054 20105 INFO migrate.versioning.api [-] done
2015-09-28 04:26:38.055 20105 INFO migrate.versioning.api [-] 236 -> 237...
2015-09-28 04:26:38.060 20105 INFO migrate.versioning.api [-] done
2015-09-28 04:26:38.060 20105 INFO migrate.versioning.api [-] 237 -> 238...
2015-09-28 04:26:38.067 20105 INFO migrate.versioning.api [-] done
2015-09-28 04:26:38.068 20105 INFO migrate.versioning.api [-] 238 -> 239...
2015-09-28 04:26:38.072 20105 INFO migrate.versioning.api [-] done
2015-09-28 04:26:38.073 20105 INFO migrate.versioning.api [-] 239 -> 240...
2015-09-28 04:26:38.079 20105 INFO migrate.versioning.api [-] done
2015-09-28 04:26:38.080 20105 INFO migrate.versioning.api [-] 240 -> 241...
2015-09-28 04:26:38.084 20105 INFO migrate.versioning.api [-] done
2015-09-28 04:26:38.085 20105 INFO migrate.versioning.api [-] 241 -> 242...
2015-09-28 04:26:38.089 20105 INFO migrate.versioning.api [-] done
2015-09-28 04:26:38.090 20105 INFO migrate.versioning.api [-] 242 -> 243...
2015-09-28 04:26:38.095 20105 INFO migrate.versioning.api [-] done
2015-09-28 04:26:38.096 20105 INFO migrate.versioning.api [-] 243 -> 244...
2015-09-28 04:26:38.110 20105 INFO migrate.versioning.api [-] done
2015-09-28 04:26:38.111 20105 INFO migrate.versioning.api [-] 244 -> 245...
2015-09-28 04:26:38.187 20105 INFO migrate.versioning.api [-] done
2015-09-28 04:26:38.188 20105 INFO migrate.versioning.api [-] 245 -> 246...
2015-09-28 04:26:38.207 20105 INFO migrate.versioning.api [-] done
2015-09-28 04:26:38.208 20105 INFO migrate.versioning.api [-] 246 -> 247...
2015-09-28 04:26:38.259 20105 INFO migrate.versioning.api [-] done
2015-09-28 04:26:38.260 20105 INFO migrate.versioning.api [-] 247 -> 248...
2015-09-28 04:26:38.267 20105 INFO 248_add_expire_reservations_index [-] Skipped adding reservations_deleted_expire_idx because an equivalent index already exists.
2015-09-28 04:26:38.272 20105 INFO migrate.versioning.api [-] done
2015-09-28 04:26:38.272 20105 INFO migrate.versioning.api [-] 248 -> 249...
2015-09-28 04:26:38.290 20105 INFO migrate.versioning.api [-] done
2015-09-28 04:26:38.291 20105 INFO migrate.versioning.api [-] 249 -> 250...
2015-09-28 04:26:38.309 20105 INFO migrate.versioning.api [-] done
2015-09-28 04:26:38.309 20105 INFO migrate.versioning.api [-] 250 -> 251...
2015-09-28 04:26:38.338 20105 INFO migrate.versioning.api [-] done
2015-09-28 04:26:38.339 20105 INFO migrate.versioning.api [-] 251 -> 252...
2015-09-28 04:26:38.431 20105 INFO migrate.versioning.api [-] done
2015-09-28 04:26:38.432 20105 INFO migrate.versioning.api [-] 252 -> 253...
2015-09-28 04:26:38.463 20105 INFO migrate.versioning.api [-] done
2015-09-28 04:26:38.464 20105 INFO migrate.versioning.api [-] 253 -> 254...
2015-09-28 04:26:38.498 20105 INFO migrate.versioning.api [-] done
root@OSCTRL-UA:~#
8. Create the nova users on keystone. So that Compute uses to authenticate with the Identity Service.
root@OSCTRL-UA:~# keystone user-create --name=nova --pass=nova123 --email=nova@unixarena.com
+----------+----------------------------------+
| Property |              Value               |
+----------+----------------------------------+
|  email   |        nova@unixarena.com        |
| enabled  |               True               |
|    id    | 0a8ef9375329415488361b4ea7267443 |
|   name   |               nova               |
| username |               nova               |
+----------+----------------------------------+
root@OSCTRL-UA:~#
root@OSCTRL-UA:~# service nova-api restart; service nova-cert restart; service nova-consoleauth restart; service nova-scheduler restart; service nova-conductor restart; service nova-novncproxy restart;
nova-api stop/waiting
nova-api start/running, process 20313
nova-cert stop/waiting
nova-cert start/running, process 20330
nova-consoleauth stop/waiting
nova-consoleauth start/running, process 20347
nova-scheduler stop/waiting
nova-scheduler start/running, process 20366
nova-conductor stop/waiting
nova-conductor start/running, process 20385
nova-novncproxy stop/waiting
nova-novncproxy start/running, process 20400
root@OSCTRL-UA:~#
Verify the service status,
 root@OSCTRL-UA:~# service nova-api status; service nova-cert status; service nova-consoleauth status; service nova-scheduler status; service nova-conductor status; service nova-novncproxy status
nova-api start/running, process 20313
nova-cert start/running, process 20330
nova-consoleauth start/running, process 20347
nova-scheduler start/running, process 20366
nova-conductor start/running, process 20385
nova-novncproxy start/running, process 20400
root@OSCTRL-UA:~#
14. You should be able to verify the nova configuration by listing the images.
root@OSCTRL-UA:~# nova image-list
+--------------------------------------+--------------+--------+--------+
| ID                                   | Name         | Status | Server |
+--------------------------------------+--------------+--------+--------+
| 7d19b639-6950-42dc-a64d-91c6662e0613 | CirrOS 0.3.0 | ACTIVE |        |
+--------------------------------------+--------------+--------+--------+
root@OSCTRL-UA:~#
We have successfully configured the compute configuration on the controller node.
Click page 2 to see the configuration on the Compute node.
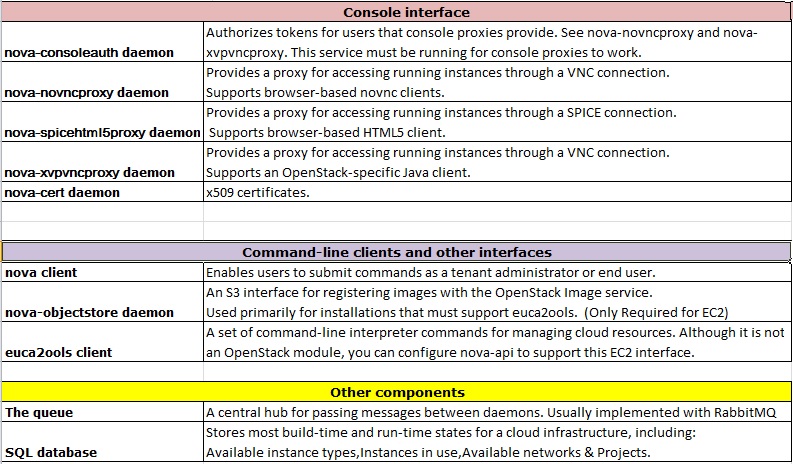
Openstack provides two options for networking. The default network type is nova-network which enables the basic networking for the instances. Nova-network has limitation and it can support only one network per instance. The advanced networking option can be obtained using Openstack neutron service. It supports plug-ins and provides the different networking equipment and software, providing flexibility to OpenStack architecture and deployment. So that tenant can setup the multi-tier applications within the openstack private cloud.
Neutron includes the following components,
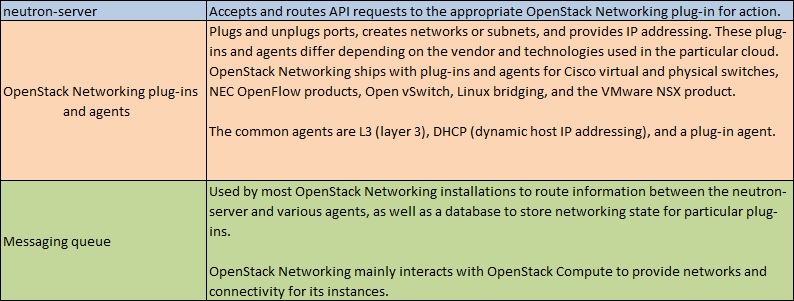
Openstack Neutron
Have a look at the below diagram to know that how the L2 , L3 and Meta Data proxy agents are communicating to the API node (Controller Node).
Neutron Openstack
Let’s configure the Neutron for our environment.
Install & Configure Neutron Related services on Controller Node (We Are here)
Install & Configure Neutron Related services for Network Node
Install & Configure Neutron Related Services for Compute Node
root@OSCTRL-UA:~# mysql -u root -p
Enter password:
Welcome to the MySQL monitor.  Commands end with ; or \g.
Your MySQL connection id is 452
Server version: 5.5.44-0ubuntu0.14.04.1 (Ubuntu)

Copyright (c) 2000, 2015, Oracle and/or its affiliates. All rights reserved.

Oracle is a registered trademark of Oracle Corporation and/or its
affiliates. Other names may be trademarks of their respective
owners.

Type 'help;' or '\h' for help. Type '\c' to clear the current input statement.

mysql> CREATE DATABASE neutron;
Query OK, 1 row affected (0.02 sec)

mysql> GRANT ALL PRIVILEGES ON neutron.* TO 'neutron'@'localhost' IDENTIFIED BY 'neutrondb123';
Query OK, 0 rows affected (0.08 sec)

mysql> GRANT ALL PRIVILEGES ON neutron.* TO 'neutron'@'%' IDENTIFIED BY 'neutrondb123';
Query OK, 0 rows affected (0.00 sec)

mysql> quit
Bye
root@OSCTRL-UA:~#
Note: My Neutron Database password has been set as “neutrondb123”.
3. Source the admin.rc file. If you do not have , just create a one like below.
8. Install the neutron related networking modules on controller node.
root@OSCTRL-UA:~# apt-get install neutron-server neutron-plugin-ml2
Reading package lists... Done
Building dependency tree
Reading state information... Done
The following extra packages will be installed:
  ipset libipset3 neutron-common python-jsonrpclib python-neutron
The following NEW packages will be installed:
  ipset libipset3 neutron-common neutron-plugin-ml2 neutron-server
  python-jsonrpclib python-neutron
0 upgraded, 7 newly installed, 0 to remove and 37 not upgraded.
Need to get 1,390 kB of archives.
After this operation, 13.1 MB of additional disk space will be used.
Do you want to continue? [Y/n] y
Get:1 http://in.archive.ubuntu.com/ubuntu/ trusty/main python-jsonrpclib all 0.1.3-1build1 [14.1 kB]
Get:2 http://ubuntu-cloud.archive.canonical.com/ubuntu/ trusty-updates/juno/main python-neutron all 1:2014.2.3-0ubuntu2~cloud0 [1,265 kB]
Get:3 http://in.archive.ubuntu.com/ubuntu/ trusty/universe libipset3 amd64 6.20.1-1 [50.8 kB]
Get:4 http://in.archive.ubuntu.com/ubuntu/ trusty/universe ipset amd64 6.20.1-1 [34.2 kB]
Get:5 http://ubuntu-cloud.archive.canonical.com/ubuntu/ trusty-updates/juno/main neutron-common all 1:2014.2.3-0ubuntu2~cloud0 [15.7 kB]
Get:6 http://ubuntu-cloud.archive.canonical.com/ubuntu/ trusty-updates/juno/main neutron-plugin-ml2 all 1:2014.2.3-0ubuntu2~cloud0 [6,870 B]
Get:7 http://ubuntu-cloud.archive.canonical.com/ubuntu/ trusty-updates/juno/main neutron-server all 1:2014.2.3-0ubuntu2~cloud0 [3,486 B]
Fetched 1,390 kB in 8s (167 kB/s)
Selecting previously unselected package python-jsonrpclib.
(Reading database ... 101633 files and directories currently installed.)
Preparing to unpack .../python-jsonrpclib_0.1.3-1build1_all.deb ...
Unpacking python-jsonrpclib (0.1.3-1build1) ...
Selecting previously unselected package libipset3:amd64.
Preparing to unpack .../libipset3_6.20.1-1_amd64.deb ...
Unpacking libipset3:amd64 (6.20.1-1) ...
Selecting previously unselected package ipset.
Preparing to unpack .../ipset_6.20.1-1_amd64.deb ...
Unpacking ipset (6.20.1-1) ...
Selecting previously unselected package python-neutron.
Preparing to unpack .../python-neutron_1%3a2014.2.3-0ubuntu2~cloud0_all.deb ...
Unpacking python-neutron (1:2014.2.3-0ubuntu2~cloud0) ...
Selecting previously unselected package neutron-common.
Preparing to unpack .../neutron-common_1%3a2014.2.3-0ubuntu2~cloud0_all.deb ...
Unpacking neutron-common (1:2014.2.3-0ubuntu2~cloud0) ...
Selecting previously unselected package neutron-plugin-ml2.
Preparing to unpack .../neutron-plugin-ml2_1%3a2014.2.3-0ubuntu2~cloud0_all.deb ...
Unpacking neutron-plugin-ml2 (1:2014.2.3-0ubuntu2~cloud0) ...
Selecting previously unselected package neutron-server.
Preparing to unpack .../neutron-server_1%3a2014.2.3-0ubuntu2~cloud0_all.deb ...
Unpacking neutron-server (1:2014.2.3-0ubuntu2~cloud0) ...
Processing triggers for man-db (2.6.7.1-1ubuntu1) ...
Processing triggers for ureadahead (0.100.0-16) ...
Setting up python-jsonrpclib (0.1.3-1build1) ...
Setting up libipset3:amd64 (6.20.1-1) ...
Setting up ipset (6.20.1-1) ...
Setting up python-neutron (1:2014.2.3-0ubuntu2~cloud0) ...
Setting up neutron-common (1:2014.2.3-0ubuntu2~cloud0) ...
Adding system user `neutron' (UID 114) ...
Adding new user `neutron' (UID 114) with group `neutron' ...
Not creating home directory `/var/lib/neutron'.
Setting up neutron-plugin-ml2 (1:2014.2.3-0ubuntu2~cloud0) ...
Setting up neutron-server (1:2014.2.3-0ubuntu2~cloud0) ...
neutron-server start/running, process 4105
Processing triggers for libc-bin (2.19-0ubuntu6.6) ...
Processing triggers for ureadahead (0.100.0-16) ...
root@OSCTRL-UA:~#
9. Edit the file “/etc/neutron/neutron.conf” like below. Here , we are just updating the database connection details, RabbitMQ & keystone configuration.
under [DEFAULT] tab, add the below line. (for Keystone & RabbitMQ)
10 . To notify compute node about the topology changes , we need to add the service tenant keys in /etc/neutron/neutron.conf. To get the service tenant keys, use the command below.
root@OSCTRL-UA:~# keystone tenant-get service
+-------------+----------------------------------+
|   Property  |              Value               |
+-------------+----------------------------------+
| description |          Service Tenant          |
|   enabled   |               True               |
|      id     | 332f6865332b45aa9cf0d79aacd1ae3b |
|     name    |             service              |
+-------------+----------------------------------+
root@OSCTRL-UA:~#
Edit the “/etc/neutron/neutron.conf” & add the following keys under [DEFAULT] tab.
12. Set the “verbose = True ” under [DEFAULT] section.
[DEFAULT]
...
verbose = True
13. Comment out any lines under “[service_providers]” section in /etc/neutron/neutron.conf.
14. Configuring Modular Layer 2 (ML2) plugin: Modular Layer 2 Plugin uses the Open vSwitch to build the virtual networking for the instances. OVS agent will be configured on the neutron node. Edit the ML2 configuration file “/etc/neutron/plugins/ml2/ml2_conf.ini like below.
16. Finalize the installation by populating the database.
root@OSCTRL-UA:~# su -s /bin/sh -c "neutron-db-manage --config-file /etc/neutron/neutron.conf  --config-file /etc/neutron/plugins/ml2/ml2_conf.ini upgrade head" neutron
INFO  [alembic.migration] Context impl MySQLImpl.
INFO  [alembic.migration] Will assume non-transactional DDL.
INFO  [alembic.migration] Running upgrade None -> havana, havana_initial
INFO  [alembic.migration] Running upgrade havana -> e197124d4b9, add unique constraint to members
INFO  [alembic.migration] Running upgrade e197124d4b9 -> 1fcfc149aca4, Add a unique constraint on (agent_type, host) columns to prevent a race
condition when an agent entry is 'upserted'.
INFO  [alembic.migration] Running upgrade 1fcfc149aca4 -> 50e86cb2637a, nsx_mappings
INFO  [alembic.migration] Running upgrade 50e86cb2637a -> 1421183d533f, NSX DHCP/metadata support
INFO  [alembic.migration] Running upgrade 1421183d533f -> 3d3cb89d84ee, nsx_switch_mappings
INFO  [alembic.migration] Running upgrade 3d3cb89d84ee -> 4ca36cfc898c, nsx_router_mappings
INFO  [alembic.migration] Running upgrade 4ca36cfc898c -> 27cc183af192, ml2_vnic_type
INFO  [alembic.migration] Running upgrade 27cc183af192 -> 50d5ba354c23, ml2 binding:vif_details
INFO  [alembic.migration] Running upgrade 50d5ba354c23 -> 157a5d299379, ml2 binding:profile
INFO  [alembic.migration] Running upgrade 157a5d299379 -> 3d2585038b95, VMware NSX rebranding
INFO  [alembic.migration] Running upgrade 3d2585038b95 -> abc88c33f74f, lb stats
INFO  [alembic.migration] Running upgrade abc88c33f74f -> 1b2580001654, nsx_sec_group_mapping
INFO  [alembic.migration] Running upgrade 1b2580001654 -> e766b19a3bb, nuage_initial
INFO  [alembic.migration] Running upgrade e766b19a3bb -> 2eeaf963a447, floatingip_status
INFO  [alembic.migration] Running upgrade 2eeaf963a447 -> 492a106273f8, Brocade ML2 Mech. Driver
INFO  [alembic.migration] Running upgrade 492a106273f8 -> 24c7ea5160d7, Cisco CSR VPNaaS
INFO  [alembic.migration] Running upgrade 24c7ea5160d7 -> 81c553f3776c, bsn_consistencyhashes
INFO  [alembic.migration] Running upgrade 81c553f3776c -> 117643811bca, nec: delete old ofc mapping tables
INFO  [alembic.migration] Running upgrade 117643811bca -> 19180cf98af6, nsx_gw_devices
INFO  [alembic.migration] Running upgrade 19180cf98af6 -> 33dd0a9fa487, embrane_lbaas_driver
INFO  [alembic.migration] Running upgrade 33dd0a9fa487 -> 2447ad0e9585, Add IPv6 Subnet properties
INFO  [alembic.migration] Running upgrade 2447ad0e9585 -> 538732fa21e1, NEC Rename quantum_id to neutron_id
INFO  [alembic.migration] Running upgrade 538732fa21e1 -> 5ac1c354a051, n1kv segment allocs for cisco n1kv plugin
INFO  [alembic.migration] Running upgrade 5ac1c354a051 -> icehouse, icehouse
INFO  [alembic.migration] Running upgrade icehouse -> 54f7549a0e5f, set_not_null_peer_address
INFO  [alembic.migration] Running upgrade 54f7549a0e5f -> 1e5dd1d09b22, set_not_null_fields_lb_stats
INFO  [alembic.migration] Running upgrade 1e5dd1d09b22 -> b65aa907aec, set_length_of_protocol_field
INFO  [alembic.migration] Running upgrade b65aa907aec -> 33c3db036fe4, set_length_of_description_field_metering
INFO  [alembic.migration] Running upgrade 33c3db036fe4 -> 4eca4a84f08a, Remove ML2 Cisco Credentials DB
INFO  [alembic.migration] Running upgrade 4eca4a84f08a -> d06e871c0d5, set_admin_state_up_not_null_ml2
INFO  [alembic.migration] Running upgrade d06e871c0d5 -> 6be312499f9, set_not_null_vlan_id_cisco
INFO  [alembic.migration] Running upgrade 6be312499f9 -> 1b837a7125a9, Cisco APIC Mechanism Driver
INFO  [alembic.migration] Running upgrade 1b837a7125a9 -> 10cd28e692e9, nuage_extraroute
INFO  [alembic.migration] Running upgrade 10cd28e692e9 -> 2db5203cb7a9, nuage_floatingip
INFO  [alembic.migration] Running upgrade 2db5203cb7a9 -> 5446f2a45467, set_server_default
INFO  [alembic.migration] Running upgrade 5446f2a45467 -> db_healing, Include all tables and make migrations unconditional.
INFO  [alembic.migration] Context impl MySQLImpl.
INFO  [alembic.migration] Will assume non-transactional DDL.
INFO  [alembic.autogenerate.compare] Detected server default on column 'cisco_ml2_apic_epgs.provider'
INFO  [alembic.autogenerate.compare] Detected removed index 'cisco_n1kv_vlan_allocations_ibfk_1' on 'cisco_n1kv_vlan_allocations'
INFO  [alembic.autogenerate.compare] Detected server default on column 'cisco_n1kv_vxlan_allocations.allocated'
INFO  [alembic.autogenerate.compare] Detected removed index 'cisco_n1kv_vxlan_allocations_ibfk_1' on 'cisco_n1kv_vxlan_allocations'
INFO  [alembic.autogenerate.compare] Detected removed index 'embrane_pool_port_ibfk_2' on 'embrane_pool_port'
INFO  [alembic.autogenerate.compare] Detected removed index 'firewall_rules_ibfk_1' on 'firewall_rules'
INFO  [alembic.autogenerate.compare] Detected removed index 'firewalls_ibfk_1' on 'firewalls'
INFO  [alembic.autogenerate.compare] Detected server default on column 'meteringlabelrules.excluded'
INFO  [alembic.autogenerate.compare] Detected server default on column 'ml2_port_bindings.host'
INFO  [alembic.autogenerate.compare] Detected added column 'nuage_routerroutes_mapping.destination'
INFO  [alembic.autogenerate.compare] Detected added column 'nuage_routerroutes_mapping.nexthop'
INFO  [alembic.autogenerate.compare] Detected server default on column 'poolmonitorassociations.status'
INFO  [alembic.autogenerate.compare] Detected added index 'ix_quotas_tenant_id' on '['tenant_id']'
INFO  [alembic.autogenerate.compare] Detected NULL on column 'tz_network_bindings.phy_uuid'
INFO  [alembic.autogenerate.compare] Detected NULL on column 'tz_network_bindings.vlan_id'
INFO  [neutron.db.migration.alembic_migrations.heal_script] Detected removed foreign key u'nuage_floatingip_pool_mapping_ibfk_2' on table u'nuage_floatingip_pool_mapping'
INFO  [alembic.migration] Running upgrade db_healing -> 3927f7f7c456, L3 extension distributed mode
INFO  [alembic.migration] Running upgrade 3927f7f7c456 -> 2026156eab2f, L2 models to support DVR
INFO  [alembic.migration] Running upgrade 2026156eab2f -> 37f322991f59, removing_mapping_tables
INFO  [alembic.migration] Running upgrade 37f322991f59 -> 31d7f831a591, add constraint for routerid
INFO  [alembic.migration] Running upgrade 31d7f831a591 -> 5589aa32bf80, L3 scheduler additions to support DVR
INFO  [alembic.migration] Running upgrade 5589aa32bf80 -> 884573acbf1c, Drop NSX table in favor of the extra_attributes one
INFO  [alembic.migration] Running upgrade 884573acbf1c -> 4eba2f05c2f4, correct Vxlan Endpoint primary key
INFO  [alembic.migration] Running upgrade 4eba2f05c2f4 -> 327ee5fde2c7, set_innodb_engine
INFO  [alembic.migration] Running upgrade 327ee5fde2c7 -> 3b85b693a95f, Drop unused servicedefinitions and servicetypes tables.
INFO  [alembic.migration] Running upgrade 3b85b693a95f -> aae5706a396, nuage_provider_networks
INFO  [alembic.migration] Running upgrade aae5706a396 -> 32f3915891fd, cisco_apic_driver_update
INFO  [alembic.migration] Running upgrade 32f3915891fd -> 58fe87a01143, cisco_csr_routing
INFO  [alembic.migration] Running upgrade 58fe87a01143 -> 236b90af57ab, ml2_type_driver_refactor_dynamic_segments
INFO  [alembic.migration] Running upgrade 236b90af57ab -> 86d6d9776e2b, Cisco APIC Mechanism Driver
INFO  [alembic.migration] Running upgrade 86d6d9776e2b -> 16a27a58e093, ext_l3_ha_mode
INFO  [alembic.migration] Running upgrade 16a27a58e093 -> 3c346828361e, metering_label_shared
INFO  [alembic.migration] Running upgrade 3c346828361e -> 1680e1f0c4dc, Remove Cisco Nexus Monolithic Plugin
INFO  [alembic.migration] Running upgrade 1680e1f0c4dc -> 544673ac99ab, add router port relationship
INFO  [alembic.migration] Running upgrade 544673ac99ab -> juno, juno
root@OSCTRL-UA:~#
If you get any error like , “Access denied for user neutron@ (using password: YES)) None None ” , then there must be inconsistency in password what you have given in step 2 & what you have updated in neutron.conf file.
17. Restart the nova & networking services.
root@OSCTRL-UA:~# service nova-api restart
nova-api stop/waiting
nova-api start/running, process 15291
root@OSCTRL-UA:~# service neutron-server restart
neutron-server stop/waiting
neutron-server start/running, process 15319
root@OSCTRL-UA:~#
List loaded extensions to verify successful launch of the neutron-server process.
If you get any error like below, then you need to re-validate the keystone configuration on neutron.conf file.
root@OSCTRL-UA:~# neutron ext-list
Unauthorized (HTTP 401) (Request-ID: req-eeea0ae8-3133-4fbf-9bbf-152bae461f7b)
root@OSCTRL-UA:~#
Please find the attached below file to know the full contents of neutron.conf & ml2_conf.ini.
Configuring the Neutron services in openstack is quite lengthy process since we need to make the necessary configuration changes on controller node (API node), Network node & Compute node. In the previous article , we have configured the neutron services on Openstack controller node. This article will demonstrate that how to configure the Network node for Neutron networking. The network node primarily handles the L3 layer networking. It is responsible for internal and external routing. It offers DHCP service for virtual networks within the openstack environment. We need to enable the few kernel parameter before installing the openstack networking packages on Networking node.
4. Install the networking components on Network Node.
root@OSNWT-UA:~# apt-get install neutron-plugin-ml2 neutron-plugin-openvswitch-agent neutron-l3-agent neutron-dhcp-agent neutron-metadata-agent
Reading package lists... Done
Building dependency tree
Reading state information... Done
The following extra packages will be installed:
5. Configure the Networking common components. This configuration will setup the authentication methods , MQ configuration and other plugins.
Configure the Networking service to use the Identify service “keystone”. Edit the “/etc/neutron/neutron.conf ”
and add the following keys in [DEFAULT] section.
[DEFAULT]
...
auth_strategy = keystone
Add the following keys to the [keystone_authtoken] section
1. Edit the “/etc/neutron/plugins/ml2/ml2_conf.ini” like below. Replace the IP address with the IP address of the instance tunnels network interface on your network node.
root@OSCTRL-UA:~# service nova-api restart
nova-api stop/waiting
nova-api start/running, process 28975
root@OSCTRL-UA:~#
Configure the Open vSwitch (OVS) service on Network Node:
Open vSwtich provides the virtual networking framework for instances . br-init (Integration Bridge) handles the internal traffic within OVS. br-ext (External Bridge) handles the external instance traffic with OVS. The external bridge requires a port on the physical external network interface to provide instances with external network access.
Let’s see how we can add the integration & external bridge.
1. Restart the OVS service on network node.
root@OSNWT-UA:~# service openvswitch-switch restart
openvswitch-switch stop/waiting
openvswitch-switch start/running
root@OSNWT-UA:~#
2. Create the Integration bridge if its not already exists.
Finalize the Neutron Installation & Configuration on Network Node:
1. Restart the agents.
root@OSNWT-UA:~# service neutron-plugin-openvswitch-agent restart
neutron-plugin-openvswitch-agent stop/waiting
neutron-plugin-openvswitch-agent start/running, process 6477
root@OSNWT-UA:~# service neutron-l3-agent restart
stop: Unknown instance:
neutron-l3-agent start/running, process 6662
root@OSNWT-UA:~# service neutron-dhcp-agent restart
neutron-dhcp-agent stop/waiting
neutron-dhcp-agent start/running, process 6707
root@OSNWT-UA:~# service neutron-metadata-agent restart
neutron-metadata-agent stop/waiting
neutron-metadata-agent start/running, process 6731
root@OSNWT-UA:~#
2. Check the service status ,
root@OSNWT-UA:~# service neutron-plugin-openvswitch-agent status; service neutron-l3-agent status;service neutron-dhcp-agent status;service neutron-metadata-agent status
neutron-plugin-openvswitch-agent start/running, process 6477
neutron-l3-agent start/running, process 6662
neutron-dhcp-agent start/running, process 6707
neutron-metadata-agent start/running, process 6731
root@OSNWT-UA:~#
This article will demonstrate that how to configure the Neutron configuration on compute node part. The compute node handles the network connectivity and security groups for each instance. In the compute node, we need to enable certain kernel parameters and install the networking components for neutron. Once the required networking components are installed , we just need to edit the configuration files to make the entries for identity service and MQ service. So far , we have configured the neutron configuration on controller node and Network node.
Let’s configure the Neutron for our environment. (Mandatory configurations on Controller Node , Network Node & Compute nodes.)
If you get any error like below , load the br_netfilter kernel module .
root@OSCMP-UA:~# sysctl -p
net.ipv4.conf.all.rp_filter = 0
net.ipv4.conf.default.rp_filter = 0 sysctl: cannot stat /proc/sys/net/bridge/bridge-nf-call-iptables: No such file or directory sysctl: cannot stat /proc/sys/net/bridge/bridge-nf-call-ip6tables: No such file or directory
root@OSCMP-UA:~#
You can load the br_netfilter kernel module using command below.
Install the Networking components on Compute Node:
You need to install neutron-plugin-ml2 and neutron-plugin-openvswtich-agent packages on compute node.
1.Install the networking components on compute node.
root@OSCMP-UA:~# apt-get install neutron-plugin-ml2 neutron-plugin-openvswitch-agent
Reading package lists... Done
Building dependency tree
Reading state information... Done
The following extra packages will be installed:
  ipset libipset3 neutron-common openvswitch-common openvswitch-switch
  python-jsonrpclib python-neutron python-novaclient
Suggested packages:
  openvswitch-datapath-module
The following NEW packages will be installed:
  ipset libipset3 neutron-common neutron-plugin-ml2
  neutron-plugin-openvswitch-agent openvswitch-common openvswitch-switch
  python-jsonrpclib python-neutron python-novaclient
0 upgraded, 10 newly installed, 0 to remove and 34 not upgraded.
Need to get 2,856 kB of archives.
After this operation, 20.8 MB of additional disk space will be used.
Do you want to continue? [Y/n] y
Get:1 http://ubuntu-cloud.archive.canonical.com/ubuntu/ trusty-updates/juno/main python-novaclient all 1:2.19.0-0ubuntu1~cloud0 [157 kB]
Get:2 http://in.archive.ubuntu.com/ubuntu/ trusty/main python-jsonrpclib all 0.1.3-1build1 [14.1 kB]
Get:3 http://in.archive.ubuntu.com/ubuntu/ trusty/universe libipset3 amd64 6.20.1-1 [50.8 kB]
Get:4 http://in.archive.ubuntu.com/ubuntu/ trusty/universe ipset amd64 6.20.1-1 [34.2 kB]
Get:5 http://ubuntu-cloud.archive.canonical.com/ubuntu/ trusty-updates/juno/main python-neutron all 1:2014.2.3-0ubuntu2~cloud0 [1,265 kB]
Get:6 http://in.archive.ubuntu.com/ubuntu/ trusty-updates/main openvswitch-common amd64 2.0.2-0ubuntu0.14.04.2 [444 kB]
Get:7 http://in.archive.ubuntu.com/ubuntu/ trusty-updates/main openvswitch-switch amd64 2.0.2-0ubuntu0.14.04.2 [864 kB]
Get:8 http://ubuntu-cloud.archive.canonical.com/ubuntu/ trusty-updates/juno/main neutron-common all 1:2014.2.3-0ubuntu2~cloud0 [15.7 kB]
Get:9 http://ubuntu-cloud.archive.canonical.com/ubuntu/ trusty-updates/juno/main neutron-plugin-ml2 all 1:2014.2.3-0ubuntu2~cloud0 [6,870 B]
Get:10 http://ubuntu-cloud.archive.canonical.com/ubuntu/ trusty-updates/juno/main neutron-plugin-openvswitch-agent all 1:2014.2.3-0ubuntu2~cloud0 [3,758 B]
Fetched 2,856 kB in 10s (268 kB/s)
Selecting previously unselected package python-jsonrpclib.
(Reading database ... 100023 files and directories currently installed.)
Preparing to unpack .../python-jsonrpclib_0.1.3-1build1_all.deb ...
Unpacking python-jsonrpclib (0.1.3-1build1) ...
Selecting previously unselected package libipset3:amd64.
Preparing to unpack .../libipset3_6.20.1-1_amd64.deb ...
Unpacking libipset3:amd64 (6.20.1-1) ...
Selecting previously unselected package ipset.
Preparing to unpack .../ipset_6.20.1-1_amd64.deb ...
Unpacking ipset (6.20.1-1) ...
Selecting previously unselected package python-novaclient.
Preparing to unpack .../python-novaclient_1%3a2.19.0-0ubuntu1~cloud0_all.deb ...
Unpacking python-novaclient (1:2.19.0-0ubuntu1~cloud0) ...
Selecting previously unselected package python-neutron.
Preparing to unpack .../python-neutron_1%3a2014.2.3-0ubuntu2~cloud0_all.deb ...
Unpacking python-neutron (1:2014.2.3-0ubuntu2~cloud0) ...
Selecting previously unselected package neutron-common.
Preparing to unpack .../neutron-common_1%3a2014.2.3-0ubuntu2~cloud0_all.deb ...
Unpacking neutron-common (1:2014.2.3-0ubuntu2~cloud0) ...
Selecting previously unselected package neutron-plugin-ml2.
Preparing to unpack .../neutron-plugin-ml2_1%3a2014.2.3-0ubuntu2~cloud0_all.deb ...
Unpacking neutron-plugin-ml2 (1:2014.2.3-0ubuntu2~cloud0) ...
Selecting previously unselected package openvswitch-common.
Preparing to unpack .../openvswitch-common_2.0.2-0ubuntu0.14.04.2_amd64.deb ...
Unpacking openvswitch-common (2.0.2-0ubuntu0.14.04.2) ...
Selecting previously unselected package openvswitch-switch.
Preparing to unpack .../openvswitch-switch_2.0.2-0ubuntu0.14.04.2_amd64.deb ...
Unpacking openvswitch-switch (2.0.2-0ubuntu0.14.04.2) ...
Selecting previously unselected package neutron-plugin-openvswitch-agent.
Preparing to unpack .../neutron-plugin-openvswitch-agent_1%3a2014.2.3-0ubuntu2~cloud0_all.deb ...
Unpacking neutron-plugin-openvswitch-agent (1:2014.2.3-0ubuntu2~cloud0) ...
Processing triggers for man-db (2.6.7.1-1ubuntu1) ...
Processing triggers for ureadahead (0.100.0-16) ...
Setting up python-jsonrpclib (0.1.3-1build1) ...
Setting up libipset3:amd64 (6.20.1-1) ...
Setting up ipset (6.20.1-1) ...
Setting up python-novaclient (1:2.19.0-0ubuntu1~cloud0) ...
Setting up python-neutron (1:2014.2.3-0ubuntu2~cloud0) ...
Setting up neutron-common (1:2014.2.3-0ubuntu2~cloud0) ...
Adding system user `neutron' (UID 110) ...
Adding new user `neutron' (UID 110) with group `neutron' ...
Not creating home directory `/var/lib/neutron'.
Setting up neutron-plugin-ml2 (1:2014.2.3-0ubuntu2~cloud0) ...
Setting up openvswitch-common (2.0.2-0ubuntu0.14.04.2) ...
Setting up openvswitch-switch (2.0.2-0ubuntu0.14.04.2) ...
openvswitch-switch start/running
Processing triggers for ureadahead (0.100.0-16) ...
Setting up neutron-plugin-openvswitch-agent (1:2014.2.3-0ubuntu2~cloud0) ...
neutron-plugin-openvswitch-agent start/running, process 18376
Processing triggers for libc-bin (2.19-0ubuntu6.6) ...
Processing triggers for ureadahead (0.100.0-16) ...
root@OSCMP-UA:~#
Configure the Networking common components:
Edit the neutron.conf file and update the following items.
Configure the Networking service to use Identity service for authentication. Edit the “/etc/neutron/neutron.conf” file and update the following key on default section.
[DEFAULT]
...
auth_strategy = keystone
Add the following keys to the [keystone_authtoken] section.
Comment out any lines in the [service_providers] section
Configure the Modular Layer 2 (ML2) plug-in:
The Module Layer 2 (ML2) plugin uses the Open vSwitch mechanism to build the virtual networking framework for instances. Edit the /etc/neutron/plugins/ml2/ml2_conf.ini file and update the required configuration.
Add the following keys to the [ml2] section on “/etc/neutron/plugins/ml2/ml2_conf.ini” .
Note: Replace 192.168.204.9 with the IP address of the instance tunnels network interface on your compute node.
Configure the Open vSwitch (OVS) service:
The open vswitch service provides the underlying virtual networking framework for openstack instances . The integration bridge br-int handles internal openstack instance network traffic within open vSwitch.
Restart the Open vSwtich Service & create the integration bridge if it’s not already created.
root@OSCMP-UA:~# service openvswitch-switch restart
openvswitch-switch stop/waiting
openvswitch-switch start/running
root@OSCMP-UA:~# ovs-vsctl add-br br-int
ovs-vsctl: cannot create a bridge named br-int because a bridge named br-int already exists
root@OSCMP-UA:~#
Configure Compute node to use Networking:
By default, Openstack will use the legacy nova-network. We need to re-configure nova to use the neutron network.
Edit the /etc/nova/nova.conf and update the default section like below.
The Neutron agents status shows that we have successfully configured the Neutron Networking . (neutron-openvswitch-agent live on both network (OSNWT-UA) & compute nodes (OSCMP-UA) ).
The Next article will demonstrate the initial network setup for Neutron.
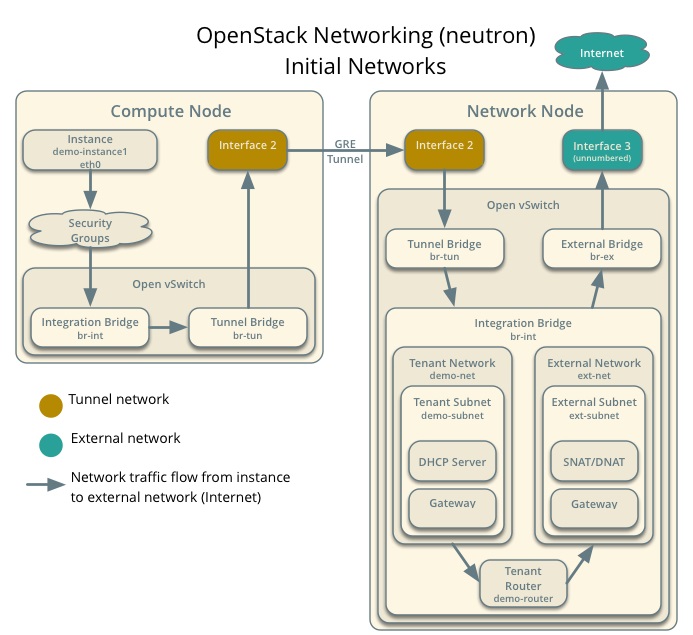
In openstack , We need to create the necessary virtual network infrastructure for Neutron Networking. This network infrastructure will be used to connect the instances including external network (internet) and tenant network. Before creating the instance , we need to validate the network connectivity. This article will demonstrate that how to create the required virtual infrastructure , configure the external network and configure the tenant network. At the end of the article ,we will see that how to verify the network connectivity.
The diagram below provides basic architectural overview of the networking components. It also shows that how the network implements for the initial networks and shows how network traffic flows from the instance to the external network or Internet. Refer Openstack.org for more information.
Neutron Openstack Network flows
Create the External Network for Neutron:
To provide the internet access to the instances , you must have external network functionality. Internet access can be enabled by assigning the floating IP’s and specific security group profiles for each instances. Instance will not get the public IP address but internet access will be provided using NAT. (Network address Translation).
Let’s create the external Network.
1. Login to the Openstack Controller Node.
2. Source the admin credentials.
root@OSCTRL-UA:~# neutron net-create ext-net --router:external --provider:physical_network external --provider:network_type flat
Created a new network:
+---------------------------+--------------------------------------+
| Field                     | Value                                |
+---------------------------+--------------------------------------+
| admin_state_up            | True                                 |
| id                        | f39aef8a-4f98-4338-b0f0-0755818d9341 |
| name                      | ext-net                              |
| provider:network_type     | flat                                 |
| provider:physical_network | external                             |
| provider:segmentation_id  |                                      |
| router:external           | True                                 |
| shared                    | False                                |
| status                    | ACTIVE                               |
| subnets                   |                                      |
| tenant_id                 | d14d6a07f862482398b3e3e4e8d581c6     |
+---------------------------+--------------------------------------+
root@OSCTRL-UA:~#
4. We should specify an exclusive part of this subnet for router and floating IP addresses to prevent interference with other devices on the external network. In our case , External floating IP will start from 203.168.205.100 to 203.168.205.200 . The default gateway is 203.168.205.1.
Tenant Network provides the IP address for internal network access for openstack instance. Let’s assume , we have tenant called “lingesh” . You can verify the tenant availability using command below.
Note: Tenant “lingesh” can use the ip address from 192.168.4.1 to 192.168.4.254.
4. Create the virtual router to pass the instance network. Router can attach to more than one virtual network. In our case , we will create the router and attach the external & tenant network to it.
root@OSCTRL-UA:~# neutron router-create lingesh-router
Created a new router:
+-----------------------+--------------------------------------+
| Field                 | Value                                |
+-----------------------+--------------------------------------+
| admin_state_up        | True                                 |
| external_gateway_info |                                      |
| id                    | 1d5f48e4-b8e0-4789-8e1d-10bd9b92155a |
| name                  | lingesh-router                       |
| routes                |                                      |
| status                | ACTIVE                               |
| tenant_id             | abe3af30f46b446fbae35a102457890c     |
+-----------------------+--------------------------------------+
root@OSCTRL-UA:~#
2. List the router which we have created for “lingesh” tenant.
root@OSNWT-UA:~# ip netns
qrouter-1d5f48e4-b8e0-4789-8e1d-10bd9b92155a
root@OSNWT-UA:~#
3. Ping the external router IP using command below.
root@OSNWT-UA:~# ip netns exec qrouter-1d5f48e4-b8e0-4789-8e1d-10bd9b92155a ping 203.168.205.101
PING 203.168.205.101 (203.168.205.101) 56(84) bytes of data.
64 bytes from 203.168.205.101: icmp_seq=1 ttl=64 time=0.165 ms
64 bytes from 203.168.205.101: icmp_seq=2 ttl=64 time=0.126 ms
64 bytes from 203.168.205.101: icmp_seq=3 ttl=64 time=0.082 ms
^C
--- 203.168.205.101 ping statistics ---
3 packets transmitted, 3 received, 0% packet loss, time 2002ms
rtt min/avg/max/mdev = 0.082/0.124/0.165/0.035 ms
root@OSNWT-UA:~#
4. You should be able to ping the tenant network as well.
root@OSNWT-UA:~# ip netns exec qrouter-1d5f48e4-b8e0-4789-8e1d-10bd9b92155a ping 192.168.4.1
PING 192.168.4.1 (192.168.4.1) 56(84) bytes of data.
64 bytes from 192.168.4.1: icmp_seq=1 ttl=64 time=0.147 ms
64 bytes from 192.168.4.1: icmp_seq=2 ttl=64 time=0.083 ms
^C
--- 192.168.4.1 ping statistics ---
2 packets transmitted, 2 received, 0% packet loss, time 1001ms
rtt min/avg/max/mdev = 0.083/0.115/0.147/0.032 ms
root@OSNWT-UA:~#
The above results shows that we have successfully configured Openstack neutron service .
What’s Next ? We have configured all the basic service to launch Openstack instance. In the next article ,we will see that how we can create the instance using command line.
Openstack instances can be launched using command line without using the horizon dashboard service. In this tutorial series, we yet configure horizon. I would like to create the new openstack instance without horizon using command line. To launch an instance, we must at least specify the OS flavour, image name, network, security group, key, and instance name. So we have to create the customized security groups , security rules and key pair prior to launching the instances.
5. You can also use the nova command to check the security group rules.
root@OSCTRL-UA:~# nova secgroup-list-rules  allow-ssh-icmp
+-------------+-----------+---------+-----------+--------------+
| IP Protocol | From Port | To Port | IP Range  | Source Group |
+-------------+-----------+---------+-----------+--------------+
| icmp        | -1        | -1      | 0.0.0.0/0 |              |
| tcp         | 22        | 22      | 0.0.0.0/0 |              |
+-------------+-----------+---------+-----------+--------------+
root@OSCTRL-UA:~#
Launch the instance
1. List the preconfigured flavour in openstack. Flavour specifics the virtual resources allocation. (Memory ,CPU , storage )
root@OSCTRL-UA:~# nova image-list
+--------------------------------------+---------------------+--------+--------+
| ID                                   | Name                | Status | Server |
+--------------------------------------+---------------------+--------+--------+
| 7d19b639-6950-42dc-a64d-91c6662e0613 | CirrOS 0.3.0        | ACTIVE |        |
| 95fafce7-ae0f-47e3-b1c9-5d2ebd1af885 | CirrOS-0.3.4-x86_64 | ACTIVE |        |
+--------------------------------------+---------------------+--------+--------+
root@OSCTRL-UA:~#
We will use image “CirrOS-0.3.4-x86_64” to launch the instance.
If you don’t have the Cirros-0.3.4-x86_64 , just download the image from internet & add it in to glance like below.
root@OSCTRL-UA:~# nova list
+--------------------------------------+-----------+--------+------------+-------------+----------+
| ID                                   | Name      | Status | Task State | Power State | Networks |
+--------------------------------------+-----------+--------+------------+-------------+----------+
|  7ae47f2b-1b2a-4562-bca9-6d6c517cdf85 | dbcirros1 | BUILD  | spawning   | NOSTATE     |          |
+--------------------------------------+-----------+--------+------------+-------------+----------+
root@OSCTRL-UA:~# nova list
+--------------------------------------+-----------+--------+------------+-------------+-------------------------------------------+
| ID                                   | Name      | Status | Task State | Power State | Networks                                  |
+--------------------------------------+-----------+--------+------------+-------------+-------------------------------------------+
| 7ae47f2b-1b2a-4562-bca9-6d6c517cdf85 | dbcirros1 | ACTIVE | -          | Running     | lingesh-net=192.168.4.13|
+--------------------------------------+-----------+--------+------------+-------------+-------------------------------------------+
root@OSCTRL-UA:~#
We can see that instance is up & running .
Do you want to verify using KVM commands ? Just login to compute node and list the instance using virsh command.
root@OSCMP-UA:~# virsh list
 Id    Name                           State
----------------------------------------------------
 2     instance-00000001              running

root@OSCMP-UA:~#
Access the instance Console:
1.Login to the controller node & source the tenant credentials .
2.List the VNC console URL for instance “dbcirros1” from controller node.
root@OSCTRL-UA:~# nova get-vnc-console dbcirros1 novnc
+-------+--------------------------------------------------------------------------------+
| Type  | Url                                                                            |
+-------+--------------------------------------------------------------------------------+
| novnc | http://OSCTRL-UA:6080/vnc_auto.html?token=aea7366b-3b87-42fc-bea5-e190e481f1b4 |
+-------+--------------------------------------------------------------------------------+
root@OSCTRL-UA:~#
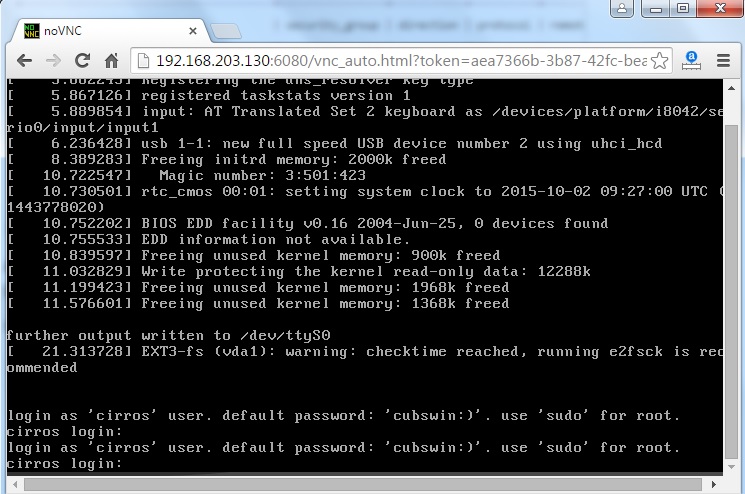
2. Copy the URL and paste in the web-browser to see the instance console. If you do not have DNS , just replace “OSCTRL-UA” with IP adddress.
Cirros VNC console
3. You can see that instance has been configured with internal IP address and able to ping gateway .
Cirros IP & gateway
At this point , you can access the instance within the private cloud . (Can be access within 192.168.4.x network). In an order to access the instance from outside network, you must assign the external IP network.
Configuring External Network for Instance:
1. Create the new external floating IP .
root@OSCTRL-UA:~# neutron floatingip-create ext-net
Created a new floatingip:
+---------------------+--------------------------------------+
| Field               | Value                                |
+---------------------+--------------------------------------+
| fixed_ip_address    |                                      |
| floating_ip_address | 192.168.203.193                      |
| floating_network_id | f39aef8a-4f98-4338-b0f0-0755818d9341 |
| id                  | 574034e0-9d88-487e-828c-d5371ffcfddc |
| port_id             |                                      |
| router_id           |                                      |
| status              | DOWN                                 |
| tenant_id           | abe3af30f46b446fbae35a102457890c     |
+---------------------+--------------------------------------+
root@OSCTRL-UA:~#
2. Associate the floating IP to the instance.
root@OSCTRL-UA:~# nova floating-ip-associate dbcirros1 192.168.203.193
root@OSCTRL-UA:~#
3. List the instance to check the IP assignment.
root@OSCTRL-UA:~# nova list
+--------------------------------------+-----------+--------+------------+-------------+-------------------------------------------+
| ID                                   | Name      | Status | Task State | Power State | Networks                                  |
+--------------------------------------+-----------+--------+------------+-------------+-------------------------------------------+
| 7ae47f2b-1b2a-4562-bca9-6d6c517cdf85 | dbcirros1 | ACTIVE | -          | Running     | lingesh-net=192.168.4.13, 192.168.203.193 |
+--------------------------------------+-----------+--------+------------+-------------+-------------------------------------------+
root@OSCTRL-UA:~#
Once you have configured the external network IP for the instance, you should be able to access the instance from outside network. (Other than 192.168.4.0)
Let me try to access the instance from controller node using the key.pem. (which we have save in the step )
1.Login to the new instance using key pair from controller node. You need to use the external IP to access the instance.
root@OSCTRL-UA:~# ssh -i lingesh.pem 192.168.203.193
Please login as 'cirros' user, not as root

^CConnection to 192.168.203.193 closed.
root@OSCTRL-UA:~#
Cirros will not allow to login as root. So we need to use “cirros” user name.
root@OSCTRL-UA:~# ssh -i lingesh.pem cirros@192.168.203.193
$ sudo su -
#
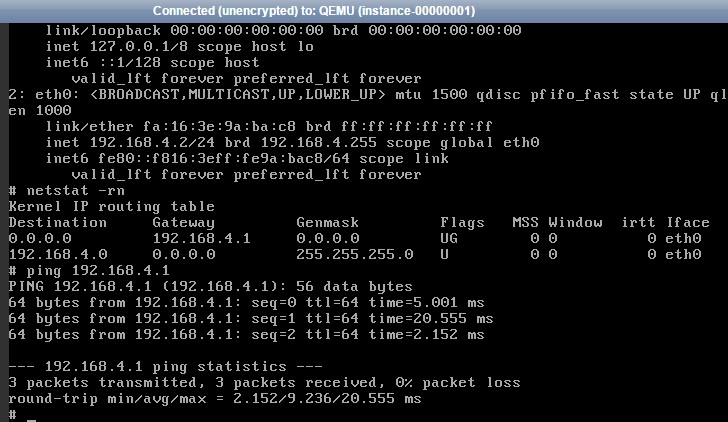
2. Just see the network configuration.
$ sudo su -
# netstat -rn
Kernel IP routing table
Destination     Gateway         Genmask         Flags   MSS Window  irtt Iface
0.0.0.0         192.168.4.1     0.0.0.0         UG        0 0          0 eth0
192.168.4.0     0.0.0.0         255.255.255.240 U         0 0          0 eth0
# ifconfig -a
eth0      Link encap:Ethernet  HWaddr FA:16:3E:6E:22:F9
          inet addr:192.168.4.13  Bcast:192.168.4.15  Mask:255.255.255.240
          inet6 addr: fe80::f816:3eff:fe6e:22f9/64 Scope:Link
          UP BROADCAST RUNNING MULTICAST  MTU:1454  Metric:1
          RX packets:423 errors:0 dropped:0 overruns:0 frame:0
          TX packets:343 errors:0 dropped:0 overruns:0 carrier:0
          collisions:0 txqueuelen:1000
          RX bytes:52701 (51.4 KiB)  TX bytes:40094 (39.1 KiB)

lo        Link encap:Local Loopback
          inet addr:127.0.0.1  Mask:255.0.0.0
          inet6 addr: ::1/128 Scope:Host
          UP LOOPBACK RUNNING  MTU:16436  Metric:1
          RX packets:0 errors:0 dropped:0 overruns:0 frame:0
          TX packets:0 errors:0 dropped:0 overruns:0 carrier:0
          collisions:0 txqueuelen:0
          RX bytes:0 (0.0 B)  TX bytes:0 (0.0 B)

#
Awesome. We have successfully launched cirros instance.
Summary:
Created the new keypair
Created new security group
Applied specific rule to the security to group to allow ICMP & SSH.
Launched the new instance
Created the new external IP
Assigned the external IP to the newly created instance
Assessed the instance from controller node using the pem key file.
Hope this article is informative to you. Share it ! Be Sociable !!!
Horizon Dashboard is an optional component in Openstack which provides the webpage to launch the instances in few clicks. Horizon is fully depend on openstack core functionalities like keystone (Identify), Glance (Image Service), nova-compute (Compute), and Networking (neutron) or legacy networking (nova-network). Object Storage service can’t be used in dashboard since its a stand alone service. In this article, we will see that how to install and configure horizon(Dashboard) on controller node. Dashboard will make you to forget all the openstack commands for sure.
Install the Dashboard components:
1.Login to the Openstack Controller node.
2. Install the Dashboard packages .
root@OSCTRL-UA:~# apt-get install openstack-dashboard apache2 libapache2-mod-wsgi memcached python-memcache
Reading package lists... Done
Building dependency tree
Reading state information... Done
libapache2-mod-wsgi is already the newest version.
The following extra packages will be installed:
  apache2-bin apache2-data openstack-dashboard-ubuntu-theme python-appconf
  python-ceilometerclient python-compressor python-django
  python-django-horizon python-django-pyscss python-heatclient
  python-openstack-auth python-pyscss python-saharaclient python-troveclient
Suggested packages:
  apache2-doc apache2-suexec-pristine apache2-suexec-custom apache2-utils
  libcache-memcached-perl libmemcached python-psycopg2 python-psycopg
  python-flup python-sqlite geoip-database-contrib gettext python-django-doc
  ipython bpython libgdal1
The following NEW packages will be installed:
  memcached openstack-dashboard openstack-dashboard-ubuntu-theme
  python-appconf python-ceilometerclient python-compressor python-django
  python-django-horizon python-django-pyscss python-heatclient python-memcache
  python-openstack-auth python-pyscss python-saharaclient python-troveclient
The following packages will be upgraded:
  apache2 apache2-bin apache2-data
3 upgraded, 15 newly installed, 0 to remove and 37 not upgraded.
Need to get 6,681 kB of archives.
After this operation, 58.0 MB of additional disk space will be used.
Do you want to continue? [Y/n] Y
You might get error like below due to “openstack-dashboard-ubuntu-theme”,
apache2_invoke: Enable configuration openstack-dashboard.conf
 * Reloading web server apache2                                                                                                                                       *
 * Apache2 is not running
invoke-rc.d: initscript apache2, action "reload" failed.
Setting up memcached (1.4.14-0ubuntu9) ...
Starting memcached: memcached.
Setting up openstack-dashboard-ubuntu-theme (1:2014.2.3-0ubuntu1~cloud0) ...
Collecting and compressing static assets...
 * Reloading web server apache2                                                                                                                                       *
 * Apache2 is not running
dpkg: error processing package openstack-dashboard-ubuntu-theme (--configure):
 subprocess installed post-installation script returned error exit status 1
Processing triggers for ureadahead (0.100.0-16) ...
Errors were encountered while processing:
 openstack-dashboard-ubuntu-theme
E: Sub-process /usr/bin/dpkg returned an error code (1)
root@OSCTRL-UA:~#
You can remove the openstack-dashboard-ubuntu-theme package using below command.
2.Edit the “/etc/openstack-dashboard/local_settings.py” file and complete the following actions.
Specify the Controller node Name.
OPENSTACK_HOST = "OSCTRL-UA"
Make sure that all the systems are allowed to access the dashboard.
ALLOWED_HOSTS = '*'
Finalize the installation:
Restart the web-service & session storage service.
root@OSCTRL-UA:~# service apache2 restart
 * Restarting web server apache2                                                                                                                              [ OK ]
root@OSCTRL-UA:~# service memcached restart
Restarting memcached: memcached.
root@OSCTRL-UA:~#
Verify the Dashboard Installation & Configuration:
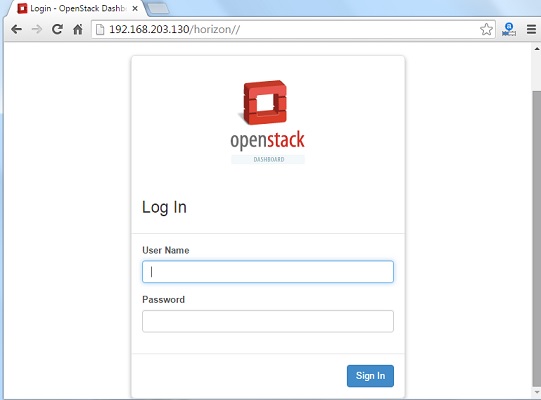
1.Access the dashboard using a web browser – http://192.168.203.130/horizon .
Openstack Dashboard
2.Login to the dashboard using admin or tenant user(lingesh) credentials .
On the successful configuration of Horizon, you should b e able to login to the portal using admin or tenant id.
Hope this article is informative to you . Share it ! Be Sociable !!!
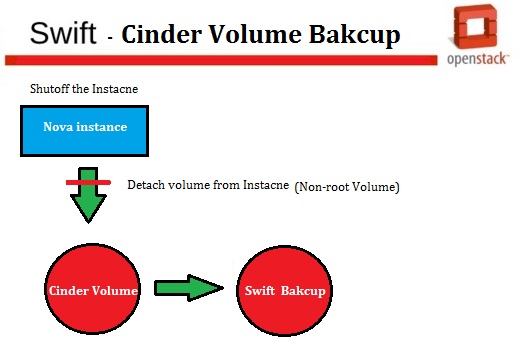
The Openstack block storage service(cinder) provide the access to the block storage devices to the openstack instances using various back-end storage drivers like LVM ,CEPH etc. The Block Storage API and scheduler services runs on the openstack controller node and openstack storage node is responsible to provide the volume service. You can configure N-number of storage nodes based on the requirement. To set a volume driver, use the “volume_driver” flag in /etc/cinder/cinder.conf file.
Openstack block storage service (cinder) support the following drivers as back-end storage devices.
The OpenStack Block Storage service (cinder) provides persistent storage to a virtual instance . Block Storage service (cinder) provides an infrastructure for managing volumes, and interacts with OpenStack Compute to provide volumes for instances. The service also enables management of volume snapshots, and volume types.
Openstack Block Storage Service Components (cinder):
Cinder services Openstack
Configure Controller node for Cinder Service:
1.Login to the Openstack Controller Node.
2.Create the database for cinder service.
root@OSCTRL-UA:~# mysql -u root -p
Enter password:
Welcome to the MySQL monitor.  Commands end with ; or \g.
Your MySQL connection id is 27
Server version: 5.5.44-0ubuntu0.14.04.1 (Ubuntu)

Copyright (c) 2000, 2015, Oracle and/or its affiliates. All rights reserved.

Oracle is a registered trademark of Oracle Corporation and/or its
affiliates. Other names may be trademarks of their respective
owners.

Type 'help;' or '\h' for help. Type '\c' to clear the current input statement.

mysql> CREATE DATABASE cinder;
Query OK, 1 row affected (0.00 sec)
3.Grant proper access to the cinder database and set the cinder DB password.
mysql> GRANT ALL PRIVILEGES ON cinder.* TO 'cinder'@'localhost' IDENTIFIED BY 'cinderdb123';
Query OK, 0 rows affected (0.00 sec)

mysql> GRANT ALL PRIVILEGES ON cinder.* TO 'cinder'@'%'  IDENTIFIED BY 'cinderdb123';
Query OK, 0 rows affected (0.00 sec)

mysql> exit
Bye
root@OSCTRL-UA:~#
4. Source the admin credentials to gain access to admin CLI commands.
9. Install the Block Storage controller components .
root@OSCTRL-UA:~# apt-get install cinder-api cinder-scheduler python-cinderclient
Reading package lists... Done
Building dependency tree
Reading state information... Done
python-cinderclient is already the newest version.
python-cinderclient set to manually installed.
The following extra packages will be installed:
  cinder-common python-barbicanclient python-cinder python-networkx
  python-taskflow
Suggested packages:
  python-ceph python-hp3parclient python-scipy python-pydot
The following NEW packages will be installed:
  cinder-api cinder-common cinder-scheduler python-barbicanclient
  python-cinder python-networkx python-taskflow
0 upgraded, 7 newly installed, 0 to remove and 37 not upgraded.
Need to get 1,746 kB of archives.
After this operation, 14.0 MB of additional disk space will be used.
Do you want to continue? [Y/n] y
10 .Edit the /etc/cinder/cinder.conf file and complete the following actions like below.
We have just configured the block storage service on controller node. We yet to configure the storage node to provide the volume service to the instances. In the next article, we will configure storage node & will test it by launching new instance using volume.
Hope this article is informative to you. Share it ! Be sociable !!!
This article will demonstrates that how to install and configure Openstack Storage nodes for the Block Storage service (cinder). For the tutorial simplicity , we will use the local disk in LVM as back-end storage. In the upcoming articles ,we will replace the LVM with CEPH storage, once we familiar with cinder services and functionalities. In our setup, Cinder service use LVM driver to create the new volumes and provides to the instance using ISCSI transport. You can scale the storage node horizontally based on the requirement.
Make sure that storage node consists the blank disk for back-end storage.
Configure the Storage Node for Cinder:
1.Login to the Openstack Storage node.
2.Install the LVM packages on storage node.
root@OSSTG-UA:~# apt-get install lvm2
Reading package lists... Done
Building dependency tree
Reading state information... Done
The following extra packages will be installed:
  libdevmapper-event1.02.1 watershed
Suggested packages:
  thin-provisioning-tools
The following NEW packages will be installed:
  libdevmapper-event1.02.1 lvm2 watershed
0 upgraded, 3 newly installed, 0 to remove and 31 not upgraded.
Need to get 492 kB of archives.
After this operation, 1,427 kB of additional disk space will be used.
Do you want to continue? [Y/n] Y
Get:1 http://in.archive.ubuntu.com/ubuntu/ trusty/main libdevmapper-event1.02.1 amd64 2:1.02.77-6ubuntu2 [10.8 kB]
Get:2 http://in.archive.ubuntu.com/ubuntu/ trusty/main watershed amd64 7 [11.4 kB]
Get:3 http://in.archive.ubuntu.com/ubuntu/ trusty/main lvm2 amd64 2.02.98-6ubuntu2 [470 kB]
Fetched 492 kB in 5s (84.4 kB/s)
Selecting previously unselected package libdevmapper-event1.02.1:amd64.
(Reading database ... 88165 files and directories currently installed.)
Preparing to unpack .../libdevmapper-event1.02.1_2%3a1.02.77-6ubuntu2_amd64.deb ...
Unpacking libdevmapper-event1.02.1:amd64 (2:1.02.77-6ubuntu2) ...
Selecting previously unselected package watershed.
Preparing to unpack .../archives/watershed_7_amd64.deb ...
Unpacking watershed (7) ...
Selecting previously unselected package lvm2.
Preparing to unpack .../lvm2_2.02.98-6ubuntu2_amd64.deb ...
Unpacking lvm2 (2.02.98-6ubuntu2) ...
Processing triggers for man-db (2.6.7.1-1ubuntu1) ...
Setting up libdevmapper-event1.02.1:amd64 (2:1.02.77-6ubuntu2) ...
Setting up watershed (7) ...
update-initramfs: deferring update (trigger activated)
Setting up lvm2 (2.02.98-6ubuntu2) ...
update-initramfs: deferring update (trigger activated)
Processing triggers for libc-bin (2.19-0ubuntu6.6) ...
Processing triggers for initramfs-tools (0.103ubuntu4.2) ...
3. List the available free disk. In my case, I have /dev/sdb.
root@OSSTG-UA:~# fdisk -l /dev/sdb

Disk /dev/sdb: 10.7 GB, 10737418240 bytes
255 heads, 63 sectors/track, 1305 cylinders, total 20971520 sectors
Units = sectors of 1 * 512 = 512 bytes
Sector size (logical/physical): 512 bytes / 512 bytes
I/O size (minimum/optimal): 512 bytes / 512 bytes
Disk identifier: 0x00000000

Disk /dev/sdb doesn't contain a valid partition table
root@OSSTG-UA:~#
4.Create the physical volume on the disk.
root@OSSTG-UA:~# pvcreate /dev/sdb
  Physical volume "/dev/sdb" successfully created
root@OSSTG-UA:~#
5. Create the new volume group using /dev/sdb. This volume group will be used by the storage service (cinder) to create the volumes.
6.Re-configure LVM to scan only the devices that contain the cinder-volume volume group. Add the filter to scan only /dev/sdb and reject all other devices. Edit the /etc/lvm/lvm.conf file like below. If you root disk is part of LVM group, make sure that you have added the disk in the filter to avoid other potential issues. In my case, root filesystem is not using LVM.
devices {
...
filter = [ "a/sdb/", "r/.*/"]
After the modification, file should provide the below results.
Openstack Object storage solution has been developed under the project called “swift”. It’s a multi-tenant object storage system and highly scalable one. It can manage large amounts of unstructured data at low cost through a RESTful HTTP API. swift-proxy-server service accepts OpenStack Object Storage API and raw HTTP requests to upload files, modify metadata, and create containers. It also serves file or container listings to web browsers. swift-account-server service manage accounts defined with Object Storage. swift-container-server service manages the mapping of containers /folders, within Object Storage. swift-object-server service manages actual objects,such as files, on the storage nodes.
For tutorial simplicity , we will configure the swift proxy service on Openstack controller node. For your information , you can run swift proxy on any node which are in storage node network. To improve the object storage performance , you should have multiple proxy nodes.
Configure Controller node for Object Storage:
1.Login to the Openstack Controller node.
2.Create the swift user for identity.
root@OSCTRL-UA:~# keystone user-create --name swift --pass swift123
+----------+----------------------------------+
| Property |              Value               |
+----------+----------------------------------+
|  email   |                                  |
| enabled  |               True               |
|    id    | 47f4941be9fd421faa1cd72fb7abbb78 |
|   name   |              swift               |
| username |              swift               |
+----------+----------------------------------+
root@OSCTRL-UA:~#
3.Add the admin role to the swift user.
root@OSCTRL-UA:~# keystone user-role-add --user swift --tenant service --role admin
root@OSCTRL-UA:~#
4.Create the service entity.
root@OSCTRL-UA:~# keystone service-create --name swift --type object-store --description "OpenStack Object Storage"
+-------------+----------------------------------+
|   Property  |              Value               |
+-------------+----------------------------------+
| description |     OpenStack Object Storage     |
|   enabled   |               True               |
|      id     | 233aa2e309a142e188424ecbb41d1e07 |
|     name    |              swift               |
|     type    |           object-store           |
+-------------+----------------------------------+
root@OSCTRL-UA:~#
5. Create the Object Storage service API endpoints.
6. Install the swift Controller node components and swift proxy.
root@OSCTRL-UA:~# apt-get install swift swift-proxy python-swiftclient python-keystoneclient python-keystonemiddleware memcached
Reading package lists... Done
Building dependency tree
Reading state information... Done
memcached is already the newest version.
python-swiftclient is already the newest version.
python-swiftclient set to manually installed.
The following extra packages will be installed:
  python-dnspython python-netifaces python-swift python-xattr
Suggested packages:
  swift-bench
The following NEW packages will be installed:
  python-dnspython python-netifaces python-swift python-xattr swift
  swift-proxy
The following packages will be upgraded:
  python-keystoneclient python-keystonemiddleware
2 upgraded, 6 newly installed, 0 to remove and 41 not upgraded.
Need to get 665 kB of archives.
After this operation, 2,666 kB of additional disk space will be used.
Do you want to continue? [Y/n] Y
Get:1 http://ubuntu-cloud.archive.canonical.com/ubuntu/ trusty-updates/juno/main python-keystoneclient all 1:0.10.1-0ubuntu1.2~cloud0 [182 kB]
Get:2 http://in.archive.ubuntu.com/ubuntu/ trusty/main python-dnspython all 1.11.1-1build1 [83.1 kB]
Get:3 http://ubuntu-cloud.archive.canonical.com/ubuntu/ trusty-updates/juno/main python-keystonemiddleware all 1.0.0-1ubuntu0.14.10.3~cloud0 [52.3 kB]
Get:4 http://ubuntu-cloud.archive.canonical.com/ubuntu/ trusty-updates/juno/main python-swift all 2.2.0-0ubuntu1.1~cloud0 [280 kB]
Get:5 http://ubuntu-cloud.archive.canonical.com/ubuntu/ trusty-updates/juno/main swift all 2.2.0-0ubuntu1.1~cloud0 [25.7 kB]
Get:6 http://ubuntu-cloud.archive.canonical.com/ubuntu/ trusty-updates/juno/main swift-proxy all 2.2.0-0ubuntu1.1~cloud0 [18.6 kB]
Get:7 http://in.archive.ubuntu.com/ubuntu/ trusty/main python-netifaces amd64 0.8-3build1 [11.3 kB]
Get:8 http://in.archive.ubuntu.com/ubuntu/ trusty/main python-xattr amd64 0.6.4-2build1 [12.5 kB]
Fetched 665 kB in 7s (88.2 kB/s)
(Reading database ... 113822 files and directories currently installed.)
Preparing to unpack .../python-keystoneclient_1%3a0.10.1-0ubuntu1.2~cloud0_all.deb ...
Unpacking python-keystoneclient (1:0.10.1-0ubuntu1.2~cloud0) over (1:0.10.1-0ubuntu1.1~cloud0) ...
Preparing to unpack .../python-keystonemiddleware_1.0.0-1ubuntu0.14.10.3~cloud0_all.deb ...
Unpacking python-keystonemiddleware (1.0.0-1ubuntu0.14.10.3~cloud0) over (1.0.0-1ubuntu0.14.10.2~cloud0) ...
Selecting previously unselected package python-dnspython.
Preparing to unpack .../python-dnspython_1.11.1-1build1_all.deb ...
Unpacking python-dnspython (1.11.1-1build1) ...
Selecting previously unselected package python-netifaces.
Preparing to unpack .../python-netifaces_0.8-3build1_amd64.deb ...
Unpacking python-netifaces (0.8-3build1) ...
Selecting previously unselected package python-xattr.
Preparing to unpack .../python-xattr_0.6.4-2build1_amd64.deb ...
Unpacking python-xattr (0.6.4-2build1) ...
Selecting previously unselected package python-swift.
Preparing to unpack .../python-swift_2.2.0-0ubuntu1.1~cloud0_all.deb ...
Unpacking python-swift (2.2.0-0ubuntu1.1~cloud0) ...
Selecting previously unselected package swift.
Preparing to unpack .../swift_2.2.0-0ubuntu1.1~cloud0_all.deb ...
Unpacking swift (2.2.0-0ubuntu1.1~cloud0) ...
Selecting previously unselected package swift-proxy.
Preparing to unpack .../swift-proxy_2.2.0-0ubuntu1.1~cloud0_all.deb ...
Unpacking swift-proxy (2.2.0-0ubuntu1.1~cloud0) ...
Processing triggers for man-db (2.6.7.1-1ubuntu1) ...
Processing triggers for ureadahead (0.100.0-16) ...
ureadahead will be reprofiled on next reboot
Setting up python-keystoneclient (1:0.10.1-0ubuntu1.2~cloud0) ...
Setting up python-keystonemiddleware (1.0.0-1ubuntu0.14.10.3~cloud0) ...
Setting up python-dnspython (1.11.1-1build1) ...
Setting up python-netifaces (0.8-3build1) ...
Setting up python-xattr (0.6.4-2build1) ...
Setting up python-swift (2.2.0-0ubuntu1.1~cloud0) ...
Setting up swift (2.2.0-0ubuntu1.1~cloud0) ...
Setting up swift-proxy (2.2.0-0ubuntu1.1~cloud0) ...
Processing triggers for ureadahead (0.100.0-16) ...
root@OSCTRL-UA:~#
7.Create the /etc/swift directory and download the swift proxy sample configuration from repository.
root@OSCTRL-UA:~# mkdir -p /etc/swift
root@OSCTRL-UA:~# cd /etc/swift
root@OSCTRL-UA:/etc/swift# curl -o /etc/swift/proxy-server.conf  https://raw.githubusercontent.com/openstack/swift/stable/juno/etc/proxy-server.conf-sample
  % Total    % Received % Xferd  Average Speed   Time    Time     Time  Current
                                 Dload  Upload   Total   Spent    Left  Speed
100 24714  100 24714    0     0   6573      0  0:00:03  0:00:03 --:--:--  6586
root@OSCTRL-UA:/etc/swift#
8.Edit the “/etc/swift/proxy-server.conf” file on the below sections.
In the default section,
[DEFAULT]
...
bind_port = 8080
user = swift
swift_dir = /etc/swift
[filter:cache]
use = egg:swift#memcache
memcache_servers = 127.0.0.1:11211
We have successfully configured the Object service for controller node. In the next article, we will see that how to configure the swift storage server.
This article will demonstrates that how to install and configure the object storage node for Openstack environment. Object storage node is responsible for account , container, and object services. For the tutorial simplicity, I will use the block storage server as object storage server. We will add new storage LUN for object storage service and create the single partition with whole disk. Object storage service supports all the filesystem which supports xattr (Extended Attributes) . In our tutorial , we will use XFS for the demonstration.
Here is my storage node’s /etc/hosts file contents. These entries are present on all other openstack nodes as well.
2.Install the rsync and other supporting packages.
root@OSSTG-UA:~# apt-get install xfsprogs rsync
Reading package lists... Done
Building dependency tree
Reading state information... Done
rsync is already the newest version.
Suggested packages:
  xfsdump attr quota
The following NEW packages will be installed:
  xfsprogs
0 upgraded, 1 newly installed, 0 to remove and 37 not upgraded.
Need to get 508 kB of archives.
After this operation, 2,691 kB of additional disk space will be used.
Do you want to continue? [Y/n] Y
Get:1 http://in.archive.ubuntu.com/ubuntu/ trusty/main xfsprogs amd64 3.1.9ubuntu2 [508 kB]
Get:2 http://in.archive.ubuntu.com/ubuntu/ trusty/main xfsprogs amd64 3.1.9ubuntu2 [508 kB]
Fetched 485 kB in 4min 47s (1,688 B/s)
Selecting previously unselected package xfsprogs.
(Reading database ... 94221 files and directories currently installed.)
Preparing to unpack .../xfsprogs_3.1.9ubuntu2_amd64.deb ...
Unpacking xfsprogs (3.1.9ubuntu2) ...
Processing triggers for man-db (2.6.7.1-1ubuntu1) ...
Setting up xfsprogs (3.1.9ubuntu2) ...
Processing triggers for libc-bin (2.19-0ubuntu6.6) ...
root@OSSTG-UA:~#
3. In my storage node, /dev/sdc is free disk. Create a primary partition on that.
root@OSSTG-UA:~# fdisk /dev/sdc
Device contains neither a valid DOS partition table, nor Sun, SGI or OSF disklabel
Building a new DOS disklabel with disk identifier 0xff89c37d.
Changes will remain in memory only, until you decide to write them.
After that, of course, the previous content won't be recoverable.

Warning: invalid flag 0x0000 of partition table 4 will be corrected by w(rite)

Command (m for help): m
Command action
   a   toggle a bootable flag
   b   edit bsd disklabel
   c   toggle the dos compatibility flag
   d   delete a partition
   l   list known partition types
   m   print this menu
   n   add a new partition
   o   create a new empty DOS partition table
   p   print the partition table
   q   quit without saving changes
   s   create a new empty Sun disklabel
   t   change a partition's system id
   u   change display/entry units
   v   verify the partition table
   w   write table to disk and exit
   x   extra functionality (experts only)

Command (m for help): n
Partition type:
   p   primary (0 primary, 0 extended, 4 free)
   e   extended
Select (default p): p
Partition number (1-4, default 1):
Using default value 1
First sector (2048-20971519, default 2048):
Using default value 2048
Last sector, +sectors or +size{K,M,G} (2048-20971519, default 20971519):
Using default value 20971519

Command (m for help): p

Disk /dev/sdc: 10.7 GB, 10737418240 bytes
255 heads, 63 sectors/track, 1305 cylinders, total 20971520 sectors
Units = sectors of 1 * 512 = 512 bytes
Sector size (logical/physical): 512 bytes / 512 bytes
I/O size (minimum/optimal): 512 bytes / 512 bytes
Disk identifier: 0xff89c37d

   Device Boot      Start         End      Blocks   Id  System
/dev/sdc1            2048    20971519    10484736   83  Linux

Command (m for help): w
The partition table has been altered!

Calling ioctl() to re-read partition table.
Syncing disks.
root@OSSTG-UA:~#
root@OSSTG-UA:~# service rsync start
 * Starting rsync daemon rsync                                                                                                                                [ OK ]
root@OSSTG-UA:~#
Install and Configure Object Storage Components:
1.Login to the storage node.
2. Install the Object storage components.
root@OSSTG-UA:~# apt-get install swift swift-account swift-container swift-object
Reading package lists... Done
Building dependency tree
Reading state information... Done
The following extra packages will be installed:
  python-dnspython python-netifaces python-swift python-xattr
Suggested packages:
  swift-bench
The following NEW packages will be installed:
  python-dnspython python-netifaces python-swift python-xattr swift
  swift-account swift-container swift-object
0 upgraded, 8 newly installed, 0 to remove and 37 not upgraded.
Need to get 465 kB of archives.
After this operation, 2,861 kB of additional disk space will be used.
Do you want to continue? [Y/n] Y
3. Download the accounting, container, and object service configuration files from the Object Storage source repository.
root@OSSTG-UA:~# curl -o /etc/swift/account-server.conf  https://raw.githubusercontent.com/openstack/swift/stable/juno/etc/account-server.conf-sample
  % Total    % Received % Xferd  Average Speed   Time    Time     Time  Current
                                 Dload  Upload   Total   Spent    Left  Speed
100  6128  100  6128    0     0   1617      0  0:00:03  0:00:03 --:--:--  1617
root@OSSTG-UA:~# curl -o /etc/swift/container-server.conf  https://raw.githubusercontent.com/openstack/swift/stable/juno/etc/container-server.conf-sample
  % Total    % Received % Xferd  Average Speed   Time    Time     Time  Current
                                 Dload  Upload   Total   Spent    Left  Speed
100  6399  100  6399    0     0   1730      0  0:00:03  0:00:03 --:--:--  1730
root@OSSTG-UA:~# curl -o /etc/swift/object-server.conf  https://raw.githubusercontent.com/openstack/swift/stable/juno/etc/object-server.conf-sample
  % Total    % Received % Xferd  Average Speed   Time    Time     Time  Current
                                 Dload  Upload   Total   Spent    Left  Speed
100 10022  100 10022    0     0   2738      0  0:00:03  0:00:03 --:--:--  2738
root@OSSTG-UA:~#
root@OSSTG-UA:/etc/swift# ls -lrt
total 28
-rw-r--r-- 1 root root  6128 Oct 22 05:09 account-server.conf
-rw-r--r-- 1 root root  6399 Oct 22 05:09 container-server.conf
-rw-r--r-- 1 root root 10022 Oct 22 05:10 object-server.conf
root@OSSTG-UA:/etc/swift#
4.Edit the /etc/swift/account-server.conf file and update the following sections.
In the [DEFAULT] section,
[DEFAULT]
.......
bind_ip = 192.168.203.133
bind_port = 6002
user = swift
swift_dir = /etc/swift
devices = /srv/node
In the [pipeline:main] section, enable the require modules.
[filter:recon]
use = egg:swift#recon
recon_cache_path = /var/cache/swift
6.Change the mount point permission.
root@OSSTG-UA:/etc/swift# chown -R swift:swift /srv/node
root@OSSTG-UA:/etc/swift# cd /srv/node
root@OSSTG-UA:/srv/node# ls -lrt
total 0
drwxr-xr-x 2 swift swift 6 Oct 22 04:22 sdc1
root@OSSTG-UA:/srv/node#
7. Create the recon cache directory.
root@OSSTG-UA:/srv/node# mkdir -p /var/cache/swift
root@OSSTG-UA:/srv/node# chown -R swift:swift /var/cache/swift
root@OSSTG-UA:/srv/node# ls -ld /var/cache/swift
drwxrwxr-x 2 swift swift 4096 Aug  6 15:16 /var/cache/swift
root@OSSTG-UA:/srv/node#
We have successfully configured the Object storage service on storage node. In the next article, we will create the initial rings (object ring, container ring and account ring).
Hope this article is informative to you. Share it !! Be Sociable !!!
This article will demonstrates that how to create the initial account, container, and object rings. These rings creates configuration files that each node uses to determine and deploy the storage architecture. The account server uses the account ring to maintain lists of containers. The container server uses the container ring to maintain lists of objects . The object server uses the object ring to maintain lists of object locations on local devices. For tutorial simplicity, we will deploy in one region and zone with 1024 maximum partitions, 3 replicas of each object, and 1 hour minimum time between moving a partition more than once. For Object Storage, a partition indicates a directory on a storage device rather than a conventional partition table.
NOTE: Here My storage node IP is 192.168.203.133.
Create the Account ring:
1.Login to the openstack controller node.
2.Navigate to /etc/swift directory.
root@OSCTRL-UA:~# cd /etc/swift/
root@OSCTRL-UA:/etc/swift# ls -lrt
total 28
-rw-r--r-- 1 root root 24807 Oct 21 10:59 proxy-server.conf
root@OSCTRL-UA:/etc/swift#
3.Create the base account.builder file.
root@OSCTRL-UA:/etc/swift# swift-ring-builder account.builder create 10 3 1
root@OSCTRL-UA:/etc/swift# ls -lrt
total 36
-rw-r--r-- 1 root root 24807 Oct 21 10:59 proxy-server.conf
drwxr-xr-x 2 root root  4096 Oct 22 06:38 backups
-rw-r--r-- 1 root root   236 Oct 22 06:38 account.builder
root@OSCTRL-UA:/etc/swift#
4. Add the storage node to the ring.
root@OSCTRL-UA:/etc/swift# swift-ring-builder account.builder add r1z1-192.168.203.133:6002/sdc1 100
Device d0r1z1-192.168.203.133:6002R192.168.203.133:6002/sdc1_"" with 100.0 weight got id 0
root@OSCTRL-UA:/etc/swift#
IP – Storage Node IP
Disk – Object storage Mount point disk
Weight – 100
5.Verify the rings contents.
root@OSCTRL-UA:/etc/swift# swift-ring-builder account.builder
account.builder, build version 1
1024 partitions, 3.000000 replicas, 1 regions, 1 zones, 1 devices, 100.00 balance
The minimum number of hours before a partition can be reassigned is 1
Devices: id region zone ip address port replication ip replication port name weight partitions balance meta
0 1 1 192.168.203.133 6002 192.168.203.133 6002 sdc1 100.00 0 -100.00
root@OSCTRL-UA:/etc/swift#
6.Re-Balance the account rings.
root@OSCTRL-UA:/etc/swift# swift-ring-builder account.builder rebalance
Reassigned 1024 (100.00%) partitions. Balance is now 0.00.
root@OSCTRL-UA:/etc/swift#
Create the Container ring:
1.Login to the controller node.
2. Navigate to the /etc/swift directory.
3.Create the base container ring.
root@OSCTRL-UA:/etc/swift# swift-ring-builder container.builder create 10 3 1
root@OSCTRL-UA:/etc/swift# ls -lrt
total 52
-rw-r--r-- 1 root root 24807 Oct 21 10:59 proxy-server.conf
-rw-r--r-- 1 root root 206 Oct 22 06:44 account.ring.gz
-rw-r--r-- 1 root root 8700 Oct 22 06:44 account.builder
-rw-r--r-- 1 root root 236 Oct 22 06:46 container.builder
drwxr-xr-x 2 root root 4096 Oct 22 06:46 backups
root@OSCTRL-UA:/etc/swift#
4.Add the storage node to the ring.
root@OSCTRL-UA:/etc/swift# swift-ring-builder container.builder add r1z1-192.168.203.133:6001/sdc1 100
Device d0r1z1-192.168.203.133:6001R192.168.203.133:6001/sdc1_"" with 100.0 weight got id 0
root@OSCTRL-UA:/etc/swift#
5.Verify the container ring contents.
root@OSCTRL-UA:/etc/swift# swift-ring-builder container.builder
container.builder, build version 1
1024 partitions, 3.000000 replicas, 1 regions, 1 zones, 1 devices, 100.00 balance
The minimum number of hours before a partition can be reassigned is 1
Devices: id region zone ip address port replication ip replication port name weight partitions balance meta
0 1 1 192.168.203.133 6001 192.168.203.133 6001 sdc1 100.00 0 -100.00
root@OSCTRL-UA:/etc/swift#
6.Re-Balance the container ring and verify it.
root@OSCTRL-UA:/etc/swift# swift-ring-builder container.builder rebalance
Reassigned 1024 (100.00%) partitions. Balance is now 0.00.
root@OSCTRL-UA:/etc/swift# swift-ring-builder container.builder
container.builder, build version 1
1024 partitions, 3.000000 replicas, 1 regions, 1 zones, 1 devices, 0.00 balance
The minimum number of hours before a partition can be reassigned is 1
Devices: id region zone ip address port replication ip replication port name weight partitions balance meta
0 1 1 192.168.203.133 6001 192.168.203.133 6001 sdc1 100.00 3072 0.00
root@OSCTRL-UA:/etc/swift#
Create the Object ring:
1. Login to the Controller Node.
2. Navigate to the /etc/swift directory.
3. Create the base object.builder file .
root@OSCTRL-UA:/etc/swift# swift-ring-builder object.builder create 10 3 1
root@OSCTRL-UA:/etc/swift# ls -lrt
total 68
-rw-r--r-- 1 root root 24807 Oct 21 10:59 proxy-server.conf
-rw-r--r-- 1 root root 206 Oct 22 06:44 account.ring.gz
-rw-r--r-- 1 root root 8700 Oct 22 06:44 account.builder
-rw-r--r-- 1 root root 208 Oct 22 06:48 container.ring.gz
-rw-r--r-- 1 root root 8700 Oct 22 06:48 container.builder
-rw-r--r-- 1 root root 236 Oct 22 06:50 object.builder
drwxr-xr-x 2 root root 4096 Oct 22 06:50 backups
root@OSCTRL-UA:/etc/swift#
4.Add the storage node to the object ring.
root@OSCTRL-UA:/etc/swift# swift-ring-builder object.builder add r1z1-192.168.203.133:6000/sdc1 100
Device d0r1z1-192.168.203.133:6000R192.168.203.133:6000/sdc1_"" with 100.0 weight got id 0
root@OSCTRL-UA:/etc/swift#
5. Verify the object ring contents.
root@OSCTRL-UA:/etc/swift# swift-ring-builder object.builder
object.builder, build version 1
1024 partitions, 3.000000 replicas, 1 regions, 1 zones, 1 devices, 100.00 balance
The minimum number of hours before a partition can be reassigned is 1
Devices: id region zone ip address port replication ip replication port name weight partitions balance meta
0 1 1 192.168.203.133 6000 192.168.203.133 6000 sdc1 100.00 0 -100.00
root@OSCTRL-UA:/etc/swift#
6. Re-Balance the Object ring and verify it.
root@OSCTRL-UA:/etc/swift# swift-ring-builder object.builder rebalance
Reassigned 1024 (100.00%) partitions. Balance is now 0.00.
root@OSCTRL-UA:/etc/swift# swift-ring-builder object.builder
object.builder, build version 1
1024 partitions, 3.000000 replicas, 1 regions, 1 zones, 1 devices, 0.00 balance
The minimum number of hours before a partition can be reassigned is 1
Devices: id region zone ip address port replication ip replication port name weight partitions balance meta
0 1 1 192.168.203.133 6000 192.168.203.133 6000 sdc1 100.00 3072 0.00
root@OSCTRL-UA:/etc/swift#
Distribute ring configuration files to the Storage Nodes:
3. Download the sample swift configuration file from internet source.
root@OSCTRL-UA:/etc/swift# curl -o /etc/swift/swift.conf https://raw.githubusercontent.com/openstack/swift/stable/juno/etc/swift.conf-sample
% Total % Received % Xferd Average Speed Time Time Time Current
Dload Upload Total Spent Left Speed
100 4763 100 4763 0 0 1381 0 0:00:03 0:00:03 --:--:-- 1381
root@OSCTRL-UA:/etc/swift# ls -lrt /etc/swift/swift.conf
-rw-r--r-- 1 root root 4763 Oct 22 06:56 /etc/swift/swift.conf
root@OSCTRL-UA:/etc/swift#
4. Edit the /etc/swift/swift.conf file and update the following sections.
6. Change the ownership of /etc/swift/swift.conf in storage node.
root@OSCTRL-UA:/etc/swift# ssh root@192.168.203.133 chown -R swift:swift /etc/swift
root@OSCTRL-UA:/etc/swift# ssh root@192.168.203.133 ls -ld /etc/swift
drwxr-xr-x 2 swift swift 4096 Oct 22 07:04 /etc/swift
root@OSCTRL-UA:/etc/swift# ssh root@192.168.203.133 ls -lrt /etc/swift
total 48
-rw-r--r-- 1 swift swift 6126 Oct 22 05:26 account-server.conf
-rw-r--r-- 1 swift swift 6398 Oct 22 05:29 container-server.conf
-rw-r--r-- 1 swift swift 10021 Oct 22 05:42 object-server.conf
-rw-r--r-- 1 swift swift 204 Oct 22 06:54 object.ring.gz
-rw-r--r-- 1 swift swift 208 Oct 22 06:54 container.ring.gz
-rw-r--r-- 1 swift swift 206 Oct 22 06:54 account.ring.gz
-rw-r--r-- 1 swift swift 4771 Oct 22 07:04 swift.conf
root@OSCTRL-UA:/etc/swift#
7. Restart the proxy service and it’s dependence service.
root@OSCTRL-UA:/var/log# service memcached restart
Restarting memcached: memcached.
root@OSCTRL-UA:/var/log# service swift-proxy restart
swift-proxy stop/waiting
swift-proxy start/running
root@OSCTRL-UA:/var/log#
8. Login to the Storage node and restart the swift services.
HEAT is Openstack’s orchestration program. It uses the template to create and manage openstack cloud resources. These templates normally called as HOT (HEAT orchestration template). The templates will help to you to provision bunch of instances, floating IPs, volumes, security groups and users in quick time. A Heat template describes the infrastructure for a cloud application in a text file in human readable format along with version control. It also provides advanced functionality, such as instance high availability, instance auto-scaling, and nested stacks. This enables OpenStack core projects to receive a larger user base. Templates are defined in YAML (Yet Another Markup Language) language.
In this article ,we will see that how to install and configure HEAT orchestration module .
Orchestration module Components:
heat – command-line client
heat-api
heat-api-cfn
heat-engine
Install and configure HEAT Orchestration :
1.Login to the controller node.
2. Create the heat database and grant the permission.
root@OSCTRL-UA:~# mysql -u root -p
Enter password:
Welcome to the MySQL monitor. Commands end with ; or \g.
Your MySQL connection id is 942
Server version: 5.5.44-0ubuntu0.14.04.1 (Ubuntu)
Copyright (c) 2000, 2015, Oracle and/or its affiliates. All rights reserved.
Oracle is a registered trademark of Oracle Corporation and/or its
affiliates. Other names may be trademarks of their respective
owners.
Type 'help;' or '\h' for help. Type '\c' to clear the current input statement.
mysql> CREATE DATABASE heat;
Query OK, 1 row affected (0.02 sec)
mysql> GRANT ALL PRIVILEGES ON heat.* TO 'heat'@'localhost' IDENTIFIED BY 'heatdb123';
Query OK, 0 rows affected (0.07 sec)
mysql> GRANT ALL PRIVILEGES ON heat.* TO 'heat'@'%' IDENTIFIED BY 'heatdb123';
Query OK, 0 rows affected (0.00 sec)
mysql> exit
Bye
root@OSCTRL-UA:~#
7. The Orchestration service automatically assigns the heat_stack_user role to users that it creates during stack deployment. Create the heat_stack_user role.
root@OSCTRL-UA:~# keystone role-create --name heat_stack_user
+----------+----------------------------------+
| Property | Value |
+----------+----------------------------------+
| id | 5de39c7ec6ac4756bacf154a50fb02b8 |
| name | heat_stack_user |
+----------+----------------------------------+
root@OSCTRL-UA:~#
8.Create the heat and heat-cfn service entities using keystone command.
3. Create the YAML language template file for HEAT in the name of “uah-stack.yml”.
heat_template_version: 2014-10-16
description: simple tiny server
parameters:
ImageID:
type: string
description: Image use to boot a server
NetID:
type: string
description: Network ID for the server
resources:
server:
type: OS::Nova::Server
properties:
image: { get_param: ImageID }
flavor: m1.tiny
networks:
- network: { get_param: NetID }
outputs:
private_ip:
description: IP address of the server in the private network
value: { get_attr: [ server, first_address ] }
root@OSCTRL-UA:~# glance image-list
+--------------------------------------+---------------------+-------------+------------------+----------+--------+
| ID | Name | Disk Format | Container Format | Size | Status |
+--------------------------------------+---------------------+-------------+------------------+----------+--------+
| 7d19b639-6950-42dc-a64d-91c6662e0613 | CirrOS 0.3.0 | qcow2 | bare | 9761280 | active |
| 95fafce7-ae0f-47e3-b1c9-5d2ebd1af885 | CirrOS-0.3.4-x86_64 | qcow2 | bare | 13287936 | active |
+--------------------------------------+---------------------+-------------+------------------+----------+--------+
root@OSCTRL-UA:~#
6.Create the NET_ID variable with available network.
root@OSCTRL-UA:~# nova list
+--------------------------------------+------------------------------+--------+------------+-------------+-------------------------+
| ID | Name | Status | Task State | Power State | Networks |
+--------------------------------------+------------------------------+--------+------------+-------------+-------------------------+
| 863cc74a-49fd-4843-83c8-bc9597cae2ff | uhnstack-server-udq3chnqb6t2 | ACTIVE | - | Running | lingesh-net=192.168.4.6 |
+--------------------------------------+------------------------------+--------+------------+-------------+-------------------------+
root@OSCTRL-UA:~#
Using HEAT, we can also create the auto-scaling stack where the instacne will be turned on based on the resource utilization. Here is the sample auto-scaling template.
This article will demonstrates the deployment of telemetry modules on Openstack environment. The telemetry services are developed in the name of celiometer. Celiometer provides a framework for monitoring, alarming and metering the OpenStack cloud resources. The Celiometer efficiently polls metering data related to OpenStack services. It collects event & metering data by monitoring notifications sent from openstack services. It publishes collected data to various API targets including data-stores and message-queues. Celiometer creates an alarm when collected data breaks defined rules.
All the telemetry services will use the messaging bus to communicate with other openstack components.
Telemetry Components:
ceilometer-agent-compute
ceilometer-agent-central
ceilometer-agent-notification
ceilometer-collector
ceilometer-alarm-evaluator
ceilometer-alarm-notifier
ceilometer-api
Configure Controller Node for Celiometer – Prerequisites:
1.Login to the Openstack controller node.
2. Install MongoDB for telemetry services.
root@OSCTRL-UA:~# apt-get install mongodb-server mongodb-clients python-pymongo
Reading package lists... Done
Building dependency tree
Reading state information... Done
The following extra packages will be installed:
libboost-filesystem1.54.0 libboost-program-options1.54.0
libgoogle-perftools4 libpcrecpp0 libsnappy1 libtcmalloc-minimal4 libunwind8
libv8-3.14.5 python-bson python-bson-ext python-gridfs python-pymongo-ext
The following NEW packages will be installed:
libboost-filesystem1.54.0 libboost-program-options1.54.0
libgoogle-perftools4 libpcrecpp0 libsnappy1 libtcmalloc-minimal4 libunwind8
libv8-3.14.5 mongodb-clients mongodb-server python-bson python-bson-ext
python-gridfs python-pymongo python-pymongo-ext
0 upgraded, 15 newly installed, 0 to remove and 44 not upgraded.
Need to get 14.7 MB of archives.
After this operation, 114 MB of additional disk space will be used.
Do you want to continue? [Y/n] Y
3. Edit the /etc/mongodb.conf and update the below sections.
Update the bind_ip as controller node IP.
bind_ip = 192.168.203.130
Add the key to reduce the journel file size for mongoDB.
smallfiles = true
4. Stop the mongoDB and remove the journal files if any. Once it’s done you can start the MongoDB to take effect of new settings.
root@OSCTRL-UA:~# service mongodb stop
mongodb stop/waiting
root@OSCTRL-UA:~# rm /var/lib/mongodb/journal/prealloc.*
rm: cannot remove ‘/var/lib/mongodb/journal/prealloc.*’: No such file or directory
root@OSCTRL-UA:~# service mongodb start
mongodb start/running, process 36834
root@OSCTRL-UA:~#
2. Install the Ceilometer controller node packages.
root@OSCTRL-UA:~# apt-get install ceilometer-api ceilometer-collector ceilometer-agent-central ceilometer-agent-notification ceilometer-alarm-evaluator ceilometer-alarm-notifier python-ceilometerclient
Reading package lists... Done
Building dependency tree
Reading state information... Done
python-ceilometerclient is already the newest version.
python-ceilometerclient set to manually installed.
The following extra packages will be installed:
ceilometer-common libsmi2ldbl python-bs4 python-ceilometer python-croniter
python-dateutil python-happybase python-jsonpath-rw python-kazoo
python-logutils python-msgpack python-pecan python-ply python-pymemcache
python-pysnmp4 python-pysnmp4-apps python-pysnmp4-mibs python-singledispatch
python-thrift python-tooz python-twisted python-twisted-conch
python-twisted-lore python-twisted-mail python-twisted-names
python-twisted-news python-twisted-runner python-twisted-web
python-twisted-words python-waitress python-webtest smitools
Suggested packages:
mongodb snmp-mibs-downloader python-kazoo-doc python-ply-doc
python-pysnmp4-doc doc-base python-twisted-runner-dbg python-waitress-doc
python-webtest-doc python-pyquery
The following NEW packages will be installed:
ceilometer-agent-central ceilometer-agent-notification
ceilometer-alarm-evaluator ceilometer-alarm-notifier ceilometer-api
ceilometer-collector ceilometer-common libsmi2ldbl python-bs4
python-ceilometer python-croniter python-dateutil python-happybase
python-jsonpath-rw python-kazoo python-logutils python-msgpack python-pecan
python-ply python-pymemcache python-pysnmp4 python-pysnmp4-apps
python-pysnmp4-mibs python-singledispatch python-thrift python-tooz
python-twisted python-twisted-conch python-twisted-lore python-twisted-mail
python-twisted-names python-twisted-news python-twisted-runner
python-twisted-web python-twisted-words python-waitress python-webtest
smitools
0 upgraded, 38 newly installed, 0 to remove and 44 not upgraded.
Need to get 4,504 kB of archives.
After this operation, 28.4 MB of additional disk space will be used.
Do you want to continue? [Y/n] Y
3. In the controller node , restart the storage services.
root@OSCTRL-UA:~# service cinder-api restart
cinder-api stop/waiting
cinder-api start/running, process 39005
root@OSCTRL-UA:~# service cinder-scheduler restart
cinder-scheduler stop/waiting
cinder-scheduler start/running, process 39026
root@OSCTRL-UA:~#
4.In Storage node, restart the storage services.
root@OSSTG-UA:~# service cinder-volume restart
cinder-volume stop/waiting
cinder-volume start/running, process 32018
root@OSSTG-UA:~#
Configure the Object Storage service to use Ceilometer:
1. The Telemetry service requires access to the Object Storage service using the ResellerAdmin role. Create the “ResellerAdmin” role. Source the admin credentials to use the CLI commands.
Create the [filter:ceilometer] section and update like below to configure the notification.
[filter:ceilometer]
use = egg:ceilometer#swift
log_level = WARN
4. Add the “swift” user to the ceilometer group.
root@OSCTRL-UA:~# usermod -a -G ceilometer swift
root@OSCTRL-UA:~# id -a swift
uid=118(swift) gid=125(swift) groups=125(swift),4(adm),128(ceilometer)
root@OSCTRL-UA:~#
5. Restart the Object proxy service.
root@OSCTRL-UA:~# service swift-proxy restart
swift-proxy stop/waiting
swift-proxy start/running
root@OSCTRL-UA:~#
root@OSCTRL-UA:~# ceilometer statistics -m image.download
+--------+----------------------------+----------------------------+------------+------------+------------+------------+-------+----------+----------------------------+----------------------------+
| Period | Period Start | Period End | Max | Min | Avg | Sum | Count | Duration | Duration Start | Duration End |
+--------+----------------------------+----------------------------+------------+------------+------------+------------+-------+----------+----------------------------+----------------------------+
| 0 | 2015-10-22T14:46:10.946043 | 2015-10-22T14:46:10.946043 | 13287936.0 | 13287936.0 | 13287936.0 | 13287936.0 | 1 | 0.0 | 2015-10-22T14:46:10.946043 | 2015-10-22T14:46:10.946043 |
+--------+----------------------------+----------------------------+------------+------------+------------+------------+-------+----------+----------------------------+----------------------------+
root@OSCTRL-UA:~#
The above command output confirms that telemetry service is working fine. Now our Openstack environment includes the telemetry service to measure the resource usage.
Hope this article is informative to you. Share it ! Be Sociable !!!
This article will demonstrates that how to re-configure the glance image-service to use backend store as swift object storage. By default , Image service will use the local filesystem to store the images when you are uploading it. The default local filesystem store directory is “/var/lib/glance/images/” on the system where you have configured the glance image service. In UnixArena tutorial , we have configured the glance image service on Openstack controller node. The local filesystem store will not be helpful when you try to scale up your environment.
Glance API will support the following back-end storage to store and retrieve the images quickly.
Glance backend Storage
Description
glance.store.rbd.Store,
Ceph Storage
glance.store.s3.Store,
Amazon S3
glance.store.swift.Store,
Swift Object Storage
glance.store.sheepdog.Store,
Sheepdog Storage
glance.store.cinder.Store,
Cinder Volume Storage
glance.store.gridfs.Store,
GridFS Storage
glance.store.vmware_datastore.Store,
VMware Datastore
glance.store.filesystem.Store,
Local filesystem (Default – /var/lib/glance/images/)
glance.store.http.Store
HTTP store ( URL )
Re-configure Glance Image API service to use Swift Storage:
6. List the newly created image using glance command.
root@OSCTRL-UA:~# glance image-list
+--------------------------------------+-------------+-------------+------------------+----------+--------+
| ID | Name | Disk Format | Container Format | Size | Status |
+--------------------------------------+-------------+-------------+------------------+----------+--------+
| c7f5c590-b6e8-4083-8648-2066cdc46348 | CIRROS-NEW5 | qcow2 | bare | 13287936 | active |
+--------------------------------------+-------------+-------------+------------------+----------+--------+
root@OSCTRL-UA:~#
7. Do you would like to see the image file from swift storage ? Here you go. By default swift will create the container called “glance” for image service. (By using defined value “swift_store_create_container_on_put = True”)
root@OSCTRL-UA:~# swift --os-auth-url http://OSCTRL-UA:5000/v2.0 --os-tenant-name service --os-username glance --os-password glance123 list glance
c7f5c590-b6e8-4083-8648-2066cdc46348
root@OSCTRL-UA:~#
You can see that file name is matching with glance image list ID.
Hope this article is informative to you . Share it ! Be Sociable !!!
This article will demonstrates that how to configure the cinder volumes backup using swift as backend storage. As you all know that swift is the Object storage within the openstack project. Swift is highly available , distributed and consistent object storage. In the previous article ,we have seen that how to make the glance image service to use swift as backed storage. Similar way , we are going to configure cinder volume’s backup storage as swift. This will help you to recover the cinder volumes or volume based instances in quick time in-case of any problem with original volume.
Openstack swift uses the commodity hardware with bunch of locally attached disks to provide the object storage solution with high availability and efficient data retrieve mechanism. This would be the one of the cheapest solution to store the static files.
Note: You can’t use the swift storage to boot the instance.
Environment:
Operating System – Ubuntu 14.04 TLS
Openstack Branch – Juno
Controller Node name – OSCTRL-UA (192.168.203.130)
Storage Node name – OSSTG-UA (192.168.203.133)
Configure Cinder services.
root@OSCTRL-UA:~# cinder service-list
+------------------+-----------+------+----------+-------+----------------------------+-----------------+
| Binary | Host | Zone | Status | State | Updated_at | Disabled Reason |
+------------------+-----------+------+----------+-------+----------------------------+-----------------+
| cinder-scheduler | OSCTRL-UA | nova | enabled | up | 2015-10-24T03:30:48.000000 | None |
| cinder-volume | OSSTG-UA | nova | enabled | up | 2015-10-24T03:30:45.000000 | None |
+------------------+-----------+------+----------+-------+----------------------------+-----------------+
root@OSCTRL-UA:~#
Assumption:
Environment has been already configured with swift storage services, cinder storage services and other basic Openstack services like nova, neutron and glance.
Configure the Cinder Backup service:
1.Login to the Storage node and install the cinder-backup service.
2.Install the cinder-backup service.
root@OSSTG-UA:~# apt-get install cinder-backup
Reading package lists... Done
Building dependency tree
Reading state information... Done
The following NEW packages will be installed:
cinder-backup
0 upgraded, 1 newly installed, 0 to remove and 37 not upgraded.
Need to get 3,270 B of archives.
After this operation, 53.2 kB of additional disk space will be used.
Get:1 http://ubuntu-cloud.archive.canonical.com/ubuntu/ trusty-updates/juno/main cinder-backup all 1:2014.2.3-0ubuntu1.1~cloud0 [3,270 B]
Fetched 3,270 B in 2s (1,191 B/s)
Selecting previously unselected package cinder-backup.
(Reading database ... 94636 files and directories currently installed.)
Preparing to unpack .../cinder-backup_1%3a2014.2.3-0ubuntu1.1~cloud0_all.deb ...
Unpacking cinder-backup (1:2014.2.3-0ubuntu1.1~cloud0) ...
Processing triggers for ureadahead (0.100.0-16) ...
Setting up cinder-backup (1:2014.2.3-0ubuntu1.1~cloud0) ...
cinder-backup start/running, process 62375
Processing triggers for ureadahead (0.100.0-16) ...
root@OSSTG-UA:~#
3. Edit the /etc/cinder/cinder.conf file and update the following line on DEFAULT section.
4. Restart the cinder services on controller node.
root@OSSTG-UA:~# service cinder-volume restart
cinder-volume stop/waiting
cinder-volume start/running, process 62564
root@OSSTG-UA:~#
root@OSSTG-UA:~# service tgt restart
tgt stop/waiting
tgt start/running, process 62596
root@OSSTG-UA:~#
root@OSSTG-UA:~# service cinder-backup status
cinder-backup start/running, process 62375
root@OSSTG-UA:~#
5. Login to the controller node. Update the /etc/cinder/cinder.conf file and update the following line on DEFAULT section.
root@OSCTRL-UA:~# cinder list
+--------------------------------------+--------+--------------+------+-------------+----------+--------------------------------------+
| ID | Status | Display Name | Size | Volume Type | Bootable | Attached to |
+--------------------------------------+--------+--------------+------+-------------+----------+--------------------------------------+
| 9070a8b9-471d-47cd-8722-9327f3b40051 | in-use | | 1 | None | true | 3d4a2971-4dc7-4fb4-a8db-04a7a8340391 |
| fc6dbba6-f8d8-4082-8f35-53bba6853982 | in-use | | 1 | None | true | 3d4a2971-4dc7-4fb4-a8db-04a7a8340391 |
+--------------------------------------+--------+--------------+------+-------------+----------+--------------------------------------+
root@OSCTRL-UA:~#
3. Try to take the backup of one of the volume.
root@OSCTRL-UA:~# cinder backup-create fc6dbba6-f8d8-4082-8f35-53bba6853982
ERROR: Invalid volume: Volume to be backed up must be available (HTTP 400) (Request-ID: req-ae9a0112-a4a8-4280-8ffb-e4993dbee241)
root@OSCTRL-UA:~#
Cinder backup failed with error “ERROR: Invalid volume: Volume to be backed up must be available (HTTP 400) Request-ID:XXX” . It’s failed because volumes are in “in-use” state. In Openstack juno version , you can’t take the volume backup if it is attached to any instance. You have to detach the cinder volume from OS instance to take the volume backup.
4. List the instances and see where the volume is attached.
root@OSCTRL-UA:~# nova list
+--------------------------------------+------+--------+------------+-------------+--------------------------+
| ID | Name | Status | Task State | Power State | Networks |
+--------------------------------------+------+--------+------------+-------------+--------------------------+
| 3d4a2971-4dc7-4fb4-a8db-04a7a8340391 | tets | ACTIVE | - | Running | lingesh-net=192.168.4.11 |
+--------------------------------------+------+--------+------------+-------------+--------------------------+
root@OSCTRL-UA:~#
root@OSCTRL-UA:~# nova show 3d4a2971-4dc7-4fb4-a8db-04a7a8340391 |grep volume
| image | Attempt to boot from volume - no image supplied |
| os-extended-volumes:volumes_attached | [{"id": "9070a8b9-471d-47cd-8722-9327f3b40051"}, {"id": "fc6dbba6-f8d8-4082-8f35-53bba6853982"}] |
root@OSCTRL-UA:~#
5. Stop the instance to detach the volume. We can detach the volume on fly as well. But it may lead to data corruption if the volume is mounted within the instance.
root@OSCTRL-UA:~# nova stop tets
root@OSCTRL-UA:~# nova list
+--------------------------------------+------+---------+------------+-------------+--------------------------+
| ID | Name | Status | Task State | Power State | Networks |
+--------------------------------------+------+---------+------------+-------------+--------------------------+
| 3d4a2971-4dc7-4fb4-a8db-04a7a8340391 | tets | SHUTOFF | - | Shutdown | lingesh-net=192.168.4.11 |
+--------------------------------------+------+---------+------------+-------------+--------------------------+
root@OSCTRL-UA:~#
6. You must know which is the root volume before detaching from the OS.If you try to detach the root volume, you will error like below. “ERROR (Forbidden): Can’t detach root device volume (HTTP 403) ”
root@OSCTRL-UA:~# cinder backup-list
+--------------------------------------+--------------------------------------+-----------+------+------+--------------+---------------+
| ID | Volume ID | Status | Name | Size | Object Count | Container |
+--------------------------------------+--------------------------------------+-----------+------+------+--------------+---------------+
| bd708772-748a-430e-bff3-6679d22da973 | fc6dbba6-f8d8-4082-8f35-53bba6853982 | available | None | 1 | 22 | volumebackups |
+--------------------------------------+--------------------------------------+-----------+------+------+--------------+---------------+
root@OSCTRL-UA:~# cinder list
+--------------------------------------+-----------+--------------+------+-------------+----------+--------------------------------------+
| ID | Status | Display Name | Size | Volume Type | Bootable | Attached to |
+--------------------------------------+-----------+--------------+------+-------------+----------+--------------------------------------+
| 9070a8b9-471d-47cd-8722-9327f3b40051 | in-use | | 1 | None | true | 3d4a2971-4dc7-4fb4-a8db-04a7a8340391 |
| fc6dbba6-f8d8-4082-8f35-53bba6853982 | available | | 1 | None | true | |
+--------------------------------------+-----------+--------------+------+-------------+----------+--------------------------------------+
root@OSCTRL-UA:~#
3. Let me delete the volume to test the restore.
root@OSCTRL-UA:~# cinder delete fc6dbba6-f8d8-4082-8f35-53bba6853982
root@OSCTRL-UA:~# cinder list
+--------------------------------------+--------+--------------+------+-------------+----------+--------------------------------------+
| ID | Status | Display Name | Size | Volume Type | Bootable | Attached to |
+--------------------------------------+--------+--------------+------+-------------+----------+--------------------------------------+
| 9070a8b9-471d-47cd-8722-9327f3b40051 | in-use | | 1 | None | true | 3d4a2971-4dc7-4fb4-a8db-04a7a8340391 |
+--------------------------------------+--------+--------------+------+-------------+----------+--------------------------------------+
root@OSCTRL-UA:~#
4.Let’s restore the deleted volume.
root@OSCTRL-UA:~# cinder backup-list
+--------------------------------------+--------------------------------------+-----------+------+------+--------------+---------------+
| ID | Volume ID | Status | Name | Size | Object Count | Container |
+--------------------------------------+--------------------------------------+-----------+------+------+--------------+---------------+
| bd708772-748a-430e-bff3-6679d22da973 | fc6dbba6-f8d8-4082-8f35-53bba6853982 | available | None | 1 | 22 | volumebackups |
+--------------------------------------+--------------------------------------+-----------+------+------+--------------+---------------+
root@OSCTRL-UA:~# cinder backup-restore bd708772-748a-430e-bff3-6679d22da973
root@OSCTRL-UA:~# cinder list
+--------------------------------------+------------------+-----------------------------------------------------+------+-------------+----------+--------------------------------------+
| ID | Status | Display Name | Size | Volume Type | Bootable | Attached to |
+--------------------------------------+------------------+-----------------------------------------------------+------+-------------+----------+--------------------------------------+
| 59b7d2ec-79b4-4d99-accf-c4906e769bf5 | restoring-backup | restore_backup_bd708772-748a-430e-bff3-6679d22da973 | 1 | None | false | |
| 9070a8b9-471d-47cd-8722-9327f3b40051 | in-use | | 1 | None | true | 3d4a2971-4dc7-4fb4-a8db-04a7a8340391 |
+--------------------------------------+------------------+-----------------------------------------------------+------+-------------+----------+--------------------------------------+
root@OSCTRL-UA:~#
5. Verify the volume status.
root@OSCTRL-UA:~# cinder list
+--------------------------------------+-----------+--------------+------+-------------+----------+--------------------------------------+
| ID | Status | Display Name | Size | Volume Type | Bootable | Attached to |
+--------------------------------------+-----------+--------------+------+-------------+----------+--------------------------------------+
| 59b7d2ec-79b4-4d99-accf-c4906e769bf5 | available | | 1 | None | true | |
| 9070a8b9-471d-47cd-8722-9327f3b40051 | in-use | | 1 | None | true | 3d4a2971-4dc7-4fb4-a8db-04a7a8340391 |
+--------------------------------------+-----------+--------------+------+-------------+----------+--------------------------------------+
root@OSCTRL-UA:~#
Here we can see that volume has been restored with ID “59b7d2ec-79b4-4d99-accf-c4906e769bf5” .
6. Attach the volume to the instance and verify the contents.
root@OSCTRL-UA:~# cinder list
+--------------------------------------+-----------+--------------+------+-------------+----------+--------------------------------------+
| ID | Status | Display Name | Size | Volume Type | Bootable | Attached to |
+--------------------------------------+-----------+--------------+------+-------------+----------+--------------------------------------+
| 59b7d2ec-79b4-4d99-accf-c4906e769bf5 | available | | 1 | None | true | |
| 9070a8b9-471d-47cd-8722-9327f3b40051 | in-use | | 1 | None | true | 3d4a2971-4dc7-4fb4-a8db-04a7a8340391 |
+--------------------------------------+-----------+--------------+------+-------------+----------+--------------------------------------+
root@OSCTRL-UA:~# nova list
+--------------------------------------+------+---------+------------+-------------+--------------------------+
| ID | Name | Status | Task State | Power State | Networks |
+--------------------------------------+------+---------+------------+-------------+--------------------------+
| 3d4a2971-4dc7-4fb4-a8db-04a7a8340391 | tets | SHUTOFF | - | Shutdown | lingesh-net=192.168.4.11 |
+--------------------------------------+------+---------+------------+-------------+--------------------------+
root@OSCTRL-UA:~# nova volume-attach tets 59b7d2ec-79b4-4d99-accf-c4906e769bf5
+----------+--------------------------------------+
| Property | Value |
+----------+--------------------------------------+
| device | /dev/vdb |
| id | 59b7d2ec-79b4-4d99-accf-c4906e769bf5 |
| serverId | 3d4a2971-4dc7-4fb4-a8db-04a7a8340391 |
| volumeId | 59b7d2ec-79b4-4d99-accf-c4906e769bf5 |
+----------+--------------------------------------+
root@OSCTRL-UA:~# cinder list
+--------------------------------------+--------+--------------+------+-------------+----------+--------------------------------------+
| ID | Status | Display Name | Size | Volume Type | Bootable | Attached to |
+--------------------------------------+--------+--------------+------+-------------+----------+--------------------------------------+
| 59b7d2ec-79b4-4d99-accf-c4906e769bf5 | in-use | | 1 | None | true | 3d4a2971-4dc7-4fb4-a8db-04a7a8340391 |
| 9070a8b9-471d-47cd-8722-9327f3b40051 | in-use | | 1 | None | true | 3d4a2971-4dc7-4fb4-a8db-04a7a8340391 |
+--------------------------------------+--------+--------------+------+-------------+----------+--------------------------------------+
root@OSCTRL-UA:~#
We have successfully recovered the deleted volume using the swift storage.
Backup the Instance’s root volume
There is no way to backup the volume which are attached to the instance in openstack Juno. So if you want to backup the root volume using cinder backup , you need to follow the below steps . This procedure is only for the testing purpose and not for the production solution.
Instance root volume – > Take Snapshot – > Create the temporary volume from snapshot – > Backup the temporary volume -> Remove the temporary volume – > Destroy the snapshot of Instance’s root volume.
Cinder root volume Backup using swift
1.Login to the controller node and source the tenant credentials .
root@OSCTRL-UA:~# nova list
+--------------------------------------+------+--------+------------+-------------+--------------------------+
| ID | Name | Status | Task State | Power State | Networks |
+--------------------------------------+------+--------+------------+-------------+--------------------------+
| 3d4a2971-4dc7-4fb4-a8db-04a7a8340391 | tets | ACTIVE | - | Running | lingesh-net=192.168.4.11 |
+--------------------------------------+------+--------+------------+-------------+--------------------------+
root@OSCTRL-UA:~# cinder list
+--------------------------------------+--------+--------------+------+-------------+----------+--------------------------------------+
| ID | Status | Display Name | Size | Volume Type | Bootable | Attached to |
+--------------------------------------+--------+--------------+------+-------------+----------+--------------------------------------+
| 9070a8b9-471d-47cd-8722-9327f3b40051 | in-use | | 1 | None | true | 3d4a2971-4dc7-4fb4-a8db-04a7a8340391 |
+--------------------------------------+--------+--------------+------+-------------+----------+--------------------------------------+
root@OSCTRL-UA:~#
You will get error like below if you didn’t use the force option. (ERROR: Invalid volume: must be available (HTTP 400) )
root@OSCTRL-UA:~# cinder snapshot-create 9070a8b9-471d-47cd-8722-9327f3b40051
ERROR: Invalid volume: must be available (HTTP 400) (Request-ID: req-2e19610a-76b6-49ab-9603-1c6e9c044703)
root@OSCTRL-UA:~#
4. Create the temporary volume using the snapshot. (For backup purpose)
In the above command , I have created the new volume with the size of 1GB .The new volume size should be same as the snapshot size. (see the cinder snapshot-list command output)
5. List the cinder volume. You should be able to see the new volume here.
root@OSCTRL-UA:~# cinder list
+--------------------------------------+-----------+-----------------+------+-------------+----------+--------------------------------------+
| ID | Status | Display Name | Size | Volume Type | Bootable | Attached to |
+--------------------------------------+-----------+-----------------+------+-------------+----------+--------------------------------------+
| 20835372-3fb1-47b0-96f5-f493bd92151d | available | tets_backup_vol | 1 | None | true | |
| 9070a8b9-471d-47cd-8722-9327f3b40051 | in-use | | 1 | None | true | 3d4a2971-4dc7-4fb4-a8db-04a7a8340391 |
+--------------------------------------+-----------+-----------------+------+-------------+----------+--------------------------------------+
root@OSCTRL-UA:~#
6. Initiate the cinder backup for newly created volume. (which is the clone of tets instance’s root volume ).
root@OSCTRL-UA:~# cinder backup-create 20835372-3fb1-47b0-96f5-f493bd92151d
+-----------+--------------------------------------+
| Property | Value |
+-----------+--------------------------------------+
| id | 1a194ba8-aa0c-41ff-9f73-9c23c4457230 |
| name | None |
| volume_id | 20835372-3fb1-47b0-96f5-f493bd92151d |
+-----------+--------------------------------------+
root@OSCTRL-UA:~#
7. Destroy the backup volume which we have created for backup purpose.
root@OSCTRL-UA:~# cinder list
+--------------------------------------+-----------+-----------------+------+-------------+----------+--------------------------------------+
| ID | Status | Display Name | Size | Volume Type | Bootable | Attached to |
+--------------------------------------+-----------+-----------------+------+-------------+----------+--------------------------------------+
| 20835372-3fb1-47b0-96f5-f493bd92151d | available | tets_backup_vol | 1 | None | true | |
| 9070a8b9-471d-47cd-8722-9327f3b40051 | in-use | | 1 | None | true | 3d4a2971-4dc7-4fb4-a8db-04a7a8340391 |
+--------------------------------------+-----------+-----------------+------+-------------+----------+--------------------------------------+
root@OSCTRL-UA:~# cinder delete 20835372-3fb1-47b0-96f5-f493bd92151d
root@OSCTRL-UA:~# cinder list
+--------------------------------------+--------+--------------+------+-------------+----------+--------------------------------------+
| ID | Status | Display Name | Size | Volume Type | Bootable | Attached to |
+--------------------------------------+--------+--------------+------+-------------+----------+--------------------------------------+
| 9070a8b9-471d-47cd-8722-9327f3b40051 | in-use | | 1 | None | true | 3d4a2971-4dc7-4fb4-a8db-04a7a8340391 |
+--------------------------------------+--------+--------------+------+-------------+----------+--------------------------------------+
root@OSCTRL-UA:~#
At this point , we have successfully backup the “tets” instance’s root volume.
How to restore instance root volume from backup ?
We will assume that nova instance “tets” have been deleted accidentally with root volume.
1. Login to the controller node and source the tenant credentials.
2. List the available cinder backup.
root@OSCTRL-UA:~# cinder backup-list
+--------------------------------------+--------------------------------------+-----------+------+------+--------------+---------------+
| ID | Volume ID | Status | Name | Size | Object Count | Container |
+--------------------------------------+--------------------------------------+-----------+------+------+--------------+---------------+
| 1a194ba8-aa0c-41ff-9f73-9c23c4457230 | 20835372-3fb1-47b0-96f5-f493bd92151d | available | None | 1 | 22 | volumebackups |
+--------------------------------------+--------------------------------------+-----------+------+------+--------------+---------------+
root@OSCTRL-UA:~#
3.Initiate the volume restore.
root@OSCTRL-UA:~# cinder backup-list
+--------------------------------------+--------------------------------------+-----------+------+------+--------------+---------------+
| ID | Volume ID | Status | Name | Size | Object Count | Container |
+--------------------------------------+--------------------------------------+-----------+------+------+--------------+---------------+
| 1a194ba8-aa0c-41ff-9f73-9c23c4457230 | 20835372-3fb1-47b0-96f5-f493bd92151d | available | None | 1 | 22 | volumebackups |
+--------------------------------------+--------------------------------------+-----------+------+------+--------------+---------------+
root@OSCTRL-UA:~# cinder backup-restore 1a194ba8-aa0c-41ff-9f73-9c23c4457230
root@OSCTRL-UA:~# cinder list
+--------------------------------------+------------------+-----------------------------------------------------+------+-------------+----------+-------------+
| ID | Status | Display Name | Size | Volume Type | Bootable | Attached to |
+--------------------------------------+------------------+-----------------------------------------------------+------+-------------+----------+-------------+
| 449ef348-04c7-4d1d-a6d0-27796dac9e49 | restoring-backup | restore_backup_1a194ba8-aa0c-41ff-9f73-9c23c4457230 | 1 | None | false | |
+--------------------------------------+------------------+-----------------------------------------------------+------+-------------+----------+-------------+
root@OSCTRL-UA:~# cinder list
+--------------------------------------+-----------+-----------------+------+-------------+----------+-------------+
| ID | Status | Display Name | Size | Volume Type | Bootable | Attached to |
+--------------------------------------+-----------+-----------------+------+-------------+----------+-------------+
| 449ef348-04c7-4d1d-a6d0-27796dac9e49 | available | tets_backup_vol | 1 | None | true | |
+--------------------------------------+-----------+-----------------+------+-------------+----------+-------------+
root@OSCTRL-UA:~#
We have successfully restored the volume from swift storage backup.
4. Let’s create the instance using the restored volume.
root@OSCTRL-UA:~# nova boot --flavor 1 --block-device source=volume,id="449ef348-04c7-4d1d-a6d0-27796dac9e49",dest=volume,shutdown=preserve,bootindex=0 --nic net-id="58ee8851-06c3-40f3-91ca-b6d7cff609a5" tets
+--------------------------------------+--------------------------------------------------+
| Property | Value |
+--------------------------------------+--------------------------------------------------+
| OS-DCF:diskConfig | MANUAL |
| OS-EXT-AZ:availability_zone | nova |
| OS-EXT-STS:power_state | 0 |
| OS-EXT-STS:task_state | scheduling |
| OS-EXT-STS:vm_state | building |
| OS-SRV-USG:launched_at | - |
| OS-SRV-USG:terminated_at | - |
| accessIPv4 | |
| accessIPv6 | |
| adminPass | 3kpFygxQDH7N |
| config_drive | |
| created | 2015-10-24T14:47:04Z |
| flavor | m1.tiny (1) |
| hostId | |
| id | 18c55ca0-8031-41d5-a9d5-c2d2828c9486 |
| image | Attempt to boot from volume - no image supplied |
| key_name | - |
| metadata | {} |
| name | tets |
| os-extended-volumes:volumes_attached | [{"id": "449ef348-04c7-4d1d-a6d0-27796dac9e49"}] |
| progress | 0 |
| security_groups | default |
| status | BUILD |
| tenant_id | abe3af30f46b446fbae35a102457890c |
| updated | 2015-10-24T14:47:05Z |
| user_id | 3f01d4f7aa9e477cb885334ab9c5929d |
+--------------------------------------+--------------------------------------------------+
root@OSCTRL-UA:~# nova list
+--------------------------------------+------+--------+------------+-------------+----------+
| ID | Name | Status | Task State | Power State | Networks |
+--------------------------------------+------+--------+------------+-------------+----------+
| 18c55ca0-8031-41d5-a9d5-c2d2828c9486 | tets | BUILD | spawning | NOSTATE | |
+--------------------------------------+------+--------+------------+-------------+----------+
root@OSCTRL-UA:~#
5. Check the nova instance status.
root@OSCTRL-UA:~# nova list
+--------------------------------------+------+--------+------------+-------------+--------------------------+
| ID | Name | Status | Task State | Power State | Networks |
+--------------------------------------+------+--------+------------+-------------+--------------------------+
| 5df256ec-1529-401b-9ad5-6a16c2d710e3 | tets | ACTIVE | - | Running | lingesh-net=192.168.4.13 |
+--------------------------------------+------+--------+------------+-------------+--------------------------+
root@OSCTRL-UA:~#
We have successfully recovered the nova instance root volume from swift backup storage.
Openstack liberty’s cinder backup supports the incremental backup and force backup creation for volume that are in use.
Do not think that Openstack volume backup is painful one. cinder backup is similar to backing up the LUN directly at the SAN storage level. When it comes to Openstack instance backup , you can use any backup agents which supports your instance (OS flavour). (Ex: Redhat Linux, Ubuntu, Solaris , windows )
Hope this article informative to you. Share it ! Be Sociable !!!
NetApp is very popular for NAS (Network Attached Storage) from the past decade . In 2002 , NetApp would like to change the NAS tag to SAN. So they have renamed their product lines to FAS (Fabric Attached SCSI) to support both NAS and SAN. In the FAS storage product lines, NetApp provides the unique storage solution which supports multiple protocols in single system. NetApp storages uses DATA ONTAP operating system which is based on Net/2 BSD Unix.
Prior to 2010, NetApp provides two type of operating systems.
DATA ONTAB 7G (NetApp’s Legacy Operating System)
DATA ONTAP GX. (NetApp’s Grid Based Operating System)
DATA ONTAP GX is based upon GRID technology (Distributed Storage Model) acquired from Spinnaker Networks.
NetApp 7 Mode vs Cluster Mode:
NetApp Today and Tomorrow
In the past, NetApp provided 7-Mode storage. 7-Mode storage provides dual-controller, cost-effective storage
systems. In 2010, NetApp Released the new Operating System called DATA ONTAP 8 which includes the 7 Mode and C Mode. We just need to choose the mode in the storage controller start-up (Similar to Dual Boot OS system). In NetApp Cluster Mode , you can easily scale out the environment on demand basis.
7-mode and c-mode
From DATA ONTAP 8.3 operating system version onwards, you do not have option to choose 7 Mode. It’s just available only as Clustered DATA ONTAP .
Clustered DATA ONTAP Highlights:
Here is the some of the key highlights of DATA ONTAP clustered mode. Some of the features are remain same as 7-Mode.
Supported Protocols:
FC
NFS
FCoE
iSCSI
pNFS
CIFS
2. Easy to Scale out
3. Storage Efficiency
It supports De-duplication
Compression
Thin Provisioning.
Cloning
4. Cost and Performance
Supports Flash Cache
Option to use SSD Drives
Flash Pool
FlexCache
SAS and SATA drive Options
5. Integrated Data protection
Snapshot Copies
Asynchronous Mirroring
Disk to Disk or Disk to tape backup option.
6. Management
Unified Management. (Manage SAN and NAS using same portal)
Secure Multi-tenancy
Multi-vendor Virtualization.
Clustered DATA ONTAP – Scalability:
Clustered Data ONTAP solutions can scale from 1 to 24 nodes, and are mostly managed as one large system. More
importantly, to client systems, a cluster looks like a single system. The performance of the cluster scales linearly to multiple gigabytes per second of throughput, and capacity scales to petabytes. Clusters are built for continuous operation; no single failure on a port, disk, card, or motherboard will cause data to become inaccessible in a system. Clustered scaling and load balancing are both transparent.
Clusters provide a robust feature set, including data protection features such as Snapshot copies, intracluster
asynchronous mirroring, SnapVault backups, and NDMP backups.
Clusters are a fully integrated solution. This example shows a 20-node cluster that includes 10 FAS systems with 6
disk shelves each, and 10 FAS systems with 5 disk shelves each. Each rack contains a high-availability (HA) pair with
storage failover (SFO) capabilities.
20 Node Cluster
Note:When you use both NAS and SAN on same system, the supported maximum cluster nodes are Eight. The 24 node cluster is possible when you use the Netapp storage only for NAS.
Performance: (NAS)
Using the load-sharing mirror relationship, you can improve the volume performance by 5X (6 Node cluster).
Linearly Scale aggregate read/write performance in a single namespace.
Performance of NAS volumes
In the above diagram , volume R is the root volume of a virtual storage server and its corresponding namespace. Volumes A, B, C, and F are mounted to R through junctions.
Here volume R and volume B has two mirror copies on different nodes to improve the read requests. Those mirror copies are just read-only to improve the read IOPS.
Other volumes A, C, D, E, F, G are distributed across multiple nodes to improve the read/write performance. But all the volumes are belongs to single name space (R)
Capacity :
In Clustered DATA ONTAP , you can increase the capacity by adding additional storage controllers and disk shelves.
NetApp Scale-out Capacity
In the above scenario, all the existing storage space has been consumed or committed. You got new request to add to increase the volume B. You need to follow the steps to scale the capacity.
Add two nodes to make a 10 cluster from 8 node cluster.
Move B volume to the new HA pair storage.
Expand the B volume.
This movement and expansion is transparent to client machines.No changes required on hosts.
In the upcoming articles , we will see the different terms and objects on NetApp Clustered DATA ONTAP.
Hope this article is informative to you. Share it ! Comment it !! Be Sociable !!!
I have been dealing with Solaris 10 Live upgrade issues from almost five years but still the new LU patches are not able to fix the common issues like updating the menu.lst file and setting the default boot environment. If the system is configured with ZFS root filesystem, then you have to follow the Live upgrade method for OS patching. Live upgrade patching method has the following sequence.
Install the latest LU Patches to the current Boot Environment.
Install the prerequisite patches to the current Boot Environment.
Create the new Boot environment.
Install the recommend OS Patch bundle on new Boot Environment.
Activate the new Boot environment
Reboot the system using init 6.
Very often i am facing problem is that menu.lst file is not updated with new boot environment information. Menu.lst file will be located in following location for respective architectures.
Path – /rpool/boot/grub/menu.lst – X86
Path – /rpool/boot/menu.lst – SPARC
Let’s see how to fix such a issues on oracle Solaris 10 X86 and SPARC environment.
Solaris 10 – X86:
Once you have activated the new BE , it should automatically populate the new BE information on menu.lst file. If not just edit the file manually and update it.
Assumption: Oracle Solaris 10 X86 system has been patched on new BE & you have activated the new BE . But it’s not populated on menu.lst. To fix this issue , just follow the below steps.
1. List the configured BE’s on the system.
bash UA-X86> lustatus
Boot Environment Is Active Active Can Copy
Name Complete Now On Reboot Delete Status
-------------------------- -------- ------ --------- ------ ----------
OLD-BE yes yes no no -
NEW-BE yes no yes no -
bash UA-X86>
Here you can see that NEW-BE should be activated across the system reboot. But the system is booting again on the OLD-BE due to menu.lst file was not up to date.
5. Reboot the system using init 6. System should come up with NEW-BE.
Solaris 10 – SPARC:
1.List the Configured BE’s.
root@UA-SPARC:~# lustatus
Boot Environment Is Active Active Can Copy
Name Complete Now On Reboot Delete Status
-------------------------- -------- ------ --------- ------ ----------
OLD-BE yes Yes no yes -
NEW-BE yes no yes no -
root@UA-SPARC:~#
This article is going to explain about the NetApp clustered DATA ONTAP’s physical objects and virtual objects. Physical elements of a system such as disks, nodes, and ports on those nodes―can be touched and seen. Logical elements of a system cannot be touched, but they do exist and use disk space. For the NetApp beginners , the initial Netapp series articles might looks difficult to understand the concept and architecture but once the LAB guide starts, they can slowly grab the things .
Physical elements:
Nodes
Disks
Network Ports
FC ports
Tape Devices
Logical elements:
Cluster
Aggregates
Volumes
Snapshot Copies
Mirror relationships
Vservers
LIFs
Volumes, Snapshot copies, and mirror relationships are areas of storage that are divided from aggregates. Clusters are groupings of physical nodes Vservers are virtual representations of resources or groups of resources. A LIF is an IP address that is associated with a single network port.
The below digram shows the typical clustered ONTAP’s two cluster setup.
Data ONTAP Cluster
Virtual Storage Server (vServer):
vServer represent grouping of physical and logical resources . This is similar to vFilers in 7 Mode. There are three types of Vservers. Data Vservers are used to read and write data to and from the cluster.Node Vservers simply represent node-scoped resources, and administrative Vservers represent entire clusters.
Administrative vServers
It represents a cluster (group of physical nodes) and it will be associated with cluster management LIF.
Netapp Administrative vServer
Node vServers
It represent each physical Node. It will be always associated with cluster LIF , node Management LIF and interconnect LIFs
Netapp Node vServers
Data vServers
Data vServers are a virtual representation of a physical data server and it will be associated with data LIFs. It will not associated with any single node. It contains following resources within it.
Let’s combine all the above vServers in to one. In the upcoming articles , we will be configuring all the elements manually starting from the cluster setup, vServers , LIFs etc..
NetApp Clustered Data ONTAP
Hope this article is informative to you. Share it ! Comment it ! Be Sociable !!!