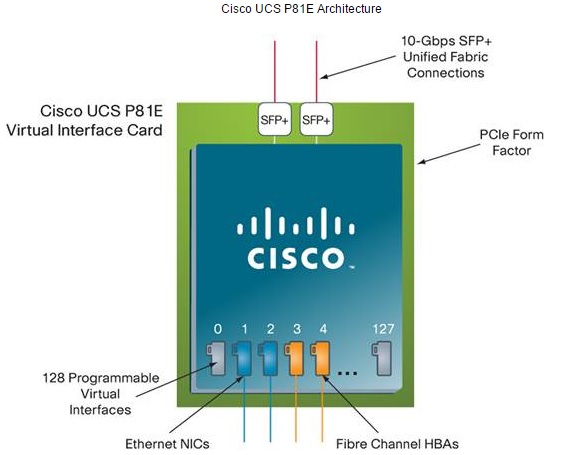
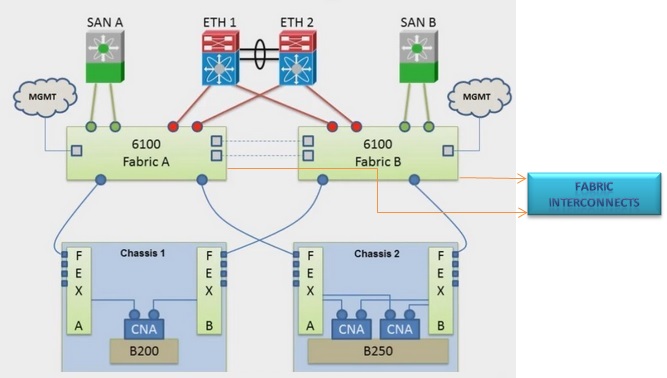
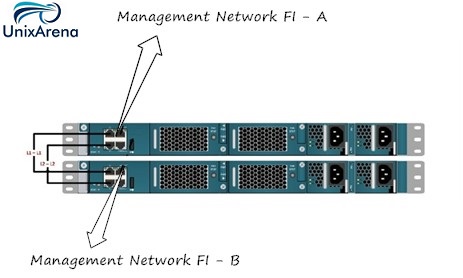
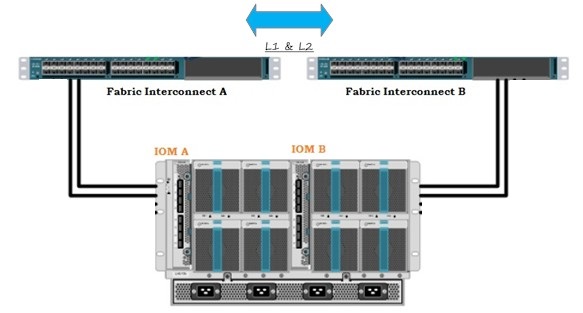
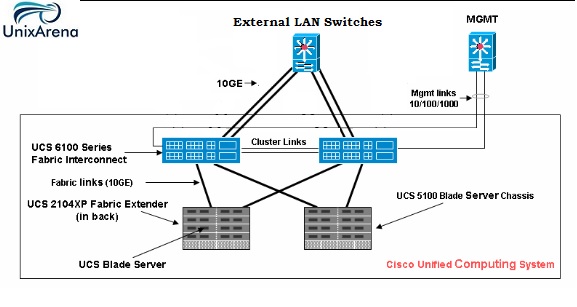
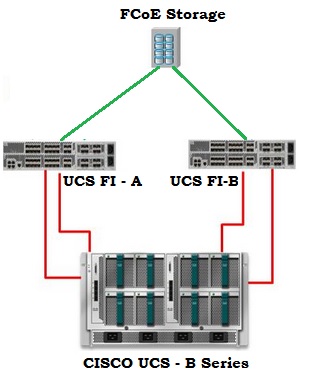
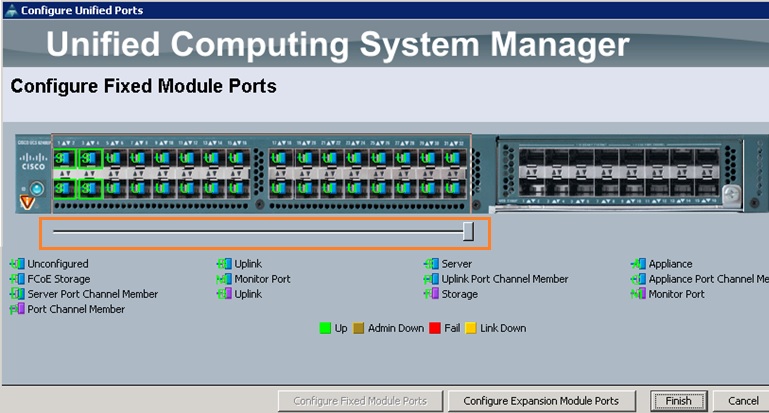
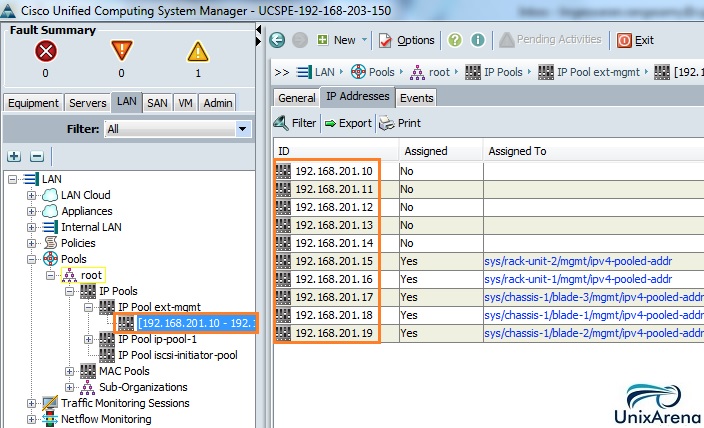
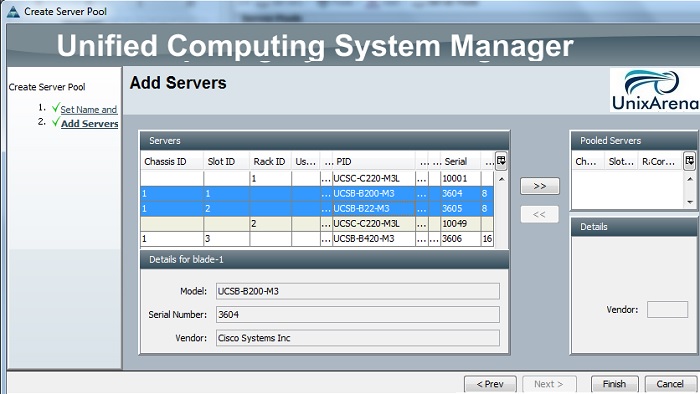
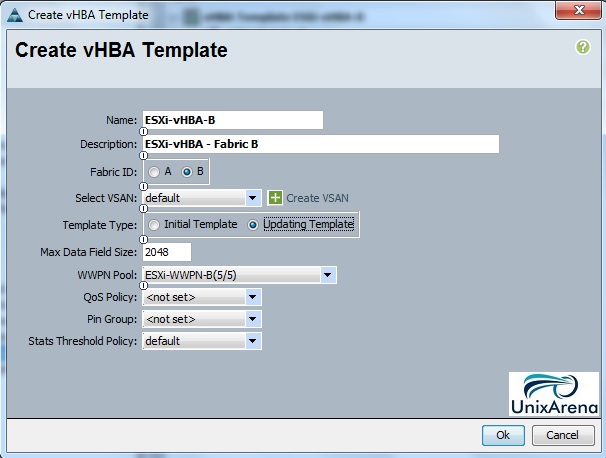
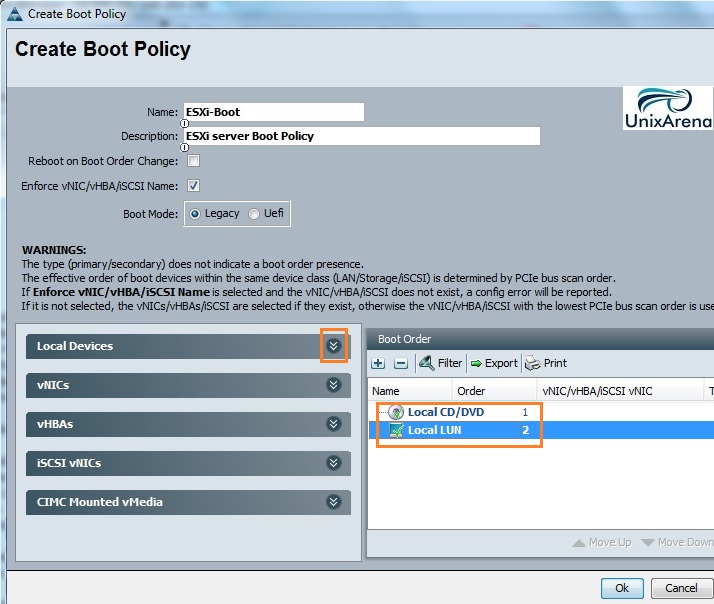
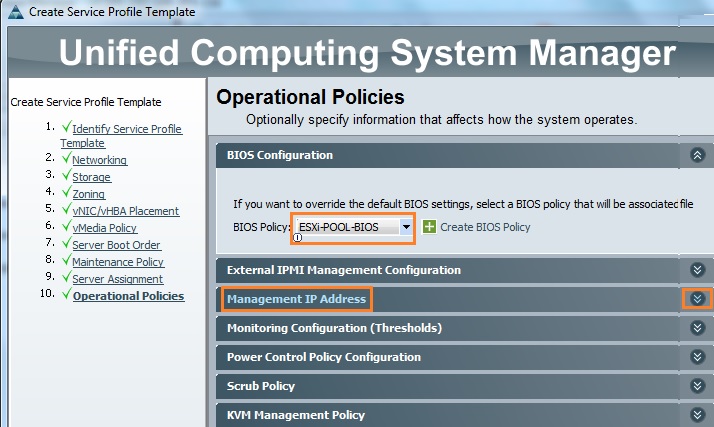
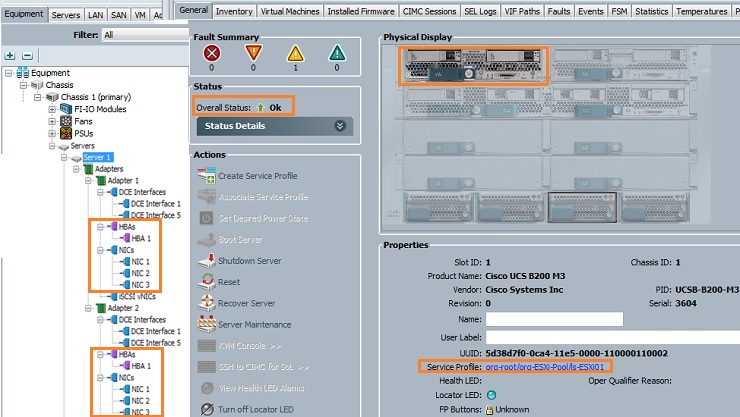
This article will explain the Cisco UCS B-Series setup from the scratch . As you know that Cisco UCS is highly customizable and I have demonstrated one of the way of UCS deployment. This may vary for each environment but Cisco UCS beginners can use this article since it explains from where to start and end. Once you have setup the UCS chassis and UCS Fabrics , you can follow the below listed articles to boot the first Blade on the UCS environment.
Most of the VMware virtual machines are configured with few virtual disks with different size according to the project requirement. When it comes to the Linux VM , there will be a dedicated disk for the root filesystem and other disks are used for application/data. So whenever there is request for resizing the existing drive , it is very easy to figure-out with fewer disks with help of variable size. But how do you map if any VM is running with 50+ virtual disks and fewer disks are directly mapped from the SAN using RDM(Raw Device Mapping) method. It’s quite complicated thing. In this article , we will find an easy solution to map the Virtual Machine disks to Linux disks or vise-versa.
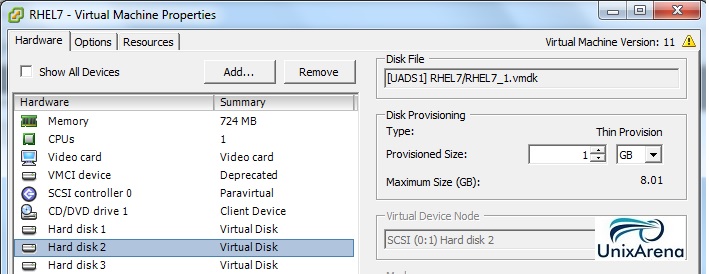
Here the my virtual Machine disks details:
VM Disk 1VM Disk 2
VM Disk 3
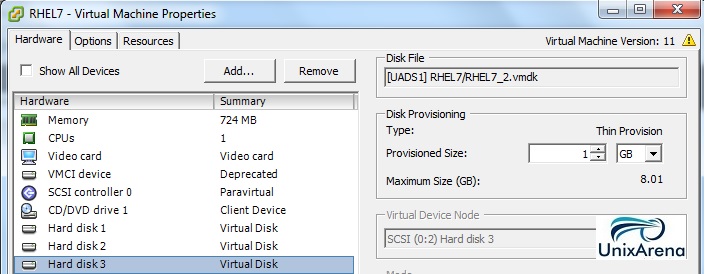
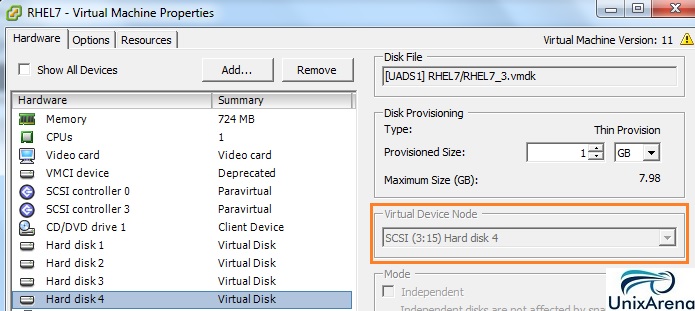
Here , I have added one more disk from SCSI controller 3.
VM Disk 4
Hard Disk 1 – 8GB (SCSI 0.0)
Hard Disk 2 – 1GB (SCSI 0.1)
Hard Disk 3 – 1GB (SCSI 0.2)
Hard Disk 4 – 1GB (SCSI 3.15)
In the Linux VM:
[root@UA-RHEL7 ~]# df -h |grep u0
/dev/sdb 1014M 33M 982M 4% /u01
/dev/sdc 1014M 33M 982M 4% /u02
/dev/sdd 1014M 33M 982M 4% /u03
[root@UA-RHEL7 ~]#
[root@UA-RHEL7 ~]# fdisk -l /dev/sda

Disk /dev/sda: 8589 MB, 8589934592 bytes, 16777216 sectors
Units = sectors of 1 * 512 = 512 bytes
Sector size (logical/physical): 512 bytes / 512 bytes
I/O size (minimum/optimal): 512 bytes / 512 bytes
Disk label type: dos
Disk identifier: 0x000c7226

   Device Boot      Start         End      Blocks   Id  System
/dev/sda1   *        2048     1026047      512000   83  Linux
/dev/sda2         1026048    16777215     7875584   8e  Linux LVM
[root@UA-RHEL7 ~]#
/dev/sda – 8GB
/dev/sdb – 1GB
/dev/sdc – 1GB
/dev/sdd – 1GB
Disks Mapping (VMware virtual machine to Linux)
From the above screenshots and Linux disks lists , we are able to map only one disk with the help of size.
Hard disk 1 – 8GB (SCSI 0.0) (VMware ) = /dev/sda – 8GB (Linux)
What about other three disks ? How can we map it ?
1. Login to Linux VM and execute the dmesg command with “grep” function like below.
[root@UA-RHEL7 ~]# dmesg |grep -i attached  |grep disk
[ 1.465282] sd 0:0:1:0: [sdb] Attached SCSI disk
[ 1.465695] sd 0:0:0:0: [sda] Attached SCSI disk
[ 53.458928] sd 0:0:2:0: [sdc] Attached SCSI disk
[ 1818.983728] sd 3:0:15:0: [sdd] Attached SCSI disk
[root@UA-RHEL7 ~]#
2. In the above screenshots , you might seen the SCSI id’s for each disks. Just compare the VMware SCSI ID’s with Linux guest SCSI id. Apart from the no of digits , both SCSI id’s are identical and this is the easiest way of mapping the disks.
Linux Disk Name
Linux SCSI ID
VMware SCSI ID
Size of the Disk
VMware Disk Number
/dev/sda
0:0:0:0
0.0
8GB
Hard Disk 1
/dev/sdb
0:0:1:0
0.1
1GB
Hard Disk 2
/dev/sdc
0:0:2:0
0.2
1GB
Hard Disk 3
/dev/sdd
3:0:15:0
3.15
1GB
Hard Disk 4
But in some cases(RDM disk are assigned to VM) , the above mapping is not sufficient to map the VMware guest disks. You might require another validation prior to confirming the disk mapping.
1. Login back to Linux VM and execute the below command. Just look at the “sgx” numbers . (sg0, sg1, sg2, sg3, sg4)
[root@UA-RHEL7 ~]# dmesg |grep sg |grep Attached
[   10.220942] sd 0:0:0:0: Attached scsi generic sg0 type 0
[   10.220974] sd 0:0:1:0: Attached scsi generic sg1 type 0
[   10.221002] sr 2:0:0:0: Attached scsi generic sg2 type 5
[   53.458334] sd 0:0:2:0: Attached scsi generic sg3 type 0
[ 1818.958156] sd 3:0:15:0: Attached scsi generic sg4 type 0
[root@UA-RHEL7 ~]#
2. The “sgX” numbers will be always stays in the “N-1″ to the VMware disk numbers. So just do N+1 for sgX to match the VMware Disk numbers. Let me bring up the table for you.
VMware Disk Mapping
We have successfully mapped the VMware guest’s virtual disks to Linux OS disks. Its always recommended to perform multiple checks to confirm the disk mapping. The above testing have been performed on VMware vSphere 6.x and Redhat Linux 7.x .
In LDOM , we can’t dynamically remove/add memory resource when the resources are physically bound. This will make hard-time for administrator and application owners where we need to bring down the guest domain every-time when you re-reconfigure memory resources. Normally Oracle Super-cluster servers are pre-configured with Hard Partitioning using the LDOM virtualization. In typical LDOM method , CPU threads are allocated to the guest domains where as in hard partitioning method , whole CPU cores needs to be allocated to the systems. According to the oracle notes ,
You cannot use dynamic reconfiguration (DR) to move memory or core resources between running domains when you set the mblock or cid property.
You will get below errors when you tried to dynamically allocate the resources using vcpu command. CPU whole-core can be add/remove dynamically when the domain is in bound/active state. But you have to use “add-core” or “remove-core” instead of using “add-vcpu” or “remove-vcpu” .
1. To Check Whether a Domain is Configured With CPU Whole Cores(Hard Partitioning) and a CPU Cap, Use the below mentioned command.
# ldm list -o resmgmt app1node1
NAME
app1node1

CONSTRAINT
    cpu=whole-core
    max-cores=16
    threading=max-throughput
    physical-bindings=core,memory
#
Verify that the whole-core constraint appears in the output and that the max-cores keyword specifies the maximum number of CPU cores configured for the domain. This shows that system is using “CPU Whole Cores(Hard Partitioning)” .
2. To get the allocated core details for the specific domain.
3. To dynamically add the CPU cores to the existing active domain, use the below command.
# ldm add-core 2 app1node1
# ldm list
NAME             STATE      FLAGS   CONS    VCPU  MEMORY   UTIL  NORM  UPTIME
primary          active     -n-cv-  UART    112   512G      14%   14%  7h 51m
app1node1        active     -n----  5001    144   512G     1.9%  1.5%  7h 58m
#
4. Using the remove-core command , you can reduce the CPU whole core from specific domain.
# ldm remove-core 2 app1node1
# ldm list
NAME             STATE      FLAGS   CONS    VCPU  MEMORY   UTIL  NORM  UPTIME
primary          active     -n-cv-  UART    112   512G      14%   14%  7h 51m
app1node1        active     -n----  5001    128   512G     1.9%  1.5%  7h 58m
#
5. You can also set the total number of CPU cores to specific domain.
# ldm set-core 18 app1node1
# ldm list
NAME             STATE      FLAGS   CONS    VCPU  MEMORY   UTIL  NORM  UPTIME
primary          active     -n-cv-  UART    112   512G      14%   14%  7h 51m
app1node1        active     -n----  5001    144   512G     1.9%  1.5%  7h 58m
#
Note: Each CPU core has 8 threads in this CPU model.
Let’s move to memory part.
When the memory resources are physically bind to the guest domain, you can’t dynamically add/remove from the domains. You will get below error when you try to do that.
7. Verify the guest domain memory size. Here you can see that physical memory size has been reduced from 512G to 480G.
# ldm list
NAME             STATE      FLAGS   CONS    VCPU  MEMORY   UTIL  NORM  UPTIME
primary          active     -n-cv-  UART    112   512G      14%   14%  7h 51m
app1node1        inactive   -_----  5001    144   480G
#
8. If you would like to increase the physical memory , you can add it back to the guest domain. If you don;t the PA , you can see the “# ldm list-devices -a memory” to find the free PA.
# ldm add-mem mblock=0x7600000000:8G,0x7400000000:8G,0x6e00000000:8G,0x6c00000000:8G app1node1
# ldm list
NAME             STATE      FLAGS   CONS    VCPU  MEMORY   UTIL  NORM  UPTIME
primary          active     -n-cv-  UART    112   512G      14%   14%  7h 51m
app1node1        inactive   -_----  5001    144   512G
#
9. Bind the guest domain & start it
# ldm bind app1node1
# ldm start app1node1
The mblock property should be used only by an administrator who is knowledgeable about the topology of the system to be configured. This advanced configuration feature enforces specific allocation rules and might affect the overall performance of the system.
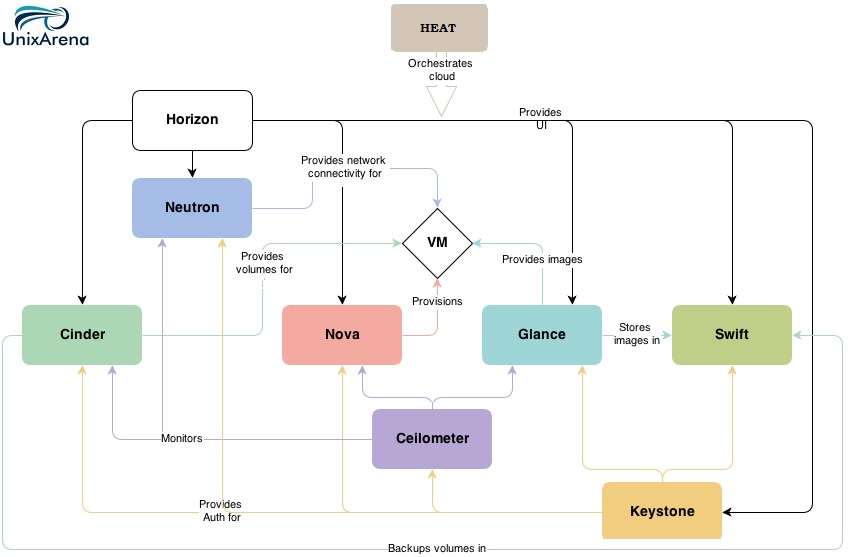
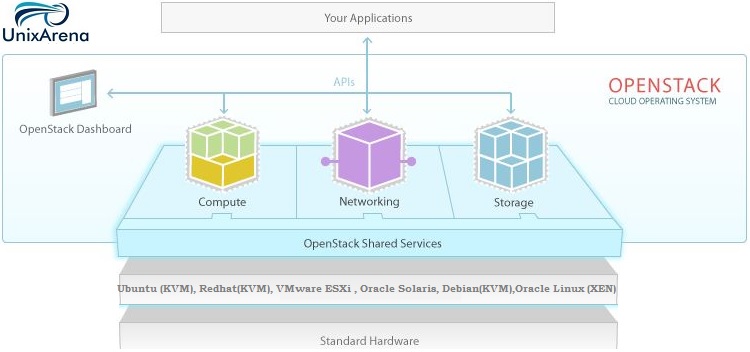
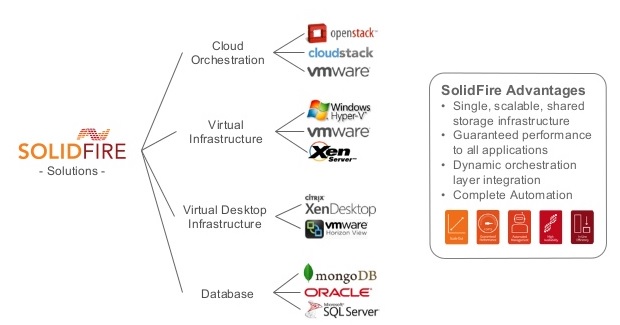
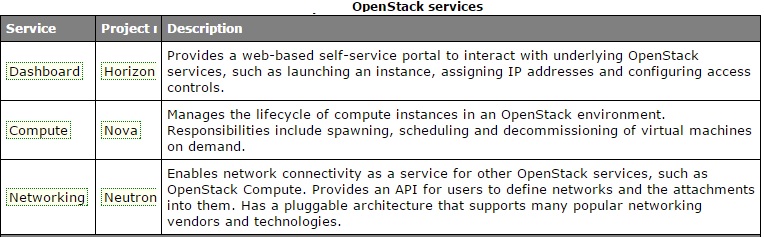
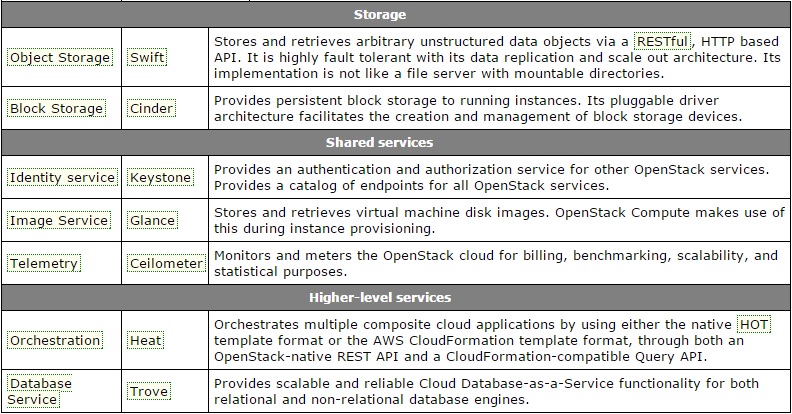
Let’s talk about Openstack architecture and Components . In the last article ,we have seen the history of private cloud softwares and Openstack. OpenStack is a cloud computing platform that controls large number of compute nodes , storage, and networking resources throughout a datacenter, all managed through a dashboard(Horizon) that gives administrators control while empowering their users to provision resources through a web interface. Openstack provides an Infrastructure-as-a-Service (IaaS) solution through a set of interrelated services.
Here is the list of openstack Services , project name and description.
The below diagram shows how the openstack components are interconnected.
Openstack-Conceptual-UnixArena
How Openstack works ?
Openstack can’t be directly installed on hardware. It requires operating systems which supports virtualization in the back-end. At present , Ubuntu(kvm), Redhat enterprise Linux(kvm) , oracle Linux(xen) , Oracle Solaris(zones), Microfsoft Hyper-v, VMware ESXi supports openstack cloud platform. That’s why openstack is the strategic choice of many types of organizations from service providers looking to offer cloud computing services on standard hardware, to companies looking to deploy private cloud, to large enterprises deploying a global cloud solution across multiple continents. Rackspace and HP are offering public cloud via openstack cloud platform.
Openstack-Basic
Hope this article is informative to you. In the next article ,we will see the deployment of Openstack on Ubuntu.
The whole world is buzzing on the cloud and cloud related technologies. Would you like to know the history of the cloud ? Let’s see. The private cloud has been started with Eucalyptus & Opennebula around 2003-2008 period and these both cloud software are almost similar to Amazon AWS (Pubic cloud). In 2009, NASA require cloud computing for their projects and they created project called “nova”. But NASA was not happy with “nova” and they have decided to scrap it. Nova developers got permission from NASA to make the “nova” code as opensource. The “nova” is based on Ruby language.
In 2010, Rackspace and NASA have jointly launched the open-source cloud-software project called “Openstack”. The OpenStack project is intended to help organizations offer cloud-computing services running on standard hardware. The initial code for openstack has been taken from Nebula(NASA Project). Rackspace has contributed to openstack on storage services part in the name of “swift” which is similar to Amazon s3. On the computing part , again “nova” become live but not with RUBY code. Because “SWIFT” is based on python and nova developers are forced to rewrite it in python to support swift.
What’s Next ? The first version of openstack released in 21st Oct 2010 and it has been named as “Austin”.
Opnestack is managed by the OpenStack Foundation, a non-profit corporate entity established in September 2012.
You might be thinking what happened to the initial private cloud projects Eucalyptus & Opennebula. HP has Joined the Openstack project and they don’t want any competitor for openstack on the market. So they have simply bought Eucalyptus and scarped it like how they have scrapped other Unix flavours in the past. They are using some functionality of Eucalyptus to integrate Amazon cloud in the hybrid clouds. Opennebula is still available for the customers and going strong but not sure how long since all the big IT giants are promoting Openstack.
In 2011, developers of the Ubuntu Linux distribution adopted OpenStack with an unsupported technology preview of the OpenStack. Ubuntu’s sponsor Canonical then introduced full support for OpenStack clouds, starting with OpenStack’s Cactus release.
Why organization can’t avoid the Openstack ?
Openstack is an open-source cloud software which means it is free to use.
The Big IT giants are supporting the Openstack which includes SUSE, Red Hat, IBM, RackSpace, Dell, Cisco,HP , Oracle, Mirantis, VMturbo etc..
It runs on standard hardware.
OpenStack is the only cloud solution that allows for mixed hypervisor IT environments, which will become increasingly fragmented over time. (Ex: KVM ,Xen, ESXi , QEMU)
According to the analysis, Openstack will take another one or two years to reach the position what Linux accomplished in 15 years. This is because of Opensource acceptance, support offerings by company and Cost effective solutions.
Hope this article is informative to you. UnixArnea’s Openstack journey will continue.
Deploying openstack on Ubuntu is very easy if you use the devstack method. DevStack is not general openstack installer but it will help us to reduce the manual configuration for first time deployment. Let’s follow the easiest method to understand the openstack deployment and other functionality. Here I have chosen Ubuntu as my base operating system/Hyper-visor. Why I should choose Ubuntu ? Ubuntu is Debian Linux variant operating system and it is one of the stable Linux operating system in the world. Ubuntu’s simple package management and supports impressed me lot. Also Ubuntu is the world’s most popular operating system for OpenStack and widely used on many public and private clouds.
Let’s start.
Prerequisites:
X86 Server Hardware with VT enabled. (You can also use VM for testing purpose)
Two NIC’s
2 x 30GB HDD
8GB Memory
2 CPU cores
Internet Connectivity to Host.
Deploying Openstack on Ubuntu 14.04:
1. Install the latest Ubuntu OS on base hardware . If you want to play with openstack , then just install the Ubuntu on VMware workstation as guest operating system.
2. Login to Ubuntu 14.04 and Install git package.
root@uacloud:~# apt-get install -y git
Reading package lists... Done
Building dependency tree
Reading state information... Done
The following extra packages will be installed:
  git-man liberror-perl
Suggested packages:
  git-daemon-run git-daemon-sysvinit git-doc git-el git-email git-gui gitk
  gitweb git-arch git-bzr git-cvs git-mediawiki git-svn
The following NEW packages will be installed:
  git git-man liberror-perl
0 upgraded, 3 newly installed, 0 to remove and 11 not upgraded.
Need to get 3,346 kB of archives.
After this operation, 21.6 MB of additional disk space will be used.
Get:1 http://in.archive.ubuntu.com/ubuntu/ trusty/main liberror-perl all 0.17-1.1 [21.1 kB]
Get:2 http://in.archive.ubuntu.com/ubuntu/ trusty-updates/main git-man all 1:1.9.1-1ubuntu0.1 [698 kB]
Get:3 http://in.archive.ubuntu.com/ubuntu/ trusty-updates/main git amd64 1:1.9.1-1ubuntu0.1 [2,627 kB]
Fetched 3,346 kB in 13s (254 kB/s)
Selecting previously unselected package liberror-perl.
(Reading database ... 56497 files and directories currently installed.)
Preparing to unpack .../liberror-perl_0.17-1.1_all.deb ...
Unpacking liberror-perl (0.17-1.1) ...
Selecting previously unselected package git-man.
Preparing to unpack .../git-man_1%3a1.9.1-1ubuntu0.1_all.deb ...
Unpacking git-man (1:1.9.1-1ubuntu0.1) ...
Selecting previously unselected package git.
Preparing to unpack .../git_1%3a1.9.1-1ubuntu0.1_amd64.deb ...
Unpacking git (1:1.9.1-1ubuntu0.1) ...
Processing triggers for man-db (2.6.7.1-1ubuntu1) ...
Setting up liberror-perl (0.17-1.1) ...
Setting up git-man (1:1.9.1-1ubuntu0.1) ...
Setting up git (1:1.9.1-1ubuntu0.1) ...
root@uacloud:~#
3. Create user and group called “stack” and set the password for the user. (Do not try with other username).
root@uacloud:~# groupadd stack
root@uacloud:~# useradd -g stack -s /bin/bash -d /opt/stack -m stack
root@uacloud:~# passwd stack
Enter new UNIX password:
Retype new UNIX password:
passwd: password updated successfully
root@uacloud:~#
4. Provide the password less sudo access to the user “stack”.
7. Configure the password less authentication for stack user with the same host.
uacloud:~$ssh stack@uacloud
The authenticity of host 'uacloud (127.0.1.1)' can't be established.
ECDSA key fingerprint is 8e:c1:20:29:32:b4:67:5c:fb:b2:a0:8c:3a:ee:9a:85.
Are you sure you want to continue connecting (yes/no)? yes
Warning: Permanently added 'uacloud' (ECDSA) to the list of known hosts.
stack@uacloud's password:
uacloud:~$
Asking for the password ? . Let me generate the new RSA keys for user “stack” and make it as password less authentication.
uacloud:~$cd ~stack/.ssh
uacloud:~$ls -la
total 12
drwx------ 2 stack stack 4096 Aug 19 01:11 .
drwxr-xr-x 4 stack stack 4096 Aug 19 01:10 ..
-rw-r--r-- 1 stack stack  222 Aug 19 01:11 known_hosts
uacloud:~$ssh-keygen
Generating public/private rsa key pair.
Enter file in which to save the key (/opt/stack/.ssh/id_rsa):
Enter passphrase (empty for no passphrase):
Enter same passphrase again:
Your identification has been saved in /opt/stack/.ssh/id_rsa.
Your public key has been saved in /opt/stack/.ssh/id_rsa.pub.
The key fingerprint is:
df:0d:92:bc:3f:e8:5c:25:33:1e:e4:d3:a4:99:b8:54 stack@uacloud
The key's randomart image is:
+---[RSA 2048]----+
|                 |
|                 |
|            E .  |
|         . * *   |
|        S * % o  |
|         o * X   |
|          +.+ .  |
|         ..o.    |
|         .o ..   |
+-----------------+
uacloud:~$
Copy the id_rsa.pub as authorized_keys in the user home directory.
uacloud:~$ls -la
total 20
drwx------ 2 stack stack 4096 Aug 19 01:14 .
drwxr-xr-x 4 stack stack 4096 Aug 19 01:10 ..
-rw------- 1 stack stack 1675 Aug 19 01:14 id_rsa
-rw-r--r-- 1 stack stack  395 Aug 19 01:14 id_rsa.pub
-rw-r--r-- 1 stack stack  222 Aug 19 01:11 known_hosts
uacloud:~$cp id_rsa.pub authorized_keys
uacloud:~$
uacloud:~$chmod 400 authorized_keys id_rsa.pub
uacloud:~$ls -lrt
total 16
-rw-r--r-- 1 stack stack  222 Aug 19 01:11 known_hosts
-r-------- 1 stack stack  395 Aug 19 01:14 id_rsa.pub
-rw------- 1 stack stack 1675 Aug 19 01:14 id_rsa
-r-------- 1 stack stack  395 Aug 19 01:14 authorized_keys
uacloud:~$
Let me test it.
stack@uacloud:~/devstack$ ssh stack@uacloud
Welcome to Ubuntu 14.04.3 LTS (GNU/Linux 3.19.0-25-generic x86_64)

 * Documentation:  https://help.ubuntu.com/

  System information as of Thu Aug 20 06:56:57 IST 2015

  System load:  0.63               Processes:             236
  Usage of /:   12.4% of 25.47GB   Users logged in:       0
  Memory usage: 63%                IP address for eth0:   192.168.203.160
  Swap usage:   0%                 IP address for virbr0: 192.168.122.1

  Graph this data and manage this system at:
    https://landscape.canonical.com/

10 packages can be updated.
10 updates are security updates.

Last login: Thu Aug 20 06:57:19 2015 from 192.168.203.1
stack@uacloud:~$
It works.
8. Clone the Openstack package from github to stack user’s home directory .
9. Navigate to the “devstack” directory which is created under the stack user home .
uacloud:~$cd devstack/
uacloud:~$ls -lrt
total 316
-rw-rw-r-- 1 stack stack 15716 Aug 19 01:19 README.md
-rw-rw-r-- 1 stack stack  2591 Aug 19 01:19 Makefile
-rw-rw-r-- 1 stack stack  1506 Aug 19 01:19 MAINTAINERS.rst
-rw-rw-r-- 1 stack stack 10143 Aug 19 01:19 LICENSE
-rw-rw-r-- 1 stack stack 14945 Aug 19 01:19 HACKING.rst
-rw-rw-r-- 1 stack stack  3774 Aug 19 01:19 FUTURE.rst
-rwxrwxr-x 1 stack stack  1978 Aug 19 01:19 exercise.sh
-rw-rw-r-- 1 stack stack  1145 Aug 19 01:19 exerciserc
-rw-rw-r-- 1 stack stack  1547 Aug 19 01:19 eucarc
drwxrwxr-x 2 stack stack  4096 Aug 19 01:19 driver_certs
drwxrwxr-x 3 stack stack  4096 Aug 19 01:19 doc
-rwxrwxr-x 1 stack stack  3229 Aug 19 01:19 clean.sh
drwxrwxr-x 2 stack stack  4096 Aug 19 01:19 extras.d
drwxrwxr-x 2 stack stack  4096 Aug 19 01:19 exercises
drwxrwxr-x 2 stack stack  4096 Aug 19 01:19 gate
-rw-rw-r-- 1 stack stack 64721 Aug 19 01:19 functions-common
-rw-rw-r-- 1 stack stack 23567 Aug 19 01:19 functions
drwxrwxr-x 7 stack stack  4096 Aug 19 01:19 files
drwxrwxr-x 2 stack stack  4096 Aug 19 01:19 inc
-rwxrwxr-x 1 stack stack 41570 Aug 19 01:19 stack.sh
-rw-rw-r-- 1 stack stack 30952 Aug 19 01:19 stackrc
-rwxrwxr-x 1 stack stack   781 Aug 19 01:19 setup.py
-rw-rw-r-- 1 stack stack   456 Aug 19 01:19 setup.cfg
drwxrwxr-x 2 stack stack  4096 Aug 19 01:19 samples
-rwxrwxr-x 1 stack stack  1188 Aug 19 01:19 run_tests.sh
-rwxrwxr-x 1 stack stack   638 Aug 19 01:19 rejoin-stack.sh
drwxrwxr-x 2 stack stack  4096 Aug 19 01:19 pkg
-rw-rw-r-- 1 stack stack  3984 Aug 19 01:19 openrc
drwxrwxr-x 8 stack stack  4096 Aug 19 01:19 lib
drwxrwxr-x 5 stack stack  4096 Aug 19 01:19 tools
drwxrwxr-x 2 stack stack  4096 Aug 19 01:19 tests
-rwxrwxr-x 1 stack stack  4185 Aug 19 01:19 unstack.sh
-rw-rw-r-- 1 stack stack  1445 Aug 19 01:19 tox.ini
uacloud:~$
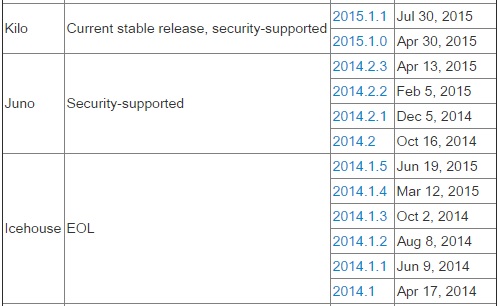
10. Check the current branch and change it to “juno” openstack branch . kilo is the most recent stable release but still it has some bugs.
uacloud:~$git branch
* master
uacloud:~$git checkout stable/juno
Branch stable/juno set up to track remote branch stable/juno from origin.
Switched to a new branch 'stable/juno'
uacloud:~$git branch
  master
* stable/juno
uacloud:~$
11. Create the installation file like below.
uacloud:~$cat local.conf
[[local|localrc]]
# IP address of the Machine (Ubuntu)
HOST_IP=192.168.203.157
# Specify the ethernet card you are exposing to openstack
FLAT_INTERFACE=eth0
# Specify a Private IP Range - should be a non-existing network
FIXED_RANGE=192.168.204.0/24
FIXED_NETWORK_SIZE=256

# Specify a FLOATING/ELASTIC IP RANGE a existing network.
FLOATING_RANGE=192.168.203.128/24

MULTI_HOST=1

# Log File Destination
LOGFILE=/opt/stack/logs/stack.sh.log

#Set Password for services , rabbitMQ,Database etc
ADMIN_PASSWORD=uapwd123
DATABASE_PASSWORD=uapwd123
MYSQL_PASSWORD=uapwd123
RABBIT_PASSWORD=uapwd123
SERVICE_PASSWORD=uapwd123
SERVICE_TOKEN=ADMIN
RECLONE=yes

uacloud:~$
Change the IP information according to your network. Read the comments within the file carefully.
It is better to keep same password for all the services for first time deployment.
12. Switch to root user and enable the IP forwarding .
The ip_forward and proxy_arp changes will be reset when the machice reboots. You can make these changes permanent by editing /etc/sysctl.conf and adding the following lines
13. Login back as stack user & Run stack.sh to start deploying the openstack. It will take minimum 30 to 40 mins depends on the internet connection speed.
stack@uacloud:~/devstack$ ./stack.sh
2015-08-19 18:58:15.517 | ++ trueorfalse False
2015-08-19 18:58:15.523 | + OFFLINE=False
2015-08-19 18:58:15.523 | ++ trueorfalse False
2015-08-19 18:58:15.526 | + ERROR_ON_CLONE=False
2015-08-19 18:58:15.527 | ++ trueorfalse True
2015-08-19 18:58:15.530 | + ENABLE_DEBUG_LOG_LEVEL=True
2015-08-19 18:58:15.531 | + FLOATING_RANGE=192.168.203.170/24
2015-08-19 18:58:15.531 | + FIXED_RANGE=192.168.204.0/24
2015-08-19 18:58:15.531 | + FIXED_NETWORK_SIZE=256

<<<<==================some of the console logs removed=============================>>>

Horizon is now available at http://192.168.203.160/
Keystone is serving at http://192.168.203.160:5000/v2.0/
Examples on using novaclient command line is in exercise.sh
The default users are: admin and demo
The password: uapwd123
This is your host ip: 192.168.203.160
stack@uacloud:~/devstack$
In the bottom of the script output, you will get the Dashboard – Horizon Details and credentials .
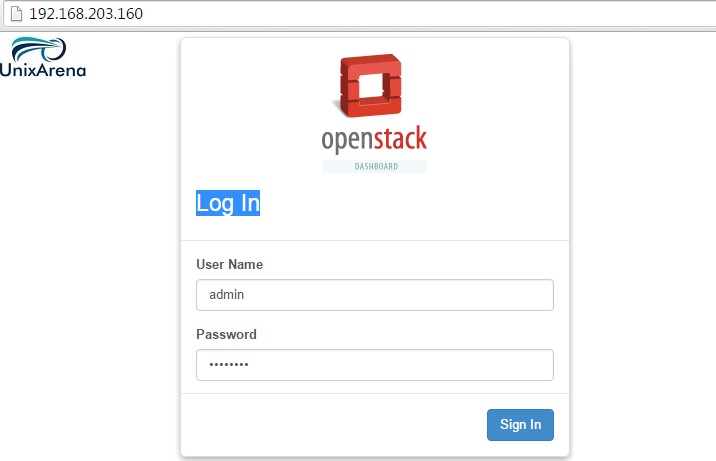
14. Lanuch the Openstack Dashboard using the IP address or hostname .
Dashboard – Horizon
Great. We got the Openstack Dashboard. In the upcoming articles , we will see how we can use the dashboard to launch the instances. Stay tuned with UnixArena by following in UnixArena Fans pages .
If the stack.sh failed with unknown errors , you must review the few things here.
stack@uacloud:~/devstack$ git checkout stable/juno
Switched to branch 'stable/juno'
Your branch is up-to-date with 'origin/stable/juno'.
stack@uacloud:~/devstack$
Reclone is used to keep the release up to date. For production environment, reclone should be set as “no”.
If the above things are not correct, you will get errors like below.
2015-08-19 18:41:16.661 | module = __import__(self.module_name, fromlist=[‘__name__’], level=0)
2015-08-19 18:41:16.662 | ImportError: No module named setuptools_ext
2015-08-19 18:41:16.662 |
2015-08-19 18:41:16.662 | —————————————-
2015-08-19 18:41:16.662 | Failed building wheel for cryptography
2015-08-19 18:41:16.662 | Running setup.py bdist_wheel for pyasn1
2015-08-19 18:41:16.857 | Stored in directory: /opt/stack/.wheelhouse
2015-08-19 18:41:16.858 | Running setup.py bdist_wheel for enum34
2015-08-19 18:41:17.006 | Stored in directory: /opt/stack/.wheelhouse
2015-08-19 18:41:17.006 | Running setup.py bdist_wheel for cffi
2015-08-19 18:41:19.851 | Stored in directory: /opt/stack/.wheelhouse
2015-08-19 18:41:19.851 | Successfully built pyasn1 enum34 cffi
2015-08-19 18:41:19.852 | Failed to build cryptography
2015-08-19 18:41:19.871 | ERROR: Failed to build one or more wheels
2015-08-19 18:41:19.903 | +++ err_trap
2015-08-19 18:41:19.903 | +++ local r=1
2015-08-19 18:41:19.918 | Error on exit
stack@uacloud:~/devstack$
If the Ubuntu version is 15.04, you will get error like below,
stack@CGI-MVPN:~/devstack$ ./stack.sh
WARNING: this script has not been tested on vivid
[Call Trace]
./stack.sh:98:die
[ERROR] ./stack.sh:98 If you wish to run this script anyway run with FORCE=yes
stack@CGI-MVPN:~/devstack$
You can overwrite above error by running like this , but stack.sh will failed at last. So better to use Ubuntu 14.04 which is already tested by devstack community.
stack@uacloud:~/devstack$ FORCE=yes ./stack.sh
WARNING: this script has not been tested on vivid
2015-08-19 07:44:11.024 | + uname -a
2015-08-19 07:44:11.024 | Linux uacloud 3.19.0-15-generic #15-Ubuntu SMP Thu Apr 16 23:32:37 UTC 2015 x86_64 x86_64 x86_64 GNU/Linux
2015-08-19 07:44:11.024 | + SSL_BUNDLE_FILE=/opt/stack/data/ca-bundle.pem
Stack.sh will also fails in situation where your internet speed is not good or intermediate disconnects.
Hope this article is informative to you .
Share it ! Support Openstack !! Now we are almost in Opensource world.
This article will demonstrate that how to stop and start the Openstack services on Ubuntu when you have done the installation through the devstack method. If you followed the devstack method for deploying the openstack, there are some set of scripts will be available to perform the stop and start openstack services without much pain. This script can be added to the Linux start up scripts in rc.local or /etc/rc.3d. In this article ,we will see that how to stop the running openstack services and start manually. Openstack services will not automatically start unless you add in to the start-up scripts or start it manually.
If you do not stop the openstack service properly prior to the system reboot ,there is a high chance of corrupting the openstack DB.
This article will cover other know issue with respect to openstack keystone.
Assume that ,we have planned the maintenance for host which requires the reboot. Before going to reboot the sever , you need to stop the openstack services properly.
1. Navigate to the /opt/stack/devstack directory. Run ./unstack.sh to stop the openstack services gracefully.
stack@uacloud:~/devstack$ ./unstack.sh
Site keystone disabled.
To activate the new configuration, you need to run:
  service apache2 reload
 * Stopping web server apache2                                                                                                                                           *
 * Starting web server apache2
 * Stopping web server apache2                                                                                                                                           *
tgt stop/waiting
stack@uacloud:~/devstack$
2. Halt the server . (If you have any maintenance planned)
3. Once the maintenance has been completed, power on the server.
4. Once the OS is booted, navigate to ~stack/devstack/ & rejoin-stack.sh . This script will bring up all the openstack services.
5. If you want to come out from this screen , press Ctrl+A then immediately press shift+” . Once you have done that , you will get screen like below. ( ” quotation key which is near to enter key )
Use the arrow keys and navigate to ” 0 shell ” and press enter to get the shell back. But the openstack screen will remain attached. If you would like to detach the screen completely , user Ctrl+A then D.
Issues & Troubleshooting:
Issue 1. Dashboard is not opening , please check the apace service and restart it .
service apache2 restart
Issue 2. Unable to login to the dashboard after rebooting the server . If you get error like “An error occurred authenticating. Please try again later.” Please restart keystone services . To restart the keystone services, press Ctrl+A then immediately press shift+” (If your screen is already attached. ) . You will screen like below.
Press Ctlr + A then D to detach the Openstack screen. Now you should be able to login to the Openstack horizon dashboard.
Hope this article is informative to you to stop & start the openstack services manually on Ubuntu . Also , it will help you to troubleshoot the dashboard login issues. Share it ! Support Openstack !!
This article will help you to understand the functionality of the openstack dashboard. Dashboard will be used by administrators and tenant. For tenant or user , it will act like a self service portal where they can launch the instance , allocate the storage and configure the network resource within the limits set by administrator. Administrator can control the projects (tenant), user management, hypervisor management and images. Dashboard is a web-based graphical user interface to access, provision and automate cloud resources. It supports the plugins where the third party products(Ex: Management tools, Billing , Monitoring ) and services can be integrated quickly. Horizon service is responsible to provide the dashboard along with Apache.
At the time of installation , there will be two users created by default.
demo – Demo user is part of demo project . Its a sample user for tenant .
admin – Administrator user which is part of admin group.
We will login as admin user & explorer the available tabs and options.
1. Open the browser and enter the Openstack host URL .
Dashboard – Horizon
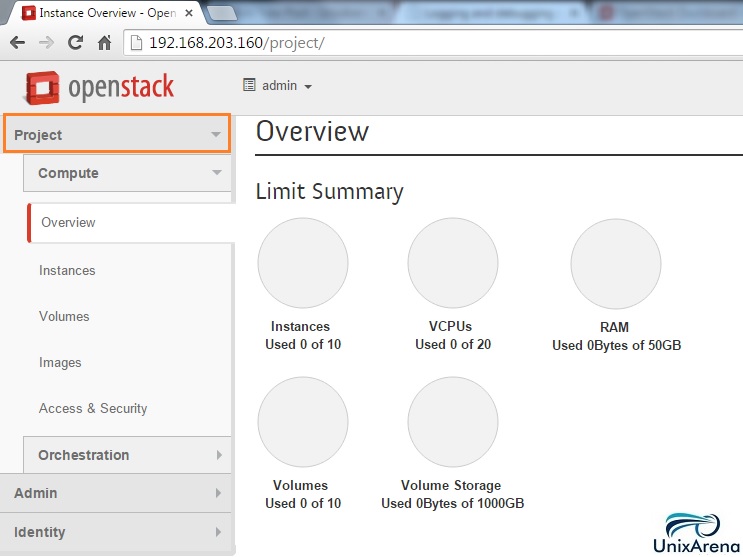
2. Once you have logged in to the dashboard, you will get screen like below by default.
Openstack Dashboard
“Project” tab is exclusively for the users(tenant). But still as a administrator , you will be able to use the project tab to launch the new instance. (Next article show you the demonstration of instancing new instance)
Orchestration will help you to perform automation.
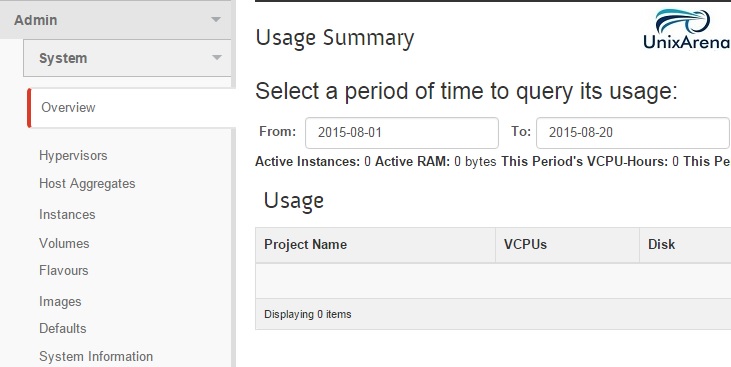
3. Let’s move forward to admin tab. As administrator , you will be spending most of the time on this tab. The below screenshot shows the usage summary for selected period.
Admin Overview
.
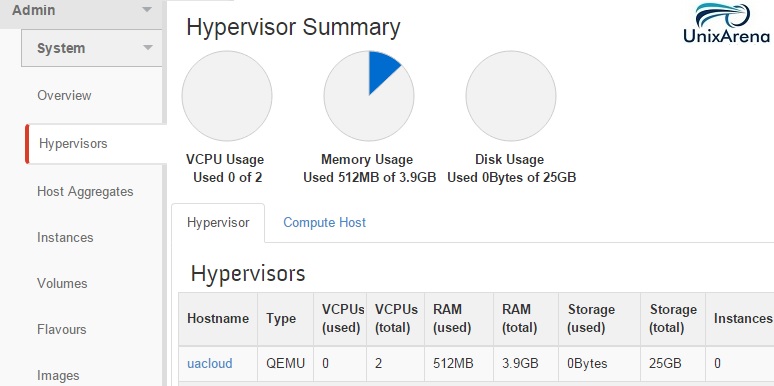
4. Click on hyper-visors to see the connected hypervisor on the system.
Openstack Hyper-visor Tab
Hypervisor are used to create the virtual instance for users or tenant. Openstack will support all the hypervisors in the world. (KVM,Xen , VMware ESXi , Hyper-V etc..)
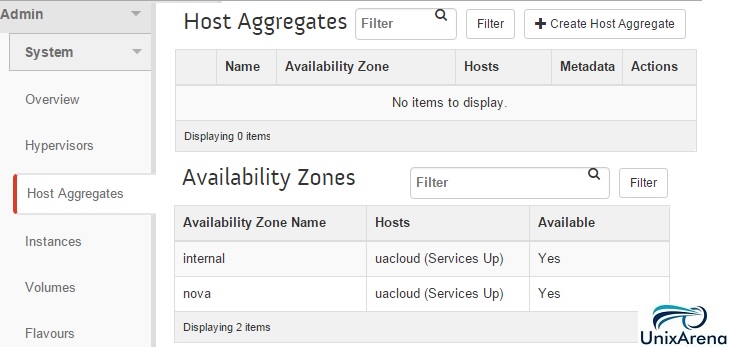
5. Host aggregates is a mechanism to further partition an availability zone. At this point , we didn’t create any host-aggregates .
Host Aggregates
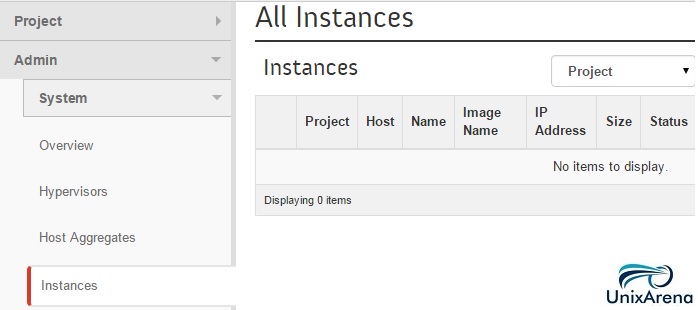
6. As administrator , you will be able to see the all instances. At this time ,we don’t have anything.
Openstack All instances
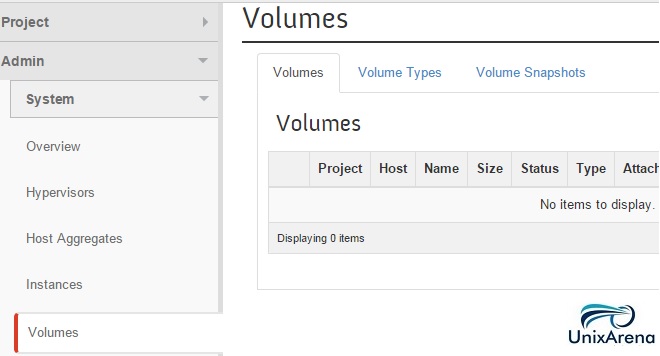
7. Here you can get the list of volumes.
Openstack Volumes
8. In the flavours, you can see the pre-configured instance types.
Openstack – Instance type
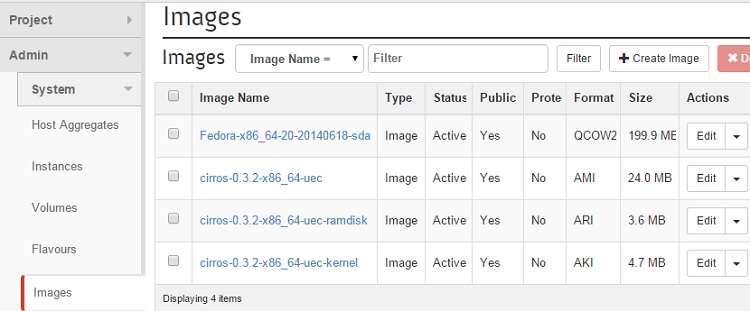
9. In Images tab, you see the pre-configured images . (which are used to start the instances).
Openstack Images
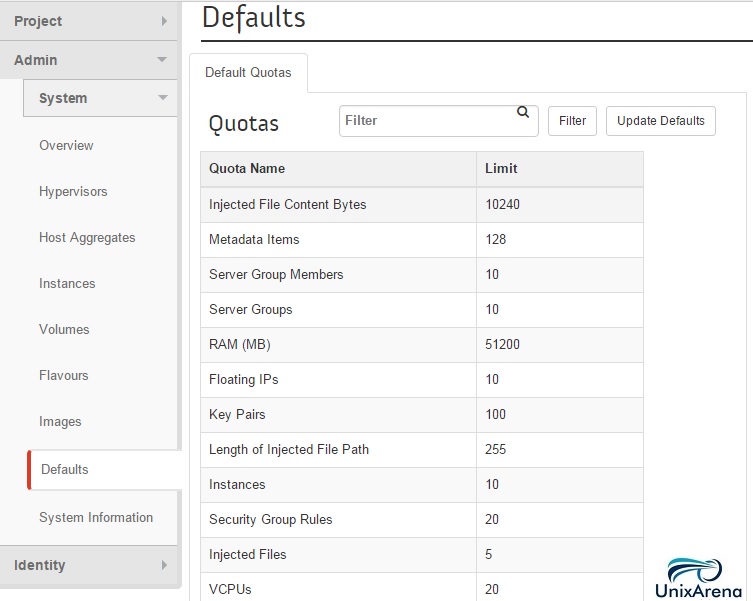
10. In Default tab ,you will find the default quota’s for each resources.
Openstack Quota
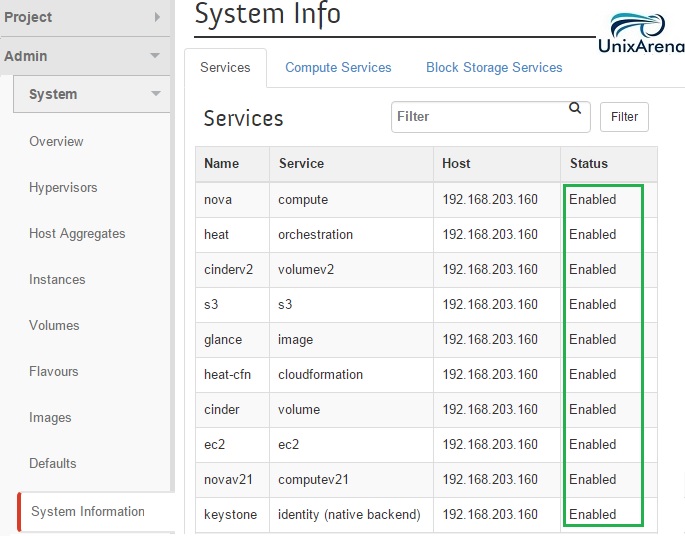
11. To know the openstack service’s current status , click on “System information” tab.
Openstack Service status
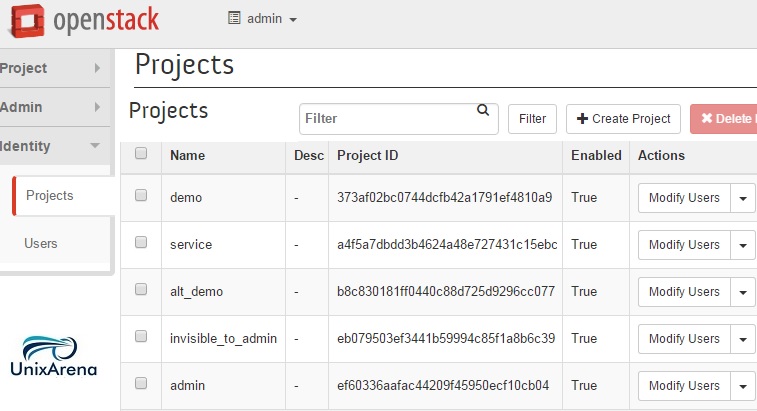
12. Identity tab holds projects and users. Here is the preconfigured projects in openstack.
Openstack Projects
13. Openstack’s users are maintained in “Identity-> Users” tab.
Openstack Users
If you login as demo user, you will not be able to see the “admin” tab. Identity tab will just show the assigned projects in read only mode.
Openstack – Demo user
In this article ,we have seen the various openstack’s tab and the difference between admin user to demo user. (tenant). In the next article , we will launch the first openstack instance.
Hope this article is informative to you . Share it ! Support Openstack !! Be Sociable !!!
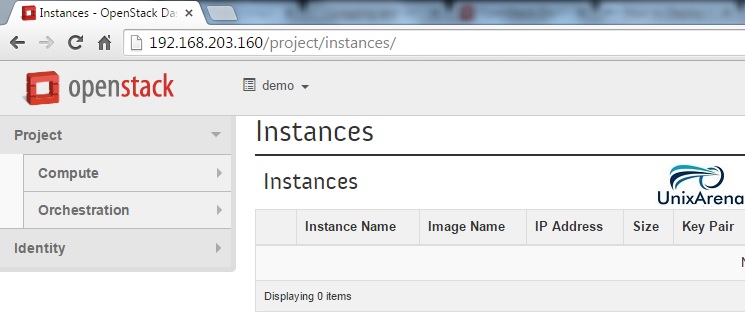
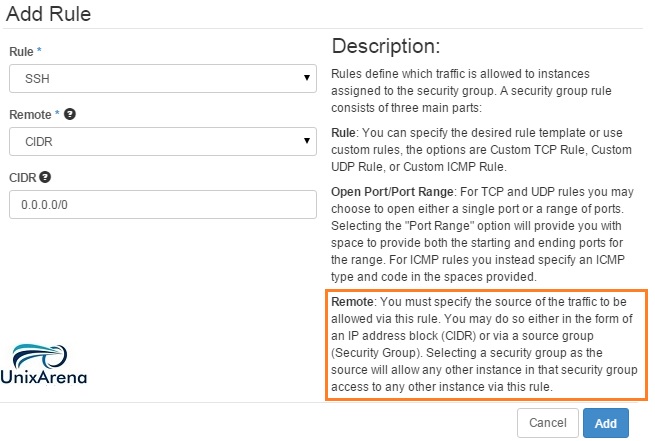
This article will demonstrate that how to launch the first Openstack instance. In the previous articles ,we have setup the openstack software and gone through the openstack dashboard functionalities. In an order to launch the openstack instances, first we need to create the network security group, rules & key pairs to access the instances from other network. In the security rule , I will make the port 22 and ping protocol to allow in the firewall. Note that once you have download the key pair , there is no way to download it again due to security reason. Let’s create the first openstack instance.
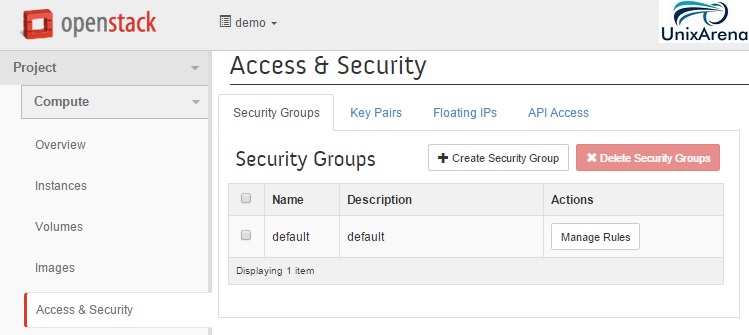
Create the Network security group & Configure the Rules:
1. Login to Openstack Dashboard as normal user. (demo)
2. Navigate to Access & Security . Select the tab called “Security Groups”.
Access & Security – Openstack
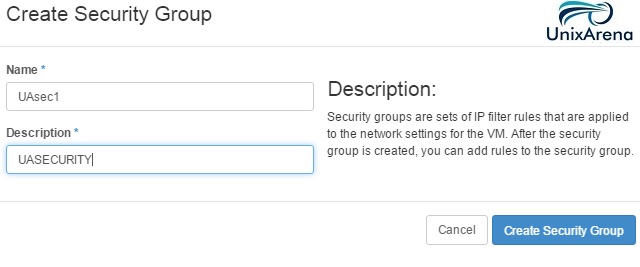
3. Click on “Create Security group”. Enter the name and description for the security group.
Create Security Group
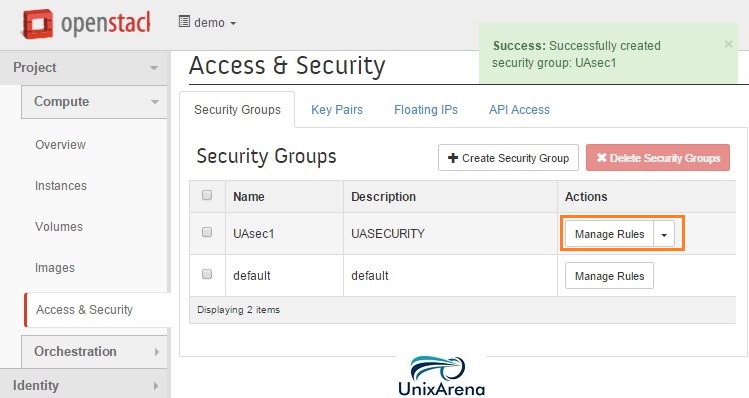
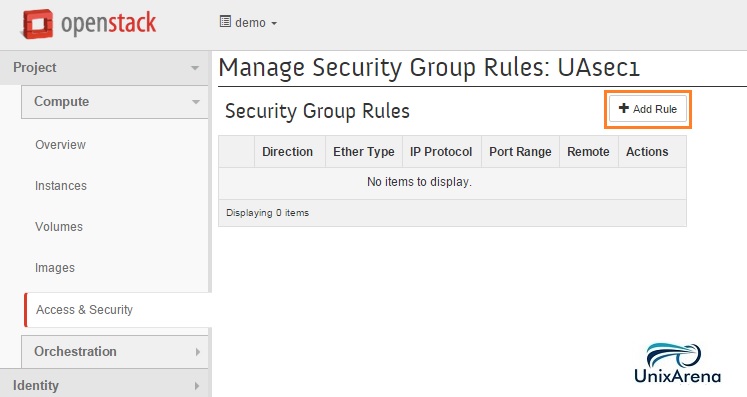
4. Once the group has been created successfully, Click on “Manage Rules” .
Manage the Network Group Rules
5. Click on “Add Rule” .
Add Rule – Openstack
6. Allow ssh from anywhere to the instances.
Allow SSH – Openstack
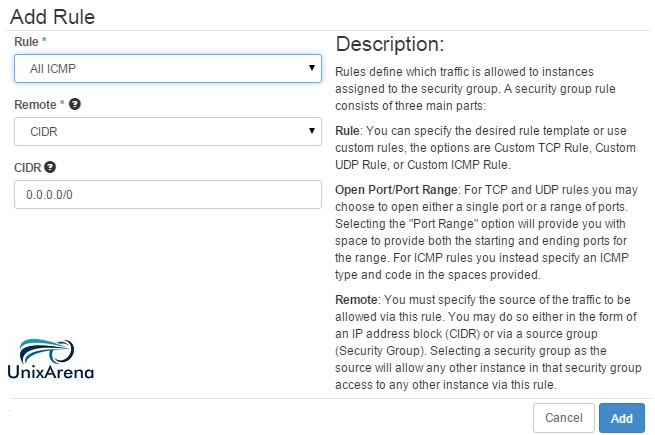
7. Similarly , allow “ping” as well to this host from anywhere.
Allow ICMP -Ping
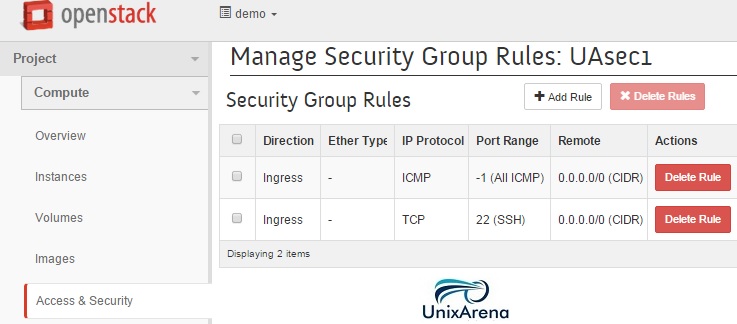
Once you have added those rules to the security group, it will look like below.
Security Rules – Openstack
Create the key-pair to access the instance:
1. Login to Openstack Dashboard.
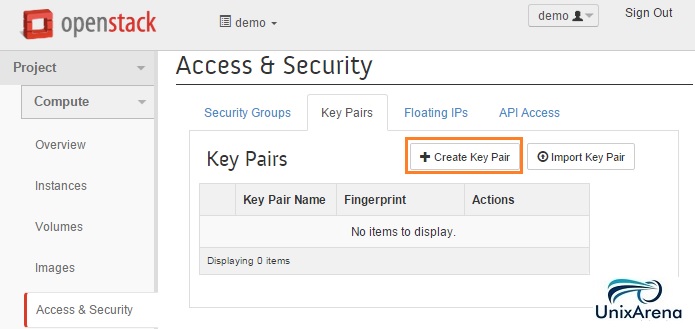
2. Navigate to security & access. Click the tab called “Key Pairs” and click on “Create key Pair” .
Key Pairs – Openstack
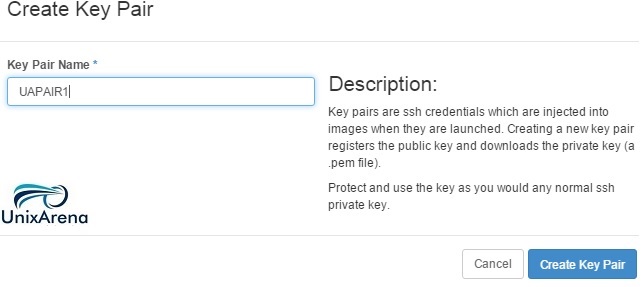
3. Enter the Key pair name. (Keep Some meaning full name). Click on “Create key Pair”
Enter the Key Pair Name
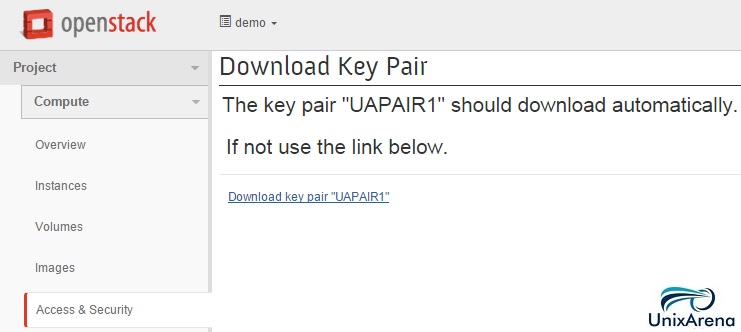
4. The key pair will be automatically downloaded to your laptop. If it didn’t download, click the link to download it. Keep the key safe since you can’t download it again.
Download Key pair – Openstack
In-case if you have lost the key ,then you need to re-create the new key pair & use it.
At this point , we have created the new security group and key pair. The security group will allows “ssh” & ping from anywhere.
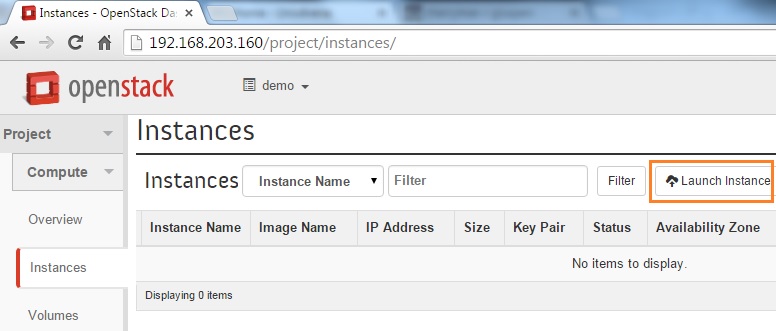
Launch the New Openstack Instance :
1. Login to Openstack Dashboard.
2. Click on “Launch Instance ” tab.
Launch instance Openstack
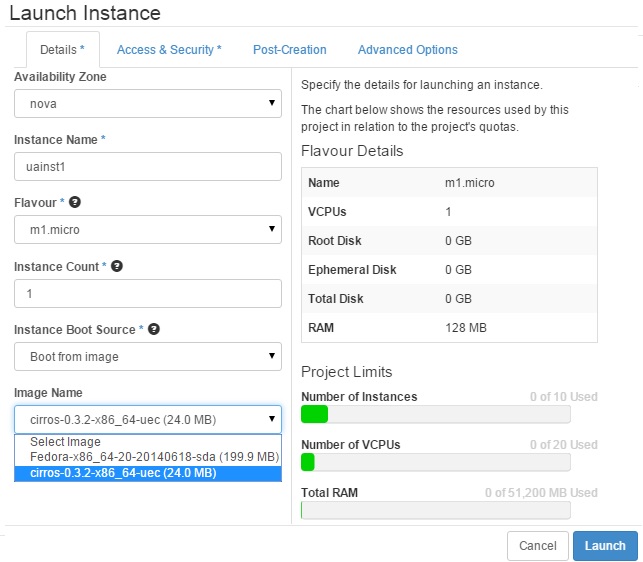
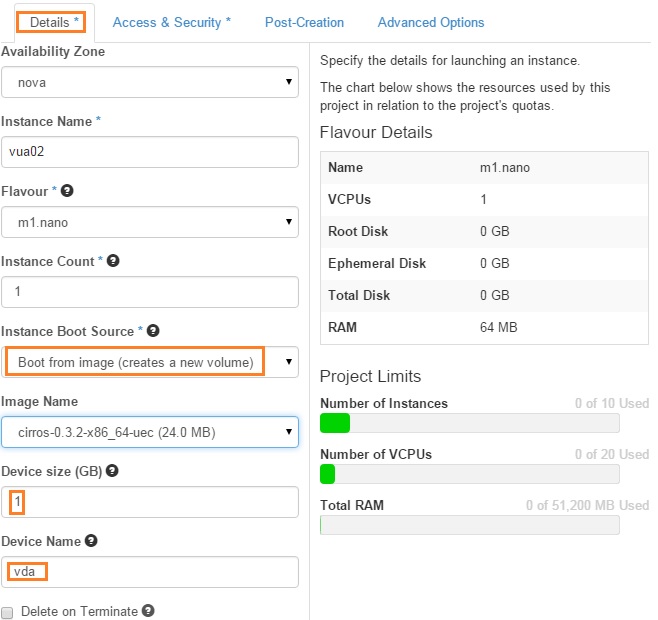
3. Select the instance details like below.
Enter the Instance Details
Availability Zone – nova . (Need to select your compute node). In our case control node & compute nodes are same.
Instance Name – Enter the desired instance name
Flavour – Select the available flavour according to your need. (See the details in right side)
Instance Count – Enter the instance Count
Boot Source – Select boot from pre-defined image.
Image Name – select “cirros” since its very small Linux foot print for testing openstack.
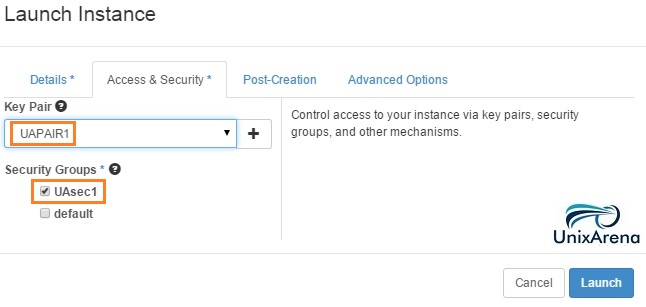
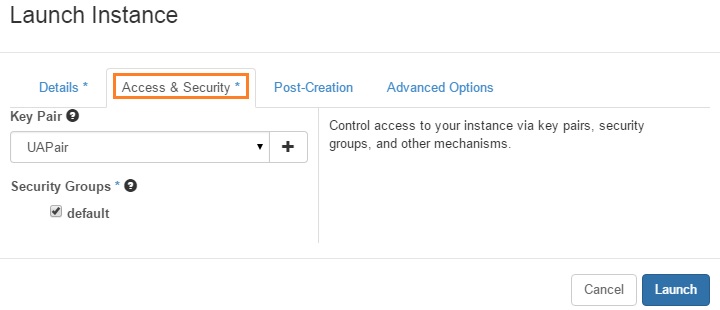
4. Click on Access & security tab for the instance. From the drop down box , select the key pair “UAPAIR” which we have created earlier. Also select the security group which we have created. Click “Launch” to launch the new instance.
Select the security group & Key Pair
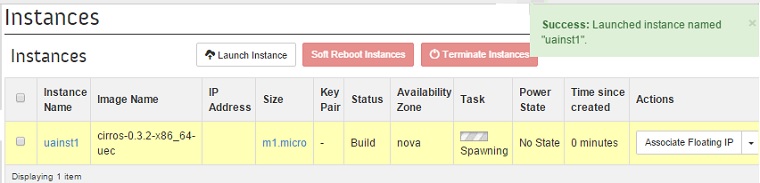
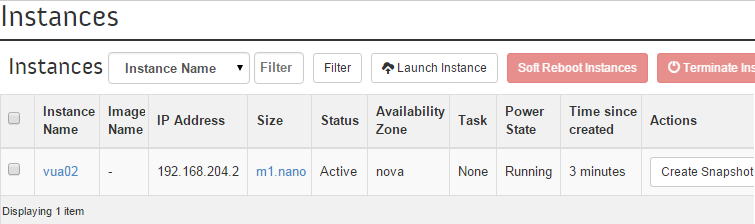
5. Here you can see that instance has been launched. It will take few minutes to boot the instance depends on the image size which we have selected.
Openstack Instance Launched
6. Once the instance is completely up , you can see the screen like below.
Openstack Instance is up
In the IP address tab , you can get the private IP address for the instance. Using this IP , You should be able to access the instance.
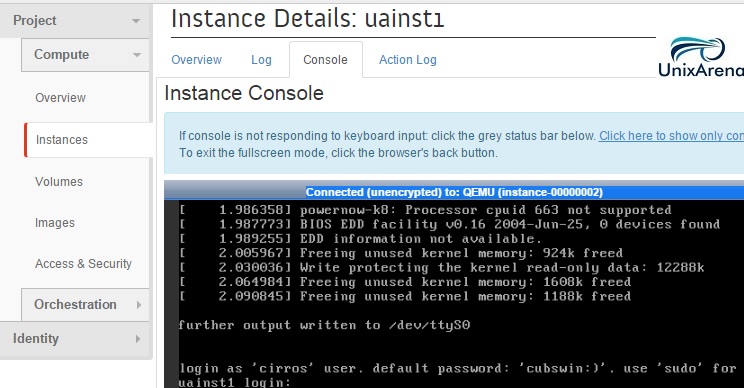
7. If you would like to see the instance console , click the instance name and select the console tab. You should be able to access the instance here as well by double clicking the console bar.
Instance Console
In Openstack’s kilo branch, console may not load properly if you didn’t add the below parameter in the local.conf file during the installation.
“enable_service n-cauth”
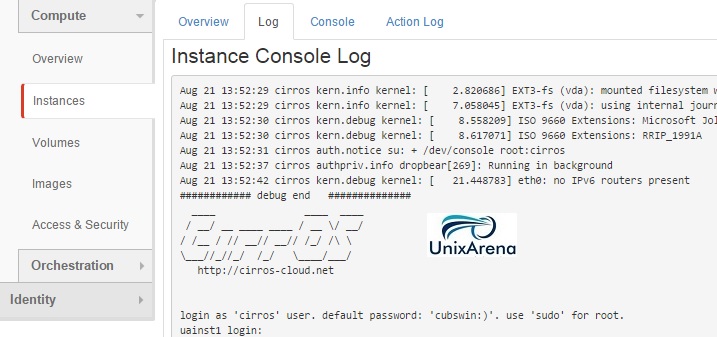
8. You can also check the log to know the instance is booted or not . (If console is not working due to above mentioned issue).
openstack instance log
You should be able to access the instance within the private IP range (If you didn’t allocate the floating IP). Here I am accessing the instance from control node.
stack@uacloud:~$ ssh cirros@192.168.204.2
cirros@192.168.204.2's password:
$
$ sudo su -
# ifconfig -a
eth0      Link encap:Ethernet  HWaddr FA:16:3E:A6:81:BE
          inet addr:192.168.204.2  Bcast:192.168.204.255  Mask:255.255.255.0
          inet6 addr: fe80::f816:3eff:fea6:81be/64 Scope:Link
          UP BROADCAST RUNNING MULTICAST  MTU:1500  Metric:1
          RX packets:114 errors:0 dropped:0 overruns:0 frame:0
          TX packets:72 errors:0 dropped:0 overruns:0 carrier:0
          collisions:0 txqueuelen:1000
          RX bytes:14089 (13.7 KiB)  TX bytes:8776 (8.5 KiB)

lo        Link encap:Local Loopback
          inet addr:127.0.0.1  Mask:255.0.0.0
          inet6 addr: ::1/128 Scope:Host
          UP LOOPBACK RUNNING  MTU:16436  Metric:1
          RX packets:0 errors:0 dropped:0 overruns:0 frame:0
          TX packets:0 errors:0 dropped:0 overruns:0 carrier:0
          collisions:0 txqueuelen:0
          RX bytes:0 (0.0 B)  TX bytes:0 (0.0 B)

# route
Kernel IP routing table
Destination     Gateway         Genmask         Flags Metric Ref    Use Iface
default         192.168.204.3   0.0.0.0         UG    0      0        0 eth0
192.168.204.0   *               255.255.255.0   U     0      0        0 eth0
If you are new to the cloud environment, You should know that how to use the key pairs to access the instances. The procedure remains same when you go for the public clouds like Amazon EC2 or Private clouds like Openstack. The ssh keys consists two parts. The first one is public key which is pushed in to the instance in the name of authorized_keys. The other one is the private key which you have downloaded after creating the key-pair with extension of “.pem”. You can’t change the key pair for the instance once its launched because the key is copied into the instances table of the nova database.
If you lost the private key or forget to allocate the key pair to the instance, you need to recreate the instance using the snapshot feature.
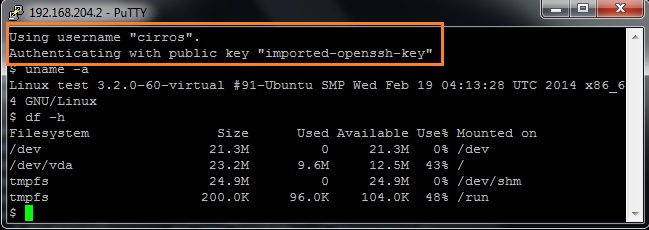
stack@uacloud:~$ ssh -i uapair.pem cirros@192.168.204.2
$
$ uname -a
Linux test 3.2.0-60-virtual #91-Ubuntu SMP Wed Feb 19 04:13:28 UTC 2014 x86_64 GNU/Linux
$ df -h
Filesystem                Size      Used Available Use% Mounted on
/dev                     21.3M         0     21.3M   0% /dev
/dev/vda                 23.2M      9.6M     12.5M  43% /
tmpfs                    24.9M         0     24.9M   0% /dev/shm
tmpfs                   200.0K     96.0K    104.0K  48% /run
$
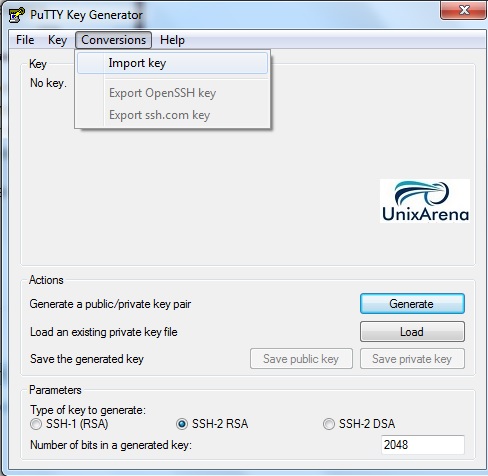
In-case if you need to access the instance from the window box, you can convert the *.pem file as *.ppk file using “puttygen.exe” utility.
1. Login to windows Laptop and download puttygen.exe from putty portal.
2. Open the puttygen.exe.
puttygen.exe – Import the key
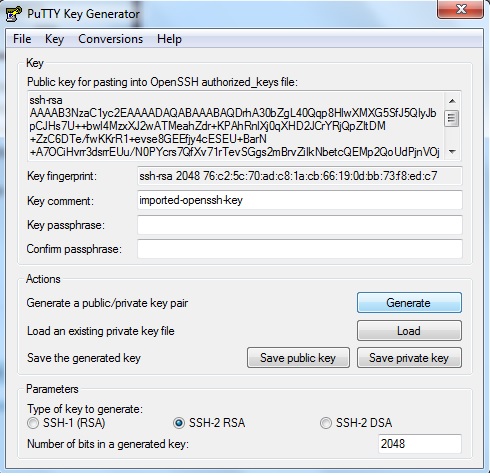
3. Once the key is loaded , you will get screen like below.
Key imported
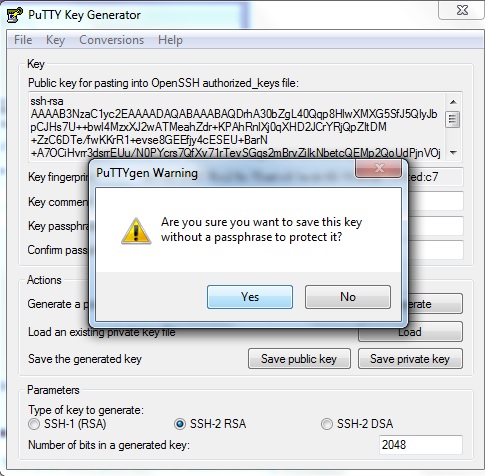
3. Click on “Save Private Key “.
Save the private key
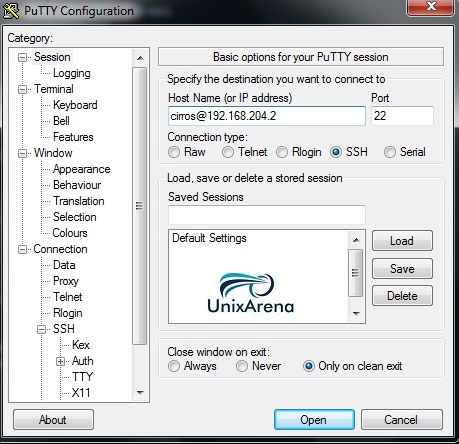
4. Open putty.exe and enter the instance’s IP address .
Session details
5. Navigate to Connection – > SSH – > Auth. Browse the private key file & select the file which you have generated using the puttygen.exe. Click on Open to access the instance.
Load the private key file
6. On the successfully authentication , you should be able to access the instance without password.
The virtual instance OS image can be created outside the openstack. By default openstack comes with small Linux foot print instance called cirros and we have tested it. But as a customer , I would like to put custom image in openstack for various requirement. In this article, we will create Ubuntu custom image using the KVM hypervisor. This article will talk more about configuring the KVM/QEMU hypervisor , installing the required packages for KVM and creating the custom OS image using the KVM/QEMU. At the end of this article, I will demonstrate that how to import the new instance image in Openstack.
Before going forward, we need to understand the various images type supported in Linux KVM. A virtual machine image or instance image is a single file which contains a virtual disk that has a bootable operating system installed on it. Let’s see the various format used in the industry.
1. qcow2 ( QEMU copy on write version 2):
qcow2 is commonly used in KVM hypervisor since its supports sparse representation and snapshot.
2. RAW:
raw image format is a simple one and supported on both xen & kvm hypervisors. The raw images are created using dd command. So it doesn’t support the sparse representation and snapshot. But this format is faster than the qcow2.
3. AMI/AKI/ARI :
These formats are used in Amazon EC2.
AMI (Amazon Machine Image): This is a virtual machine image in raw format.
AKI (Amazon Kernel Image) :A kernel file that the hypervisor will load initially to boot the image. (vmlinuz)
ARI (Amazon Ramdisk Image) :An optional ramdisk file mounted at boot time.(initrd).
4. VMDK:
VMDK (Virtual Machine DisK ) is a default format in VMware ESXi hypervisors.
5. VHDX:
VHDX is the default image format in Microsoft Hyper-V.
6. ISO:
The ISO format is a disk image formatted with the read-only ISO 9660 (also known as ECMA-119) filesystem commonly used for CDs and DVDs.
As I said earlier, prefer other than the Openstack controller machine for creating the OS images. In my case , I am using the Ubuntu machine with VT enabled hardware to create the custom image for Openstack.
1.Login to the Ubuntu Server which has the VT enabled processors.
2. Verify the VT (virtualization Technology ) in that server.
root@KVM#kvm-ok
INFO: /dev/kvm exists
KVM  acceleration can be used
Incase, if you are running Ubuntu in virtual box or VMware workstation , you will error like “Your CPU does not support KVM extensions” . In this case, you can use QEMU if your hardware has VT enabled processor. This can be validated using “virt-host-validate”.
root@KVM#kvm-ok
INFO: Your CPU does not support KVM extensions
KVM acceleration can NOT be used
root@KVM#
root@KVM#/usr/bin/virt-host-validate
  QEMU: Checking for hardware virtualization                                 : WARN (Only emulated CPUs are available, performance will be significantly limited)
  QEMU: Checking for device /dev/vhost-net                                   : PASS
  QEMU: Checking for device /dev/net/tun                                     : PASS
   LXC: Checking for Linux >= 2.6.26                                         : PASS
root@KVM#
3. Install the KVM/QEMU packages using apt-get command. If you already have the qemu-kvm , just ignore this step.
root@KVM#apt-get install qemu-kvm
Reading package lists... Done
Building dependency tree
Reading state information... Done
The following packages were automatically installed and are no longer required:
  python-chardet-whl python-colorama python-colorama-whl python-distlib
  python-distlib-whl python-html5lib python-html5lib-whl python-pip-whl
  python-requests-whl python-setuptools-whl python-six-whl python-urllib3-whl
  python-wheel python3-pkg-resources
root@KVM#apt-get install virtinst
Reading package lists... Done
Building dependency tree
Reading state information... Done
The following packages were automatically installed and are no longer required:
  python-chardet-whl python-colorama python-colorama-whl python-distlib
  python-distlib-whl python-html5lib python-html5lib-whl python-pip-whl
  python-requests-whl python-setuptools-whl python-six-whl python-urllib3-whl
  python-wheel python3-pkg-resources
Use 'apt-get autoremove' to remove them.
The following extra packages will be installed:
  python-pycurl python-urlgrabber
Suggested packages:
  libcurl4-gnutls-dev python-pycurl-dbg virt-viewer
The following NEW packages will be installed:
  python-pycurl python-urlgrabber virtinst
0 upgraded, 3 newly installed, 0 to remove and 19 not upgraded.
Need to get 270 kB of archives.
After this operation, 1,519 kB of additional disk space will be used.
Do you want to continue? [Y/n] y
Get:1 http://in.archive.ubuntu.com/ubuntu/ trusty/main python-pycurl amd64 7.19.3-0ubuntu3 [47.9 kB]
Get:2 http://in.archive.ubuntu.com/ubuntu/ trusty-updates/main python-urlgrabber all 3.9.1-4ubuntu3.14.04.1 [42.3 kB]
Get:3 http://in.archive.ubuntu.com/ubuntu/ trusty/main virtinst all 0.600.4-3ubuntu2 [179 kB]
Fetched 270 kB in 4s (65.7 kB/s)
Selecting previously unselected package python-pycurl.
(Reading database ... 78622 files and directories currently installed.)
Preparing to unpack .../python-pycurl_7.19.3-0ubuntu3_amd64.deb ...
Unpacking python-pycurl (7.19.3-0ubuntu3) ...
Selecting previously unselected package python-urlgrabber.
Preparing to unpack .../python-urlgrabber_3.9.1-4ubuntu3.14.04.1_all.deb ...
Unpacking python-urlgrabber (3.9.1-4ubuntu3.14.04.1) ...
Selecting previously unselected package virtinst.
Preparing to unpack .../virtinst_0.600.4-3ubuntu2_all.deb ...
Unpacking virtinst (0.600.4-3ubuntu2) ...
Processing triggers for man-db (2.6.7.1-1ubuntu1) ...
Setting up python-pycurl (7.19.3-0ubuntu3) ...
Setting up python-urlgrabber (3.9.1-4ubuntu3.14.04.1) ...
Setting up virtinst (0.600.4-3ubuntu2) ...
root@KVM#
6. Create the virtual machine image file like below. Here I am using raw format to create the image.
root@KVM#grep -v "#" /etc/libvirt/qemu.conf
user = "root"
group = "root"
root@KVM#
8.Create the virtual machine using below command. (Change the details according to your environment.)
root@KVM#ls -lrt
total 587780
-rw-rw-r-- 1 libvirt-qemu kvm  601882624 Aug 19 16:53 ubuntu-14.04.3-server-amd64.iso
-rw-r--r-- 1 libvirt-qemu kvm 2147483648 Aug 27 11:44 ubuntu-14.qcow2
root@KVM#
root@KVM#virt-install --virt-type qemu --name ubun-img1 --ram 512 --cdrom=/var/tmp/ubuntu-14.04.3-server-amd64.iso --disk /var/tmp/ubuntu-14.qcow2,format=qcow2 --network network=default --graphics vnc,listen=0.0.0.0 --noautoconsole --os-type=linux --os-variant=ubuntumaverick

Starting install...
Creating domain...                                                                                                                               |    0 B     00:00
Domain installation still in progress. You can reconnect to
the console to complete the installation process.
root@KVM#
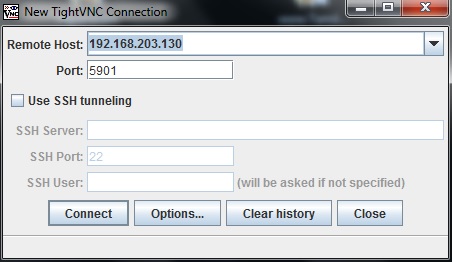
9. Find the VNC port the virtual machine which you have started. Here we can see that virtual machine console is listening in “0.0.0.0:1 ” . Since the VNC port is listening in universal IP, So you can connect from anywhere. “:1” represents “5901” .
10. Open the VNCviewer and connect to the virtual instance VNC port.
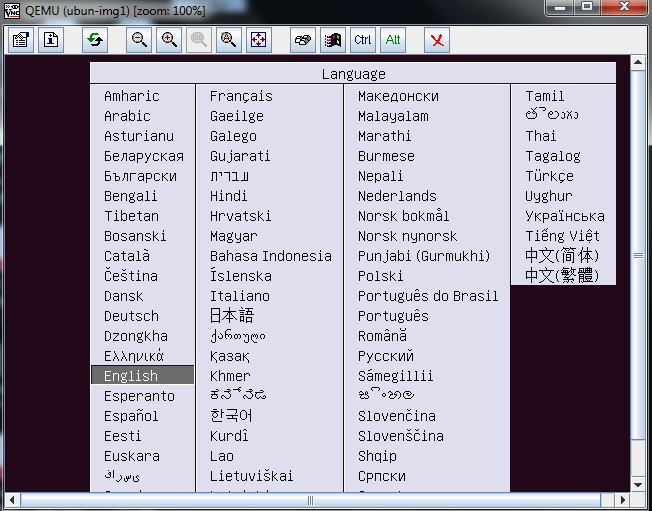
Cloud Image Creation
11. You could see that system is booted using the ISO. During the installation , you must choose ssh-server package for instance access and configure the network.
Cloud Image Creation
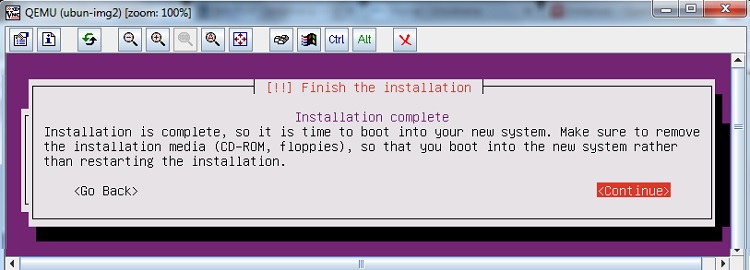
12. Perform the typical Ubuntu installation. Once its done , just reboot the machine.
Cloud Image Creation
13. Here you can see that system is booted from the hard-drive.
Cloud Image Creation
If the virtual guest is not started automatically , it may went to shut-off state. Login to your KVM machine and start like below. Follow the step 9 to find the VNC port for this machine.
root@KVM:~# virsh list --all
 Id    Name                           State
----------------------------------------------------
 5     instance-00000003              running
 14    ubun-img2                      shut-off

root@KVM:~# virsh start ubun-img2
root@KVM:~# virsh list --all
 Id    Name                           State
----------------------------------------------------
 5     instance-00000003              running
 14    ubun-img2                      running

root@KVM:~#
14. Virtual instance must have internet access to install cloud-init package on it.
15. Make sure that “/etc/apt/sources.list” file is up to date on virtual instance. If not , you may not able to install the cloud init package. If “/etc/apt/sources.list” is empty , use the “http://repogen.simplylinux.ch/” to generate it .
My sources.list looks like below. (You could use the same if you are using the Ubuntu 14.04.)
root@ubun-img2:~# cat /etc/apt/sources.list
#------------------------------------------------------------------------------#
#                            OFFICIAL UBUNTU REPOS                             #
#------------------------------------------------------------------------------#


###### Ubuntu Main Repos
deb http://in.archive.ubuntu.com/ubuntu/ trusty main universe
deb-src http://in.archive.ubuntu.com/ubuntu/ trusty main universe multiverse

###### Ubuntu Update Repos
deb http://in.archive.ubuntu.com/ubuntu/ trusty-updates main universe
deb http://in.archive.ubuntu.com/ubuntu/ trusty-proposed main universe
deb http://in.archive.ubuntu.com/ubuntu/ trusty-backports main universe
deb-src http://in.archive.ubuntu.com/ubuntu/ trusty-updates main universe multiverse
deb-src http://in.archive.ubuntu.com/ubuntu/ trusty-proposed main universe multiverse
deb-src http://in.archive.ubuntu.com/ubuntu/ trusty-backports main universe multiverse

###### Ubuntu Partner Repo
deb http://archive.canonical.com/ubuntu trusty partner
deb-src http://archive.canonical.com/ubuntu trusty partner

###### Ubuntu Extras Repo
deb http://extras.ubuntu.com/ubuntu trusty main
deb-src http://extras.ubuntu.com/ubuntu trusty main


root@ubun-img2:~#
16. Install cloud-init package.
root@ubun-img2:~# apt-get install cloud-init
Reading package lists... Done
Building dependency tree
Reading state information... Done
The following extra packages will be installed:
  cloud-guest-utils eatmydata gdisk gir1.2-glib-2.0 groff-base iso-codes
  libasn1-8-heimdal libcurl3-gnutls libdbus-glib-1-2 libgirepository-1.0-1
  libglib2.0-0 libglib2.0-data libgssapi3-heimdal libhcrypto4-heimdal
  libheimbase1-heimdal libheimntlm0-heimdal libhx509-5-heimdal libicu52
  libkrb5-26-heimdal libldap-2.4-2 libroken18-heimdal librtmp0 libsasl2-2
  libsasl2-modules libsasl2-modules-db libwind0-heimdal libxml2 libyaml-0-2
  python-apt-common python-cheetah python-configobj python-json-pointer
  python-jsonpatch python-oauth python-prettytable python-serial python-yaml
  python3-apt python3-dbus python3-gi python3-pycurl
  python3-software-properties sgml-base shared-mime-info
  software-properties-common unattended-upgrades xml-core xz-utils
Suggested packages:
  groff isoquery libsasl2-modules-otp libsasl2-modules-ldap
  libsasl2-modules-sql libsasl2-modules-gssapi-mit
  libsasl2-modules-gssapi-heimdal python-markdown python-pygments
  python-memcache python-wxgtk2.8 python-wxgtk python3-apt-dbg python-apt-doc
  python-dbus-doc python3-dbus-dbg libcurl4-gnutls-dev python3-pycurl-dbg
  sgml-base-doc bsd-mailx mail-transport-agent debhelper
The following NEW packages will be installed:
  cloud-guest-utils cloud-init eatmydata gdisk gir1.2-glib-2.0 groff-base
  iso-codes libasn1-8-heimdal libcurl3-gnutls libdbus-glib-1-2
  libgirepository-1.0-1 libglib2.0-0 libglib2.0-data libgssapi3-heimdal
  libhcrypto4-heimdal libheimbase1-heimdal libheimntlm0-heimdal
  libhx509-5-heimdal libicu52 libkrb5-26-heimdal libldap-2.4-2
  libroken18-heimdal librtmp0 libsasl2-2 libsasl2-modules libsasl2-modules-db
  libwind0-heimdal libxml2 libyaml-0-2 python-apt-common python-cheetah
  python-configobj python-json-pointer python-jsonpatch python-oauth
  python-prettytable python-serial python-yaml python3-apt python3-dbus
  python3-gi python3-pycurl python3-software-properties sgml-base
  shared-mime-info software-properties-common unattended-upgrades xml-core
  xz-utils
0 upgraded, 49 newly installed, 0 to remove and 14 not upgraded.
Need to get 15.2 MB of archives.
After this operation, 72.0 MB of additional disk space will be used.
Do you want to continue? [Y/n] y
Unpacking python-json-pointer (1.0-2build1) ...
Selecting previously unselected package python-jsonpatch.
Preparing to unpack .../python-jsonpatch_1.3-4_all.deb ...
Unpacking python-jsonpatch (1.3-4) ...
Selecting previously unselected package libgirepository-1.0-1.
Preparing to unpack .../libgirepository-1.0-1_1.40.0-1ubuntu0.2_amd64.deb ...
Unpacking libgirepository-1.0-1 (1.40.0-1ubuntu0.2) ...
Selecting previously unselected package gir1.2-glib-2.0.
Preparing to unpack .../gir1.2-glib-2.0_1.40.0-1ubuntu0.2_amd64.deb ...
Unpacking gir1.2-glib-2.0 (1.40.0-1ubuntu0.2) ...
Selecting previously unselected package groff-base.
Preparing to unpack .../groff-base_1.22.2-5_amd64.deb ...

Adding 'diversion of /etc/init/ureadahead.conf to /etc/init/ureadahead.conf.disabled by cloud-init'
Processing triggers for libc-bin (2.19-0ubuntu6.6) ...
Processing triggers for sgml-base (1.26+nmu4ubuntu1) ...
Processing triggers for ureadahead (0.100.0-16) ...
root@ubun-img2:~#
Upon the cloud-init package installation, file “/etc/cloud/cloud.cfg” will be created. cloud-init is the Ubuntu package that handles early initialization of a cloud instance. Each cloud instance must have the cloud-init package.
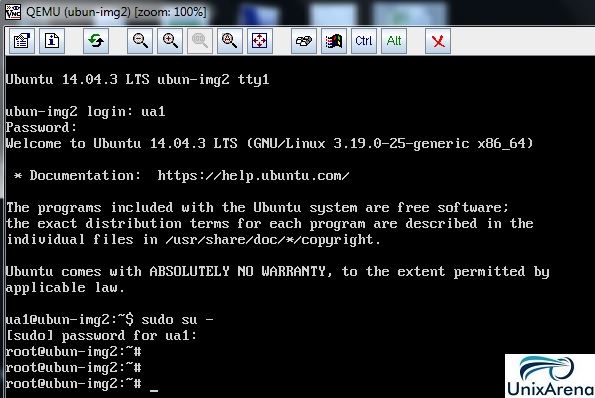
17. Halt the instance .
root@ubun-img2:~# /sbin/shutdown -h now

Broadcast message from ua1@ubun-img2
        (/dev/pts/0) at 6:33 ...

The system is going down for halt NOW!
root@ubun-img2:~#
18.Back to the KVM machine and perform the clean up of the instance. This process will remove the MAC , network configuration and other instance specific stuffs. First we need an utility called “virt-sysperp”. Let’s install it.
root@KVM:/opt/stack# apt-get install libguestfs-tools
Reading package lists... Done
Building dependency tree
Reading state information... Done
The following packages were automatically installed and are no longer required:
  python-chardet-whl python-colorama python-colorama-whl python-distlib
  python-distlib-whl python-html5lib python-html5lib-whl python-pip-whl
  python-requests-whl python-setuptools-whl python-six-whl python-urllib3-whl
  python-wheel python3-pkg-resources
Use 'apt-get autoremove' to remove them.
The following extra packages will be installed:
  libconfig9 libguestfs-perl libhivex0 libintl-perl libstring-shellquote-perl
  libsys-virt-perl libwin-hivex-perl libxml-parser-perl libxml-xpath-perl
Suggested packages:
  libintl-xs-perl
The following NEW packages will be installed:
  libconfig9 libguestfs-perl libguestfs-tools libhivex0 libintl-perl
  libstring-shellquote-perl libsys-virt-perl libwin-hivex-perl
  libxml-parser-perl libxml-xpath-perl
0 upgraded, 10 newly installed, 0 to remove and 19 not upgraded.
Need to get 4,680 kB of archives.
After this operation, 18.1 MB of additional disk space will be used.
Do you want to continue? [Y/n] y
Get:1 http://in.archive.ubuntu.com/ubuntu/ trusty/main libconfig9 amd64 1.4.9-2 [21.7 kB]
Get:2 http://in.archive.ubuntu.com/ubuntu/ trusty/universe libhivex0 amd64 1.3.9-2build1 [30.3 kB]

Get:10 http://in.archive.ubuntu.com/ubuntu/ trusty/universe libguestfs-tools amd64 1:1.24.5-1 [2,529 kB]
Fetched 4,680 kB in 37s (126 kB/s)
Preconfiguring packages ...
Selecting previously unselected package libconfig9:amd64.
(Reading database ... 78742 files and directories currently installed.)
Preparing to unpack .../libconfig9_1.4.9-2_amd64.deb ...
Unpacking libconfig9:amd64 (1.4.9-2) ...

Setting up libconfig9:amd64 (1.4.9-2) ...
Setting up libhivex0:amd64 (1.3.9-2build1) ...
Setting up libintl-perl (1.23-1build1) ...
Setting up libstring-shellquote-perl (1.03-1) ...
Setting up libsys-virt-perl (1.2.1-1) ...
Setting up libxml-parser-perl (2.41-1build3) ...
Setting up libxml-xpath-perl (1.13-7) ...
Setting up libwin-hivex-perl (1.3.9-2build1) ...
Setting up libguestfs-perl (1:1.24.5-1) ...
Setting up libguestfs-tools (1:1.24.5-1) ...
Processing triggers for libc-bin (2.19-0ubuntu6.6) ...
root@KVM:/opt/stack#
19. Run the virt-sysperp to perform the clean up against the image.
root@uacloud:/opt/stack# virt-sysprep -d ubun-img2
Examining the guest ...
Fatal error: exception Guestfs.Error("/usr/bin/supermin-helper exited with error status 1.
To see full error messages you may need to enable debugging.
See http://libguestfs.org/guestfs-faq.1.html#debugging-libguestfs")
root@uacloud:/opt/stack#
Command failed with error “Fatal error: exception Guestfs.Error(“/usr/bin/supermin-helper exited with error status 1.”. Let me enable the debug mode for virt-sysperp and run it to find the cause.
It’s failing with known error “/usr/bin/supermin-helper: ext2: parent directory not found: /lib: File not found by ext2_lookup “. To fix the issue , First Update the “febootstrap” .
root@uacloud:/opt/stack# apt-get upgrade febootstrap
Reading package lists... Done
Building dependency tree
Reading state information... Done
Calculating upgrade... Done
The following packages were automatically installed and are no longer required:
  python-chardet-whl python-colorama python-colorama-whl python-distlib
  python-distlib-whl python-html5lib python-html5lib-whl python-pip-whl
  python-requests-whl python-setuptools-whl python-six-whl python-urllib3-whl
  python-wheel python3-pkg-resources
Use 'apt-get autoremove' to remove them.
The following NEW packages will be installed:
  febootstrap
The following packages have been kept back:
  linux-generic-lts-vivid linux-headers-generic-lts-vivid
  linux-image-generic-lts-vivid
The following packages will be upgraded:
  apparmor apport libapparmor-perl libapparmor1 libxen-4.4 libxenstore3.0
  linux-firmware openssh-sftp-server python3-apport python3-problem-report
  qemu-keymaps qemu-kvm qemu-system-common qemu-system-x86 qemu-utils tzdata
16 upgraded, 1 newly installed, 0 to remove and 3 not upgraded.
Need to get 28.0 MB of archives.
After this operation, 5,720 kB of additional disk space will be used.
Do you want to continue? [Y/n] y
Second, update the guestfs appliance. Perform the guestfs test tool to validate it. If you get “TEST FINISHED OK” , then you are good to proceed with virt-sysprep”.
20. Un-define the virtual instance. The instances’ image file is now good to upload it in openstack.
root@uacloud:/opt/stack# virsh list --all
 Id    Name                           State
----------------------------------------------------
 5     instance-00000003              running
 -     ubun-img2                      shut off
root@uacloud:/opt/stack# virsh undefine ubun-img2
Domain ubun-img2 has been undefined
root@uacloud:/opt/stack# virsh list --all
 Id    Name                           State
----------------------------------------------------
 5     instance-00000003              running
root@uacloud:/opt/stack#
In my setup, image is located in /var/tmp. Refer step 8 to know the image file location.
root@KVM#ls -lrt
total 2002636
-rw-rw-r-- 1 libvirt-qemu kvm   601882624 Aug 19 16:53 ubuntu-14.04.3-server-amd64.iso
-rw-r--r-- 1 root         root 1448869888 Aug 28 04:05 ubuntu-14.qcow2
root@KVM#pwd
/var/tmp
root@KVM#
We have successfully created the Ubuntu cloud instance image.
Import the newly created Instance Image in Openstack:
1. Login to Openstack controller node.
2. Copy the Ubuntu image file which we have created in the KVM machine. I kept the new image instance file in /var/tmp.
stack@uacloud:~$ ls -lrt /var/tmp/ubuntu-14.qcow2
-rw-r--r-- 1 stack stack 1448869888 Aug 28 04:05 /var/tmp/ubuntu-14.qcow2
stack@uacloud:~$
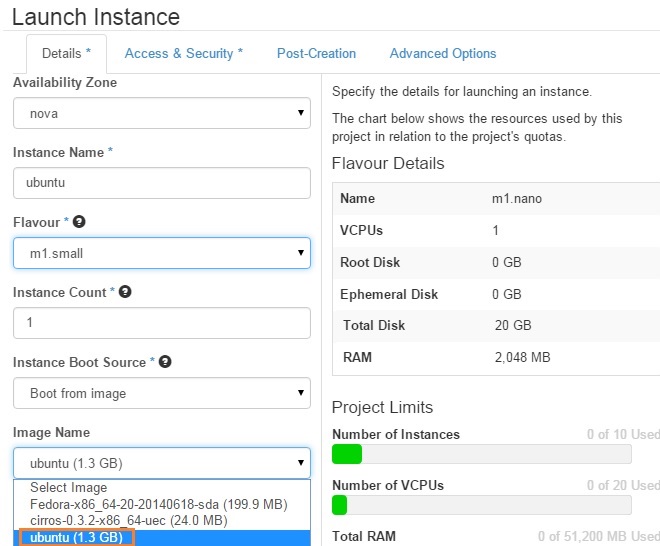
3.Create the image using glance using the source image file.
2. When you click on launch instance tab , you should be able to choose ubuntu image like below.
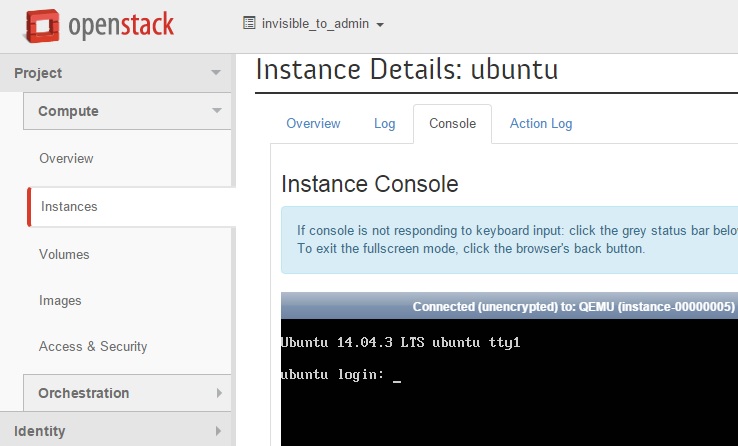
Lanuch Ubuntu instance
3. Once the instance is up & running , click on the instance & see the console.
Instance Console
In this article , we have seen that how to create the custom OS image for the cloud instance and importing in to the openstack’s glance service . At last ,we have launched the instance using the newly created image. Hope this article is informative to you.
Creating the cloud instance image is not a cake-walk. If you have followed the last article ,you would have felt the same. That could be the reason why the pre-configured cloud images are available in the internet. Openstack.org also states that “The simplest way to obtain a virtual machine image that works with OpenStack is to download one that someone else has already created.” In this article we will see that where we can download the various Linux distribution cloud images and windows images.
CirrOS images:
CirrisOS images can be downloaded from CirrOS official download page. CirrOS is very small Linux foot print and test image on Openstack cloud environment. If your deployment uses QEMU or KVM, we recommend using the images in qcow2 format. The most recent 64-bit qcow2 image as of this writing is cirros-0.3.4-x86_64-disk.img.
In a CirrOS image, the login account is cirros. The password is cubswin:)
Ubuntu Cloud Images are pre-installed disk images that have been customized by Ubuntu engineering to run on cloud-platforms such as Amazon EC2, Openstack, Windows and LXC.
Fedora projects maintains the cloud images on getfedora.org. Fedoara’s default user is “fedora”.
openSUSE:
OpneSUSE can be downloaded from suse website . SUSE Linux Enterprise Server (SLES) is not available but you can built the custom image using the SUSE studio.
Red Hat Enterprise Linux images
Redhat Maintains their own cloud images for Redhat Enterprise Linux. Unlike other Linux, you can’t download the images without the valid redhat subscription. Here is the download links for RHEL 6 & 7.
Cloudbase solutions provides the windows servers 2012 images . It has been customized by cloudbase and ready to be deployed in openstack. It supported on the below listed hyper-visors.
Hyper-V
KVM
XenServer
Cloudbase bundles the required drivers also in the images. For an example , virtIO drivers included in the image for KVM. This images are pre-installed with cloud-init packages and properly sys-prepared and generalized.
I am sure that many of the companies are still thinking that which is the best software for Private cloud solutions. The infrastructure market is changing rapidly in recent times. Once upon a time , mainframe was ruling in the market . Later on , Unix operating systems were kicked in to the market and operating systems like Sun Solaris , IBM AIX and HP-UX were replaced the most of the mainframe machines. Still those Unix flavours are surviving in enterprise market due to robustness and support . In late 2000’s , Microsoft also started occupying the Mid-range server market. In 2005 , Linux has emerged in to the market to cut the cost of Unix systems (RISC)and costly Microsoft window license.
The above history rolls around the typical Operating system’s revolution and falls. In traditional systems, we may not use all the system resources. In late 2010 , Virtualization has boomed to utilize the hardware 100% (More than 100%). So all the operating system vendors were started offering the Virtualization on their respective OS. At the same time , hypervisor emerged in to the market and entire world was driving towards to server consolidating. VMware’s ESXi hypervisor is still ruling the datacenter.
After seeing the Amazon cloud platform success , most of the companies are started looking for the private cloud software and they find the Openstack at the right time. Due to openness of Openstack’s nature, many organization are interested to contribute, support & promote this private cloud software.
Is it possible to compare VMware vSphere with Openstack ?
It’s difficult. But both VMware vSphere and Openstack offers the private cloud solutions.Openstack is made to enhance the existing technology and provide the on-demand basis virtual resources. This ecosystem software can help to reduce the power , Cost. Openstack has almost 30+ approved services within it where as VMware vSphere is offering less than 5 (compute, storage, image , networking, & Dashboard). Unlike VMware , you no need to check for the hardware compatibility for Openstack. The Openstack controller node can even run on “whitebox” commodity hardware.
Openstack has the block IO based storage(swift) for the instances but VMware doesn’t have it. Openstack is just 4 years old and only 10 release had in the past. So it requires some time to reach the enterprise computing. But where as VMware reached high in the enterprise virtualization market. Since the Openstack’s icehouse release, most of the companies are joined with Openstack and aggressively they are making the progress to reach the customers.
When it comes to cloud , people will be always questing about the security. I think openstack has considerably cleared that boundary with strong POC (Proof of concept).
Note that VMware also supports the openstack development and they have integrated openstack with vCenter servers. In VMworld 2015 , VMware has proudly announced VIO 2.0 (VMware Integrated OpenStack 2) with many new features including seamless upgrade, LBaaS ,Ceilometer , Qcow2 image support etc.
Openstack supports almost all the hyper-visors in the world including VMware ESxi , Xen , KVM and Hyper-V. Its default hyper-visor is KVM. Where as VMware only supports their own hypervisor ESXi. This motivates to use Openstack than VMware. Another thing is that , VMware VIO (VMware Integrated Openstack) is an appliance which is deployed on top of VMware vCenter. vCenter also performs the similar tasks like Openstack. Not sure how we can scale of the environment using the VIO2 .
Some of the reports admitted that VMware Integrated Openstack customers are more than the Redhat Openstack customers. But those are existing VMware customers and they have shown the interest on VMware Integrated Openstack. Looks like customers would like evaluate the openstack on their existing environment without any additional cost since they may invested some millions of dollars on that.
Openstack is free software but you have to pay bit more for the support. It also requires lot of skills and very difficult to get people from the market. According to me , Openstack + KVM hypervisor would really save lot of money but you should get the right people to design it properly. At the same time , it can be integrated with VMware hypervisor & Hyper-V to utilize the existing infrastructure.
VMware is already invested on the vCloud director (vCloud Automation centre) for the private cloud solutions. They have also invested in Openstack for the similar solutions. This increases the companies investment on the different technology for same solutions. EMC is the parent company of VMware. Recently they have acquired virtustream who is the hybrid cloud solutions provider. In this case, Both Parent and child companies are investing on the different cloud technologies for the same solutions which makes more confusing. Looks like EMC is planning to buy the remaining stake of VMware to tighten the grip on VMware to save $ 1 Billion annually by avoiding the double investments for same solutions.
It’s a right time for companies to start use of Openstack. At the same time , it better to use multiple hyper-visors like KVM , Xen , VMware ESXi to make the flexible environment in the private cloud.
The VMware’s global conference for virtualization and cloud computing “VMworld 2015” is completed in San Francisco today. In that conference , they have announced the most important release for “VMware integrated Openstack 2.0 (VIO 2.0)”. The first VMware integrated openstack (VIO) released in 2014. Since then VMware aggressively doing more enhancement on the Openstack part. VIO 2.0 has major updates with lot of features and expected to be available before the end of Q3 2015 for download.
Let’s see what VIO 2.0 brings new to the world.
Openstack Kilo:
VMware Integrated Openstack 2.0 is based on kilo which is the latest openstack release . The previous openstack release was named as Juno. VIO 1.0 is based on Icehouse release which was released prior to juno. Ironic is the new feature which is integrated in to the kilo release. Ironic helps to provision the physical machine in addition to the existing VM instance provisioning. It also supports the Linux containers which the next emerging technology. Users can place workloads in the best environment for their performance requirements. Rackspace is already using Ironic on their production environment.
OpenStack Upgrade:
Openstack is just 5 years old technology and the development is still going on the aggressive phase. So the release will be supported for just one year from the release date. So you have forced to upgrade the environment to get the community support. The upgrade is not so easy like a traditional operating systems. But VMware Integrated Openstack 2.0 supports the seamless upgrade. VMware claimed that this is the industry’s first seamless upgrade capability between OpenStack releases. Customers will now be able to upgrade from VIO 1.0 (Icehouse) to VIO 2.0 (Kilo), and even roll back if anything goes wrong, in a more operationally efficient manner.
Language Support:
VIO 2.0 will support in seven languages including English, German, French, Traditional Chinese, Simplified Chinese, Japanese and Korean.
Load Balancer as Service: (LBaas)
As you all know that VMware NSX is targeting to make all the psychical networks in to the software defined network(SDN) model. Load Balancer as service will be available to the openstack through VMware NSX from VIO 2.0 onwards.
Ceilometer:
Ceilometer is the openstack’s default billing system which provides the accurate resources usage to the customer. VIO 2.0 will support ceilometer using the mongoDB as backend database.
HEAT: (The Orchestration Program):
HEAT is the default orchestration program in Openstack. Infrastructure as code or programmable infrastructure to manage configurations and automate provisioning of infrastructure in addition to deployments and HEAT is responsible to do that in Openstack. HEAT uses the simple YAML based text files to create the infrastructure in few minutes. VIO 2. 0 supports the HEAT’s auto scaling facility to turn on the instance on demand basis. When the workload reaches the specific limit, HEAT’s auto scaling can turn on another few instances to share the work load. LBaaS will provide load balancing for the scale out components.
Backup and Restore:
VIO 2.0 will include the ability to backup and restore OpenStack services and configuration data in quick time.
Windows Customization:
VIO 2.0 supports the windows image customization where you can specify the various attributes like SID, admin password for the VM. You will also get the options to specify the affinity rules.
Qcow2 Image Support:
VMware’s default image format is VMDK(Virtual Machine disk image). From VIO 2.0 onwards, It will support the Linux ‘s famous qcow2 image. (Quick copy on write).
Feel free to try VMware’s Hands on LAB for VIO . (HOL)
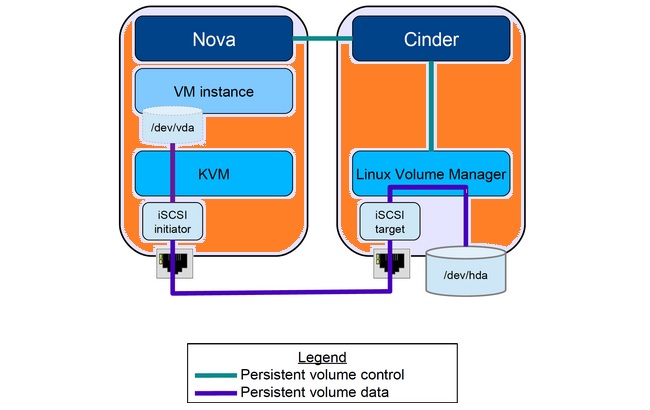
Cinder is the default block storage service on Openstack. Cinder service manages the volumes , volume snapshots, and volume types. Prior to year 2012 , cinder was part of nova module in the name of nova-volume. To reduce the nova coding and improve the volume service, developers has separated the volume service from nova codes and they named volume service as cinder. Since then , multiple vendors are started providing the API to the cinder services. By default , cinder uses the LVM as back-end storage system. The default configuration file is /etc/cinder/cinder.conf. In this article, I will demonstrate that how to use the cinder service on Openstack which is configured using devstack method.
There are three important components in cinder block service.
cinder-volume.
cinder-scheduler
cinder-backup
Messaging queue. (RabbitMQ)
Cinder act like a front-end interface and communicate to LVM or Ceph using the API in the back-end to provide the volume services. Ceph is the advanced storage which eliminates the limitations of LVM.
Configure the cinder: (Only for the testing purpose )
Note: Since I have logged in as stack user , Need to use sudo command to get the necessary privileges.
1.Let’s have dedicated harddrive for cinder.
stack@uacloud:~$ sudo  fdisk -l /dev/sdb

Disk /dev/sdb: 10.7 GB, 10737418240 bytes
255 heads, 63 sectors/track, 1305 cylinders, total 20971520 sectors
Units = sectors of 1 * 512 = 512 bytes
Sector size (logical/physical): 512 bytes / 512 bytes
I/O size (minimum/optimal): 512 bytes / 512 bytes
Disk identifier: 0x00000000

Disk /dev/sdb doesn't contain a valid partition table
stack@uacloud:~$
2. Install the lvm2 packages. (In my case, lvm2 is already installed)
stack@uacloud:~$ sudo apt-get install lvm2
Reading package lists... Done
Building dependency tree
Reading state information... Done
lvm2 is already the newest version.
0 upgraded, 0 newly installed, 0 to remove and 17 not upgraded.
stack@uacloud:~$
5. Edit the cinder.conf like below. Just replaced volume group name as stack-vg.
stack@uacloud:~$ cat /etc/cinder/cinder.conf |grep group
volume_group = stack-volumes-lvmdriver-1
stack@uacloud:~$ cp /etc/cinder/cinder.conf /etc/cinder/cinder.conf.08092015
stack@uacloud:~$ vi /etc/cinder/cinder.conf
stack@uacloud:~$ cat /etc/cinder/cinder.conf |grep group
volume_group = stack-vg
stack@uacloud:~$
6. Run unstack.sh & re-join.sh to restart all the openstack services.
stack@uacloud:~/devstack$ ./unstack.sh
Site keystone disabled.
To activate the new configuration, you need to run:
  service apache2 reload
 * Stopping web server apache2                                                                                                                                           *
 * Starting web server apache2                                                                                                                                          AH00558: apache2: Could not reliably determine the server's fully qualified domain name, using 127.0.0.1. Set the 'ServerName' directive globally to suppress this message
 *
pkill: killing pid 42051 failed: Operation not permitted
pkill: killing pid 42055 failed: Operation not permitted
 * Stopping web server apache2                                                                                                                                           *
tgt stop/waiting
stack@uacloud:~/devstack$ ./rejoin-stack.sh
[detached from 48132.stack]
stack@uacloud:~/devstack$
8. Login to Openstack Dashboard to use the first cinder volume. If you unable to get the Dashboard, restart the Apache services like below.
stack@uacloud:~/devstack$ sudo   service apache2 restart
 * Restarting web server apache2                                                                                                                                                                                                                                                                                               [ OK ]
stack@uacloud:~/devstack$
9. By default, nova instance creates the image file under below mentioned location when you launch the instance (using image).
10. Since we have configured the cinder , Let’s create new instance on cinder volume. Login to the Openstack dashboard & Launch instance.
Use Volume for Nova instance
11. Click on Access & security to map the right key pairs & security profile.
Use Volume for Nova instance
12. Here you can see that instance has been created using the cinder volume.
Instance is up
13. Navigate to the volumes tab. Here you can see that volume is created and attached to the instance “vua02”. Since it is a OS volume , so marked as bootable. (Right side)
Volume’s Tab
There was an issue while configuring the cinder service where I am unable to create a new volume using the dashboard. But I was able to create the volume using “cinder create 1” using command line. To fix this , I have re-installed the ISCSI packages. (Ubuntu)
Openstack is not just only about the internet buzz. It’s going to create new revolution on the IT infrastructure industry. How Openstack can do this since it’s just 5 years old ? Is it similar to VMware virtualization ? Oracle VM ? Redhat Virtualization ? Citrix Xen ? Not exactly. Openstack is an opensource project which accepts all the hyper-visors as virtualiazation host, Dedicated volume management node , Object storage , Software defined networking , Orchestration and many more. For an example, Using Openstack controller node , you can connect to VMware ESXi and create the VM and use it . At the same time , you can also able to communicate to the KVM hypervisor and launch the new OS instance using Openstack dashboard. All the Operating system vendors are willing to support openstack to ensure that their products are like in the market.
If you are new to openstack and would like to learn openstack , you must use devstack method to deploy for first time. This article is strictly for openstack beginners.
Click on the each title to reach the respective articles.
When you are using the devstack method to manage the openstack services , you need to stop the services prior to the controller node reboot. In my setup , all the services are configured on the same node. Just go through this article to stop & start the openstack services.
By default, instances are launched using swift storage service(Object Storage). If you select “Boot from Image using new volume”, system will look for cinder service and if it is available , if will create a new volume for the OS instance. In this article, I have configured the LVM2 as back-end storage for cinder service.
If you feel that creating the custom OS instance image is painful, you can download the pre-configured Cloud images for various operating system from internet. I have consolidated all the various Operating system’s download links in this article.
Hope this consolidated article will give you some idea to start learning Openstack. So far we have just seen the basic openstack services and it’s use. There are services like “HEAT” orchestration service , neutron for Software defined networking ,LBaas and etc… Hope you can find “Openstack Guide for Experts” soon in UnixArena. Stay Tuned.
Storage Industry haven’t changed much prior to the Hypervisor’s revolution. But in last few years, the industry is facing heavy competition from new vendor’s innovation ideas, Quality of the product , seamless support and cost. SolidFire is one of the storage vendors who is re-writing the fundamental of SAN boxes. The traditional SAN arrays will consists spinning disks with various speeds and some amount of Flash devices for cache. But SolidFire produces the SAN boxes only with Flash Array’s and it says “Good Bye” to spinning disks. Using SolidFire , customers can achieve linear scale of both capacity and performance without downtime or performance impact.
Since physical machine can host multiple virtual machine, the amount of required IOPS also increased rapidly. VMware’s storage vMotion feature a simple example which use to double the IO’s frequently. The SolidFire storage is just built for most demanding OpenStack , Cloud environments.
Like openstack , Cloudstack also an opensource cloud software which is developed by Apache Software Foundation (ASF). Initial cloudstack project has been developed by cloud.com then sold to Citirx. Citrix donated cloudstack to Apache Software foundation to make the project as 100% open source. At present Citrix is main contributor to cloudstack.
SolidFire has dedicated resources that drive real contributions to the CloudStack community. They strive to deliver the industry’s most comprehensive storage integration for CloudStack. SolidFire has already validated multi-hypervisor support within CloudStack while continually pushing to expand the supported use cases for the combined solution. Going forward, we are focused on driving continued improvements into the CloudStack storage architecture to ensure it can exploit the most advanced, next-generation storage functionality.
This series of the article is going to provide the step by step method to deploy each component of Openstack cloud Computing platform. As you all know that Openstack is an open source cloud computing platform which support all type of cloud environments. This project aims for simple implementation, massive scalability, and a rich set of features. Cloud computing experts from around the world contribute to the project. Openstack consists of several key projects that you install separately but that work together depending on your cloud needs. These projects include Compute, Identity Service, Networking, Image Service, Block Storage, Object Storage, Telemetry, Orchestration, and Database. In this article series ,we will be seeing “4 node Openstack Architecture” planning and implementation.
Identity service, Image Service, management portions of Compute and Networking, Networking plug-in, and the dashboard. It also includes supporting services such as a database, Message Broker , and Network Time Protocol (NTP). Optionally , it can also provide Database Service, Orchestration, and Telemetry. These components provides the additional features to your environment.
Node 2
Compute (Nova)
The compute node runs the hypervisor portion of Compute, which operates tenant virtual machines or instances. By default Compute uses KVM as the hypervisor. The compute node also runs the Networking plug-in and layer 2 agent which operate tenant networks and implement security groups. You can also run more than one compute node to provide the more compute resources to the openstack controller node.
Node 3
Networking (Neutron)
The network node runs the Networking plug-in, layer 2 agent, and several layer 3 agents that provision and operate tenant networks. Layer 2 services include provisioning of virtual networks and tunnels. Layer 3 services include routing, NAT , and DHCP. This node also handles external (internet) connectivity for tenant virtual machines or instances.
Node 4
Storage (Swift & Cinder)
This storage node is responsible to provide the Block Storage, Object Storage.
Openstack 4 Node Architecture
Let’s Build the Nodes for openstack:
Install Ubuntu 14.04 64 bit servers on 4 systems [either in Physical machines or within a VMware/Virtual box VMs] with “openssh-server” package installed.
2. Configure each node like below. (Hostname , IP etc..)
Nodes
HostName
IP Address
Functionality
Node 1
OSCTRL-UA
192.168.203.130
Controller
Node 2
OSCMP-UA
192.168.203.131
Compute
Node 3
OSNWT-UA
192.168.203.132
Network
Node 4
OSSTG-UA
192.168.203.133
Storage
3. Add the below entry on all the hosts for name resolution.
5. The external interface uses a special configuration without an IP address assigned to it. Configure the third interface as the external interface on network node. (eth2)
Add the below entry in /etc/network/interfaces and save it .
root@OSNWT-UA:~# tail -6  /etc/network/interfaces
#External Network
auto  eth2
iface eth2 inet manual
up ip link set dev $IFACE up
down ip link set dev $IFACE down
root@OSNWT-UA:~#
6. Configure the controller node as NTP reference server and any additional nodes to set their time from the controller node.
Install NTP packages on all the Nodes using apt-get command.
# apt-get install ntp
Edit the NTP configuration on Network node ,Storage node and Compute node like below.
root@OSSTG-UA:~# cat /etc/ntp.conf |grep server |grep -v "#"
server OSCTRL-UA
root@OSSTG-UA:~#

root@OSCMP-UA:~# cat /etc/ntp.conf |grep server |grep -v "#"
server OSCTRL-UA
root@OSCMP-UA:~#


root@OSNWT-UA:~# cat /etc/ntp.conf |grep server |grep -v "#"
server OSCTRL-UA
root@OSNWT-UA:~#
In the above output, we can see that all the openstack nodes are using controller node(OSCTRL-UA) as NTP server. The “ntpq -p” command confirms that all the nodes are in sync with Openstack controller node.
root@OSSTG-UA:~# ntpq -p
     remote           refid      st t when poll reach   delay   offset  jitter
==============================================================================
*OSCTRL-UA       91.189.94.4      3 u   99  128  377    0.282  -15.576   4.977
root@OSSTG-UA:~#


root@OSCMP-UA:~# cat /etc/ntp.conf |grep server |grep -v "#"
server OSCTRL-UA
root@OSCMP-UA:~# ntpq -p
     remote           refid      st t when poll reach   delay   offset  jitter
==============================================================================
*OSCTRL-UA       91.189.94.4      3 u   32  128  377    0.237   -5.282   2.664
root@OSCMP-UA:~#


root@OSNWT-UA:~# cat /etc/ntp.conf |grep server |grep -v "#"
server OSCTRL-UA
root@OSNWT-UA:~# ntpq -p
     remote           refid      st t when poll reach   delay   offset  jitter
==============================================================================
*OSCTRL-UA       91.189.94.4      3 u  113  128  377    0.471  -22.105   4.027
root@OSNWT-UA:~#
Openstack Controller node is syncing time with internet sources. (By default). No additional configuration required.
root@OSCTRL-UA:~# cat /etc/ntp.conf |grep server |grep -v "#"
server 0.ubuntu.pool.ntp.org
server 1.ubuntu.pool.ntp.org
server 2.ubuntu.pool.ntp.org
server 3.ubuntu.pool.ntp.org
server ntp.ubuntu.com
root@OSCTRL-UA:~# ntpq -p
     remote           refid      st t when poll reach   delay   offset  jitter
==============================================================================
-ns02.hns.net.in 142.66.101.13    2 u   78  128  377   76.966   35.500  31.104
+dnspun.net4indi 120.88.46.10     3 u  119  128  377   83.678    7.101   3.390
-123.108.200.124 123.108.225.6    3 u  127  128  377   75.094   21.590   7.696
+113.30.137.34   212.26.18.41     2 u    8  128  377   77.814   -2.678   6.067
*juniperberry.ca 193.79.237.14    2 u   25  128  377  197.141    5.911   5.170
root@OSCTRL-UA:~#
Summary:
We have seen the various openstack service names and it’s use.
We have seen the sample architecture of “4 Node Openstack” .
We have deployed the 4 Ubuntu 14.04 TLS machines (Physical or VM) and defined the functionality of each nodes.
Configured system IP addresses on each Nodes & added in to the /etc/hosts on all the nodes for local DNS.
Configured tunnelling IP’s on Network node & Compute Node.
Used the third NIC card (eth2) for special configuration without configuring any IP address on Network node (neutron)
Configured the NTP on all the nodes. All the Openstack nodes will use controller node as reference server. Openstack Controller system will sync with internet source by default.
Openstack Manual Installation will be quite lengthy process. If you are new to Openstack , Please check out Beginners Guide
Controller node is the heart of Openstack platform which manages the various services. This article help you to configure the Mysql DB & Rabbit MQ messaging service on Openstack controller node. Each services must be protected with password for security reason. Each service will invoke for password whenever you are trying to use it. In real production environment, Openstack will recommended to use the random password using openssl command. These passwords will be generated by pwgen program.
You need to generate “N” number of passwords which needed for each openstack services. Here I would like to keep the simple password for each services since its a test environment.
Here is the pre-defined password for my environment.
Service Name (Key)
Password
Database password (no variable used)
stack (Set root password )
RABBIT_PASS
rabbit123
KEYSTONE_DBPASS
keydb123
ADMIN_PASS
admin123
GLANCE_DBPASS
glancedb123
GLANCE_PASS
glance123
NOVA_DBPASS
novadb123
NOVA_PASS
nova123
DASH_DBPASS
dsahdb123
CINDER_DBPASS
cinderdb123
CINDER_PASS
cinder123
NEUTRON_DBPASS
neutrondb123
NEUTRON_PASS
neutron123
HEAT_DBPASS
heatdb123
HEAT_PASS
heat123
CEILOMETER_DBPASS
celidb123
CEILOMETER_PASS
celi123
TROVE_DBPASS
trovedb123
TROVE_PASS
trove123
Controller Node setup:
1. Most of the openstack services requires Database to store the information. On the controller node, install the MySQL Server and client packages, and the Python library. During the installation, system will prompt to set the password for Mysql root user. (According to my password table, I set as “stack”)
root@OSCTRL-UA:/mnt# apt-get install python-mysqldb mysql-server
Reading package lists... Done
Building dependency tree
Reading state information... Done
The following extra packages will be installed:
  libdbd-mysql-perl libdbi-perl libhtml-template-perl libmysqlclient18
  libterm-readkey-perl mysql-client-5.5 mysql-client-core-5.5 mysql-common
  mysql-server-5.5 mysql-server-core-5.5
Suggested packages:
  libclone-perl libmldbm-perl libnet-daemon-perl libplrpc-perl
  libsql-statement-perl libipc-sharedcache-perl tinyca mailx
  python-egenix-mxdatetime python-mysqldb-dbg
The following NEW packages will be installed:
  libdbd-mysql-perl libdbi-perl libhtml-template-perl libmysqlclient18
  libterm-readkey-perl mysql-client-5.5 mysql-client-core-5.5 mysql-common
  mysql-server mysql-server-5.5 mysql-server-core-5.5 python-mysqldb
0 upgraded, 12 newly installed, 0 to remove and 49 not upgraded.
Need to get 9,569 kB of archives.
After this operation, 96.7 MB of additional disk space will be used.
Do you want to continue? [Y/n] y
Get:1 http://in.archive.ubuntu.com/ubuntu/ trusty-updates/main mysql-common all 5.5.44-0ubuntu0.14.04.1 [13.9 kB]
Get:11 http://in.archive.ubuntu.com/ubuntu/ trusty-updates/main mysql-server all 5.5.44-0ubuntu0.14.04.1 [12.2 kB]
Get:12 http://in.archive.ubuntu.com/ubuntu/ trusty/main python-mysqldb amd64 1.2.3-2ubuntu1 [55.4 kB]
Fetched 9,569 kB in 46s (205 kB/s)
Preconfiguring packages ...
Selecting previously unselected package mysql-common.
(Reading database ... 57912 files and directories currently installed.)
Preparing to unpack .../mysql-common_5.5.44-0ubuntu0.14.04.1_all.deb ...
Unpacking mysql-common (5.5.44-0ubuntu0.14.04.1) ...
Selecting previously unselected package libmysqlclient18:amd64.
Preparing to unpack .../libmysqlclient18_5.5.44-0ubuntu0.14.04.1_amd64.deb ...
Unpacking libmysqlclient18:amd64 (5.5.44-0ubuntu0.14.04.1) ...
Selecting previously unselected package libdbi-perl.
Preparing to unpack .../libdbi-perl_1.630-1_amd64.deb ...
Unpacking libdbi-perl (1.630-1) ...
Selecting previously unselected package libdbd-mysql-perl.
Preparing to unpack .../libdbd-mysql-perl_4.025-1_amd64.deb ...
Unpacking libdbd-mysql-perl (4.025-1) ...
Selecting previously unselected package libterm-readkey-perl.
Preparing to unpack .../libterm-readkey-perl_2.31-1_amd64.deb ...
Unpacking libterm-readkey-perl (2.31-1) ...
Selecting previously unselected package mysql-client-core-5.5.
Preparing to unpack .../mysql-client-core-5.5_5.5.44-0ubuntu0.14.04.1_amd64.deb ...
Unpacking mysql-client-core-5.5 (5.5.44-0ubuntu0.14.04.1) ...
Selecting previously unselected package mysql-client-5.5.
Preparing to unpack .../mysql-client-5.5_5.5.44-0ubuntu0.14.04.1_amd64.deb ...
Unpacking mysql-client-5.5 (5.5.44-0ubuntu0.14.04.1) ...
Selecting previously unselected package mysql-server-core-5.5.
Preparing to unpack .../mysql-server-core-5.5_5.5.44-0ubuntu0.14.04.1_amd64.deb ...
Unpacking mysql-server-core-5.5 (5.5.44-0ubuntu0.14.04.1) ...
Processing triggers for man-db (2.6.7.1-1ubuntu1) ...
Setting up mysql-common (5.5.44-0ubuntu0.14.04.1) ...
Selecting previously unselected package mysql-server-5.5.
(Reading database ... 58268 files and directories currently installed.)
Preparing to unpack .../mysql-server-5.5_5.5.44-0ubuntu0.14.04.1_amd64.deb ...
Unpacking mysql-server-5.5 (5.5.44-0ubuntu0.14.04.1) ...
Selecting previously unselected package libhtml-template-perl.
Preparing to unpack .../libhtml-template-perl_2.95-1_all.deb ...
Unpacking libhtml-template-perl (2.95-1) ...
Selecting previously unselected package mysql-server.
Preparing to unpack .../mysql-server_5.5.44-0ubuntu0.14.04.1_all.deb ...
Unpacking mysql-server (5.5.44-0ubuntu0.14.04.1) ...
Selecting previously unselected package python-mysqldb.
Preparing to unpack .../python-mysqldb_1.2.3-2ubuntu1_amd64.deb ...
Unpacking python-mysqldb (1.2.3-2ubuntu1) ...
Processing triggers for man-db (2.6.7.1-1ubuntu1) ...
Processing triggers for ureadahead (0.100.0-16) ...
Setting up libmysqlclient18:amd64 (5.5.44-0ubuntu0.14.04.1) ...
Setting up libdbi-perl (1.630-1) ...
Setting up libdbd-mysql-perl (4.025-1) ...
Setting up libterm-readkey-perl (2.31-1) ...
Setting up mysql-client-core-5.5 (5.5.44-0ubuntu0.14.04.1) ...
Setting up mysql-client-5.5 (5.5.44-0ubuntu0.14.04.1) ...
Setting up mysql-server-core-5.5 (5.5.44-0ubuntu0.14.04.1) ...
Setting up mysql-server-5.5 (5.5.44-0ubuntu0.14.04.1) ...
150920 23:19:49 [Warning] Using unique option prefix key_buffer instead of key_buffer_size is deprecated and will be removed in a future release. Please use the full name instead.
150920 23:19:49 [Note] /usr/sbin/mysqld (mysqld 5.5.44-0ubuntu0.14.04.1) starting as process 3453 ...
mysql start/running, process 3585
Setting up libhtml-template-perl (2.95-1) ...
Setting up python-mysqldb (1.2.3-2ubuntu1) ...
Processing triggers for ureadahead (0.100.0-16) ...
Setting up mysql-server (5.5.44-0ubuntu0.14.04.1) ...
Processing triggers for libc-bin (2.19-0ubuntu6.6) ...
root@OSCTRL-UA:/mnt#
2. Edit the /etc/mysql/my.cnf file.
Under the [mysqld] section, set the following keys to enable InnoDB, UTF-8 character set, and UTF-8 collation by default.
set the bind-address key to the management IP address of the controller node to enable access by other nodes via the management network.
bind-address = 192.168.203.130
3. Restart the mysql database service to take effect of new settings.
root@OSCTRL-UA:/mnt# service mysql restart
mysql stop/waiting
mysql start/running, process 3778
root@OSCTRL-UA:/mnt#
4. Secure the mysql database. You must delete the anonymous users that are created when the database is first started. Otherwise, database connection problems occur when you follow the instructions in this guide. mysql_secure_installation does the clean up for you.
root@OSCTRL-UA:~# mysql_secure_installation

NOTE: RUNNING ALL PARTS OF THIS SCRIPT IS RECOMMENDED FOR ALL MySQL
      SERVERS IN PRODUCTION USE!  PLEASE READ EACH STEP CAREFULLY!


In order to log into MySQL to secure it, we'll need the current
password for the root user.  If you've just installed MySQL, and
you haven't set the root password yet, the password will be blank,
so you should just press enter here.

Enter current password for root (enter for none):
OK, successfully used password, moving on...

Setting the root password ensures that nobody can log into the MySQL
root user without the proper authorisation.

You already have a root password set, so you can safely answer 'n'.

Change the root password? [Y/n] n
 ... skipping.

By default, a MySQL installation has an anonymous user, allowing anyone
to log into MySQL without having to have a user account created for
them.  This is intended only for testing, and to make the installation
go a bit smoother.  You should remove them before moving into a
production environment.

Remove anonymous users? [Y/n] y
 ... Success!

Normally, root should only be allowed to connect from 'localhost'.  This
ensures that someone cannot guess at the root password from the network.

Disallow root login remotely? [Y/n] y
 ... Success!

By default, MySQL comes with a database named 'test' that anyone can
access.  This is also intended only for testing, and should be removed
before moving into a production environment.

Remove test database and access to it? [Y/n] y
 - Dropping test database...
ERROR 1008 (HY000) at line 1: Can't drop database 'test'; database doesn't exist
 ... Failed!  Not critical, keep moving...
 - Removing privileges on test database...
 ... Success!

Reloading the privilege tables will ensure that all changes made so far
will take effect immediately.

Reload privilege tables now? [Y/n] y
 ... Success!

Cleaning up...


All done!  If you've completed all of the above steps, your MySQL
installation should now be secure.

Thanks for using MySQL!


root@OSCTRL-UA:~#
5. Login to other three nodes and install python-mysqldb library.
#Openstack Compute Nodes
192.168.203.131 OSCMP-UA
root@OSSTG-UA:~# apt-get install python-mysqldb
Reading package lists... Done
Building dependency tree
Reading state information... Done
The following extra packages will be installed:
  libmysqlclient18 mysql-common
Suggested packages:
  python-egenix-mxdatetime mysql-server-5.1 mysql-server python-mysqldb-dbg
The following NEW packages will be installed:
  libmysqlclient18 mysql-common python-mysqldb
0 upgraded, 3 newly installed, 0 to remove and 49 not upgraded.
Need to get 665 kB of archives.
After this operation, 3,824 kB of additional disk space will be used.
Do you want to continue? [Y/n] y
Get:1 http://in.archive.ubuntu.com/ubuntu/ trusty-updates/main mysql-common all 5.5.44-0ubuntu0.14.04.1 [13.9 kB]
Get:2 http://in.archive.ubuntu.com/ubuntu/ trusty-updates/main libmysqlclient18 amd64 5.5.44-0ubuntu0.14.04.1 [596 kB]
Get:3 http://in.archive.ubuntu.com/ubuntu/ trusty/main python-mysqldb amd64 1.2.3-2ubuntu1 [55.4 kB]
Fetched 665 kB in 6s (98.4 kB/s)
Selecting previously unselected package mysql-common.
(Reading database ... 57912 files and directories currently installed.)
Preparing to unpack .../mysql-common_5.5.44-0ubuntu0.14.04.1_all.deb ...
Unpacking mysql-common (5.5.44-0ubuntu0.14.04.1) ...
Selecting previously unselected package libmysqlclient18:amd64.
Preparing to unpack .../libmysqlclient18_5.5.44-0ubuntu0.14.04.1_amd64.deb ...
Unpacking libmysqlclient18:amd64 (5.5.44-0ubuntu0.14.04.1) ...
Selecting previously unselected package python-mysqldb.
Preparing to unpack .../python-mysqldb_1.2.3-2ubuntu1_amd64.deb ...
Unpacking python-mysqldb (1.2.3-2ubuntu1) ...
Setting up mysql-common (5.5.44-0ubuntu0.14.04.1) ...
Setting up libmysqlclient18:amd64 (5.5.44-0ubuntu0.14.04.1) ...
Setting up python-mysqldb (1.2.3-2ubuntu1) ...
Processing triggers for libc-bin (2.19-0ubuntu6.6) ...
root@OSSTG-UA:~#


root@OSNWT-UA:~# apt-get install python-mysqldb


root@OSCMP-UA:~# apt-get install python-mysqldb
Configure message broker service:
OpenStack requires message broker to coordinate the operations and status information among services. It typically runs on the controller node. Openstack supports RabbitMQ, Qpid and ZeroMQ. In our test environment , we will use RabbitMQ since we are running openstack on Ubuntu.
1. Install RabbitMQ on Openstack Controller Node.
root@OSCTRL-UA:~# apt-get install rabbitmq-server
Reading package lists... Done
Building dependency tree
Reading state information... Done
The following extra packages will be installed:
  erlang-asn1 erlang-base erlang-corba erlang-crypto erlang-diameter
  erlang-edoc erlang-eldap erlang-erl-docgen erlang-eunit erlang-ic
  erlang-inets erlang-mnesia erlang-nox erlang-odbc erlang-os-mon
  erlang-parsetools erlang-percept erlang-public-key erlang-runtime-tools
  erlang-snmp erlang-ssh erlang-ssl erlang-syntax-tools erlang-tools
  erlang-webtool erlang-xmerl libltdl7 libodbc1 libsctp1 lksctp-tools
Suggested packages:
  erlang erlang-manpages erlang-doc xsltproc fop erlang-ic-java
  erlang-observer libmyodbc odbc-postgresql tdsodbc unixodbc-bin
The following NEW packages will be installed:
  erlang-asn1 erlang-base erlang-corba erlang-crypto erlang-diameter
  erlang-edoc erlang-eldap erlang-erl-docgen erlang-eunit erlang-ic
  erlang-inets erlang-mnesia erlang-nox erlang-odbc erlang-os-mon
  erlang-parsetools erlang-percept erlang-public-key erlang-runtime-tools
  erlang-snmp erlang-ssh erlang-ssl erlang-syntax-tools erlang-tools
  erlang-webtool erlang-xmerl libltdl7 libodbc1 libsctp1 lksctp-tools
  rabbitmq-server
0 upgraded, 31 newly installed, 0 to remove and 49 not upgraded.
Need to get 22.6 MB of archives.
After this operation, 40.5 MB of additional disk space will be used.
Do you want to continue? [Y/n] y
Get:1 http://in.archive.ubuntu.com/ubuntu/ trusty/main libltdl7 amd64 2.4.2-1.7ubuntu1 [35.0 kB]
Get:30 http://in.archive.ubuntu.com/ubuntu/ trusty/main lksctp-tools amd64 1.0.15+dfsg-1 [51.3 kB]
Get:31 http://in.archive.ubuntu.com/ubuntu/ trusty/main rabbitmq-server all 3.2.4-1 [3,909 kB]
Fetched 22.6 MB in 2min 15s (167 kB/s)
Extracting templates from packages: 100%
Selecting previously unselected package libltdl7:amd64.
(Reading database ... 58398 files and directories currently installed.)
Preparing to unpack .../libltdl7_2.4.2-1.7ubuntu1_amd64.deb ...
Unpacking libltdl7:amd64 (2.4.2-1.7ubuntu1) ...
Selecting previously unselected package libodbc1:amd64.
Preparing to unpack .../libodbc1_2.2.14p2-5ubuntu5_amd64.deb ...
Unpacking libodbc1:amd64 (2.2.14p2-5ubuntu5) ...
Selecting previously unselected package libsctp1:amd64.
Preparing to unpack .../libsctp1_1.0.15+dfsg-1_amd64.deb ...
Unpacking libsctp1:amd64 (1.0.15+dfsg-1) ...
Selecting previously unselected package erlang-base.
Preparing to unpack .../erlang-base_1%3a16.b.3-dfsg-1ubuntu2.1_amd64.deb ...
Unpacking erlang-base (1:16.b.3-dfsg-1ubuntu2.1) ...
Selecting previously unselected package erlang-asn1.
Preparing to unpack .../erlang-asn1_1%3a16.b.3-dfsg-1ubuntu2.1_amd64.deb ...
Unpacking erlang-asn1 (1:16.b.3-dfsg-1ubuntu2.1) ...
Selecting previously unselected package erlang-mnesia.
Preparing to unpack .../erlang-mnesia_1%3a16.b.3-dfsg-1ubuntu2.1_amd64.deb ...
Unpacking erlang-mnesia (1:16.b.3-dfsg-1ubuntu2.1) ...
Selecting previously unselected package erlang-runtime-tools.
Preparing to unpack .../erlang-runtime-tools_1%3a16.b.3-dfsg-1ubuntu2.1_amd64.deb ...
Unpacking erlang-runtime-tools (1:16.b.3-dfsg-1ubuntu2.1) ...
Selecting previously unselected package erlang-crypto.
Preparing to unpack .../erlang-crypto_1%3a16.b.3-dfsg-1ubuntu2.1_amd64.deb ...
Unpacking erlang-crypto (1:16.b.3-dfsg-1ubuntu2.1) ...
Selecting previously unselected package erlang-public-key.
Preparing to unpack .../erlang-public-key_1%3a16.b.3-dfsg-1ubuntu2.1_amd64.deb ...
Unpacking erlang-public-key (1:16.b.3-dfsg-1ubuntu2.1) ...
Selecting previously unselected package erlang-ssl.
Preparing to unpack .../erlang-ssl_1%3a16.b.3-dfsg-1ubuntu2.1_amd64.deb ...
Unpacking erlang-ssl (1:16.b.3-dfsg-1ubuntu2.1) ...
Selecting previously unselected package erlang-inets.
Preparing to unpack .../erlang-inets_1%3a16.b.3-dfsg-1ubuntu2.1_amd64.deb ...
Unpacking erlang-inets (1:16.b.3-dfsg-1ubuntu2.1) ...
Selecting previously unselected package erlang-corba.
Preparing to unpack .../erlang-corba_1%3a16.b.3-dfsg-1ubuntu2.1_amd64.deb ...
Unpacking erlang-corba (1:16.b.3-dfsg-1ubuntu2.1) ...
Selecting previously unselected package erlang-syntax-tools.
Preparing to unpack .../erlang-syntax-tools_1%3a16.b.3-dfsg-1ubuntu2.1_amd64.deb ...
Unpacking erlang-syntax-tools (1:16.b.3-dfsg-1ubuntu2.1) ...
Selecting previously unselected package erlang-diameter.
Preparing to unpack .../erlang-diameter_1%3a16.b.3-dfsg-1ubuntu2.1_amd64.deb ...
Unpacking erlang-diameter (1:16.b.3-dfsg-1ubuntu2.1) ...
Selecting previously unselected package erlang-xmerl.
Preparing to unpack .../erlang-xmerl_1%3a16.b.3-dfsg-1ubuntu2.1_amd64.deb ...
Unpacking erlang-xmerl (1:16.b.3-dfsg-1ubuntu2.1) ...
Selecting previously unselected package erlang-edoc.
Preparing to unpack .../erlang-edoc_1%3a16.b.3-dfsg-1ubuntu2.1_amd64.deb ...
Unpacking erlang-edoc (1:16.b.3-dfsg-1ubuntu2.1) ...
Selecting previously unselected package erlang-eldap.
Preparing to unpack .../erlang-eldap_1%3a16.b.3-dfsg-1ubuntu2.1_amd64.deb ...
Unpacking erlang-eldap (1:16.b.3-dfsg-1ubuntu2.1) ...
Selecting previously unselected package erlang-erl-docgen.
Preparing to unpack .../erlang-erl-docgen_1%3a16.b.3-dfsg-1ubuntu2.1_amd64.deb ...
Unpacking erlang-erl-docgen (1:16.b.3-dfsg-1ubuntu2.1) ...
Selecting previously unselected package erlang-eunit.
Preparing to unpack .../erlang-eunit_1%3a16.b.3-dfsg-1ubuntu2.1_amd64.deb ...
Unpacking erlang-eunit (1:16.b.3-dfsg-1ubuntu2.1) ...
Selecting previously unselected package erlang-ic.
Preparing to unpack .../erlang-ic_1%3a16.b.3-dfsg-1ubuntu2.1_amd64.deb ...
Unpacking erlang-ic (1:16.b.3-dfsg-1ubuntu2.1) ...
Selecting previously unselected package erlang-odbc.
Preparing to unpack .../erlang-odbc_1%3a16.b.3-dfsg-1ubuntu2.1_amd64.deb ...
Unpacking erlang-odbc (1:16.b.3-dfsg-1ubuntu2.1) ...
Selecting previously unselected package erlang-snmp.
Preparing to unpack .../erlang-snmp_1%3a16.b.3-dfsg-1ubuntu2.1_amd64.deb ...
Unpacking erlang-snmp (1:16.b.3-dfsg-1ubuntu2.1) ...
Selecting previously unselected package erlang-os-mon.
Preparing to unpack .../erlang-os-mon_1%3a16.b.3-dfsg-1ubuntu2.1_amd64.deb ...
Unpacking erlang-os-mon (1:16.b.3-dfsg-1ubuntu2.1) ...
Selecting previously unselected package erlang-parsetools.
Preparing to unpack .../erlang-parsetools_1%3a16.b.3-dfsg-1ubuntu2.1_amd64.deb ...
Unpacking erlang-parsetools (1:16.b.3-dfsg-1ubuntu2.1) ...
Selecting previously unselected package erlang-percept.
Preparing to unpack .../erlang-percept_1%3a16.b.3-dfsg-1ubuntu2.1_amd64.deb ...
Unpacking erlang-percept (1:16.b.3-dfsg-1ubuntu2.1) ...
Selecting previously unselected package erlang-ssh.
Preparing to unpack .../erlang-ssh_1%3a16.b.3-dfsg-1ubuntu2.1_amd64.deb ...
Unpacking erlang-ssh (1:16.b.3-dfsg-1ubuntu2.1) ...
Selecting previously unselected package erlang-webtool.
Preparing to unpack .../erlang-webtool_1%3a16.b.3-dfsg-1ubuntu2.1_amd64.deb ...
Unpacking erlang-webtool (1:16.b.3-dfsg-1ubuntu2.1) ...
Selecting previously unselected package erlang-tools.
Preparing to unpack .../erlang-tools_1%3a16.b.3-dfsg-1ubuntu2.1_amd64.deb ...
Unpacking erlang-tools (1:16.b.3-dfsg-1ubuntu2.1) ...
Selecting previously unselected package erlang-nox.
Preparing to unpack .../erlang-nox_1%3a16.b.3-dfsg-1ubuntu2.1_all.deb ...
Unpacking erlang-nox (1:16.b.3-dfsg-1ubuntu2.1) ...
Selecting previously unselected package lksctp-tools.
Preparing to unpack .../lksctp-tools_1.0.15+dfsg-1_amd64.deb ...
Unpacking lksctp-tools (1.0.15+dfsg-1) ...
Selecting previously unselected package rabbitmq-server.
Preparing to unpack .../rabbitmq-server_3.2.4-1_all.deb ...
Unpacking rabbitmq-server (3.2.4-1) ...
Processing triggers for man-db (2.6.7.1-1ubuntu1) ...
Processing triggers for ureadahead (0.100.0-16) ...
Setting up libltdl7:amd64 (2.4.2-1.7ubuntu1) ...
Setting up libodbc1:amd64 (2.2.14p2-5ubuntu5) ...
Setting up libsctp1:amd64 (1.0.15+dfsg-1) ...
Setting up erlang-base (1:16.b.3-dfsg-1ubuntu2.1) ...
Searching for services which depend on erlang and should be started...none found.
Setting up erlang-asn1 (1:16.b.3-dfsg-1ubuntu2.1) ...
Setting up erlang-mnesia (1:16.b.3-dfsg-1ubuntu2.1) ...
Setting up erlang-runtime-tools (1:16.b.3-dfsg-1ubuntu2.1) ...
Setting up erlang-crypto (1:16.b.3-dfsg-1ubuntu2.1) ...
Setting up erlang-public-key (1:16.b.3-dfsg-1ubuntu2.1) ...
Setting up erlang-ssl (1:16.b.3-dfsg-1ubuntu2.1) ...
Setting up erlang-inets (1:16.b.3-dfsg-1ubuntu2.1) ...
Setting up erlang-corba (1:16.b.3-dfsg-1ubuntu2.1) ...
Setting up erlang-syntax-tools (1:16.b.3-dfsg-1ubuntu2.1) ...
Setting up erlang-diameter (1:16.b.3-dfsg-1ubuntu2.1) ...
Setting up erlang-xmerl (1:16.b.3-dfsg-1ubuntu2.1) ...
Setting up erlang-edoc (1:16.b.3-dfsg-1ubuntu2.1) ...
Setting up erlang-eldap (1:16.b.3-dfsg-1ubuntu2.1) ...
Setting up erlang-erl-docgen (1:16.b.3-dfsg-1ubuntu2.1) ...
Setting up erlang-eunit (1:16.b.3-dfsg-1ubuntu2.1) ...
Setting up erlang-ic (1:16.b.3-dfsg-1ubuntu2.1) ...
Setting up erlang-odbc (1:16.b.3-dfsg-1ubuntu2.1) ...
Setting up erlang-snmp (1:16.b.3-dfsg-1ubuntu2.1) ...
Setting up erlang-os-mon (1:16.b.3-dfsg-1ubuntu2.1) ...
Setting up erlang-parsetools (1:16.b.3-dfsg-1ubuntu2.1) ...
Setting up erlang-percept (1:16.b.3-dfsg-1ubuntu2.1) ...
Setting up erlang-ssh (1:16.b.3-dfsg-1ubuntu2.1) ...
Setting up erlang-webtool (1:16.b.3-dfsg-1ubuntu2.1) ...
Setting up erlang-tools (1:16.b.3-dfsg-1ubuntu2.1) ...
Setting up erlang-nox (1:16.b.3-dfsg-1ubuntu2.1) ...
Setting up lksctp-tools (1.0.15+dfsg-1) ...
Setting up rabbitmq-server (3.2.4-1) ...
Adding group `rabbitmq' (GID 116) ...
Done.
Adding system user `rabbitmq' (UID 110) ...
Adding new user `rabbitmq' (UID 110) with group `rabbitmq' ...
Not creating home directory `/var/lib/rabbitmq'.
 * Starting message broker rabbitmq-server                                                                                                                    [ OK ]
Processing triggers for libc-bin (2.19-0ubuntu6.6) ...
Processing triggers for ureadahead (0.100.0-16) ...
root@OSCTRL-UA:~#
2. RabbitMQ installs with default account “guest” . Since its test environment , we can use the same. Let me set the pre-defined password according to the table.
root@OSCTRL-UA:~# rabbitmqctl change_password guest rabbit123
Changing password for user "guest" ...
...done.
root@OSCTRL-UA:~#
Good, Now you are ready to install OpenStack services! We will the Openstack service installation in upcoming articles.
If you liked the article , Don’t forget to click on the below social icons to share it with friends.
Keystone provides the identify service in openstack which is responsible for user management. It tracks the openstack users and their permissions. It provides a catalog of available services with their API endpoints. OpenStack Identity Service needs to install on controller node. Keystone will use the database to store the information. So we need to configure the keystone service to use the locally installed Mysql DB. Before proceeding further, You need to understand the terms like User, credentials , Authentication, Token, Tenant, service, Endpoint and Role.
OpenStack Identity Concepts
OpenStack Identity Service Installation : (Keystone) – Juno .
root@OSCTRL-UA:~# dpkg -l | grep keystone
ii  keystone                            1:2014.2.3-0ubuntu1~cloud0            all          OpenStack identity service - Daemons
ii  python-keystone                     1:2014.2.3-0ubuntu1~cloud0            all          OpenStack identity service - Python library
ii  python-keystoneclient               1:0.10.1-0ubuntu1.1~cloud0            all          Client library for OpenStack Identity API
ii  python-keystonemiddleware           1.0.0-1ubuntu0.14.10.2~cloud0         all          Middleware for OpenStack Identity (Keystone) - Python 2.x
root@OSCTRL-UA:~#
Compare the table above & command output to know the Openstack release name. In our case , it is using “Juno”.
2. Specify the location of the database in the configuration file. In this guide, we use a MySQL database on the controller node with the username keystone. Replace KEYSTONE_DBPASS with a suitable password for the database user. Edit the keystone.conf like below. (Refer Part 2 to know the pre-defined password)
4. Configure the Mysql database for keystone service. First you need to login as Mysql root with configured password. (Refer Part to know the Mysql root password)
root@OSCTRL-UA:~# mysql -u root -pstack
Welcome to the MySQL monitor.  Commands end with ; or \g.
Your MySQL connection id is 48
Server version: 5.5.44-0ubuntu0.14.04.1 (Ubuntu)

Copyright (c) 2000, 2015, Oracle and/or its affiliates. All rights reserved.

Oracle is a registered trademark of Oracle Corporation and/or its
affiliates. Other names may be trademarks of their respective
owners.

Type 'help;' or '\h' for help. Type '\c' to clear the current input statement.

mysql> CREATE DATABASE keystone;
Query OK, 1 row affected (0.00 sec)

mysql> GRANT ALL PRIVILEGES ON keystone.* TO 'keystone'@'localhost' IDENTIFIED BY 'keydb123';
Query OK, 0 rows affected (0.00 sec)

mysql> GRANT ALL PRIVILEGES ON keystone.* TO 'keystone'@'%' IDENTIFIED BY 'keydb123';
Query OK, 0 rows affected (0.00 sec)

mysql> exit
Bye
root@OSCTRL-UA:~#
In Mysql ,we have just created the table called “keystone” and grated all privileges to “keystone” user . keystone database user password is “keydb123”.
5. Populate the Identity service(keystone) database.
root@OSCTRL-UA:~# su -s /bin/sh -c "keystone-manage db_sync" keystone
root@OSCTRL-UA:~#
6. Define an authorization token to use as a shared secret between the Identity Service and other OpenStack services. Use openssl to generate a random token and store it in the keystone configuration file.
root@OSCTRL-UA:~# openssl rand -hex 10
a5d5bc4c4f358460ddc0
root@OSCTRL-UA:~# vi /etc/keystone/keystone.conf
root@OSCTRL-UA:~# head -3 /etc/keystone/keystone.conf
[DEFAULT]
# A "shared secret" between keystone and other openstack services
admin_token = a5d5bc4c4f358460ddc0
root@OSCTRL-UA:~#
7. Configure the log directory for keystone service. Edit the /etc/keystone/keystone.conf file and update the [DEFAULT] section.
root@OSCTRL-UA:~# vi /etc/keystone/keystone.conf
root@OSCTRL-UA:~# head -4 /etc/keystone/keystone.conf
[DEFAULT]
# A "shared secret" between keystone and other openstack services
admin_token = a5d5bc4c4f358460ddc0
log_dir = /var/log/keystone
root@OSCTRL-UA:~#
8.Restart the keystone service to take effect of new settings.
root@OSCTRL-UA:~# service keystone restart
keystone stop/waiting
keystone start/running, process 8458
root@OSCTRL-UA:~#
9.Add cronjob to perform the expired tokens clean up. By default keystone service stores the expired token in the database indefinitely. This will increase the database size and may reduce the performance. So its better to purge the expired tokens hourly basis.
 root@OSCTRL-UA:~# apt-get install apache2
Reading package lists... Done
Building dependency tree
Reading state information... Done
The following extra packages will be installed:
  apache2-bin apache2-data libapr1 libaprutil1 libaprutil1-dbd-sqlite3
  libaprutil1-ldap
Suggested packages:
  apache2-doc apache2-suexec-pristine apache2-suexec-custom apache2-utils
The following NEW packages will be installed:
  apache2 apache2-bin apache2-data libapr1 libaprutil1 libaprutil1-dbd-sqlite3
  libaprutil1-ldap
0 upgraded, 7 newly installed, 0 to remove and 0 not upgraded.
Need to get 1,270 kB of archives.
After this operation, 5,238 kB of additional disk space will be used.
Do you want to continue? [Y/n] y
2.Install mod-wsgi for apache2.
root@OSCTRL-UA:~# apt-get install libapache2-mod-wsgi
Reading package lists... Done
Building dependency tree
Reading state information... Done
The following NEW packages will be installed:
  libapache2-mod-wsgi
0 upgraded, 1 newly installed, 0 to remove and 0 not upgraded.
Need to get 67.4 kB of archives.
After this operation, 248 kB of additional disk space will be used.
Get:1 http://in.archive.ubuntu.com/ubuntu/ trusty-updates/main libapache2-mod-wsgi amd64 3.4-4ubuntu2.1.14.04.2 [67.4 kB]
Fetched 67.4 kB in 3s (19.6 kB/s)
Selecting previously unselected package libapache2-mod-wsgi.
(Reading database ... 95781 files and directories currently installed.)
Preparing to unpack .../libapache2-mod-wsgi_3.4-4ubuntu2.1.14.04.2_amd64.deb ...
Unpacking libapache2-mod-wsgi (3.4-4ubuntu2.1.14.04.2) ...
Setting up libapache2-mod-wsgi (3.4-4ubuntu2.1.14.04.2) ...
apache2_invoke: Enable module wsgi
 * Restarting web server apache2
3. Edit the “/etc/apache2/apache2.conf” and configure the ServerName option to reference the controller node.