Quantcast
Channel: Lingesh, Author at UnixArena
Viewing all 369 articles
Browse latest View live

Amazon AWS – Change volume type – SSD GP2 to SSD IOPS – Part 13

$
0
0

This article will walk through that how to change the AWS EBS volume type from  SSD GP2 to  SSD IOPS volume type. Changing the volume type  is not straight forward for all the volume types. Due to the instance limitation, you can’t change the volume type on the fly. You need to halt the instance in an order to change the volume type. But you could give a try to change the volume type while the instance is up & running .

1. Login to the AWS Console and navigate to EC2 tab.

2. Stop the instance by clicking Action – > Instance State – > Stop.

Stop the AWS instance


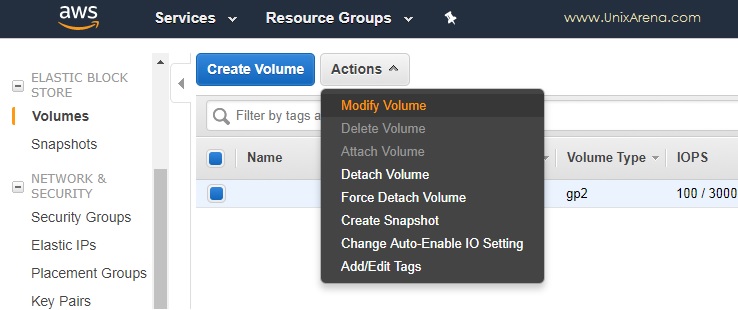
3. Navigate to the volume tab. Select the volume and click on modify from Actions tab.

Click on Modify Volume - AWS
Click on Modify Volume – AWS


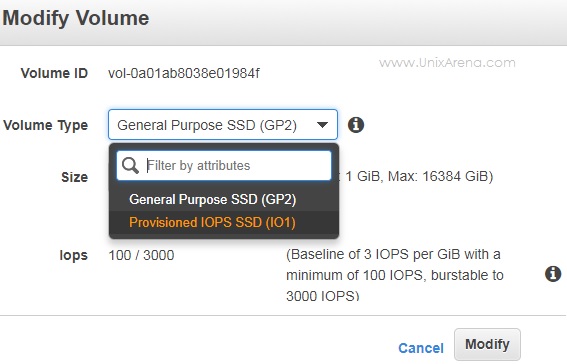
4. Change the volume type from SSD GP2 to SSD IO1.

Change the volume type from SSD GP2 to SASD IO1


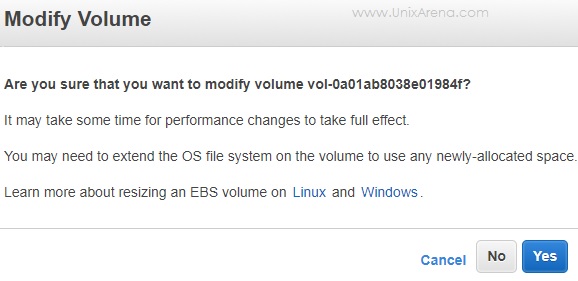
5. Click “Yes” to change the volume type.

Click Yes to change volume type - AWS
Click Yes to change volume type – AWS


If you try to change the volume type without stopping the instance, it will fail.

AWS on-fly Volume Modification Fails


If you have seen the above procedure , we can’t change the volume type to any magnetic storage or other available storage types. We will see that how to change the EBS volume to other volume types in next article.

Share it ! Comment it !! Be Sociable !!!

The post Amazon AWS – Change volume type – SSD GP2 to SSD IOPS – Part 13 appeared first on UnixArena.


Amazon AWS – Change EBS volume type using Snapshot – Part 14

$
0
0

This article will walk through that how to change the AWS EBS volume type using snapshot feature. There is a limitation with AWS that you can’t change the volume type on fly. You must need to halt the instance and change the volume type. But again  , you can’t switch to all the volume types available in AWS using that method. As a workaround , You can take the snapshot of the EBS volume and create a new volume using snapshot with desired volume type. Once you have the new volumes ready , You can simply detach the old volume from instance and attach the new volume. Let’s have a look at the demonstration .


1. Login to the AWS console.

2. EC2 instance is already in shutdown sate. We are going to change the instance root volume from SDD IOPS to Magnetic storage.  Since the instance is in shutdown state, data on the volume will be more consistent.

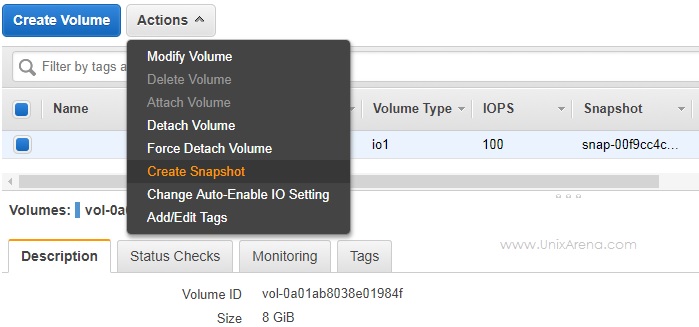
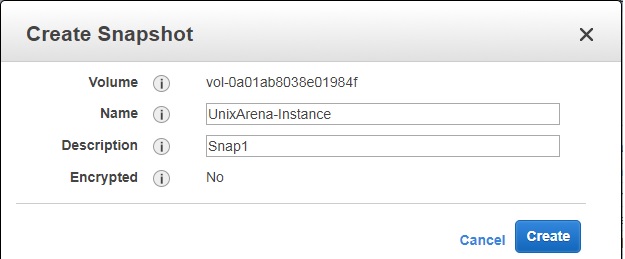
3. Navigate to the volumes tab in AWS console. Select the volume and click on “Create Snapshot”.

Create EBS volume snapshot - AWS
Create EBS volume snapshot – AWS


4. Enter the snapshot name for your reference and click on “Create” tab.

Name the snapshot - AWS
Name the snapshot – AWS


On the successful snapshot creation request, you will get message like below.

EBS volume - Snapshot
EBS volume – Snapshot


5. Navigate to the snapshot tab and look at the snapshot creation progress.

In-progress - Snapshot - EBS
In-progress – Snapshot – EBS


6. Check the snapshot description tab to see the origin of the snapshot that we have created.

Snapshot Information - Volume
Snapshot Information – Volume


7. Once the snapshot is ready (progress tab), we will create a new volume with desired volume type.

Create Volume from snapshot


8. Select the desired volume type.

Select the volume type - AWS
Select the volume type – AWS


9. Enter the volume size same as source volume size or higher. You can,t give the volume size less than the source volume.

Select the volume size as snapshot source size or higher


On the successful volume creation, you will get the following message with volume name.

Volume Created - AWS
Volume Created – AWS


10. Navigate back to the volume tab and see the volumes.  One is source volume which is in SSD GP2 volume type. The other one is created from snapshot which is in standard magnetic volume.

New Volume created from Snapshot


We have successfully created the clone copy on new volume with different storage type. Let’s see that to replace the volume for the instance.

Before detaching the volume , you must find out the block device name from the instance description tab. We need this information on step 14.

Instance Volume Block Device Name


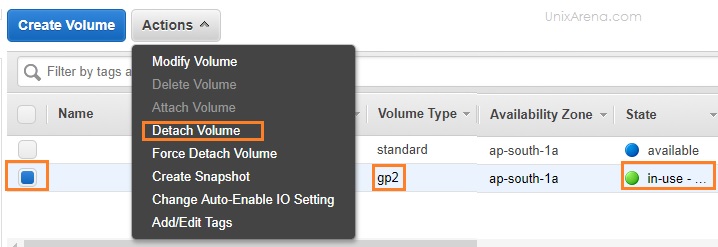
11. Detach the source (old) volume from instance.

Detach the old volume from Instance


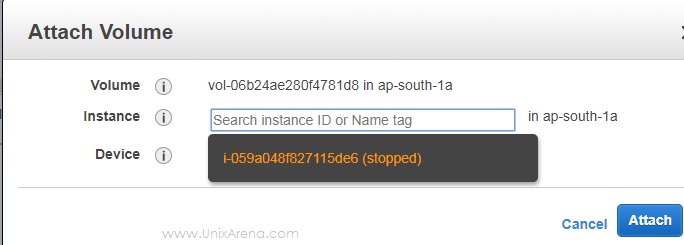
12. Select the newly created volume and attach it to the instance.

Attach the new volume - AWS
Attach the new volume – AWS


13. Select the instance ID or tag.

Select the Instance to Attach volume


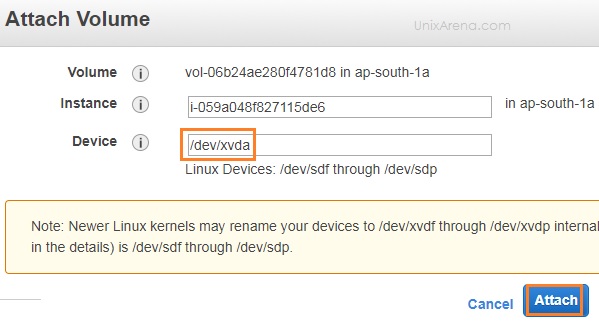
14. Enter the block device name which you have gathered before proceeding with step 11.

Enter the correct block Device name


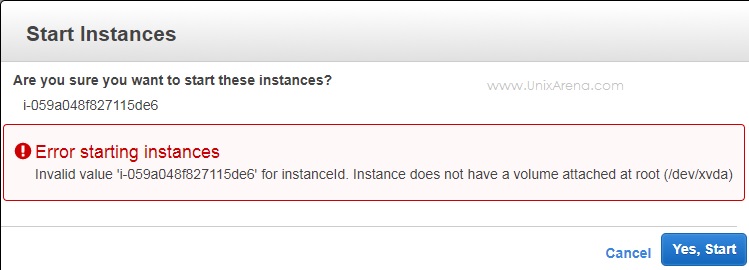
If  you have entered different volume name than the source, you will get error like below while starting the instance.

Error While starting instance with incorrect block device
Invalid value for instanceId. Instance does not have a volume attached at root 


15. Go back to EC2 console  and start the instance .

Start the EC2 instance - AWS
Start the EC2 instance – AWS


16. You can see that instance s up & running fine.

Instance is running with new volume type


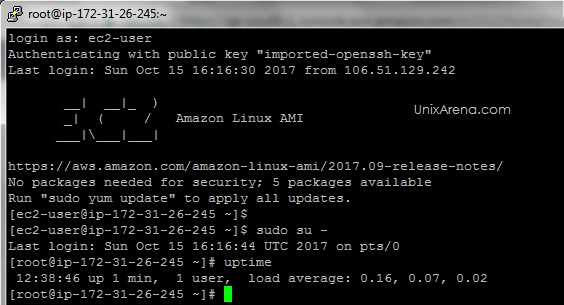
17. Let me login to the instance and check it .

AWS instance Up & running


After the sanity check , you are good to destroy the old volume from the volume tab. Hope this article is informative to you .

Share it ! Comment it !! Be sociable !!!

The post Amazon AWS – Change EBS volume type using Snapshot – Part 14 appeared first on UnixArena.

Oracle Solaris Cluster – Configure Oracle Database with Dataguard- Part 1

$
0
0

This article will provide step by step procedure to manage the oracle Database under Sun-cluster aka Solaris cluster on Oracle Dataguard environment. Oracle Dataguard is widely used product for the disaster recovery solutions.It provides great visibility to database administrator to manage their environment in better manner. Sun-cluster is used only on oracle Solaris operating system and use of this product have been increased recently. Companies are keep on trying to reduce their operating cost and that axed Veritas products like volume manager and vertias cluster from datacenter. That’s the reason , we are seeing use of ZFS & Sun-cluster aka Solaris cluster increased rapidly.

This article will help you to setup ZFS storage pool under suncluster.

Oracle Datagarud - Sun Cluster Setup
Oracle Dataguard – Sun Cluster Setup

Prerequisites :

  • Two nodes with oracle solaris 10 or 11 on each sites. (PROD & DR)
  • Sun Cluster product installed on both the nodes & configured. (PROD & DR)
  • ZFS storage pool resource configured on suncluster. (PROD & DR)
  • Oracle database have been installed and configured. (PROD & DR)


  • Assumptions:   PRIMARY
    Resource Group Name – UADBPRD-rg
    Zpool Resource name – UADBPRD-HAS


Let’s see the step by step procedure to bring the primary oracle database under Sun cluster / Solaris cluster control.


PRIMARY:

Login  to the production cluster nodes and perform the following activities.

1. Register the required cluster resource types.

# clrt register SUNW.oracle_server
# clrt register SUNW.oracle_listener
# clrt register SUNW.logicalhostname


2. Add the database VIP in /etc/hosts file.

# cat /etc/hosts  |grep UAVSL-vip
192.168.2.40	    UAVSL-VIP


3. Create the logical hostname resource for VIP.

# clreslogicalhostname  create -g  UADBPRD-rg  -h  UAVSL-VIP -N db_ipmp@2,db_ipmp@1 UAVSL-vip-res


4. Create the oracle database server resource.

# clresource create -g  UADBPRD-rg -t SUNW.oracle_server -p Connect_string=cluster/password -p ORACLE_SID=UADBPRD  -p ORACLE_HOME=/oracle/UADBPRD/product/12.1.0.2 -p Alert_log_file=/oracle/diag/rdbms/UADBPRD/trace/alert_UADBBPRD.log  -p Dataguard_role=PRIMARY -p resource_dependencies=UADBPRD-HAS  UADBPRD-ORA-server


5. Create the oracle database listener resoruce.

# clresource create -g  UADBPRD-rg -t SUNW.oracle_listener -p LISTENER_NAME=LISTENER  -p ORACLE_HOME=/oracle/UADBPRD/product/12.1.0.2  -p resource_dependencies=UADBPRD-ORA-server UADBPRD-ORA-LSN


6. Check the cluster status using clrg & clrs commands.

# clrg status 

=== Cluster Resource Groups ===

Group Name        Node Name        Suspended    Status
----------        ---------        ---------    ------
UADBPRD-ora-rg    Nodea            Yes          Online
                  Nodeb            Yes          Offline

# clrs status

=== Cluster Resources ===

Resource Name       Node Name        State      Status Message
-------------       ---------        -----      --------------
UADBPRD-vip         Nodea            Online     Online - LogicalHostname online.
                    Nodeb            Offline    Offline - LogicalHostname offline.

UADBPRD-ORA-LSN     Nodea            Online     Online 
                    Nodeb            Offline    Offline

UADBPRD-ORA-server  Nodea            Online     Online 
                    Nodeb            Offline    Offline

UADBPRD-HAS         Nodea            Online     Online
                    Nodeb            Offline    Offline
Nodea:#

In the next article ,we will see that how to configure the oracle Dataguard physical standby node with sun cluster/ Solaris cluster.

Hope this article is informative to you. Share it ! Comment it !! Be Sociable !!!

The post Oracle Solaris Cluster – Configure Oracle Database with Dataguard- Part 1 appeared first on UnixArena.

Oracle Solaris Cluster – Configure Standby Oracle Database – Dataguard – Part 2

$
0
0

Here is the step by step procedure to bring the oracle Dataguard standby instance under sun cluster control.Once you have completed the primary node setup , you are good to proceed with standby configuration. In this oracle Dataguard  configuration ,we will be using the standby nodes as DR servers and it must be configured as physical mode. Logical standby mode is for offloading the production database and we are not going to cover here.

This article will help you to setup ZFS storage pool under sun cluster.

Note: This article is not covering too much of details about oracle database or sun cluster. The intend of this article is just to show the example of configuring the oracle db server , listener and recovery resources. 

Prerequisites :

1. Two nodes with oracle Solaris 10 or 11 on each sites. (PROD & DR)
2. Sun Cluster product installed on both the nodes & configured. (PROD & DR)
3. ZFS storage pool resource configured on sun cluster. (PROD & DR)
4. Oracle database have been installed and configured. (PROD & DR)


Assumptions:

  • Resource Group Name – UASTBYDBPRD-rg
  • Zpool Resource name – UASTBYDBPRD-HAS


Let’s see the step by step procedure to bring the primary oracle database under sun cluster/ Solaris Cluster control.

1. Register the required cluster resoruce types.

# clrt register SUNW.oracle_server
# clrt register SUNW.oracle_listener
# clrt register SUNW.logicalhostname
# clrt register SUNW.gds


2. Add the database VIP in /etc/hosts file.

# cat /etc/hosts  |grep UAVSL-vip
192.168.2.45	    UASTBYVSL-VIP


3. Create the logical hostname resource for VIP.

# clreslogicalhostname  create -g  UASTBYDBPRD-rg  -h  UASTBYVSL-VIP -N db_ipmp@2,db_ipmp@1 UASTBYVSL-VIP


4. Create the oracle database server resource.

# clresource create -g  UASTBYDBPRD-rg -t SUNW.oracle_server -p Connect_string=cluster/password -p ORACLE_SID=UADBPRD  -p ORACLE_HOME=/oracle/UASTBYDBPRD/product/12.1.0.2 -p Alert_log_file=/oracle/diag/rdbms/UASTBYDBPRD/trace/alert_UADBBPRD.log  -p Dataguard_role=STANDBY  -p Standby_mode=PHYSICAL -p resource_dependencies=UASTBYDBPRD-HAS  UASTBYDBPRD-ORA-server


5. Create the oracle database listener resource.

# clresource create -g  UASTBYDBPRD-rg -t SUNW.oracle_listener -p LISTENER_NAME=LISTENER  -p ORACLE_HOME=/oracle/UASTBYDBPRD/product/12.1.0.2  -p resource_dependencies=UASTBYDBPRD-ORA-server UASTBYDBPRD-ORA-LSN


6. Create the custom resource for oracle database MRP recovery process. You must write a small pices of script to start and stop the MRP process for database recovery.

# clresource create -g UASTBYDBPRD-rg -t SUNW.gds -p Scalable=false -p Start_command="/oracle/UASTBYDBPRD/cluster/scripts/recovery.ksh start" -p Stop_command="/oracle/UASTBYDBPRD/cluster/scripts/recovery.ksh stop" -p Probe_command="/oracle/UASTBYDBPRD/cluster/scripts/recovery.ksh status" -p Child_mon_level=-1 -p Failover_enabled=TRUE -p Stop_signal=15 -p resource_dependencies=UASTBYDBPRD-ORA-LSN -p Network_aware=false -p Failover_mode=LOG_ONLY UASTBYDBPRD-ORA-MRP


7. Check the cluster status using clrg and clrs command.

# clrg status 

=== Cluster Resource Groups ===

Group Name           Node Name        Suspended     Status
----------           ---------       ---------      ------
UASTBYDBPRD-ora-rg    Nodea            Yes          Online
                      Nodeb            Yes          Offline

# clrs status

=== Cluster Resources ===

Resource Name       Node Name          State      Status Message
-------------       ---------           -----      --------------
UASTBYDBPRD-ORA-MRP    Nodea            Online    Online
                       Nodeb            Offline   Offline

UASTBYDBPRD-VIP        Nodea            Online     Online - LogicalHostname online.
                       Nodeb            Offline    Offline - LogicalHostname offline.

UASTBYDBPRD-ORA-LSN    Nodea            Online     Online 
                       Nodeb            Offline    Offline

UASTBYDBPRD-ORA-server  Nodea            Online     Online 
                        Nodeb            Offline    Offline

UASTBYDBPRD-HAS         Nodea            Online     Online
                        Nodeb            Offline    Offline
Nodea:#

We successfully configured the oracle datagaurd physical standby node on sun cluster/ Solaris Cluster. Hope this article is informative . Share it ! Comment it !! Be Sociable !!!

The post Oracle Solaris Cluster – Configure Standby Oracle Database – Dataguard – Part 2 appeared first on UnixArena.

CLOUD WAR – Openstack vs VMware vSphere vs Amazon AWS

$
0
0

Cloud War or Data-center war ? There is a healthy competition out in the market to reduce the overall operating cost on IT.  Companies are benefited with the cloud revolution, Virtualization and automation. Most of the organisations are moving towards asset free to reduce their additional investments on IT equipment. But all the organizations can’t just follow the same strategy since lot of things needs to be consider prior to choosing the right infrastructure. Here, we will see some of the modern computing model’s advantages and disadvantages.

This article is not going to discuss any of those technologies in depth but just give overview.


VMware vSphere:

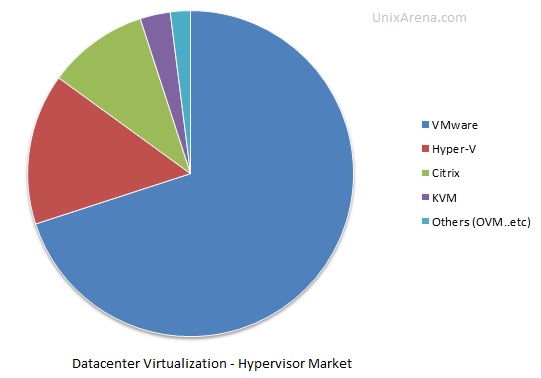
VMware vSphere hypervisor can be found in almost 80% of datacenter around the world. VMware revolution happened within the short span of time. ESXi hypervisor revolution have changed the way of computing and it have reduced the datacenter cost with it’s robust virtualization technology. It’s most preferred method for hosting Windows and Linux VM on-premise datacenter.  Most suited product for datacenter virtualization.

VMware have reduced the significant amount of cost compare to late 2000’s IT operating cost. Due to cloud revolution and Open source maturity ,VMware might face tough competition in the market.

Cons: Product’s licensing cost & proprietary hardware.

Pros: Matured datacenter virtualization product.


Hyper-visor Market - UnixArena
Hyper-visor Market – UnixArena


Openstack:

Openstack is Open source software for creating private and public clouds. Since it have been backed by DXC(HP), IBM, Oracle and other big players in late 2014’s and everybody have predicted that it might provide the alternate solution to Amazon AWS. But it failed to match up with Amazon AWS. Openstack might not be able to compete with Public cloud giant but it’s going be tough competitor for private cloud products which are exists on the markets today (VMware, OVM, RHEV..etc).

Cons: Complexity and lack support.

Pros: Open source. Product is capable of delivering both private cloud and public cloud.

Openstack Contributions by companies


Amazon AWS /Microsoft Azure:

Amazon AWS/ Microsoft Azure are king in the public cloud offering. They have integrated many products and pay per use clicked very well. But still , but you need plan lot of the things to control the running cost. Unlike on-premise server, you can’t just leave a database or application which are unused for any other functional. If you leave , you might need to pay for the compute, storage and network cost to the cloud provider which might turn in to big numbers. If you choose the public cloud , you should be smart enough to control usage.

Cons: Data will be residing on off-premise.

Pros: Pay per use , No upfront fee’s , No need to invest on IT Hardware


Public Cloud Market share 2018


This market going to be continuously changing and challenging to adopt the new way of computing. You must choose the right technology for right functions to save the cost , ensure the availability and create a trust on application  reliability.  Hope this article is informative to you.  Share it ! Comment it ! ! Be Sociable !!!

The post CLOUD WAR – Openstack vs VMware vSphere vs Amazon AWS appeared first on UnixArena.

LINUX – SCSI Device Management – Identifying Devices

$
0
0

This article is going to share very least used SCSI commands on Linux operating systems. These commands will be very useful to identifying SCSI devices and tuneable parameters. There are few utilities which can be used to get the detailed information about the scsi devices. lsscsi is most command tool which scans sysfs pseudo file system to provide the required information. The lsscsi command should show the relationship between a device’s primary node name (SCSI generic (sg) node name) and kernel name. “sdparm”  command is used to view and set values contained in various mode pages supported by SCSI. Commands are supported by scsi devices which carries across many transports like ATAPI , PATA ,SATA , SPI , SAS, FCP , USB, ISCSI.


1. Reading /proc filesystems devices are the easiest way of to identify the scsi devices.

[root@UARHEL1 ~]# cat /proc/scsi/scsi
Attached devices:
Host: scsi2 Channel: 00 Id: 00 Lun: 00
  Vendor: VBOX     Model: HARDDISK         Rev: 1.0
  Type:   Direct-Access                    ANSI  SCSI revision: 05
Host: scsi1 Channel: 00 Id: 00 Lun: 00
  Vendor: VBOX     Model: CD-ROM           Rev: 1.0
  Type:   CD-ROM                           ANSI  SCSI revision: 05
[root@UARHEL1 ~]# 


2. lsscsi is the most of the command utility to list the SCSI devices. If lsscsi is not found , You must install lsscsi.x86_64 package.

[root@UARHEL1 ~]# lsscsi
[1:0:0:0]    cd/dvd  VBOX     CD-ROM           1.0   /dev/sr0
[2:0:0:0]    disk    VBOX     HARDDISK         1.0   /dev/sda
[root@UARHEL1 ~]#


3.To know the SCSI device queue depth ,use “-l” option.

[root@UARHEL1 ~]# lsscsi -l
[1:0:0:0]    cd/dvd  VBOX     CD-ROM           1.0   /dev/sr0
  state=running queue_depth=1 scsi_level=6 type=5 device_blocked=0 timeout=30
[2:0:0:0]    disk    VBOX     HARDDISK         1.0   /dev/sda
  state=running queue_depth=32 scsi_level=6 type=0 device_blocked=0 timeout=30
[root@UARHEL1 ~]#


4.To know the device mapping between SG driver and Linux device.

[root@UARHEL1 ~]# lsscsi -g
[1:0:0:0]    cd/dvd  VBOX     CD-ROM           1.0   /dev/sr0   /dev/sg1
[2:0:0:0]    disk    VBOX     HARDDISK         1.0   /dev/sda   /dev/sg0
[root@UARHEL1 ~]#


To list the scsi devices with size,

[root@UARHEL1 ~]# lsscsi -s
[1:0:0:0]    cd/dvd  VBOX     CD-ROM           1.0   /dev/sr0        -
[2:0:0:0]    disk    VBOX     HARDDISK         1.0   /dev/sda   17.1GB
[root@UARHEL1 ~]#


To list the device in verbose mode which provides the device physical path ,

[root@UARHEL1 ~]# lsscsi -v
[1:0:0:0]    cd/dvd  VBOX     CD-ROM           1.0   /dev/sr0
  dir: /sys/bus/scsi/devices/1:0:0:0  [/sys/devices/pci0000:00/0000:00:01.1/ata2/host1/target1:0:0/1:0:0:0]
[2:0:0:0]    disk    VBOX     HARDDISK         1.0   /dev/sda
  dir: /sys/bus/scsi/devices/2:0:0:0  [/sys/devices/pci0000:00/0000:00:14.0/host2/target2:0:0/2:0:0:0]
[root@UARHEL1 ~]#


HELP: lsscsi

[root@UARHEL1 ~]# lsscsi -help
Usage: lsscsi   [--classic] [--device] [--generic] [--help] [--hosts]
                [--kname] [--list] [--lunhex] [--long] [--protection]
                [--scsi_id] [--size] [--sysfsroot=PATH] [--transport]
                [--verbose] [--version] [--wwn] []
  where:
    --classic|-c      alternate output similar to 'cat /proc/scsi/scsi'
    --device|-d       show device node's major + minor numbers
    --generic|-g      show scsi generic device name
    --help|-h         this usage information
    --hosts|-H        lists scsi hosts rather than scsi devices
    --kname|-k        show kernel name instead of device node name
    --list|-L         additional information output one
                      attribute=value per line
    --long|-l         additional information output
    --lunhex|-x       show LUN part of tuple as hex number in T10 format;
                      use twice to get full 16 digit hexadecimal LUN
    --protection|-p   show target and initiator protection information
    --protmode|-P     show negotiated protection information mode
    --scsi_id|-i      show udev derived /dev/disk/by-id/scsi* entry
    --size|-s         show disk size
    --sysfsroot=PATH|-y PATH    set sysfs mount point to PATH (def: /sys)
    --transport|-t    transport information for target or, if '--hosts'
                      given, for initiator
    --verbose|-v      output path names where data is found
    --version|-V      output version string and exit
    --wwn|-w          output WWN for disks (from /dev/disk/by-id/wwn*)
             filter output list (def: '*:*:*:*' (all))

List SCSI devices or hosts, optionally with additional information
[root@UARHEL1 ~]#


5. “sdparm” command  is another useful command to view and set the values contained in various mode pages supported by SCSI.If you get error like “sdparm command not found” ,then you are missing that utility on that server. You can install sdparm using yum command.

Packages:

  • sg3_utils-libs-1.37-5.el7.x86_64
  • sdparm-1.08-3.el7.x86_64


6. Here is the list of supported page modes for scsi devices.

[root@UARHEL1 ~]# sdparm --enumerate
Mode pages:
  addp 0x0e,0x02  DT device primary port (ADC)
  adlu 0x0e,0x03  logical unit (ADC)
  adtd 0x0e,0x01  Targer device (ADC)
  adts 0x0e,0x04  Targer device serial number (ADC)
  apo  0x1a,0xf1  SAT ATA Power condition
  atag 0x0a,0x02  Application tag (SBC)
  bc   0x1c,0x01  Background control (SBC)
  ca   0x08       Caching (SBC)
  cms  0x2a       CD/DVD (MM) capabilities and mechanical status (MMC)
  co   0x0a       Control
  coe  0x0a,0x01  Control extension
  cdp  0x0a,0xf0  Control data protection (SSC)
  dac  0x0f       Data compression (SSC)
  dc   0x10       Device configuration (SSC)
  dca  0x1f       Device capabilities (SMC)
  dce  0x10,0x01  Device configuration extension (SSC)
  dr   0x02       Disconnect-reconnect (SPC + transports)
  eaa  0x1d       Element address assignment (SMC)
  edc  0x1f,0x41  Extended device capabilities (SMC)
  esm  0x14       Enclosure services management (SES)
  fo   0x03       Format (SBC)
  ie   0x1c       Informational exceptions control
  lbp  0x1c,0x02  Logical block provisioning (SBC)
  mco  0x1d       Medium configuration (SSC)
  mpa  0x11       Medium partition (SSC)
  mrw  0x03       Mount rainier reWritable (MMC)
  pat  0x0a,0xf1  SAT pATA control
  pl   0x18       Protocol specific logical unit
  po   0x1a       Power condition
  ps   0x1a,0x01  Power consumption
  poo  0x0d       Power condition - old version
  pp   0x19       Protocol specific port
  rbc  0x06       RBC device parameters (RBC)
  rd   0x04       Rigid disk (SBC)
  rw   0x01       Read write error recovery
  tgp  0x1e       Transport geometry parameters (SMC)
  tp   0x1d       Timeout and protect (MMC)
  ve   0x07       Verify error recovery (SBC)
  wp   0x05       Write parameters (MMC)
  xo   0x10       XOR control (SBC)
[root@UARHEL1 ~]#


7. sdparm can be used to inquiry about specific scsi devices to know the supported VPD pages.

[root@UARHEL1 ~]# sdparm --inquiry /dev/sda
    /dev/sda: VBOX      HARDDISK          1.0
Device identification VPD page:
VPD page error: short designator around offset -1
[root@UARHEL1 ~]#

Since I am demonstrating using virtual box Linux instance, you can’t see the page modes for the specific devices.

HELP: sdparm

[root@UARHEL1 ~]# sdparm -help
Usage: sdparm [--all] [--clear=STR] [--command=CMD] [--dbd] [--defaults]
              [--dummy] [--flexible] [--get=STR] [--help] [--hex] [--inquiry]
              [--long] [--num-desc] [--page=PG[,SPG]] [--quiet] [--readonly]
              [--save] [--set=STR] [--six] [--transport=TN] [--vendor=VN]
              [--verbose] [--version] DEVICE [DEVICE...]

       sdparm --enumerate [--all] [--inquiry] [--long] [--page=PG[,SPG]]
              [--transport=TN] [--vendor=VN]
  where:
    --all | -a            list all known fields for given device
    --clear=STR | -c STR    clear (zero) field value(s)
    --command=CMD | -C CMD    perform CMD (e.g. 'eject')
    --dbd | -B            set DBD bit in mode sense cdb
    --defaults | -D       set a mode page to its default values
    --dummy | -d          don't write back modified mode page
    --enumerate | -e      list known pages and fields (ignore device)
    --flexible | -f       compensate for common errors, relax some checks
    --get=STR | -g STR    get (fetch) field value(s)
    --help | -h           print out usage message
    --hex | -H            output in hex rather than name/value pairs
    --inquiry | -i        output INQUIRY VPD page(s) (def: mode page(s))
                          use --page=PG for VPD number (-1 for std inq)
    --long | -l           add description to field output
    --num-desc | -n       report number of mode page descriptors
    --page=PG[,SPG] | -p PG[,SPG]    page (and optionally subpage) number
                          [or abbrev] to output, change or enumerate
    --quiet | -q          suppress device vendor/product/revision string line
    --readonly | -r       force read-only open of DEVICE (def: depends
                          on operation). Mainly for ATA disks
    --save | -S           place mode changes in saved page as well
    --set=STR | -s STR    set field value(s)
    --six | -6            use 6 byte SCSI mode cdbs (def: 10 byte)
    --transport=TN | -t TN    transport protocol number [or abbrev]
    --vendor=VN | -M VN    vendor (manufacturer) number [or abbrev]
    --verbose | -v        increase verbosity
    --version | -V        print version string and exit

View or change SCSI mode page fields (e.g. of a disk or CD/DVD drive).
STR can be [=val] or ::[=val].
[root@UARHEL1 ~]#


8. Install sg3 utilities which provides command called sg_map.

[root@UARHEL1 ~]# sg_map -i -x
/dev/sg0  2 0 0 0  0  /dev/sda  VBOX      HARDDISK          1.0
/dev/sg1  1 0 0 0  5  /dev/sr0  VBOX      CD-ROM            1.0
[root@UARHEL1 ~]#

Packge name

  • sg3_utils.x86_64


Help:  sg_map

[root@UARHEL1 ~]# sg_map --help
Unknown switch: --help
Usage: sg_map [-a] [-h] [-i] [-n] [-sd] [-scd or -sr] [-st] [-V] [-x]
  where:
    -a      do alphabetic scan (ie sga, sgb, sgc)
    -h or -?    show this usage message then exit
    -i      also show device INQUIRY strings
    -n      do numeric scan (i.e. sg0, sg1, sg2) (default)
    -sd     show mapping to disks
    -scd    show mapping to cdroms (look for /dev/scd
    -sr     show mapping to cdroms (look for /dev/sr
    -st     show mapping to tapes (st and osst devices)
    -V      print version string then exit
    -x      also show bus,chan,id,lun and type

If no '-s*' arguments given then show all mappings. This utility
is DEPRECATED, do not use in Linux 2.6 series or later.
[root@UARHEL1 ~]#

In upcoming articles ,we will see more about other hardware management on Linux operating system. Hope this article is informative to you. Share it ! Comment it !! Be sociable !!!

The post LINUX – SCSI Device Management – Identifying Devices appeared first on UnixArena.

Para virtualization vs Full virtualization vs Hardware assisted Virtualization

$
0
0

Virtualization is nothing but abstracting operating system, application, storage or network away from the true underlying hardware or software. It creates the illusion of physical hardware to achieve the goal of operating system isolation. In last decade, data centers were occupied by a large number of physical servers, network switches, storage devices. It consumed a lot of power and manpower to maintain the data centers. In that period, there were many companies were researching about the hardware emulation/simulation like QEMU, virtual PC etc.. It’s very hard to list all the virtualization types here. So I have just listed down only the server virtualization types.


  • Full Virtualization (Hardware Assisted/ Binary Translation )
  • Paravirtualization
  • Hybrid Virtualization
  • OS level Virtualization
Types of virtualization


Full Virtualization:

Virtual machine simulates hardware to allow an unmodified guest OS to be run in isolation. There is two type of Full virtualizations in the enterprise market.  On both full virtualization types, guest operating system’s source information will not be modified.

  • Software assisted full virtualization
  • Hardware-assisted full virtualization


Software Assisted – Full Virtualization  (BT – Binary Translation )

It completely relies on binary translation to trap and virtualize the execution of sensitive, non-virtualizable instructions sets. It emulates the hardware using the software instruction sets. Due to binary translation, it often criticized for performance issue. Here is the list of software which will fall under software assisted (BT).

  • VMware workstation (32Bit guests)
  • Virtual PC
  • VirtualBox (32-bit guests)
  • VMware Server
Binary Translation - Full Virtualization
Binary Translation – Full Virtualization


Hardware-Assisted –  Full Virtualization  (VT)

Hardware-assisted full virtualization eliminates the binary translation and it directly interrupts with hardware using the virtualization technology which has been integrated on X86 processors since 2005 (Intel VT-x and AMD-V).  Guest OS’s instructions might allow a virtual context execute privileged instructions directly on the processor, even though it is virtualized.

Hardware-assisted virtualization - Hypervisor
Hardware-assisted virtualization – Hypervisor

Here is the list of enterprise software which supports hardware-assisted – Full virtualization which falls under hypervisor type 1  (Bare metal )

  • VMware ESXi /ESX
  • KVM
  • Hyper-V
  • Xen
hypervisor - Native - Bare-metal
hypervisor – Native – Bare-metal


The following virtualization type of virtualization falls under hypervisor type 2  (Hosted).

  • VMware Workstation  (64-bit guests only )
  • Virtual Box (64-bit guests only )
  • VMware Server (Retired )
Hosted - Hypervisor type 2
Hosted – Hypervisor type 2


Paravirtualization:

Paravirtualization works differently from the full virtualization. It doesn’t need to simulate the hardware for the virtual machines. The hypervisor is installed on a physical server (host) and a guest OS is installed into the environment. Virtual guests aware that it has been virtualized, unlike the full virtualization (where the guest doesn’t know that it has been virtualized) to take advantage of the functions. In this virtualization method, guest source codes will be modified with sensitive information to communicate with the host. Guest Operating systems require extensions to make API calls to the hypervisor. In full virtualization, guests will issue a hardware calls but in paravirtualization, guests will directly communicate with the host (hypervisor) using the drivers. Here is the lisf of products which supports paravirtualization.

  • Xen
  • IBM LPAR
  • Oracle VM for SPARC  (LDOM)
  • Oracle VM for X86  (OVM)


The below diagram might help you to understand how Xen supports both full virtualization and paravirtualization. Due to the architecture difference between windows and Linux based Xen hypervisor, Windows operating system can’t be para-virtualized.  But it does for Linux guest by modifying the kernel.  But VMware ESXi doesn’t modify the kernel for both Linux and Windows guests.
Xen supports both Full virutalization and Para-virtualization

Xen supports both Full virtualization and Para-virtualization

Hybrid Virtualization: ( Hardware Virtualized with PV Drivers )

In Hardware assisted full virtualization, Guest operating systems are unmodified and it involves many VM traps and thus high CPU overheads which limit the scalability.  Paravirtualization is a complex method where guest kernel needs to be modified to inject the API. By considering these issues, engineers have come with hybrid paravirtualization. It’s a combination of both Full & Paravirtualization. The virtual machine uses paravirtualization for specific hardware drivers (where there is a bottleneck with full virtualization, especially with I/O & memory intense workloads), and the host uses full virtualization for other features. The following products support hybrid virtualization.

  • Oracle VM for x86
  • Xen
  • VMware ESXi

The following diagram will help you to understand how VMware supports both full virtualization and hybrid virtualization. RDMA uses the paravirual driver to bypass VMkernel in hardware-assisted full virtualization.

VMware ESXi - Example of Hybrid virtualization
VMware ESXi – Example of Hybrid virtualization


OS level Virtualization:

Operating system-level virtualization is widely used.It also knowns “containerization”. Host Operating system kernel allows multiple user spaces aka instance.In OS-level virtualization, unlike other virtualization technologies, there will be very little or no overhead since its uses the host operating system kernel for execution. Oracle Solaris zone is one of the famous containers in the enterprise market.  Here is the list of other containers.

  • Linux LCX
  • Docker
  • AIX WPAR
Solaris Containers - OS level virtualization Example
Solaris Containers – OS-level virtualization Example

Each virtualization technologies have their own advantages and disadvantages. The choice of virtualization heavily depends on use and cost.

There are a lot of technologies are evolving and enterprise products support multiple virtualization types to improve the performance and reduce the resource overhead. I know its bit hard to understand and classify the virtualization technologies. But I have tried my level best to put it together.

Share it! Comme it !!  Be sociable !!!

The post Para virtualization vs Full virtualization vs Hardware assisted Virtualization appeared first on UnixArena.

Virtual Machine Live Migration – How it works ?

$
0
0

Virtualization’s revolution has pushed many technical challenges from “impossible” category to the “possible” category. Live Guest OS Migration can be considered as one of the major benefits of the OS virtualization. Migrating the virtual machine from one host to another host without downtime facilitates fault management, load-balancing, and low-level system maintenance. It has eliminated all difficulties faced by process-level migration by just moving the whole virtual machine with running operating system.

Migrating the whole virtual means that in-memory state of VM can be transferred in a  consistent and efficient fashion during the live OS migration. It includes the kernel state, active TCP/IP connections, application state, and sockets. In the practical world, You can migrate the live database server without recycling the application to re-connect to the database. If you are migrating the web server, you no need to re-establish the session since your old sessions are still valid if you do the live migration.


Live OS migration :

Is it possible to migrate VM without downtime? No. There is a downtime required to migrate the VM in live migration too but without impacting the end user. The operating system has a timeout value for each process. For an example, to write the data to the disk have a certain amount of timeout value. Within this time-out time period, if we are able to migrate the VM from host to another host, all the TCP/IP connections will be valid & end users will not be impacted due to this migration. But how can you migrate the VM within the timeout period?  Looks impossible.

Live Migration addresses all of these concerns by using the pre-copy approach.  In which pages of memory are frequently copied from the source host to the destination host without stopping the execution of the virtual machine that is migrated.


Live Migration Timeline:

Stage 0:

Pre-Migration stage – A target host will be preselected where the resources required to receive migration will be guaranteed.


Stage 1:

Reservation – A request is submitted to migrate a VM from Host-A to Host-B. If the request is not fulfilled, then VM will continue to run on Host-A.


Stage 2:

Repetitive Pre-Copy: During the first iteration, all memory pages are transferred from Host-A to Host-B. Subsequent iterations copy are only those pages dirtied during the previous transfer.


Stage 3:

Stop (suspend)-and-Copy:  In this phase, VM will be suspended on Host-A and redirect its network traffic to Host-B. CPU state and any remaining inconsistent memory pages are then transferred like a final sync. This process will reach a consistent suspended copy of the VM at both Host-A and Host-B. Host-A will remain primary and it will be resumed in case of failure at this stage.


Stage 4:

Commitment to the hosts:  Host-B sends the signal to Host-A that it has successfully received a consistent VM OS image. Host-A acknowledges the signal and destroys the VM. Host-B becomes the primary host for migrated VM.


Stage 5:

Activation of VM:  The migrated VM on Host-B is now activated. Post-migration code connects to the local resources and resumes the operation.


VM Live Migration timelines


Here is the list of hypervisor products which supports the Guest OS Live Migration.

  • VMware vSphere – vMotion
  • Xen – Live Migration
  • Oracle VM for x86 – Live Migration
  • RHEV – Live Migration.
  • Oracle LDOM – Live Migration
  • AIX – LPAR – Live Migraiton
  • Microsoft Hyper-V


VMware vMotion
VMware vMotion


Hope this article is informative to you. Share it! Comment it !! Be Sociable !!!

The post Virtual Machine Live Migration – How it works ? appeared first on UnixArena.


How to Install Ansible Engine on CentOS / RHEL

$
0
0

Installing the Ansible engine and set up the environment is pretty straightforward. Ansible engine can be installed on the majority of Linux flavors which includes CentOS, RHEL, Ubuntu, and Debian but it doesn’t support Windows, Solaris, and AIX. But there are no restrictions to participate as ansible clients. Ansible uses the SSH  protocol to manage the Unix and Linux servers. Windows Servers can be managed by using “WinRM”. In this lab environment, we will be using CentOS 7  to install ansible engine.

Environment: 

  • CentOS 7.5 / RHEL 7.5
  • Static IP
  • Internet Connection
  • Access to extra RPM’s
  • IPtables flushed out / Firewall service Stopped.
  • SELinux disabled.


OS release:

[sysadmin@ansible-server ~]$ cat /etc/redhat-release
CentOS Linux release 7.5.1804 (Core)
[sysadmin@ansible-server ~]$


Firewall:

[root@ansible-server ~]# systemctl disable  firewalld
Removed symlink /etc/systemd/system/multi-user.target.wants/firewalld.service.
Removed symlink /etc/systemd/system/dbus-org.fedoraproject.FirewallD1.service.
[root@ansible-server ~]# systemctl stop  firewalld
[root@ansible-server ~]# systemctl status firewalld
● firewalld.service - firewalld - dynamic firewall daemon
   Loaded: loaded (/usr/lib/systemd/system/firewalld.service; disabled; vendor preset: enabled)
   Active: inactive (dead)
     Docs: man:firewalld(1)

Jul 03 08:01:11 ansible-server systemd[1]: Starting firewalld - dynamic firewall daemon...
Jul 03 08:01:14 ansible-server systemd[1]: Started firewalld - dynamic firewall daemon.
Jul 03 08:03:19 ansible-server systemd[1]: Stopping firewalld - dynamic firewall daemon...
Jul 03 08:03:19 ansible-server systemd[1]: Stopped firewalld - dynamic firewall daemon.
[root@ansible-server ~]#


IPTables:

[root@ansible-server ~]# iptables -L
Chain INPUT (policy ACCEPT)
target     prot opt source               destination

Chain FORWARD (policy ACCEPT)
target     prot opt source               destination

Chain OUTPUT (policy ACCEPT)
target     prot opt source               destination
[root@ansible-server ~]#


SELinux:

[root@ansible-server ~]# getenforce
Permissive
[root@ansible-server ~]#
[root@ansible-server ~]# cat /etc/selinux/config |grep "SELINUX="
SELINUX=disabled
[root@ansible-server ~]#


REPO:

[root@ansible-server ~]# cd /etc/yum.repos.d/
[root@ansible-server yum.repos.d]# ls -lrt |grep -i base
-rw-r--r--. 1 root root 1664 May 17 06:53 CentOS-Base.repo
[root@ansible-server yum.repos.d]# 
[root@ansible-server yum.repos.d]# cat CentOS-Base.repo
[base]
name=CentOS-$releasever - Base
mirrorlist=http://mirrorlist.centos.org/?release=$releasever&arch=$basearch&repo=os&infra=$infra
#baseurl=http://mirror.centos.org/centos/$releasever/os/$basearch/
gpgcheck=1
gpgkey=file:///etc/pki/rpm-gpg/RPM-GPG-KEY-CentOS-7

#released updates
[updates]
name=CentOS-$releasever - Updates
mirrorlist=http://mirrorlist.centos.org/?release=$releasever&arch=$basearch&repo=updates&infra=$infra
#baseurl=http://mirror.centos.org/centos/$releasever/updates/$basearch/
gpgcheck=1
gpgkey=file:///etc/pki/rpm-gpg/RPM-GPG-KEY-CentOS-7

#additional packages that may be useful
[extras]
name=CentOS-$releasever - Extras
mirrorlist=http://mirrorlist.centos.org/?release=$releasever&arch=$basearch&repo=extras&infra=$infra
#baseurl=http://mirror.centos.org/centos/$releasever/extras/$basearch/
gpgcheck=1
gpgkey=file:///etc/pki/rpm-gpg/RPM-GPG-KEY-CentOS-7


Updating the OS & Installing Ansible: (Online Method)

1. Update the CentOS / RHEL using yum command. This will install the available fixes from the repository.

[sysadmin@ansible-server ~]$ sudo yum update
Loaded plugins: fastestmirror
Loading mirror speeds from cached hostfile
 * base: mirrors.fibergrid.in
 * extras: mirrors.fibergrid.in
 * updates: mirrors.fibergrid.in
Resolving Dependencies
--> Running transaction check
---> Package NetworkManager.x86_64 1:1.10.2-13.el7 will be updated
---> Package NetworkManager.x86_64 1:1.10.2-14.el7_5 will be an update
---> Package NetworkManager-libnm.x86_64 1:1.10.2-13.el7 will be updated
---> Package NetworkManager-libnm.x86_64 1:1.10.2-14.el7_5 will be an update
---> Package NetworkManager-team.x86_64 1:1.10.2-13.el7 will be updated
---> Package NetworkManager-team.x86_64 1:1.10.2-14.el7_5 will be an update
---> Package NetworkManager-tui.x86_64 1:1.10.2-13.el7 will be updated

Once the update is done, just reboot the server to boot with the updated kernel.

2. Install the Ansible engine from the CentOS repository.

[sysadmin@ansible-server ~]$ sudo yum install ansible
Loaded plugins: fastestmirror
Loading mirror speeds from cached hostfile
 * base: mirrors.fibergrid.in
 * extras: mirrors.fibergrid.in
 * updates: mirrors.fibergrid.in
Resolving Dependencies
--> Running transaction check
---> Package ansible.noarch 0:2.4.2.0-2.el7 will be installed
--> Processing Dependency: sshpass for package: ansible-2.4.2.0-2.el7.noarch
--> Processing Dependency: python2-jmespath for package: ansible-2.4.2.0-2.el7.noarch
--> Processing Dependency: python-six for package: ansible-2.4.2.0-2.el7.noarch
--> Processing Dependency: python-setuptools for package: ansible-2.4.2.0-2.el7.noarch
--> Processing Dependency: python-passlib for package: ansible-2.4.2.0-2.el7.noarch
--> Processing Dependency: python-paramiko for package: ansible-2.4.2.0-2.el7.noarch
--> Processing Dependency: python-jinja2 for package: ansible-2.4.2.0-2.el7.noarch
--> Processing Dependency: python-httplib2 for package: ansible-2.4.2.0-2.el7.noarch
--> Processing Dependency: python-cryptography for package: ansible-2.4.2.0-2.el7.noarch

Installed:
  ansible.noarch 0:2.4.2.0-2.el7

Dependency Installed:
  PyYAML.x86_64 0:3.10-11.el7                        libyaml.x86_64 0:0.1.4-11.el7_0                                     python-babel.noarch 0:0.9.6-8.el7
  python-backports.x86_64 0:1.0-8.el7                python-backports-ssl_match_hostname.noarch 0:3.5.0.1-1.el7          python-cffi.x86_64 0:1.6.0-5.el7
  python-enum34.noarch 0:1.0.4-1.el7                 python-httplib2.noarch 0:0.9.2-1.el7                                python-idna.noarch 0:2.4-1.el7
  python-ipaddress.noarch 0:1.0.16-2.el7             python-jinja2.noarch 0:2.7.2-2.el7                                  python-markupsafe.x86_64 0:0.11-10.el7
  python-paramiko.noarch 0:2.1.1-4.el7               python-passlib.noarch 0:1.6.5-2.el7                                 python-ply.noarch 0:3.4-11.el7
  python-pycparser.noarch 0:2.14-1.el7               python-setuptools.noarch 0:0.9.8-7.el7                              python-six.noarch 0:1.9.0-2.el7
  python2-cryptography.x86_64 0:1.7.2-2.el7          python2-jmespath.noarch 0:0.9.0-3.el7                               python2-pyasn1.noarch 0:0.1.9-7.el7
  sshpass.x86_64 0:1.06-2.el7

Complete!


3. Check the Ansible version.

[sysadmin@ansible-server ~]$ ansible --version
ansible 2.4.2.0
  config file = /etc/ansible/ansible.cfg
  configured module search path = [u'/home/sysadmin/.ansible/plugins/modules', u'/usr/share/ansible/plugins/modules']
  ansible python module location = /usr/lib/python2.7/site-packages/ansible
  executable location = /usr/bin/ansible
  python version = 2.7.5 (default, Apr 11 2018, 07:36:10) [GCC 4.8.5 20150623 (Red Hat 4.8.5-28)]
[sysadmin@ansible-server ~]$


4. Validating the localhost by passing ping.

[sysadmin@ansible-server ~]$ ansible localhost -m ping
 [WARNING]: Could not match supplied host pattern, ignoring: all

 [WARNING]: provided hosts list is empty, only localhost is available

localhost | SUCCESS => {
    "changed": false,
    "ping": "pong"
}
[sysadmin@ansible-server ~]$

It works. Here, we have got the response “pong” from localhost.


Offline Method:  (RHEL 7 / CentOS 7)

1. Configure the RHEL 7 / CentOS DVD local repo .

2. Download the following packages from Redhat portal.

-rwxr--r-- 1 root root 10471452 Aug  1 12:37 ansible-2.6.2-1.el7ae.noarch.rpm
-rwxr--r-- 1 root root   117768 Aug  1 12:37 python-httplib2-0.9.1-2.1.el7.noarch.rpm
-rwxr--r-- 1 root root   274600 Aug  1 12:37 python-paramiko-2.1.1-4.el7.noarch.rpm
-rwxr--r-- 1 root root   500080 Aug  1 12:37 python-passlib-1.6.5-1.1.el7.noarch.rpm
-rwxr--r-- 1 root root    39640 Aug  1 12:37 python2-jmespath-0.9.0-4.el7ae.noarch.rpm
-rwxr--r-- 1 root root    21900 Aug  1 12:37 sshpass-1.06-1.el7.x86_64.rpm


3. Execute the following command to install “Ansible engine” and dependencies

# yum install ansible-2.6.2-1.el7ae.noarch.rpm python-httplib2-0.9.1-2.1.el7.noarch.rpm python-paramiko-2.1.1-4.el7.noarch.rpm python-passlib-1.6.5-1.1.el7.noarch.rpm python2-jmespath-0.9.0-4.el7ae.noarch.rpm sshpass-1.06-1.el7.x86_64.rpm

Hope this article is informative to you. Share it! Comment it !! Be Sociable !!!

The post How to Install Ansible Engine on CentOS / RHEL appeared first on UnixArena.

Ansible – How to Prepare and Setup Client Nodes ?

$
0
0

Ansible doesn’t require an agent to push the changes but it needs few configurations on the client side to access the server and perform the tasks without prompting for username/ password/other authentication. I would recommend using non-root user for Ansible setup but ensure that user is consistent across your environment. Let’s setup the servers for Ansible automation.


Environment :

  • Ansible user – sysadmin
  • Elevated Access – sudo
  • Ansible Server – ansible-server
  • Client Servers (Just for Demo. You can add as many as client nodes)
    • uaans69  – RHEL 6.9
    • uaans – RHEL 7
    • ana-1 – RHEL 7
  • Authentication- SSH public key


Ansible Server - Client
Ansible Server – Client


Configure Password Less Authentication – Ansible 

1. Login to Ansible server (Control Node) as an user.

[sysadmin@ansible-server ~]$ id -a
uid=1000(sysadmin) gid=1000(sysadmin) groups=1000(sysadmin)
[sysadmin@ansible-server ~]$ uname -n
ansible-server
[sysadmin@ansible-server ~]$


2. Generate new ssh key if it’s not done already. This key will be copied to all the ansible clients to provide the passwordless access.

[sysadmin@ansible-server ~]$ ssh-keygen -t rsa
Generating public/private rsa key pair.
Enter file in which to save the key (/home/sysadmin/.ssh/id_rsa):
Created directory '/home/sysadmin/.ssh'.
Enter passphrase (empty for no passphrase):
Enter same passphrase again:
Your identification has been saved in /home/sysadmin/.ssh/id_rsa.
Your public key has been saved in /home/sysadmin/.ssh/id_rsa.pub.
The key fingerprint is:
SHA256:2B4nZLweGolgyJY0gfWXILB1Pe72XdmpszRW8a4y5cY sysadmin@ansible-server
The key's randomart image is:
+---[RSA 2048]----+
|o*= o.           |
|++o+ .oo         |
|o+o ..o.+     .  |
|.. . o.* .     o |
|    ..+ S .  o...|
|      o= =  o.+. |
|     ...o. .+=  .|
|        . .o=.E. |
|            .*.  |
+----[SHA256]-----+
[sysadmin@ansible-server ~]$
[sysadmin@ansible-server ~]$ ls -lrt .ssh
total 12
-rw-r--r--. 1 sysadmin sysadmin  405 Jul  3 08:38 id_rsa.pub
-rw-------. 1 sysadmin sysadmin 1675 Jul  3 08:38 id_rsa
[sysadmin@ansible-server ~]$

Ensuring that “sysadmin” user is created on all the servers.

3. Transfer the ssh public key to Ansible clients. Here is the list of servers which will be added as ansible client.

  • 192.168.3.150 – uaans69
  • 192.168.3.201 – ana-1
  • 192.168.3.20 – uaans
[sysadmin@ansible-server ~ ]$ cd .ssh/
[sysadmin@ansible-server .ssh]$ ssh-copy-id -i id_rsa.pub uaans69
/bin/ssh-copy-id: INFO: Source of key(s) to be installed: "id_rsa.pub"
The authenticity of host 'uaans69 (192.168.3.150)' can't be established.
RSA key fingerprint is SHA256:mmbl7G1sTVJGdfgMvgZ8ptaoIX46sNGxPGM1GSaA6EY.
RSA key fingerprint is MD5:60:86:f6:8f:d0:0d:a4:3c:76:87:cf:98:50:fb:22:f9.
Are you sure you want to continue connecting (yes/no)? yes
/bin/ssh-copy-id: INFO: attempting to log in with the new key(s), to filter out any that are already installed
/bin/ssh-copy-id: INFO: 1 key(s) remain to be installed -- if you are prompted now it is to install the new keys
sysadmin@uaans69's password:

Number of key(s) added: 1

Now try logging into the machine, with:   "ssh 'uaans69'"
and check to make sure that only the key(s) you wanted were added.

[sysadmin@ansible-server .ssh]$ ssh-copy-id -i id_rsa.pub ana-1
/bin/ssh-copy-id: INFO: Source of key(s) to be installed: "id_rsa.pub"
The authenticity of host 'ana-1 (192.168.3.201)' can't be established.
ECDSA key fingerprint is SHA256:a8kjhbIMymnkGB6LMD0tZ6ip03XqCn9bNPke2x2ZCn8.
ECDSA key fingerprint is MD5:7d:65:54:65:f0:e0:c7:d6:19:fb:1d:7b:a2:2e:93:bd.
Are you sure you want to continue connecting (yes/no)? yes
/bin/ssh-copy-id: INFO: attempting to log in with the new key(s), to filter out any that are already installed
/bin/ssh-copy-id: INFO: 1 key(s) remain to be installed -- if you are prompted now it is to install the new keys
sysadmin@ana-1's password:

Number of key(s) added: 1

Now try logging into the machine, with:   "ssh 'ana-1'"
and check to make sure that only the key(s) you wanted were added.

[sysadmin@ansible-server .ssh]$ ssh-copy-id -i id_rsa.pub uaans
/bin/ssh-copy-id: INFO: Source of key(s) to be installed: "id_rsa.pub"
The authenticity of host 'uaans (192.168.3.20)' can't be established.
ECDSA key fingerprint is SHA256:JrvB5W3cEYZA/+onnyMJP6uIrQlSCK+iVSMbr9p2B74.
ECDSA key fingerprint is MD5:2d:9d:e3:6b:fe:5b:27:a5:89:3c:fe:6a:01:51:7c:65.
Are you sure you want to continue connecting (yes/no)? yes
/bin/ssh-copy-id: INFO: attempting to log in with the new key(s), to filter out any that are already installed
/bin/ssh-copy-id: INFO: 1 key(s) remain to be installed -- if you are prompted now it is to install the new keys
sysadmin@uaans's password:

Number of key(s) added: 1

Now try logging into the machine, with:   "ssh 'uaans'"
and check to make sure that only the key(s) you wanted were added.

[sysadmin@ansible-server .ssh]$ 


4. Let’s test our work. We should be able to login to all the client as “sysadmin” user without password.

[sysadmin@ansible-server ~]$ ssh uaans
[sysadmin@uaans ~]$ logout
Connection to uaans closed.
[sysadmin@ansible-server ~]$ ssh uaans69
[sysadmin@uaans69 ~]$ logout
Connection to uaans69 closed.
[sysadmin@ansible-server ~]$ ssh ana-1
Last login: Sat Jun 30 10:00:47 2018
[sysadmin@ana-1 ~]$ logout
Connection to ana-1 closed.
[sysadmin@ansible-server ~]$

It works.

5. Login to each client node and update sudoers file like below. This will provide the elevated access to “sysadmin” user.

[root@uaans69 ~]# cat /etc/sudoers |grep sysadmin
sysadmin         ALL=(ALL)       NOPASSWD: ALL
[root@uaans69 ~]#


We have successfully setup the Ansible server and client nodes for Ansible Automation. Ansible user, keys and Sudo privileges can be injected into the VM template to make the VM ready for ansible automation without doing all the above steps for new VM server to bring under ansible engine.


The Next step would be setting up the Ansible inventory.

The post Ansible – How to Prepare and Setup Client Nodes ? appeared first on UnixArena.

Ansible – How to Setup Inventory for Easy Operations ?

$
0
0

In Ansible, Setting up inventory is one of the most important tasks.  Ansible can work with multiple servers at the same time but the challenge is how to classify the servers. While setting up Ansible environment, you need to classify the hosts as much a possible using the ansible inventory. For an example, By looking at the inventory, you should be able to list the specific application environment hosts, datacenter, location etc.  Let’s start building Ansible inventory file.

  • Default Ansible Inventory File : /etc/ansible/hosts
 Please note that /etc/ansible/hosts is different from OS /etc/hosts.


Server Inventory: 

Datacenter: DC-MTL

  • uaans69 – Production ABC – Application Server
  • ana-2      – Production ABC – Database Server

Datacenter: DC-TOR

  • ana-1 –  QA ABC – Database Server
  • uaans – QA ABC – Application Server

Region: QUEBEC
Country: CANADA


Adding Servers to the inventory

1.Login to Ansible server as a user.  In this tutorial, we are using “sysadmin” user on all the client nodes.

[sysadmin@ansible-server ~]$ id
uid=1000(sysadmin) gid=1000(sysadmin) groups=1000(sysadmin)
[sysadmin@ansible-server ~]$ cd /etc/ansible/
[sysadmin@ansible-server ansible]$ ls -lrt
total 24
drwxr-xr-x. 2 root root     6 Jan 29 12:15 roles
-rw-r--r--. 1 root root  1016 Jan 29 12:15 hosts
-rw-r--r--. 1 root root 19179 Jan 29 12:15 ansible.cfg
[sysadmin@ansible-server ansible]$


2. To edit the “hosts” file, you need an root access. use “sudo” to get the elevated access.

[sysadmin@ansible-server ansible]$ sudo vi hosts


Add the following lines to the /etc/ansible/hosts file and save it.

[ABC-APP1-QUT]
uaans

Here “ABC-APP1-QUT” is group name and “uaans” is a server which is part of that.


3. List all the hosts which are added into the hosts file.

[sysadmin@ansible-server ansible]$ ansible all --list-hosts
  hosts (1):
    uaans
[sysadmin@ansible-server ansible]$


You could also list using the group parameter like below when you have more hosts. It will help to filter the hosts in Group wise and push the configuration.

[sysadmin@ansible-server ansible]$ ansible ABC-APP1-QUT --list-hosts
  hosts (1):
    uaans
[sysadmin@ansible-server ansible]$


Let’s ping all the hosts which are in the ansible inventroy. (we just have one host!)

[sysadmin@ansible-server ansible]$ ansible all -m ping
uaans | SUCCESS => {
    "changed": false,
    "ping": "pong"
}
[sysadmin@ansible-server ansible]$

Ansible reads the inventory file and sends the ping module. The above output shows, nothing has changed but got the “pong” response.
4. Let’s send a specific command to the newly created group. If you have 100 hosts in that group, Ansible will get the results by logging in to each server.

[sysadmin@ansible-server ansible]$ ansible ABC-APP1-QUT -a 'uptime'
uaans | SUCCESS | rc=0 >>
 08:07:43 up 1 day, 16:24,  2 users,  load average: 0.00, 0.01, 0.05

[sysadmin@ansible-server ansible]$

Here, ansible server is logged in to the remote server and got the required output.


5. Let’s add all other remaining servers from our servers list. Add the following lines in /etc/ansible/hosts file.

[ABC-APP1-QUT]
uaans

[ABC-DB1-QUT]
ana-1

[ABC-APP1-PRD]
uaans69

[ABC-DB1-PRD]
ana-2

Look at each line closely. I have classified the hosts using the App name as “ABC” and landscape (PRD or QUT).


List all the hosts now.

[sysadmin@ansible-server ansible]$ ansible all --list-hosts
  hosts (4):
    uaans69
    uaans
    ana-2
    ana-1
[sysadmin@ansible-server ansible]$


6. Let’s find out the load average on group “ABC-DB1-PRD”.

[sysadmin@ansible-server ansible]$ ansible ABC-DB1-PRD -a 'uptime'
ana-2 | SUCCESS | rc=0 >>
 08:33:12 up 10:00,  2 users,  load average: 0.00, 0.01, 0.05

[sysadmin@ansible-server ansible]$


Now you could have a doubt that Why can’t we directly use the hostname to get the desired command output? Off-course, you can do that but group meant for a different purpose.

[sysadmin@ansible-server ansible]$ ansible ana-2  -a 'uptime'
ana-2 | SUCCESS | rc=0 >>
 08:37:42 up 10:05,  2 users,  load average: 0.00, 0.01, 0.05

[sysadmin@ansible-server ansible]$


7. Let’s classify the hosts further using the landscape. Here, we are creating the master group by specifying the children. Add the following lines in the ansible host file.

[ABC-QUT:children]
ABC-APP1-QUT
ABC-DB1-QUT

[ABC-PRD:children]
ABC-APP1-PRD
ABC-DB1-PRD


List the hosts from ABC-QUT.

[sysadmin@ansible-server ansible]$ ansible ABC-QUT --list-hosts
  hosts (2):
    uaans
    ana-1
[sysadmin@ansible-server ansible]$ 


List the hosts from ABC-PRD

[sysadmin@ansible-server ansible]$ ansible ABC-PRD --list-hosts
  hosts (2):
    uaans69
    ana-2
[sysadmin@ansible-server ansible]$

We have got the desired output. Using the same method, Let me classify more.


7. Let’s classify the hosts further using the datacenter, region, and country. Same hosts can be part of multiple groups. Here, I have added the same set of hosts using datacenter classification. I might use children relationship but there is no hard code rule to run a specific application on the same datacenter. Same application could run on different datacenters as well. So we are just adding the hosts according to the hosted data center.

[DC-MTL]
uaans
ana-1

[DC-TOR]
uaans69
ana-2

[QUEBEC:children]
DC-MTL
DC-TOR

[CANADA:children]
QUEBEC


List the servers which are running in country “CANADA”.

[sysadmin@ansible-server ansible]$ ansible CANADA --list-hosts
  hosts (4):
    uaans
    ana-1
    uaans69
    ana-2
[sysadmin@ansible-server ansible]$


List all the hosts. Even though we have added the same set of servers in multiple groups, it just removes the duplicate and provides the actual number of hosts.

[sysadmin@ansible-server ansible]$ ansible all --list-hosts
  hosts (4):
    uaans
    ana-1
    uaans69
    ana-2
[sysadmin@ansible-server ansible]$

In this tutorial, we haven’t discussed the hostname range, IP range and set up the variables in inventory file. We shall discuss those things in later part of the tutorial.

The post Ansible – How to Setup Inventory for Easy Operations ? appeared first on UnixArena.

Ansible – Command vs Shell vs Raw Modules

$
0
0

Ansible uses modules to complete the task on the remote server. The most commonly used command modules are “command”, “shell”, and “raw”. Each module has its own advantages and disadvantages. In Ad-hoc command mode, unless you specify the module name, it uses “command” module by default. In this article, we will see the functionality of these modules and use cases.


Command Module:

“Command” module is the default module in Ansible Ad-hoc mode. command module can able to execute only the binaries on remote hosts. Command module won’t be impacted by local shell variables since it bypasses the shell. At the same time, it may not be able to run “shell” inbuilt functions(ex: set) and redirection (which also shell’s inbuilt functionality).

1.Login to ansible server.

2. Let’s find out the current run level on host “uaans”.

[sysadmin@ansible-server ~]$ ansible uaans -a "who -r"
uaans | SUCCESS | rc=0 >>
         run-level 5  2018-06-29 06:14

[sysadmin@ansible-server ~]$


You can also make the output in a single line using the “-o” option.

[sysadmin@ansible-server ~]$ ansible uaans -a "who -r" -o
uaans | SUCCESS | rc=0 | (stdout)          run-level 5  2018-06-29 06:14
[sysadmin@ansible-server ~]$


The above command executed the below-listed binary in the remote server and got the desired results.

$ ls -lrt /bin/who
-rwxr-xr-x. 1 root root 49872 Apr 10 21:35 /bin/who

Same way, you should be able to execute the binaries on the remote host. To use “command” module, the remote host should have python installed (2.7 >).


3. Let’s look at the example if the remote server doesn’t have python installed.

[sysadmin@ansible-server ~]$ ansible uaans69 -a "who -r"
uaans69 | FAILED! => {
    "changed": false,
    "module_stderr": "Shared connection to uaans69 closed.\r\n",
    "module_stdout": "/bin/sh: /usr/bin/python: No such file or directory\r\n",
    "msg": "MODULE FAILURE",
    "rc": 0
}
[sysadmin@ansible-server ~]$

“Command” module failed because the remote host doesn’t have python installed.


Raw Module:

Datacenter has combinations of appliances, servers and network devices. Python might not be installed on all the server and appliances. If that’s the case, how to manage those using Ansible?  Ansible offers “raw” module to overcome such a limitation of the “command” module.

[sysadmin@ansible-server ~]$ ansible uaans69 -m raw -a "who -r"
uaans69 | SUCCESS | rc=0 >>
         run-level 3  2018-05-14 13:19
Shared connection to uaans69 closed.

[sysadmin@ansible-server ~]$ ansible uaans69 -m raw -a "who -r" -o
uaans69 | SUCCESS | rc=0 | (stdout)          run-level 3  2018-05-14 13:19\r\n (stderr) Shared connection to uaans69 closed.\r\n
[sysadmin@ansible-server ~]$

“raw” module just executes a low-down and dirty SSH command over the network.


Shell Module: 

Shell module is very useful when you want to use redirections and shell’s inbuilt functionality.

1. Find out the disk utilization using “command” module.

[sysadmin@ansible-server ~]$ ansible -a "df -h" uaans69
uaans69 | SUCCESS | rc=0 >>
Filesystem      Size  Used Avail Use% Mounted on
/dev/sda2        18G  2.7G   14G  16% /
tmpfs           931M     0  931M   0% /dev/shm
/dev/sda1       283M   40M  229M  15% /boot
/dev/sr0        3.7G  3.7G     0 100% /mnt

[sysadmin@ansible-server ~]$


2. Can you try to filter the utilization only for “/” or “/dev/sda2”?

[sysadmin@ansible-server ~]$ ansible -a "df -h|grep sda2" uaans69
uaans69 | FAILED | rc=1 >>
df: invalid option -- '|'
Try `df --help' for more information.non-zero return code
[sysadmin@ansible-server ~]$ 

The above errors show that you can’t use the pipe (|) in the command module. Let’s use the “Shell” module.


3. Run the same command using the shell module.

[sysadmin@ansible-server ~]$ ansible -m shell -a "df -h|grep sda2" uaans69
uaans69 | SUCCESS | rc=0 >>
/dev/sda2        18G  2.7G   14G  16% /

[sysadmin@ansible-server ~]$ ansible -m shell -a "df -h|grep sda2" uaans69 -o
uaans69 | SUCCESS | rc=0 | (stdout) /dev/sda2        18G  2.7G   14G  16% /
[sysadmin@ansible-server ~]$ 

Here, we have got the desired results since “|” is shell’s inbuilt functionality.


4. Let’s test the redirection functionality on the command module.

[sysadmin@ansible-server ~]$ ansible  -a "df -h > /var/tmp/df.out"  uaans
uaans | FAILED | rc=1 >>
df: ‘>’: No such file or directory
df: ‘/var/tmp/df.out’: No such file or directorynon-zero return code

[sysadmin@ansible-server ~]$

Redirection failed when you use “command” module.
Let’s run the same command using the shell module.

[sysadmin@ansible-server ~]$ ansible -m shell -a "df -h > /var/tmp/df.out"  uaans
uaans | SUCCESS | rc=0 >>

[sysadmin@ansible-server ~]$


Verify the redirection by logging in to the remote server,

[sysadmin@ansible-server ~]$ ssh uaans
Last login: Fri Jul  6 23:33:26 2018 from 192.168.3.151
[sysadmin@uaans ~]$ ls -lrt /var/tmp/df.out
-rw-rw-r--. 1 sysadmin sysadmin 319 Jul  6 23:33 /var/tmp/df.out
[sysadmin@uaans ~]$ cat /var/tmp/df.out
Filesystem      Size  Used Avail Use% Mounted on
/dev/sda3        18G  4.9G   13G  28% /
devtmpfs        908M     0  908M   0% /dev
tmpfs           914M     0  914M   0% /dev/shm
tmpfs           914M  8.6M  905M   1% /run
tmpfs           914M     0  914M   0% /sys/fs/cgroup
/dev/sda1       297M   85M  213M  29% /boot
[sysadmin@uaans ~]$


5. Shell module offers to run a specific “shell” on the remote server as well.

[sysadmin@ansible-server ~]$ ansible -m shell -a "/bin/bash |echo $SHELL"  uaans
uaans | SUCCESS | rc=0 >>
/bin/bash

[sysadmin@ansible-server ~]$
[sysadmin@ansible-server ~]$ ansible  -m shell -a "/bin/bash |df -h "  uaans
uaans | SUCCESS | rc=0 >>
Filesystem      Size  Used Avail Use% Mounted on
/dev/sda3        18G  4.9G   13G  28% /
devtmpfs        908M     0  908M   0% /dev
tmpfs           914M     0  914M   0% /dev/shm
tmpfs           914M  8.6M  905M   1% /run
tmpfs           914M     0  914M   0% /sys/fs/cgroup
/dev/sda1       297M   85M  213M  29% /boot
[sysadmin@ansible-server ~]$

The post Ansible – Command vs Shell vs Raw Modules appeared first on UnixArena.

Ansible – Running Command on Ad-hoc Mode

$
0
0

Ansible allows administrators to execute on-demand tasks on Ansible managed servers. The ad-hoc commands are the most basic operations that can be performed with Ansible engine. Each ad-hoc command is capable of performing a single operation on host or group of hosts. To perform multiple operations, the administrator should run the series of ad-hoc commands from Ansible Server. Some of the commands might require “root” privilege. We will see that how to become a root user in ad-hoc mode.


1. Login to Ansible server and run “uptime” command in ad-hoc mode.

[sysadmin@ansible-server ~]$ ansible all -a 'uptime'
ana-2 | SUCCESS | rc=0 >>
 07:01:19 up 2 days,  8:29,  2 users,  load average: 0.24, 0.06, 0.06

ana-1 | SUCCESS | rc=0 >>
 00:43:56 up 3 days, 20:58,  1 user,  load average: 0.19, 0.31, 0.22

uaans | SUCCESS | rc=0 >>
 04:18:41 up 3 days, 12:00,  2 users,  load average: 0.00, 0.01, 0.05

uaans69 | SUCCESS | rc=0 >>
 04:18:40 up 4 days,  1:50,  2 users,  load average: 0.00, 0.00, 0.00


To align the output in one line, use “-o” option.

[sysadmin@ansible-server ~]$ ansible all -a 'uptime' -o
ana-1 | SUCCESS | rc=0 | (stdout)  00:44:03 up 3 days, 20:58,  1 user,  load average: 0.17, 0.31, 0.22
uaans69 | SUCCESS | rc=0 | (stdout)  04:18:46 up 4 days,  1:50,  2 users,  load average: 0.00, 0.00, 0.00
uaans | SUCCESS | rc=0 | (stdout)  04:18:47 up 3 days, 12:00,  2 users,  load average: 0.00, 0.01, 0.05
ana-2 | SUCCESS | rc=0 | (stdout)  07:01:26 up 2 days,  8:29,  2 users,  load average: 0.22, 0.06, 0.06
[sysadmin@ansible-server ~]$


2. How to gain the escalated privileges on Ad-hoc mode?

The following command just finds the user which is configured with ansible for passwordless authentication.

[sysadmin@ansible-server ~]$  ansible all -a "whoami"
ana-1 | SUCCESS | rc=0 >>
sysadmin

ana-2 | SUCCESS | rc=0 >>
sysadmin

uaans | SUCCESS | rc=0 >>
sysadmin

uaans69 | SUCCESS | rc=0 >>
sysadmin

[sysadmin@ansible-server ~]$


Try the same command using the “-b” option to gain the elevated access/root access.

[sysadmin@ansible-server ~]$  ansible all -b -a "whoami"
uaans69 | SUCCESS | rc=0 >>
root

uaans | SUCCESS | rc=0 >>
root

ana-2 | SUCCESS | rc=0 >>
root

ana-1 | SUCCESS | rc=0 >>
root
[sysadmin@ansible-server ~]$

Here we can see that, sysadmin user has gained the root access.  In many cases, you need to escalate the privileges to manage the hosts.


3. Install Apache package using “ad-hoc” command.

  • “-b” option used for escalating the privilege.
  • “-m” option used for specifying the module.
[sysadmin@ansible-server ~]$ ansible all -b -m yum -a "name=httpd state=present"
ana-2 | SUCCESS => {
    "changed": false,
    "msg": "",
    "rc": 0,
    "results": [
        "httpd-2.4.6-80.el7.centos.1.x86_64 providing httpd is already installed"
    ]
}
ana-1 | SUCCESS => {
    "changed": false,
    "msg": "",
    "rc": 0,
    "results": [
        "httpd-2.4.6-80.el7.centos.1.x86_64 providing httpd is already installed"
    ]
}
uaans69 | SUCCESS => {
    "changed": false,
    "msg": "",
    "rc": 0,
    "results": [
        "httpd-2.2.15-60.el6_9.6.x86_64 providing httpd is already installed"
    ]
}
uaans | SUCCESS => {
    "changed": false,
    "msg": "",
    "rc": 0,
    "results": [
        "httpd-2.4.6-17.el7.x86_64 providing httpd is already installed"
    ]
}
[sysadmin@ansible-server ~]$


3. Try to remove the installed package without “-b” option. You should get errors since we haven’t escalated the privileges.

[sysadmin@ansible-server ~]$ ansible all -m yum -a "name=httpd state=absent"
ana-2 | FAILED! => {
    "changed": false,
    "msg": "You need to be root to perform this command.\n",
    "rc": 1,
    "results": [
        "Loaded plugins: fastestmirror\n"
    ]
}
ana-1 | FAILED! => {
    "changed": false,
    "msg": "Repository epel is listed more than once in the configuration\nRepository epel-source is listed more than once in the configuration\nYou need to be root to perform this command.\n",
    "rc": 1,
    "results": [
        "Loaded plugins: fastestmirror\n"
    ]
}
uaans | FAILED! => {
    "changed": false,
    "msg": "You need to be root to perform this command.\n",
    "rc": 1,
    "results": [
        "Loaded plugins: langpacks, product-id, subscription-manager\n"
    ]
}
uaans69 | FAILED! => {
    "changed": false,
    "msg": "You need to be root to perform this command.\n",
    "rc": 1,
    "results": [
        "Loaded plugins: product-id, refresh-packagekit, search-disabled-repos, security,\n              : subscription-manager\n"
    ]
}
[sysadmin@ansible-server ~]$

The “ad-hoc” mode can be used to perform most of the activities but playbooks and roles are more matured and it’s better for error handling. It can also avoid the command line syntax errors.  When you have a mix of Debian and RHEL variants, ad-hoc mode commands might fail since commands will be different on each flavor.

The post Ansible – Running Command on Ad-hoc Mode appeared first on UnixArena.

Ansible – Using File & Copy Modules in Ad-hoc Mode?

$
0
0

Ansible “Ad-hoc” mode can be used to copy/delete/modify files on the specific host or Group of hosts using ansible modules. File module is used for setting file attributes like permission, ownership and creating the links. “Copy” module is used to copy the files to hosts from Ansible server. These modules are very often used in Ad-hoc mode to push the application configurations, system configurations etc.. You could quickly push the configuration to multiple hosts using these modules. Let’s demonstrate the functions of  “file” and “copy” modules.


File operations:

1. Login to Ansible server and list the hosts.

[sysadmin@ansible-server ~]$ ansible --list-hosts all
  hosts (4):
    uaans
    ana-1
    uaans69
    ana-2
[sysadmin@ansible-server ~]$ ansible uaans69 -m ping
uaans69 | SUCCESS => {
    "changed": false,
    "ping": "pong"
}
[sysadmin@ansible-server ~]$


2. Create a blank file on the host (uaans69) with a given path using ansible.

[sysadmin@ansible-server ~]$ ansible uaans69 -m file -a 'path=/var/tmp/ansible_test.txt state=touch'
uaans69 | SUCCESS => {
    "changed": true,
    "dest": "/var/tmp/ansible_test.txt",
    "gid": 502,
    "group": "sysadmin",
    "mode": "0664",
    "owner": "sysadmin",
    "secontext": "unconfined_u:object_r:user_tmp_t:s0",
    "size": 0,
    "state": "file",
    "uid": 502
}
[sysadmin@ansible-server ~]$ 


Verify our work by logging in to uaans69 host.

[sysadmin@ansible-server ~]$ ssh uaans69
Last login: Wed Jul 11 05:09:24 2018 from 192.168.3.151
[sysadmin@uaans69 ~]$ ls -lrt /var/tmp/ansible_test.txt
-rw-rw-r--. 1 sysadmin sysadmin 0 Jul 11 05:09 /var/tmp/ansible_test.txt
[sysadmin@uaans69 ~]$ logout
Connection to uaans69 closed.
[sysadmin@ansible-server ~]$


Let’s change the file permission and ownership and verify by directly logging in to the host.

[sysadmin@ansible-server ~]$ ansible uaans69 -b -m file -a 'path=/var/tmp/ansible_test.txt owner=root group=root mode=0644'
uaans69 | SUCCESS => {
    "changed": true,
    "gid": 0,
    "group": "root",
    "mode": "0644",
    "owner": "root",
    "path": "/var/tmp/ansible_test.txt",
    "secontext": "unconfined_u:object_r:user_tmp_t:s0",
    "size": 0,
    "state": "file",
    "uid": 0
}
[sysadmin@ansible-server ~]$ ssh uaans69 ls -lrt /var/tmp/ansible_test.txt
-rw-r--r--. 1 root root 0 Jul 11 05:59 /var/tmp/ansible_test.txt
[sysadmin@ansible-server ~]$


3. Remove the newly created file and verify by directly logging in to the host.

[sysadmin@ansible-server ~]$ ansible uaans69 -m file -a 'path=/var/tmp/ansible_test.txt state=absent'
uaans69 | SUCCESS => {
    "changed": true,
    "path": "/var/tmp/ansible_test.txt",
    "state": "absent"
}
[sysadmin@ansible-server ~]$ ssh uaans69
Last login: Wed Jul 11 05:09:49 2018 from 192.168.3.151
[sysadmin@uaans69 ~]$ ls -lrt /var/tmp/ansible_test.txt
ls: cannot access /var/tmp/ansible_test.txt: No such file or directory
[sysadmin@uaans69 ~]$


4. Let’s create a soft link on the host.

[sysadmin@ansible-server ~]$ ansible uaans69 -m file -a 'src=/etc/hosts dest=/var/tmp/hosts state=link'
uaans69 | SUCCESS => {
    "changed": true,
    "dest": "/var/tmp/hosts",
    "gid": 502,
    "group": "sysadmin",
    "mode": "0777",
    "owner": "sysadmin",
    "secontext": "unconfined_u:object_r:user_tmp_t:s0",
    "size": 10,
    "src": "/etc/hosts",
    "state": "link",
    "uid": 502
}

Verify our work.

[sysadmin@ansible-server ~]$ ssh uaans69
Last login: Wed Jul 11 05:56:12 2018 from 192.168.3.151
[sysadmin@uaans69 ~]$ ls -lrt /var/tmp/hosts
lrwxrwxrwx. 1 sysadmin sysadmin 10 Jul 11 05:56 /var/tmp/hosts -> /etc/hosts
[sysadmin@uaans69 ~]$


5. Create a new directory on the host and verify.

[sysadmin@ansible-server ~]$ ansible uaans69 -m file -a 'path=/var/tmp/archive state=directory'
uaans69 | SUCCESS => {
    "changed": true,
    "gid": 502,
    "group": "sysadmin",
    "mode": "0775",
    "owner": "sysadmin",
    "path": "/var/tmp/archive",
    "secontext": "unconfined_u:object_r:user_tmp_t:s0",
    "size": 4096,
    "state": "directory",
    "uid": 502
}
[sysadmin@ansible-server ~]$ ssh uaans69
Last login: Wed Jul 11 06:03:13 2018 from 192.168.3.151
[sysadmin@uaans69 ~]$ ls -ld /var/tmp/archive
drwxrwxr-x. 2 sysadmin sysadmin 4096 Jul 11 06:03 /var/tmp/archive
[sysadmin@uaans69 ~]$

You could change the permission and ownership of the directory file module.


” copy ” Module- Copies files to remote locations:

The copy module copies a file from the local or remote machine to a location on the remote machine. Use the fetch module to copy files from remote locations to the local host.

1. Copy the Ansible server’s /etc/hosts file to remote host “uaans69”. Here are the uaans69’s “/etc/hosts” contents.

cat /etc/hosts
127.0.0.1   localhost localhost.localdomain localhost4 localhost4.localdomain4
::1         localhost localhost.localdomain localhost6 localhost6.localdomain6

The following copy action failed since we didn’t escalate the privileges.

[sysadmin@ansible-server ~]$ ansible uaans69 -m copy -a 'src=/etc/hosts dest=/etc/hosts'
uaans69 | FAILED! => {
    "changed": false,
    "checksum": "021b217c1b2f61e9b5faa24885ac951970e1f6e8",
    "msg": "Destination /etc not writable"
}
[sysadmin@ansible-server ~]$


“/etc/hosts” modification requires root privileges. use “-b” option to become the root user.

[sysadmin@ansible-server ~]$ ansible uaans69 -b -m copy -a 'src=/etc/hosts dest=/etc/hosts'
uaans69 | SUCCESS => {
    "changed": true,
    "checksum": "021b217c1b2f61e9b5faa24885ac951970e1f6e8",
    "dest": "/etc/hosts",
    "gid": 0,
    "group": "root",
    "md5sum": "56aadbedb93d3be9a472f1725fa828b0",
    "mode": "0644",
    "owner": "root",
    "secontext": "system_u:object_r:net_conf_t:s0",
    "size": 557,
    "src": "/home/sysadmin/.ansible/tmp/ansible-tmp-1531284115.26-70289318446057/source",
    "state": "file",
    "uid": 0
}
[sysadmin@ansible-server ~]$


Verify our work.

[sysadmin@ansible-server ~]$ ssh uaans69 cat /etc/hosts
127.0.0.1   localhost localhost.localdomain localhost4 localhost4.localdomain4
::1         localhost localhost.localdomain localhost6 localhost6.localdomain6
192.168.3.151   ansible-server
192.168.3.150   uaans69
192.168.3.201   ana-1
192.168.3.20    uaans
[sysadmin@ansible-server ~]$


2. We must take the backup of any configuration file before editing it. Is it possible to take a backup before overwriting it? Offcourse, You can do that using “backup” keyword.

[sysadmin@ansible-server ~]$ ansible uaans69 -b -m copy -a 'src=/etc/hosts dest=/etc/hosts backup=yes'
uaans69 | SUCCESS => {
    "backup_file": "/etc/hosts.9969.2018-07-11@06:16:49~",
    "changed": true,
    "checksum": "021b217c1b2f61e9b5faa24885ac951970e1f6e8",
    "dest": "/etc/hosts",
    "gid": 0,
    "group": "root",
    "md5sum": "56aadbedb93d3be9a472f1725fa828b0",
    "mode": "0644",
    "owner": "root",
    "secontext": "system_u:object_r:net_conf_t:s0",
    "size": 557,
    "src": "/home/sysadmin/.ansible/tmp/ansible-tmp-1531284592.86-208978173473604/source",
    "state": "file",
    "uid": 0
}

Verify the backup file.

[sysadmin@ansible-server ~]$ ssh uaans69
Last login: Wed Jul 11 06:16:49 2018 from 192.168.3.151
[sysadmin@uaans69 ~]$ ls -lrt /etc/hosts*
-rw-r--r--. 1 root root 460 Jan 12  2010 /etc/hosts.deny
-rw-r--r--. 1 root root 370 Jan 12  2010 /etc/hosts.allow
-rw-r--r--. 1 root root 158 Jul 11 06:16 /etc/hosts.9969.2018-07-11@06:16:49~
-rw-r--r--. 1 root root 557 Jul 11 06:16 /etc/hosts
[sysadmin@uaans69 ~]$ cat /etc/hosts.9969.2018-07-11\@06\:16\:49~
127.0.0.1   localhost localhost.localdomain localhost4 localhost4.localdomain4
::1         localhost localhost.localdomain localhost6 localhost6.localdomain6
[sysadmin@uaans69 ~]$


We could also update the permissions and ownership for the copied files using “copy” module.

The post Ansible – Using File & Copy Modules in Ad-hoc Mode? appeared first on UnixArena.
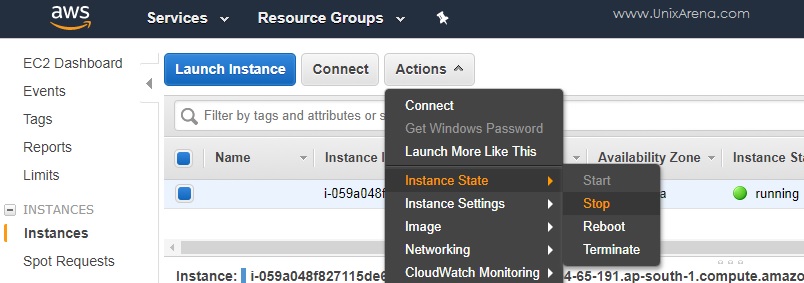
Ansible – What is Playbook ? Play with Tasks & Handlers

$
0
0

Ansible – What is playbook? Playbooks are useful to perform multiple tasks and eliminates the limitation of Ad-hoc mode. Playbooks are the configuration, deployment and orchestration language of Ansible and it’s expressed in YAML format. If Ansible modules are the tools in your workshop, playbooks are your instruction manuals. YAML (Yet Another Markup Language) is human-readable data serialization language. This article will demonstrate that how to create a simple playbook and execute it.


Writing the First Playbook: 

1. Login to Ansible engine server.


2. Create a new playbook to install “httpd” on Linux servers.

---

- hosts: all
  become: yes

  tasks:
    - name: Install the latest version of Apache
      yum: name=httpd state=latest update_cache=yes

  • Playbook should always start with three “” and follow with mandatory hosts field which starts with ““.
  • For package management, we need to gain the root privileges. “become: yes”
  •  tasks: List of tasks that you would like to perform on the client nodes. You must provide the unique name for each task. In the Second line, we are using “yum” module to install the “httpd” version should be latest and requested to update the cache.

3. Save the file with an extension of “yaml”.

$ ls -lrt install_httpd.yaml
-rw-rw-r-- 1 linadm linadm 294 Jul 25 21:47 install_httpd.yaml
$


4. Create the list of servers where you would like to install the latest version of Apache.

$ ls -lrt lin-servers
-rw-r--r-- 1 linadm linadm 1370 Jul 12 02:26 lin-servers
$


5. Execute the playbook to deploy Apache on all the list of servers.

$ ansible-playbook -i lin-servers install_httpd.yaml

PLAY [gpfslinapp1] ******************************************************************************************************

TASK [Gathering Facts] ******************************************************************************************************
ok: [gpfslinapp1]

TASK [Install the latest version of Apache] ******************************************************************************************************
changed: [gpfslinapp1]

PLAY RECAP *******************************************************************************************
gpfslinapp1                : ok=2    changed=1    unreachable=0    failed=0


6. Let’s verify our work.

$ ansible -a "rpm -qa httpd" -i lin-servers all

gpfslinapp1 | SUCCESS | rc=0 >>
httpd-2.4.6-80.el7.centos.1.x86_64


7. Remove the “httpd” package before proceeding with next exercise.

We could be done the same thing in the ad-hoc mode as well.

What’s the advantages of using playbook? Let’s explore. 

We should be able to use multiple tasks, handlers, loops and conditional execution using the playbook.


How to use handlers in Ansible Playbook:? 

1. Update the playbook like below.

---

- hosts: all
  become: yes

  tasks:
    - name: Install the latest version of Apache
      yum: name=httpd state=latest update_cache=yes
      ignore_errors: yes
      notify: start Apache

  handlers:
    - name: start Apache
      service: name=httpd enabled=yes state=started

  • Included handlers in the playbook.
  • Once the installation is completed, service must be started.
  • Service must be enabled across the system reboot.


2. Execute the playbook.

$ ansible-playbook install_httpd.yaml -i lin-servers.1

PLAY [gpfslinapp1] ***************************************************************************************************

TASK [Gathering Facts] ***************************************************************************************************
ok: [gpfslinapp1]

TASK [Install the latest version of Apache] ****************************************************************************************************
changed: [gpfslinapp1]

RUNNING HANDLER [start Apache] ****************************************************************************************************
changed: [gpfslinapp1]

PLAY RECAP *****************************************************************************************
gpfslinapp1                : ok=3    changed=2    unreachable=0    failed=0

Here you could see that package “httpd” is installed and service is started automatically. It also enabled across the server reboot.


3. Verify our work by checking the apache’s service status on the client node.

$  ansible -a "systemctl status httpd" -i lin-servers.1  all
gpfslinapp1 | SUCCESS | rc=0 >>
● httpd.service - The Apache HTTP Server
   Loaded: loaded (/usr/lib/systemd/system/httpd.service; enabled; vendor preset: disabled)
   Active: active (running) since Thu 2018-07-26 01:21:40 UTC; 4min 39s ago
     Docs: man:httpd(8)
           man:apachectl(8)
 Main PID: 81943 (httpd)
   Status: "Total requests: 0; Current requests/sec: 0; Current traffic:   0 B/sec"
   CGroup: /system.slice/httpd.service
           ├─81943 /usr/sbin/httpd -DFOREGROUND


We have successfully created the first Ansible playbook. Using the playbook , we have installed apache on the servers and started the service automatically. In the upcoming sections, we will be writing many playbooks using different modules and functionality.  Stay tuned.

The post Ansible – What is Playbook ? Play with Tasks & Handlers appeared first on UnixArena.


Ansible – How to Gather facts on Remote Server ?

$
0
0

Ansible  – “setup” module is responsible to gather facts of the remote hosts. The system facts are nothing but the system configuration which includes the hostname, IP address, filesystems, OS releases, Users, Network parameters, CPU, memory and many more. This module is automatically included in all the playbooks to gather useful variables which can be used to create the dynamic inventory or perform the specific tasks. There is a way to write the custom facts about the hosts to filter further. Let’s start exploring it.

Assumptions:

  • Ansible Server : ansible-server
  • Remote host: gpfslinapp1


Ansible – SETUP module:

1. Here is the temporary inventory file.

[linadm@ansible-server automation]$ cat lin-servers.1
gpfslinapp1
[linadm@ansible-server automation]$


2. To get the facts of the remote hosts, use the following command.

[linadm@ansible-server automation]$ ansible -m  setup -i lin-servers.1 all 
gpfslinapp1 | SUCCESS => {
    "ansible_facts": {
        "ansible_all_ipv4_addresses": [
            "192.168.3.151"
        ],
        "ansible_all_ipv6_addresses": [
            "fe80::5af3:5374:a618:9c07"
        ],
        "ansible_apparmor": {
            "status": "disabled"


<<>>


3. If you would like to run the remote facts on the specific hosts from the inventory, use the following command.

[linadm@ansible-server automation]$ ansible -m  setup -i lin-servers.1 gpfslinapp1
gpfslinapp1 | SUCCESS => {
    "ansible_facts": {
        "ansible_all_ipv4_addresses": [
            "192.168.3.151"
        ],
        "ansible_all_ipv6_addresses": [
            "fe80::5af3:5374:a618:9c07"
        ],
        "ansible_apparmor": {
            "status": "disabled"
        },
        "ansible_architecture": "x86_64",
        "ansible_bios_date": "05/20/2014",
        "ansible_bios_version": "6.00",
        "ansible_cmdline": {
            "BOOT_IMAGE": "/vmlinuz-3.10.0-862.3.3.el7.x86_64",
            "LANG": "en_US.UTF-8",


“setup” Module – Use Filter in Adhoc Mode:

1. Limit the setup module facts, use “filter” option. The following command filters the currently mounted filesystems on the remote host.

[linadm@ansible-server automation]$ ansible -m  setup -i lin-servers.1 gpfslinapp1 -a 'filter=ansible_mounts'
gpfslinapp1 | SUCCESS => {
    "ansible_facts": {
        "ansible_mounts": [
            {
                "block_available": 4250037,
                "block_size": 4096,
                "block_total": 4638976,
                "block_used": 388939,
                "device": "/dev/sda3",
                "fstype": "xfs",
                "inode_available": 9240033,
                "inode_total": 9283072,
                "inode_used": 43039,
                "mount": "/",
                "options": "rw,relatime,attr2,inode64,noquota",
                "size_available": 17408151552,
                "size_total": 19001245696,
                "uuid": "1abdbd4f-d020-4b23-a68d-5518b98e7ec0"
            },
            {
                "block_available": 36413,
                "block_size": 4096,
                "block_total": 75945,
                "block_used": 39532,
                "device": "/dev/sda1",
                "fstype": "xfs",
                "inode_available": 153266,
                "inode_total": 153600,
                "inode_used": 334,
                "mount": "/boot",
                "options": "rw,relatime,attr2,inode64,noquota",
                "size_available": 149147648,
                "size_total": 311070720,
                "uuid": "ebf6278a-2098-493e-8e3a-7f7d8d4841d5"
            }
        ]
    },
    "changed": false
}
[linadm@ansible-server automation]$

2. To filter the remote host’s OS distribution, use the following ansible variable.

[linadm@ansible-server automation]$ ansible -m  setup -i lin-servers.1 gpfslinapp1 -a 'filter=ansible_distribution'
gpfslinapp1 | SUCCESS => {
    "ansible_facts": {
        "ansible_distribution": "CentOS"
    },
    "changed": false
}
[linadm@ansible-server automation]$

Classifying the hosts using the “setup” Module:

1.  To find out the running kernel on all the hosts, use the following command.

[linadm@ansible-server automation]$ ansible -m setup -i lin-servers.1 all -a 'filter="ansible_kernel"' -o
gpfslinapp1 | SUCCESS => {"ansible_facts": {"ansible_kernel": "3.10.0-862.3.3.el7.x86_64"}, "changed": false}
uaans69     | SUCCESS => {"ansible_facts": {"ansible_kernel": "2.6.32-696.20.1.el6.x86_64"},"changed": false}
[linadm@ansible-server automation]$


Note: “uaans69” – host has been added into the inventory.


Hope this article is informative to you. Share it! Comment it! Be Sociable!

The post Ansible – How to Gather facts on Remote Server ? appeared first on UnixArena.
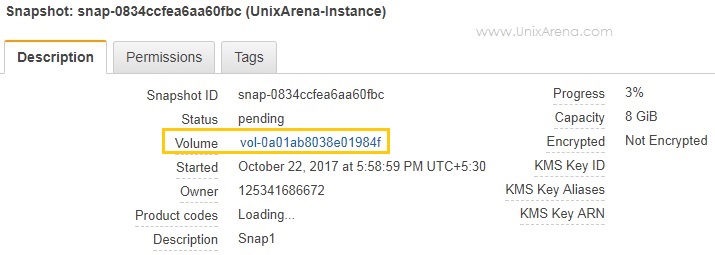
Ansible – How to Use facts on Playbooks ? Conditional Check

$
0
0

Ansible playbook can make changes to the list of servers in quick time. Ansible’s setup module is able to identify the host’s types, OS distributions, and many other facts. For an example, You got a request from a client to install “Apache” package on all the Linux hosts where you have a mix of “Debian” and “Red Hat” variants. As you aware that “Debian(apt)” and “RedHat (yum)” package management will differ from each other. In such a situation, you could gather the facts (setup module) and pass to the playbook with conditions. We will also see that how to ignore the errors and continue with next tasks.

Let’s write a single playbook to install “apache” package on both distributions.


Environment:

  • Ansible Server – ansible-server
  • Remote hosts – uaans69gpfslinapp1


1. Login to Ansible server and view the ad-hoc inventory.  (If you do not have one, just add the remote hosts in the file)

[linadm@ansible-server automation]$ cat lin-servers.1
gpfslinapp1
uaans69
[linadm@ansible-server automation]$


2. Create a playbook to install apache on both distributions.

[linadm@ansible-server automation]$ cat ua_http_install.yaml
---

- hosts: all
  become: yes

  tasks:
  - name: Install Apache on Ubuntu
    apt: name=apache2 state=present
    
  - name: Install Apache on Red Hat
    yum: name=httpd state=present
[linadm@ansible-server automation]$


3. Let’s run the playbook to see the errors.

[linadm@ansible-server automation]$ ansible-playbook -i lin-servers.1 ua_http_install.yaml

PLAY [all] ***************************************************************
TASK [Gathering Facts] ***************************************************
ok: [gpfslinapp1]
ok: [uaans69]

TASK [Install Apache on Ubuntu] ******************************************
fatal: [gpfslinapp1]: FAILED! => {"changed": false, "cmd": "apt-get update", "msg": "[Errno 2] No such file or directory", "rc": 2}
fatal: [uaans69]: FAILED! => {"changed": false, "cmd": "apt-get update", "msg": "[Errno 2] No such file or directory", "rc": 2}

PLAY RECAP ***************************************************************
gpfslinapp1                : ok=1    changed=0    unreachable=0    failed=1
uaans69                    : ok=1    changed=0    unreachable=0    failed=1

[linadm@ansible-server automation]$


Playbook failed at the first task and job terminated. It didn’t try for the RedHat hosts to complete the task.

Ignore Errors and Continue

1. To ignore the errors, ansible provides the option called “ignore_errors: True” parameter. Let’s update the playbook like below.

[linadm@ansible-server automation]$ cat ua_http_install.yaml
---

- hosts: all
  become: yes

  tasks:
  - name: Install Apache on Ubuntu
    apt: name=apache2 state=present
    ignore_errors: True

  - name: Install Apache on Red Hat
    yum: name=httpd state=present
    ignore_errors: True
[linadm@ansible-server automation]$


2. Re-run the playbook and look for errors.

[linadm@ansible-server automation]$ ansible-playbook -i lin-servers.1 ua_http_install.yaml

PLAY [all] ****************************************************************

TASK [Gathering Facts] ****************************************************
ok: [gpfslinapp1]
ok: [uaans69]

TASK [Install Apache on Ubuntu] ********************************************
fatal: [gpfslinapp1]: FAILED! => {"changed": false, "cmd": "apt-get update", "msg": "[Errno 2] No such file or directory", "rc": 2}
...ignoring
fatal: [uaans69]: FAILED! => {"changed": false, "cmd": "apt-get update", "msg": "[Errno 2] No such file or directory", "rc": 2}
...ignoring

TASK [Install Apache on Red Hat] ********************************************
ok: [gpfslinapp1]
ok: [uaans69]

PLAY RECAP *******************************************************************
gpfslinapp1                : ok=2    changed=1    unreachable=0    failed=0
uaans69                    : ok=2    changed=1    unreachable=0    failed=0

[linadm@ansible-server automation]$

The Job has been completed successfully but we can see that apt commands are tried to execute on Redhat servers and failed.

Let’s add a conditional check on the playbook to avoid those errors.

Using Facts on Playbook:

Update the playbook with ansible variable using a conditional check. “ansible_os_family” is one of the ansible variables from “setup” module. By default, ansible playbook gathers facts and then executes the tasks.

[linadm@ansible-server automation]$ cat ua_http_install.yaml
---

- hosts: all
  become: yes

  tasks:
  - name: Install Apache on Ubuntu
    apt: name=apache2 state=present
    when: ansible_os_family == "Debian"
    ignore_errors: True

  - name: Install Apache on Red Hat
    yum: name=httpd state=present
    when: ansible_os_family == "RedHat"
    ignore_errors: True
[linadm@ansible-server automation]$

2. Let’s run the playbook again.

[linadm@ansible-server automation]$ ansible-playbook -i lin-servers.1 ua_http_install.yaml

PLAY [all] ************************************************************

TASK [Gathering Facts] *************************************************
ok: [gpfslinapp1]
ok: [uaans69]

TASK [Install Apache on Ubuntu] ***************************************
skipping: [uaans69]
skipping: [gpfslinapp1]

TASK [Install Apache on Red Hat] ***************************************
ok: [gpfslinapp1]
ok: [uaans69]

PLAY RECAP *************************************************************
gpfslinapp1                : ok=2    changed=0    unreachable=0    failed=0
uaans69                    : ok=2    changed=0    unreachable=0    failed=0

[linadm@ansible-server automation]$


Here, we could see that RHEL hosts are skipped where the apt modules are used. Hope this article is informative to you. Share it! Comment it !! Be Sociable !!!

The post Ansible – How to Use facts on Playbooks ? Conditional Check appeared first on UnixArena.

Ansible – Use Loop Functions in Playbook

$
0
0

Ansible “loop” option might look like little backward but it will very useful when you want to perform the repetitive tasks. For each section in ansible playbook, we need to provide a meaningful name. For an example, if you want to install multiple packages, you need to create the section for each package. This could increase the length of the playbook and have to create a new block of code for the same action but different packages. In such cases, “loop” function will help to repeat the action for a list of items.


Environment

  • Ansible Server – ansible-server
  • Remote hosts – uaans69 , gpfslinapp1


Loop Function on YUM module: 

1. Login to Ansible server and view the ad-hoc inventory.  (If you do not have one, just add the remote hosts in the file)

[linadm@ansible-server automation]$ cat lin-servers.1
gpfslinapp1
uaans69
[linadm@ansible-server automation]$


2. Create a new playbook using “item” & “with_items” to demonstrate the loop function.

[linadm@ansible-server automation]$ cat install_packages1.yaml
---

- hosts: all
  become: yes

  tasks:
   - name: Install Packages
     yum: name={{ item }} update_cache=yes state=latest
     with_items:
       - vim
       - lsof
       - nano
[linadm@ansible-server automation]$

In the above playbook, “yum” module has been used to install the list of packages after updating the cache.


3. Execute the playbook using the ad-hoc inventory.

[linadm@ansible-server automation]$ ansible-playbook -i lin-servers.1 install_packages1.yaml

PLAY [all] ************************************************************

TASK [Gathering Facts] ***********************************************
ok: [gpfslinapp1]
ok: [uaans69]

TASK [Install Packages] ************************************************
ok: [uaans69] => (item=[u'vim', u'lsof', u'nano'])
changed: [gpfslinapp1] => (item=[u'vim', u'lsof', u'nano'])

PLAY RECAP ************************************************************
gpfslinapp1                : ok=2    changed=1    unreachable=0    failed=0
uaans69                    : ok=2    changed=0    unreachable=0    failed=0

[linadm@ansible-server automation]$

Here we could see that packages have been installed on remote hosts “gpfslinapp1” and packages exist on “uaans69”.


Impact of Inefficient Code :

1. What will be the impact of writing inefficient code?

If we would have written the playbook without “item” and “with_items”, the playbook would look like below.
We could see that the number of lines is more comparable to the above one.

---

- hosts: all
  become: yes

  tasks:
   - name: Install Packages
     yum: name=vim update_cache=yes state=latest

   - name: Install Packages
     yum: name=lsof state=latest

   - name: Install Packages
     yum: name=nano state=latest


2. Let’s measure the execution time of the above-mentioned playbook.

[linadm@ansible-server automation]$ time ansible-playbook -i lin-servers.1 install_packages1_without_loop.yaml

PLAY [all] *************************************************

TASK [Gathering Facts] *************************************
ok: [gpfslinapp1]
ok: [uaans69]

TASK [Install Packages] ************************************
ok: [uaans69]
ok: [gpfslinapp1]

TASK [Install Packages] ************************************
ok: [uaans69]
ok: [gpfslinapp1]

TASK [Install Packages] ***************************************
ok: [uaans69]
ok: [gpfslinapp1]

PLAY RECAP *****************************************************
gpfslinapp1                : ok=4    changed=0    unreachable=0    failed=0
uaans69                    : ok=4    changed=0    unreachable=0    failed=0

real    0m44.297s
user    0m5.048s
sys     0m1.269s
[linadm@ansible-server automation]$


3. Let’s measure the runtime of the playbook which has been created with loops.

[linadm@ansible-server automation]$ time ansible-playbook -i lin-servers.1 install_packages1.yaml

PLAY [all] *******************************************

TASK [Gathering Facts] ********************************
ok: [gpfslinapp1]
ok: [uaans69]

TASK [Install Packages] ********************************
ok: [uaans69] => (item=[u'vim', u'lsof', u'nano'])
ok: [gpfslinapp1] => (item=[u'vim', u'lsof', u'nano'])

PLAY RECAP ***********************************************
gpfslinapp1                : ok=2    changed=0    unreachable=0    failed=0
uaans69                    : ok=2    changed=0    unreachable=0    failed=0

real    0m27.082s
user    0m4.364s
sys     0m0.697s
[linadm@ansible-server automation]$


Here you could see the difference. Using the right function at the right place will always reduce the load and
runtime.


User Module – Loop:

Here is another use case of “loop” in Ansible. The following playbook can be used to create the list of users on all the remote nodes.

---

- hosts: all
  become: yes

  - name: add generic account users on all the hosts
    user:
      name: "{{ item }}"
      state: present
      groups: "adb"
    loop:
     - webadmin
     - dbadmin
  • Usernames: “webadmin”, “dbadmin”
  • Group: “adb”


Hope this article is informative to you. Share it! Comme it! Be Sociable !!!

The post Ansible – Use Loop Functions in Playbook appeared first on UnixArena.
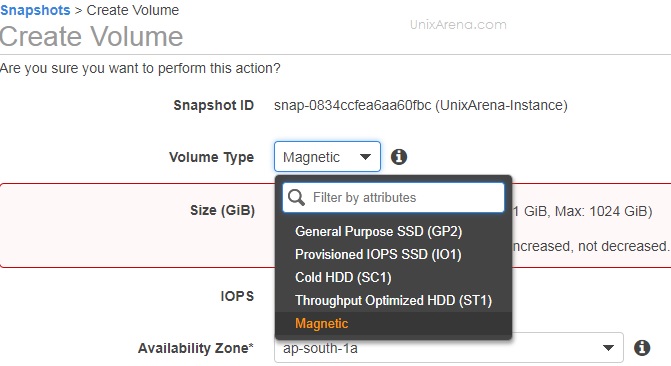
Ansible – How to Store Playbook Result in Variable ?

$
0
0

Ansible playbooks/roles often used to complete the specific task which does not require an output. In some cases, you might need to capture the complex command output as results. The output would help to generate the required reports. In some cases, you might require to store configuration backup of the hosts. In this article, we will walk through to capture the output in a variable and display it.


Environment

  • Ansible Server – ansible-server
  • Remote hosts –  gpfslinapp1


Register Task Output: 


1. Create the playbook to execute the “df” command to check the /boot usage. Use “register” to store the output to a variable.

---

 - hosts: all
   become: yes

   tasks:
     - name: Execute /boot usage on Hosts
       command: 'df -h /boot'
       register: dfboot


2. Run the playbook to see the result. Ensure that “gpfslinapp1” host in the inventory file “lin-servers”.

[linadm@ansible-server playbooks]$ ansible-playbook -i lin-servers df.boot.yaml

PLAY [all] ****************************************************************

TASK [Gathering Facts] ****************************************************
ok: [gpfslinapp1]

TASK [Execute /boot usage on Hosts] ***************************************
changed: [gpfslinapp1]

PLAY RECAP *****************************************************************
gpfslinapp1                : ok=2    changed=1    unreachable=0    failed=0
[linadm@ansible-server playbooks]$

The playbook ran “df -h /boot” command and register the output to variable “dfroot”.
 

3. Display the registered output using debug module. stdout keyword is used along with the variable name to display the output.

[linadm@ansible-server playbooks]$ cat df.boot.yaml
---

 - hosts: all
   become: yes

   tasks:
     - name: Execute /boot usage on Hosts
       command: 'df -h /boot'
       register: dfboot

     - debug: var=dfboot.stdout

[linadm@ansible-server playbooks]$


4. Repeat the playbook execution to see the difference now.

[linadm@ansible-server playbooks]$ ansible-playbook -i ../lin-servers.1 df.boot.yaml

PLAY [all] ***********************************************************

TASK [Gathering Facts] ***********************************************
ok: [gpfslinapp1]

TASK [Execute /boot usage on Hosts] **********************************
changed: [gpfslinapp1]

TASK [debug] *********************************************************
ok: [gpfslinapp1] => {
    "dfroot.stdout": "Filesystem      Size  Used Avail Use% Mounted on\n/dev/sda1       297M  155M  143M  53% /boot"
}

PLAY RECAP **********************************************************
gpfslinapp1                : ok=3    changed=1    unreachable=0    failed=0
[linadm@ansible-server playbooks]$


5. If you would like to display the variable output differently, you could replace the “stdout with “stdout_lines”.

[linadm@ansible-server playbooks]$ cat df.boot.yaml
---

 - hosts: all
   become: yes

   tasks:
     - name: Execute /boot usage on Hosts
       command: 'df -h /boot'
       register: dfboot

     - debug: var=dfboot.stdout_lines
[linadm@ansible-server playbooks]$


6. Re-execute the playbook. Results will display the command output in aligned format.

[linadm@ansible-server playbooks]$ ansible-playbook -i ../lin-servers.1 df.boot.yaml

PLAY [all] ****************************************************************

TASK [Gathering Facts] ****************************************************
ok: [gpfslinapp1]

TASK [Execute /boot usage on Hosts] ***************************************
changed: [gpfslinapp1]

TASK [debug] ***************************************************************
ok: [gpfslinapp1] => {
    "dfboot.stdout_lines": [
        "Filesystem      Size  Used Avail Use% Mounted on",
        "/dev/sda1       297M  155M  143M  53% /boot"
    ]
}

PLAY RECAP ****************************************************************
gpfslinapp1                : ok=3    changed=1    unreachable=0    failed=0
[linadm@ansible-server playbooks]$

“stdout_lines” just display the command output without any modification in JASON format.

Hope this article is informative to you. Share it! Comment it !! Be Sociable !!!

The post Ansible – How to Store Playbook Result in Variable ? appeared first on UnixArena.
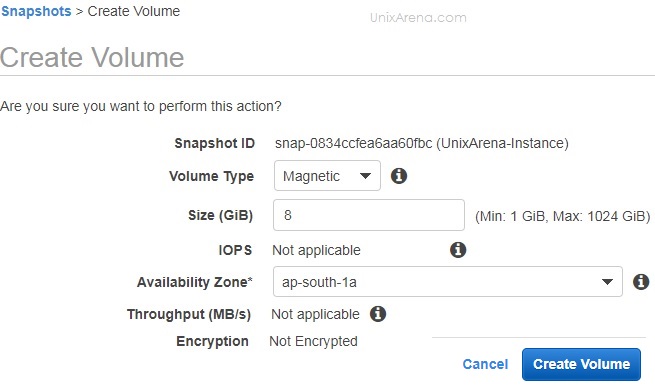
NAKIVO Backup & Replication v8.0 with ASR Released

$
0
0

Much awaited NAKIVO Backup & Replication v8.0 is released on Aug 27, 2018, with the rich set of features. NAKIVO Backup & Replication v8.0 bundled with Automatic Site Recovery. The Automatic site recovery orchestrates the entire site recovery process which includes testing, planned failover, emergency failover, failback, and data center migration. These features will definitely help customers to achieve the defined RTO and RPO without any manual work.


NAKIVO Backup & Replication v8


Advanced Site Recovery Workflows

NAKIVO Backup & Replication v8 offers a platform that users can build tailored recovery workflows to automate and simplify the entire site recovery process. For example, a Site Recovery procedure might have many steps with the different set of jobs:

  • Shutdown the source VMs
  • Run a final VM replication (Final Sync)
  • change replica VM IPs (Destination VM)
  • connect replica VMs to appropriate networks (Establish the connection to Recovered VM)
  • Set the replica VM boot order
  • Verify successful recovery
  • send email notifications, etc.
Site Recovery workflow - Nakivo
Site Recovery workflow – Nakivo


Using Nakivo, we should be able to create a workflow for each job and underpin with Recovery job.


Non-Disruptive Site Recovery Testing

The industry has been changed significantly. There was a time when support teams use to site for 48hours to perform the test DR/ site Recovery. All the steps have been documented and people were executed one by one. Many cases, Production will be shut down for the DR drills. But nowadays, due to matured virtualization technologies and companies like Nakivo brings a lot of new things where DR test can be performed in an hour. In Nakio’s new release, we should be able to create the workflows with defined RTO. Site recovery can be done without impacting the production. Just initiate the site recovery workflow/job and have a cup of coffee to complete the recovery.

Nakivo RTO - v8
Nakivo RTO – v8


All-in-One Availability Solution – Single License

Software and hardware costs kill the business, especially SMB. Of course, for each an every product, there will be an industry leader. CTO must choose the product which can be affordable for their business in the long run. Nakivo saves the customer business by bundling all the availability solution in one product. Site Recovery is an integral feature of NAKIVO Backup & Replication and does not require separate licensing. With NAKIVO Backup & Replication v8, customers can use one solution for data backup, deduplication, granular restore, replication, and site recovery. All aspects of data protection and recovery can be managed from a single pane of glass and are covered by a single license.

All in one - Solution - Nakivo
All in one – Solution – Nakivo


 Striking Pricing:

Until now, the cost of robust site recovery functionality has been prohibitive for most SMBs and even enterprises, with some solutions charging over $10,000 for just 25 VMs. With the release of v8, NAKIVO Backup & Replication can reduce the cost of data protection and site recovery dramatically. The Site Recovery feature is included in the Enterprise edition of NAKIVO Backup & Replication v8, which starts at $299 per socket and has no feature or capacity limitations.

TOC - Cost - Nakvio
TOC – Cost – Nakvio


NAKIVO Resources

The post NAKIVO Backup & Replication v8.0 with ASR Released appeared first on UnixArena.

Viewing all 369 articles
Browse latest View live


<script src="https://jsc.adskeeper.com/r/s/rssing.com.1596347.js" async> </script>