Quantcast
Channel: Lingesh, Author at UnixArena
Viewing all 369 articles
Browse latest View live

Shellshock bug – vulnerability on Bash shell

$
0
0

Millions of computers are using bash shell (command interpreter ). New security flaw has been found on bash(Bash Code Injection Vulnerability (CVE-2014-6271) and it allows attackers  can take the system control remotely. Heartbleed wave was just over on last april (Openssl vulnerability ).Is Shell-shock hurts more than Heartbleed ? Off-course  Yes. Heartbleed was all about sniffing the system memory but Shellshock  has opened the door so widely.It’s giving the direct access on the systems. BASH(Bourne-Again SHell) is the default shell in all the Linux flavors(Redhat Linux,Open SUSE,Ubuntu etc..) and oracle Solaris 11. Some of the other operating systems also shipped with bash shell but not a default shell. Red Hat has become aware that the patch for CVE-2014-6271 is incomplete and oracle working on this issue. We can expect the patches for bash shell very soon from operating system vendors. Stay tuned.

How can i find my bash version is vulnerable ?  (Bash Shell Remote Code Execution Vulnerability (CVE-2014-6271, CVE-2014-7169)

Redhat – Linux :

1.Make sure bash shell in command search path .

[root@Global-RH ~]# which bash
/bin/bash
[root@Global-RH ~]#

2.Execute the below command and check the results.

[root@Global-RH ~]# env x='() { :;}; echo vulnerable' bash -c "echo this is a test"
vulnerable
this is a test
[root@Global-RH ~]#

Here the command output shows “vulnerability” . It  means you are using a vulnerable version of Bash( Shellshock-vulnerability).

 Workaround: – Not working 

1. Copy the below contents as  bash_ld_preload.c to /var/tmp/

#include <sys/types.h>
#include 
#include 

static void __attribute__ ((constructor)) strip_env(void);
extern char **environ;

static void strip_env()
{
	char *p,*c;
	int i = 0;
	for (p = environ[i]; p!=NULL;i++ ) {
		c = strstr(p,"=() {");
		if (c != NULL) {
			*(c+2) = '\0';
		}
		p = environ[i];
	}
}

2. Verify the checksum.

[root@Global-RH ~]# sha256sum bash_ld_preload.c
28cb0ab767a95dc2f50a515106f6a9be0f4167f9e5dbc47db9b7788798eef153  bash_ld_preload.c
[root@Global-RH ~]#

3.Make sure you have gcc compiler on the path.

[root@Global-RH ~]# which gcc
/usr/bin/gcc
[root@Global-RH ~]#

4.Compile the bash_ld_preload.c like below . It will create file called “bash_ld_preload.so”.

[root@Global-RH ~]# gcc bash_ld_preload.c -fPIC -shared -Wl,-soname,bash_ld_preload.so.1 -o bash_ld_preload.so
[root@Global-RH ~]# ls -lrt
total 112
-rw-r--r--. 1 root root   325 Sep 25 23:16 bash_ld_preload.c
-rwxr-xr-x. 1 root root  6201 Sep 25 23:22 bash_ld_preload.so
[root@Global-RH ~]#

5.Copy the bash_ld_preload.so to /lib.

[root@Global-RH ~]# cp bash_ld_preload.so /lib/
6.Create a new file called "/etc/ld.so.preload" and add "/lib/bash_ld_preload.so" to it.
[root@Global-RH ~]# vi /etc/ld.so.preload
[root@Global-RH ~]# cat /etc/ld.so.preload
/lib/bash_ld_preload.so
[root@Global-RH ~]# file /lib/bash_ld_preload.so
/lib/bash_ld_preload.so: ELF 64-bit LSB shared object, x86-64, version 1 (SYSV), dynamically linked, not stripped

7.You need to export the library on the necessary services start up file.Here my system is webserver.So i have added in /etc/init.d/httpd.

[root@Global-RH ~]# grep LD /etc/init.d/httpd
LD_PRELOAD=/lib/bash_ld_preload.so
export LD_PRELOAD
[root@Global-RH ~]#

8.Restart necessary services .

[root@Global-RH ~]# service httpd restart
Stopping httpd:                                            [  OK  ]
ServerName                                                 [  OK  ]
[root@Global-RH ~]#

9.Check “vulnerability ” of bash again using the strings.

[root@Global-RH ~]# env x='() { :;}; echo vulnerable' bash -c "echo this is a test"
this is a test
[root@Global-RH ~]#

I see “vulnerability” message is disappeared but expected output is something like below.

[root@Global-RH Desktop]# env x='() { :;}; echo vulnerable'  bash -c "echo this is a test"
bash: warning: x: ignoring function definition attempt
bash: error importing function definition for `x'
this is a test
[root@Global-RH Desktop]#

How to Fix shellshock bug on Redhat Linux ?

1. Download the below rpm packages for respective OS version and architecture and update the bash rpm.You can download the below mentioned rpm packages from here.

OSRPMArchitecture
 Redhat Enterprise Linux 6bash-4.1.2-15.el6_5.2.x86_64.rpm64-Bit
 Redhat Enterprise Linux 6bash-4.1.2-15.el6_5.2.i686.rpm32-Bit
 Redhat Enterprise Linux 5bash-3.2-33.el5_11.4.x86_64.rpm64-Bit
 Redhat Enterprise Linux 5bash-3.2-33.el5_11.4.i386.rpm32-Bit

Note that package versions includes fixes for CVE-2014-6271 and CVE-2014-7169 .

 
[root@Global-RH Desktop]# env x='() { :;}; echo vulnerable'  bash -c "echo this is a test"
vulnerable
this is a test
[root@Global-RH Desktop]# bash -version
GNU bash, version 4.1.2(1)-release (x86_64-redhat-linux-gnu)
Copyright (C) 2009 Free Software Foundation, Inc.
License GPLv3+: GNU GPL version 3 or later <http://gnu.org/licenses/gpl.html>

This is free software; you are free to change and redistribute it.
There is NO WARRANTY, to the extent permitted by law.
[root@Global-RH Desktop]# rpm -qa bash
bash-4.1.2-9.el6_2.x86_64
[root@Global-RH Desktop]#
[root@Global-RH Desktop]# rpm -Uvh bash-4.1.2-15.el6_5.1.x86_64.rpm
warning: bash-4.1.2-15.el6_5.1.x86_64.rpm: Header V3 RSA/SHA256 Signature, key ID fd431d51: NOKEY
Preparing...                ########################################### [100%]
   1:bash                   ########################################### [100%]
[root@Global-RH Desktop]# env x='() { :;}; echo vulnerable'  bash -c "echo this is a test"
bash: warning: x: ignoring function definition attempt
bash: error importing function definition for `x'
this is a test
[root@Global-RH Desktop]#

2.Re-load the Libraries:

[root@Global-RH Desktop]# /sbin/ldconfig
[root@Global-RH Desktop]# echo $?
0
[root@Global-RH Desktop]#

Do I need to reboot or restart services after installing this update?
No, a reboot of your system or any of your services is not required. This vulnerability is in the initial import of the process environment from the kernel. This only happens when Bash is started. After the update that fixes this issue is installed, such new processes will use the new code, and will not be vulnerable. Conversely, old processes will not be started again, so the vulnerability does not materialize. If you have a strong reason to suspect that a system was compromised by this vulnerability then a system reboot should be performed as a best security practice and security checks should be analyzed for suspicious activity.

Oracle Solaris 10 :

You can use the same set of strings to find whether shellshock is saying “Hello” to Solaris or not . But we can blindly say that all the systems are hitting this bug which has “bash” shell installed.

[root@UA_SOL10 ~]# env x='() { :;}; echo vulnerable' bash -c "echo this is a test"
vulnerable
this is a test
[root@UA_SOL10 ~]# 
[root@UA_SOL10 ~]# bash -version
GNU bash, version 3.2.51(1)-release (sparc-sun-solaris2.10)
Copyright (C) 2007 Free Software Foundation, Inc.
[root@UA_SOL10 ~]# pkginfo -l SUNWbash
   PKGINST:  SUNWbash
      NAME:  GNU Bourne-Again shell (bash)
  CATEGORY:  system
      ARCH:  sparc
   VERSION:  11.10.0,REV=2005.01.08.05.16
   BASEDIR:  /
    VENDOR:  Oracle Corporation
      DESC:  GNU Bourne-Again shell (bash) version 3.2
    PSTAMP:  sfw10-patch20120813130538
  INSTDATE:  Feb 13 2014 16:13
   HOTLINE:  Please contact your local service provider
    STATUS:  completely installed
     FILES:        4 installed pathnames
                   2 shared pathnames
                   2 directories
                   1 executables
                1552 blocks used (approx)

[root@UA_SOL10 ~]# exit

How to fix shellshock bug on Oracle Solaris 10 ?

1. Download the patches from https://support.oracle.com .The following table lists the IDRs or patches required to resolve the vulnerabilities described in CVE-2014-6271 and CVE-2014-7169.

CVE
Solaris 11.2Solaris 11.1Solaris 10Solaris 9
   SPARC
x86
SPARC
x86
CVE-2014-6271
CVE-2014-7169
11.2.2.7.0IDR1400.2 (applies to Solaris 11.1 to Solaris 11.1 SRU12.5)IDR1401.2 (applies to Solaris 11.1 SRU13.6 to Solaris 11.1 SRU21.4.1)126546-06126547-06149079-01149080-01
CVE-2014-7186
CVE-2014-7187
IDR1404.1IDR1400.2 (applies to Solaris 11.1 to Solaris 11.1 SRU12.5)
IDR1401.2 (applies to Solaris 11.1 SRU13.6 to Solaris 11.1 SRU21.4.1)
IDR151577-02IDR151578-02IDR151573-02IDR151574-02
Solaris 10 IDR(s) SPARC: IDR151577-02 requires patch 126546-06 and X86: IDR151578-02 requires patch 126547-06. Solaris 9 IDR151573-02 requires patch 149079-01.

2.This Solaris 10 patch has dependencies . So you need to download the below patch if your system is not having that.

Pre-requisite solaris

Pre-requisite solaris

3.Copy those patches to the system and perform the patch installation.My system was not having 126547-05 patch. So let me install it first.

UASOL1:#showrev -p |grep 126547
Patch: 126547-04 Obsoletes:  Requires:  Incompatibles:  Packages: SUNWbash, SUNWsfman
UASOL1:#
UASOL1:#unzip 126547-05.zip > /dev/null
UASOL1:#ls -lrt
total 12057
drwxr-xr-x   5 root     root          14 Nov 19  2013 126547-05
-rwx------   1 root     root      328477 Sep 26 13:36 p19689293_1000_Solaris86-64.zip
-rwx------   1 root     root      434305 Sep 26 13:38 p19689287_1000_SOLARIS64.zip
-rwx------   1 root     root     2615963 Sep 26 13:39 126546-05.zip
-rwx------   1 root     root     2510125 Sep 26 13:40 126547-05.zip
UASOL1:#
UASOL1:#patchadd /var/tmp/shellshock/126547-05
Validating patches...
Loading patches installed on the system...
Done!
Loading patches requested to install.
Done!
The following requested patches have packages not installed on the system
Package SUNWbashS from directory SUNWbashS in patch 126547-05 is not installed on the system. Changes for package SUNWbashS will not be applied to the system.
Checking patches that you specified for installation.
Done!
Approved patches will be installed in this order:
126547-05
Checking installed patches...
Executing prepatch script...
Installing patch packages...
Patch 126547-05 has been successfully installed.
See /var/sadm/patch/126547-05/log for details
Executing postpatch script...
Patch packages installed:
  SUNWbash
  SUNWsfman
UASOL1:#

4. Let me install the shellshock patch.

UASOL1:#unzip p19689293_1000_Solaris86-64.zip > /dev/null
UASOL1:#unzip IDR151578-01-735861361.zip > /dev/null
UASOL1:#patchadd  /var/tmp/shellshock/IDR151578-01
Validating patches...
Loading patches installed on the system...
Done!
Loading patches requested to install.
Done!
Checking patches that you specified for installation.
Done!
Approved patches will be installed in this order:
IDR151578-01
Checking installed patches...
Executing prepatch script...
#############################################################
INTERIM DIAGNOSTICS/RELIEF (IDR) IS PROVIDED HEREBY "AS IS",
TO AUTHORIZED CUSTOMERS ONLY. IT IS LICENSED FOR USE ON
SPECIFICALLY IDENTIFIED EQUIPMENT, AND FOR A LIMITED PERIOD OF
TIME AS DEFINED BY YOUR SERVICE PROVIDER.  ANY PROGRAM
MODIFIED THROUGH ITS USE REMAINS GOVERNED BY THE TERMS AND
CONDITONS OF THE ORIGINAL LICENSE APPLICABLE TO THAT
PROGRAM. INSTALLATION OF THIS IDR NOT MEETING THESE CONDITIONS
SHALL WAIVE ANY WARRANTY PROVIDED UNDER THE ORIGINAL LICENSE.
FOR MORE DETAILS, SEE THE README.
#############################################################
Do you wish to continue this installation {yes or no} [yes]?
(by default, installation will continue in 60 seconds)
yes
Installing patch packages...
Patch IDR151578-01 has been successfully installed.
See /var/sadm/patch/IDR151578-01/log for details
Executing postpatch script...
Patch packages installed:
  SUNWbash
UASOL1:#

Let me test vulnerable using echo command.

UASOL1:#env x='() { :;}; echo vulnerable' bash -c "echo this is a test"
bash: warning: x: ignoring function definition attempt
bash: error importing function definition for `x'
this is a test
UASOL1:#

Looks good. Patch works perfectly!!!

How to fix shellshock bug on  Oracle Solaris 11.2:

(Refer Above table for patch information)

1.Check the vulnerable of bash and check the bash & OS release version.

UA_SOL11:~#env x='() { :;}; echo vulnerable' bash -c "echo this is a test"
vulnerable
this is a test
UA_SOL11:~#bash -version
GNU bash, version 4.1.11(2)-release (i386-pc-solaris2.11)
Copyright (C) 2009 Free Software Foundation, Inc.
License GPLv3+: GNU GPL version 3 or later <http://gnu.org/licenses/gpl.html>

This is free software; you are free to change and redistribute it.
There is NO WARRANTY, to the extent permitted by law.
UA_SOL11:~#pkg info bash
          Name: shell/bash
       Summary: GNU Bourne-Again shell (bash)
      Category: System/Shells
         State: Installed
     Publisher: solaris
       Version: 4.1.11
 Build Release: 5.11
        Branch: 0.175.2.0.0.42.1
Packaging Date: June 23, 2014 02:15:58 AM
          Size: 2.98 MB
          FMRI: pkg://solaris/shell/bash@4.1.11,5.11-0.175.2.0.0.42.1:20140623T021558Z
UA_SOL11:~#uname -a
SunOS SAN 5.11 11.2 i86pc i386 i86pc
UA_SOL11:~#

2.Copy the downloaded p5p package to the system and unzip it .

UA_SOL11:~#ls -lrt
total 4103
-rwx------   1 root     root     2033944 Sep 26 14:35 p19687137_112000_Solaris86-64.zip
UA_SOL11:~#unzip p19687137_112000_Solaris86-64.zip > /dev/null
UA_SOL11:~#ls -lrt
total 8976
-rw-r--r--   1 root     root     2416640 Sep 25 18:32 idr1399.1.p5p
-rw-r--r--   1 root     root         433 Sep 25 18:48 README.idr1399.1.txt
-rwx------   1 root     root     2033944 Sep 26 14:35 p19687137_112000_Solaris86-64.zip
UA_SOL11:~#

3.I have tried to install directly without setting publisher but failed.

UA_SOL11:~# pkg install -g ./idr1399.1.p5p idr1399.1
pkg install: The proposed operation on this parent image can not be performed because
temporary origins were specified and this image has children.  Please either
retry the operation again without specifying any temporary origins, or if
packages from additional origins are required, please configure those origins
persistently.
UA_SOL11:~#

4.Let me set the publisher for this patch .

UA_SOL11:~#pkg set-publisher -g file:///var/tmp/shellshock/idr1399.1.p5p solaris
UA_SOL11:~#
UA_SOL11:~#pkg publisher
PUBLISHER                   TYPE     STATUS P LOCATION
solaris                     origin   online F file:///var/tmp/shellshock/idr1399.1.p5p/
solaris                     origin   online F http://192.168.2.49:909/
UA_SOL11:~#

5.Install the patch using pkg command.

UA_SOL11:~#pkg install idr1399
           Packages to install:   1
            Packages to update:   1
       Create boot environment:  No
Create backup boot environment: Yes

Release Notes:
  # Release Notes for IDR : idr1399
  # -------------------------------
  Release               : Solaris 11.2 SRU # 2.5.0
  Platform              : COMMON

  Bug(s) addressed      :
        19682871 : Problem with utility/bash

  Package(s) included   :
        pkg:/shell/bash

  Removal instruction   :
  # /usr/bin/pkg update --reject pkg://solaris/idr1399@1,5.11 pkg:/shell/bash@4.1.11,5.11-0.175.2.0.0.42.1:20140623T021558Z

  Generic Instructions  :
  1) If system is configured with 'Zones', ensure that IDR is available in a configured repository.
  2) When removing IDR, you may NOT have all packages
  specified in "Removal instruction" installed on the system.
  Thus put only those packages in removal which are installed on the system
  Special Instructions for : idr1399
  None.

DOWNLOAD                                PKGS         FILES    XFER (MB)   SPEED
Completed                                2/2         10/10      0.5/0.5 35.5M/s

PHASE                                          ITEMS
Removing old actions                             3/3
Installing new actions                         14/14
Updating modified actions                        3/3
Updating package state database                 Done
Updating package cache                           1/1
Updating image state                            Done
Creating fast lookup database                   Done
Updating package cache                           1/1
UA_SOL11:~#

6.Let me test the vulnerable  again.

UA_SOL11:~#env x='() { :;}; echo vulnerable' bash -c "echo this is a test"
bash: warning: x: ignoring function definition attempt
bash: error importing function definition for `x'
this is a test
UA_SOL11:~#

Cool. Works perfectly for Solaris 11 too.

VMware ESXi:

VMware has its own shell and not using bash. Even you can’t install bash on esxi  . According to their security blog, VMware investigating bash command injection vulnerability aka Shell Shock (CVE-2014-6271, CVE-2014-7169). It may be applicable for ESX 3.5 & ESX4 versions.

ESXi 4.0, 4.1, 5.0, 5.1, and 5.5 are not affected because these versions use the Ash shell (through busybox), which is not affected by the vulnerability reported for the Bash shell.

ESX 4.0 and 4.1 have a vulnerable version of the Bash shell.

There are Linux appliances from VMware had this vulnerable bash shell.Here you can download the patch to fix it.

  • VMware vCenter Server Appliance 5.0 U3b – download
  • VMware vCenter Server Appliance 5.1 U2b – download
  • VMware vCenter Server Appliance 5.5 U2a – download

To know more about VMware Appliance vulnerability , Please check it in VMware KB

 Sources:

The post Shellshock bug – vulnerability on Bash shell appeared first on UnixArena.


What is VMware vCloud ? How it works ?

$
0
0

In IT infrastructure market, Cloud is the trending topic and technology from last few years. Most of the hardware vendors and operating systems developers have already started working to integrate the cloud technology on existing operating systems. For an example , oracle had integrated the openstack cloud software on their oracle Solaris operating systems.Let’s have Q&A on cloud topic to understand the basic need of cloud computing.

What is cloud computing ? Why everybody is behind it ?

Cloud computing is the delivery on demand infrastructure which includes operating systems ,database,  applications and virtual datacenters over the internet on pay-for use basis. It reduces the total ownership costs compare to the traditional computing.For an example, If company is planning to start new online shopping portal , they need to buy servers , storage , networking components , database and application. Also they need to deploy these systems in highly available datacenters. They need to hire administrators  to build the servers ,deploying the database and application.This process will definitely  take minimum 3 to 4 months to make the portal live. Cloud computing simply eliminates all these back-end works and provides the infrastructure in few minutes .Based your requirement , you can opt IAAS , SAAS or PAAS .

Cloud Offerings:

IAAS :- Infrastructure as Service. It provides to the companies with computing resources including servers, networking, storage, and data center space on a pay-per-use basis. In other words , cloud end user will get virtual machine and they can install necessary software on it.

SAAS:-Software as Service. Cloud based application provides the service directly to the end user. Example: BMC company is offering SAAS for ITSM ticketing system portal where we just need to pay per user method. Companies needs to pay for number of users to SAAS provides if they want to opt ITSM on cloud.

PAAS:Platform as a service. It offers cloud based environment from end to end that  required to support the complete life cycle of building and delivering web-based  applications. You no need to buy or manage the underlying hardware, software, provisioning and hosting. Example: Website hosting on cloud.

What is VMware’s vCloud ?

A vCloud is VMware’s cloud solution product bundle which includes all the necessary software  to deliver the cloud computing. vCloud mainly focusing on IAAS (Infrastructure as service).The vCloud layer will build on top of VMware vSphere by extending the robust virtual infrastructure capabilities to facilitate delivery of infrastructure service via cloud computing without compromising the performance.

vCloud Components and Role on Cloud Computing:

VMware vCloud Components

VMware vCloud Components

vCloud Components Role:

vCloud Component Description
VMware vCloud Director (vCD)
vCloud API
Cloud Coordinator and UI. Abstracts vSphere resources
Includes:
• vCloud Director Server(s) (also known as “cell”)
• vCloud Director Database
• vCloud API, used to manage cloud objects
VMware vSphereUnderlying foundation of virtualized resources.
The vSphere family of products includes:
• vCenter Server and vCenter Server Database
• ESXi hosts, clustered by vCenter Server
• Management Assistant
VMware vShieldProvides network security services
Includes:
• vShield Manager (VSM) virtual appliance
• vShield Edge* virtual appliances, automatically deployed by vCloud Director
VMware vCenter ChargebackOptional component that provides resource metering and reporting to facilitate resource howback/chargeback
Includes:
• vCenter Chargeback Server
• Chargeback Data Collector
• vCloud Data Collector
• VSM Data Collector
VMware vCenter OrchestratorOptional component that facilitates orchestration at the vCloud API  and vSphere levels.
VMware vCloud Request ManagerOptional component that provides provisioning request and approval  workflows, software license tracking, and policy-based cloud  partitioning
VMware vCloud ConnectorOptional component to facilitate transfer of a powered-off vApp in OVF format from a local vCloud or vSphere to a remote vCloud

How vCloud works ?

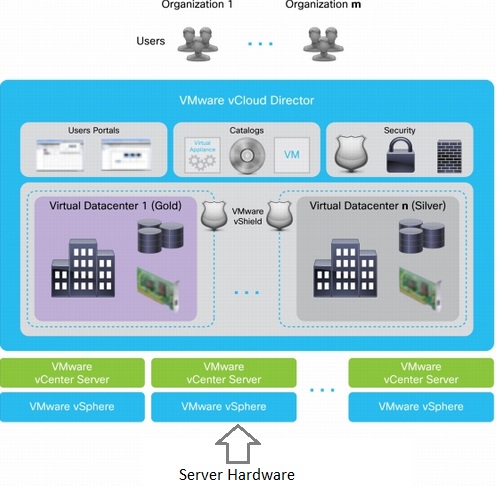
Have a look at the below image closely.  To setup the vCloud, you need to install VMware ESXi hypervisor on servers and configure VMware vCenter Server. This layer will be your typical VMware vSphere setup. Once you made this setup ready , then you need to deploy VMware vCloud director (Will be replaced by vCloud Automation soon) and VMware vShield for network security. The vCloud director directly talks to VMware vCenter for any new VM provisioning and creating the virtual datacenter. These virtual datacenters and VM access will be given to the cloud end user based on the requirement.

VMware vCloud

VMware vCloud

How vCloud can provide different level of service to the end user ?

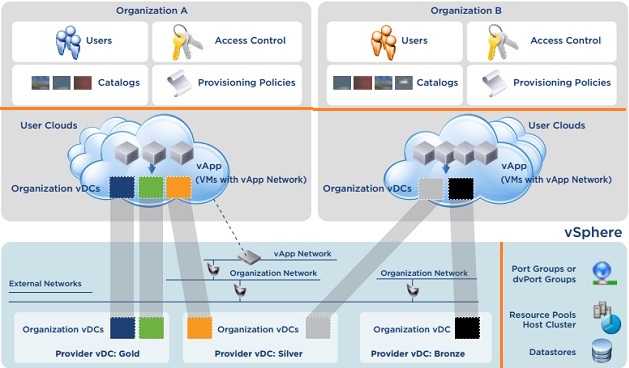
We need to go one more level deeper than above image to understand the vCloud setup.In vCloud , we can create a number of virtual datacenter based on service level.

Example:

  • Provider virtual DC GOLD –  Gold SAN storage and high availability computing nodes.(vMotion + DRS + HA)
  • Provider virtual DC SILVER-  Silver SAN storage and high availability computing nodes.(vMotion + HA)
  • Provider virtual DC Bronze –  Bronze SAN storage and without high availability for computing.
Provides vDC vs Organization vDC

Provides vDC vs Organization vDC

  • Provider = Cloud service offering company
  • organization = An association of related end consumers.

We will be just giving access to the Organization’s virtual datacenters to the end consumers. Cloud offering company will allot some set of resources to the organization based on the requirement.  For an example, one organization may need different level of service resources like below and it is possible to provide using VMware vCloud.

  1. GOLD  - 1TB Storage  200oGHZ CPU  100GB Memory
  2. SILVER  - 512GB Storage  100oGHZ CPU  50GB Memory

Image Source: www.VMware.com

Thank you for visiting UnixArena.

The post What is VMware vCloud ? How it works ? appeared first on UnixArena.
VMware vCloud Director Build From Scratch – 1

$
0
0

In this VMware vCloud Director article series, this article is going to demonstrate that how to attach the vCloud director to VMware vCenter Server and how to create a provider virtual Data-center. vCloud director can’t manage the system resources or virtual resources directly.It requires VMware vCenter server in the back-end to get the required  resources using vCloud API. Once you have setup the below prerequisite, you can attach the VMware vCenter server to vCloud director.

Prerequisite:

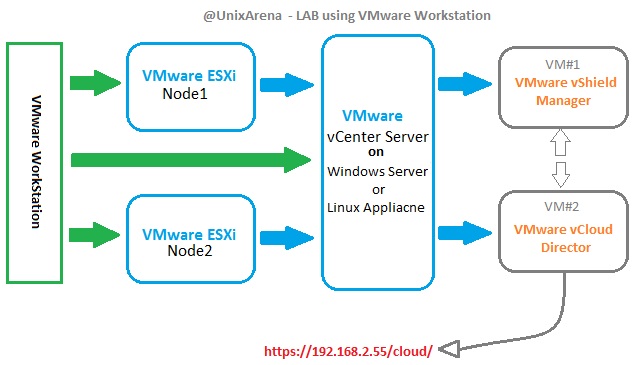
For learning purpose , i had setup the vCloud Director and VMware vSphere on VMware workstation. Physical serves will be used for production VMware vSphere environment .

Here is my LAB setup model – VMware vCloud Director .

Unixarena vCloud LAB

Unixarena vCloud LAB

vCloud Director logical terms:

vCloud Director Construct

Description

Provider Virtual DatacenterLogical grouping of vSphere compute resources (attached vSphere cluster and one or more datastores) for the purposes of providing cloud resources to consumers
External NetworkA network that connects to the outside using an existing vSphere network port group.
Network PoolA set of pre-allocated networks that vCloud Director can draw upon as needed to create private networks  and NAT-routed networks.
OrganizationA unit of administration that represents a logical collection of users, groups, and computing resources, and also serves as a security boundary from which only users of a particular organization can deploy workloads and have visibility into such workloads in the cloud.In the simplest term, an organization = an association of related end consumers.
Organization Virtual DatacenterSubset allocation of a provider virtual datacenter’s  resources assigned to an organization, backed by a vCenter resource pool automatically created by vCloud Director. An organization virtual datacenter allocates resources using one of three models:
•Pay as you go
•Reservation
•Allocation
Organization NetworkA network visible within an organization. It can be an external organization network with connectivity to an external network, and use a direct or routed connection, or it can be an internal network visible only to vApps within the organization.

Attach a vCenter Server to vCloud Director:

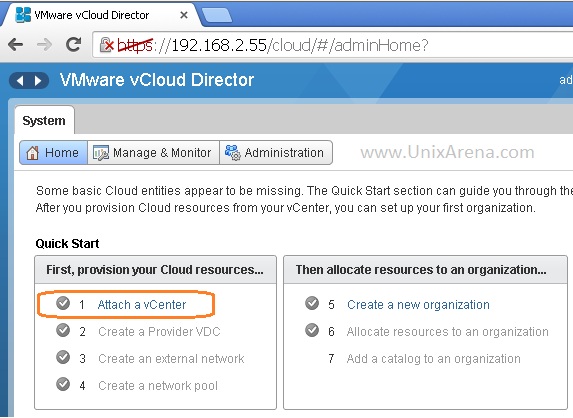
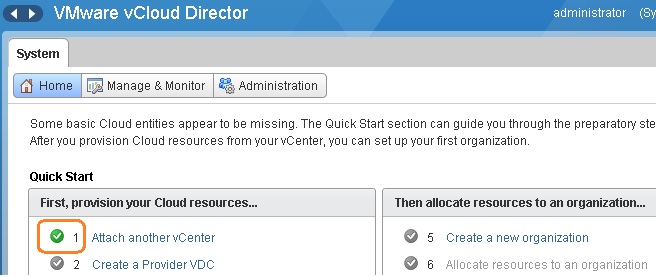
1. Access the vCloud director portal  and click on home.Here we are just going to follow the “Quick Setup” to provide private cloud to the customers. Click on “Attach a vCenter ”

Attach vcloud director to vCenter server

Attach vCloud director to vCenter server

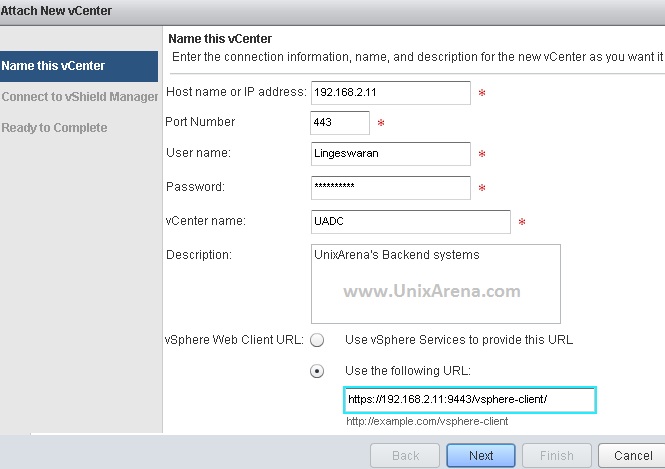
2.Enter the vCenter Server IP address/Hostname and super user credentials .Click on next to continue.

Enter the vCenter Server details

Enter the vCenter Server details

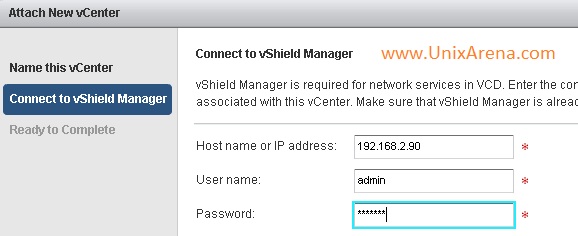
3.Enter the VMware vShield Manager IP/hostname and admin credentials.

Enter the vShield Manager IP/Credntials

Enter the vShield Manager IP/Credntials

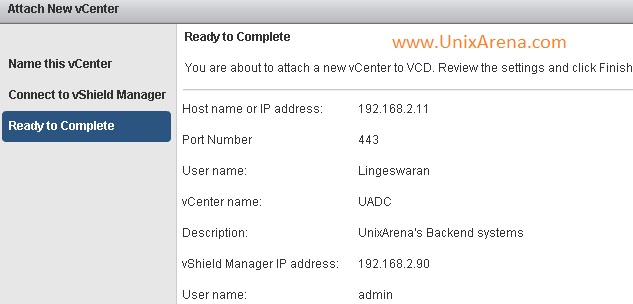
4. Click Finish to complete the wizard.

Complete the wizard

Complete the wizard

5.Once the vCenter server is attached , you will be getting “green ticket mark”  in quick setup like below .You can see the attached vCenter server resources in Manager & monitor tab .

vCloud director is attached to vCenter Server

vCloud director is attached to vCenter Server

Quick setup just guides that what needs to be done next.  Now we need to create a provider VDC.

Create a Provider vDC:

We need to create a “provider virtual data center” based on the service level. (Ex: Gold vDC , Silver vDC ). Cloud service provider will be managing the “Provider vDC” and cloud end users won’t get access to this virtual datacenter. Let’s see how we can create the Provider vDC.

1. Click on the “Create a Provider vDC”  to create new virtual datacenter.

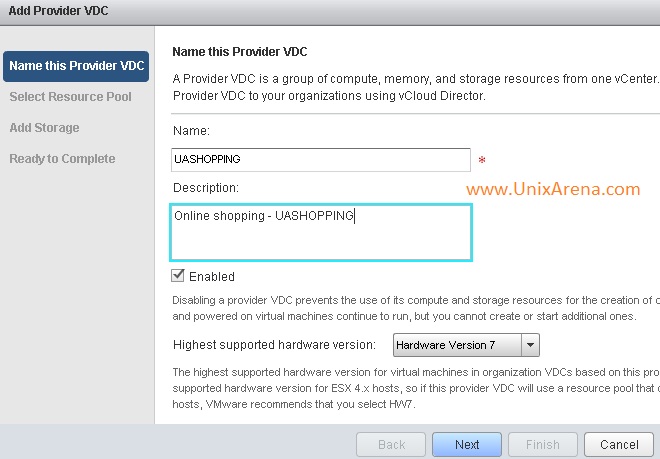
2.Name this provider vDC . (Ex: GOLD vDC)

Creating new Provider vDC

Creating new Provider vDC

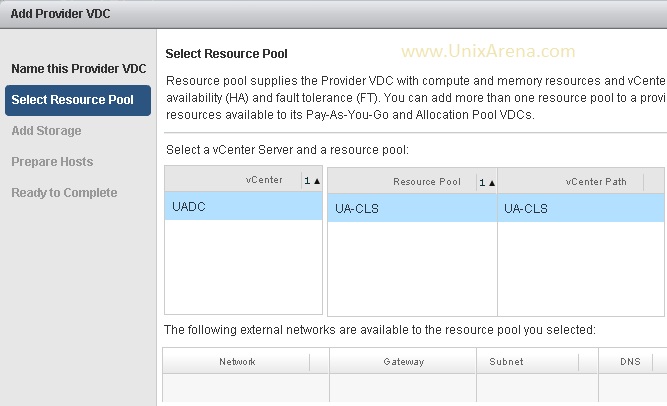
3.Select the vCenter’s datacenter and resource pools.

Select the vCenter DC & RP

Select the vCenter DC & RP

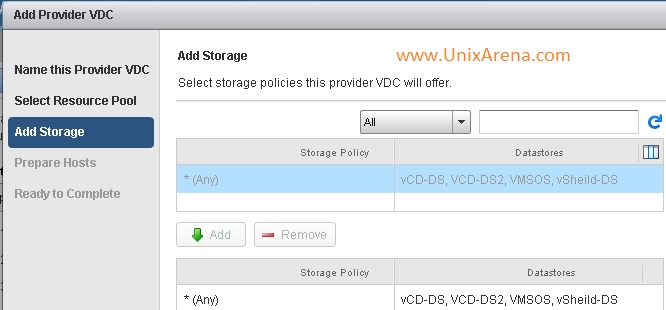
4.Select the storage polices for this virtual datacenter.

Select the storage policy

Select the storage policy

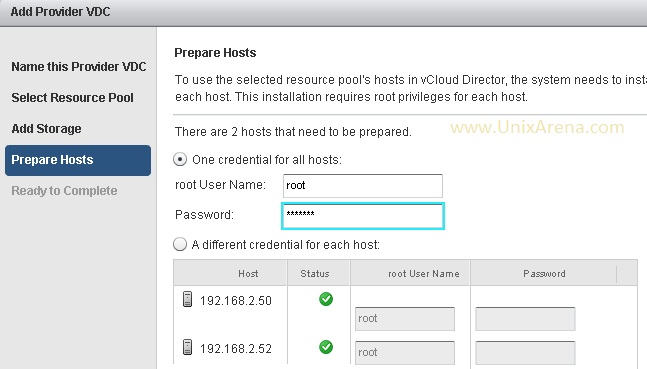
5.Prepare the ESXi hosts for vCloud Director. If the root user password is same for both the nodes, you can select like below .Otherwise , you need to enter for each host.

Prepare the host for vcloud

Prepare the host for vcloud

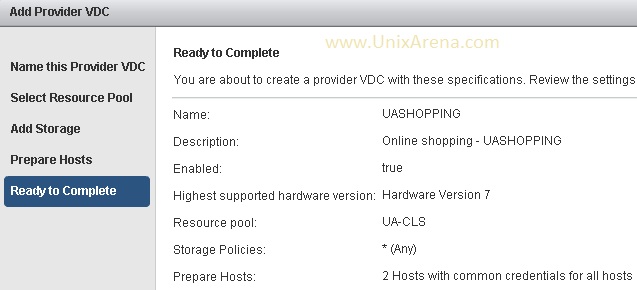
During the ESXi host preparation , vCloud agent will be installed on both the ESXi servers. To install those agents , system needs to go in to Maintenance mode and running VM will be migrated to available ESXi if the clustering is enabled. If you have any issue to prepare the host, refer the below article . http://www.unixarena.com/2014/07/host-prepare-vcloud-director-agent-installation.html

6.Click Finish the complete the wizard.

Click finish to create provider vDC

Click finish to create provider vDC

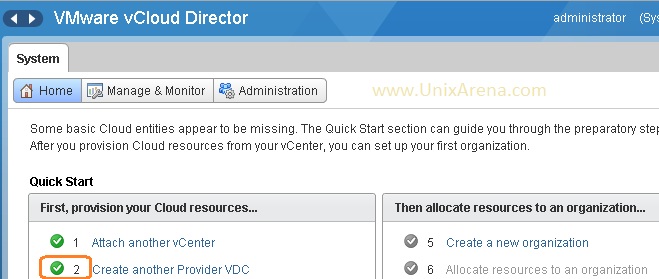
7.Once the Provider vDC is created, you can see the indication in Quick Setup .

Successfully created the Provides vDC

Successfully created the Provides vDC

  1. Attach a vCenter  - Completed 
  2. Create a Provider vDC – Completed 
  3. Create an external network
  4. Create a network pool
  5. Create a new organization
  6. Allocate the resources to an organization
  7. Add a Catalog to an organization

We will see the rest of quick setup in the next article . Thank you for visiting UnixArena.

The post VMware vCloud Director Build From Scratch – 1 appeared first on UnixArena.
VMware vCloud Director Build From Scratch – 2

$
0
0

In this article ,we will see the remaining vCloud director’s quick setup which we have left out in the last article.We have  already seen  that how to attach the vCloud director to VMware vCenter server and creating the provider vDC. Here we will be seeing the external networking part and creating the new organization. once you have created the organization, we need to allocate the set of resources to it. For each organization ,there will be the unique URL to access it .Cloud end users will be just getting the access to organization vDC and  the resources that allocated to it.

  1. Attach a vCenter  - Completed 
  2. Create a Provider vDC – Completed 
  3. Create an external network
  4. Create a network pool
  5. Create a new organization
  6. Allocate the resources to an organization
  7. Add a Catalog to an organization

Create an external network

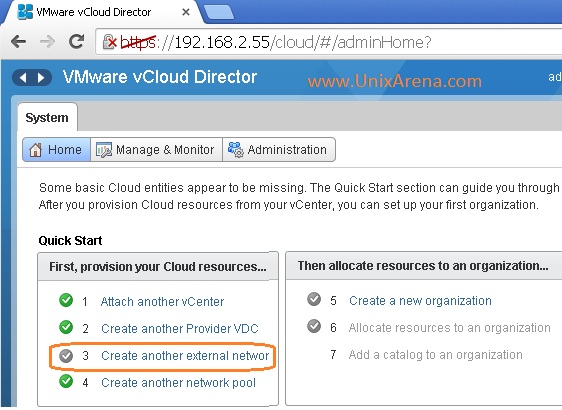
1. Login to the vCloud director web portal and click on “Create an external network”.

vCloud External network

vCloud External network

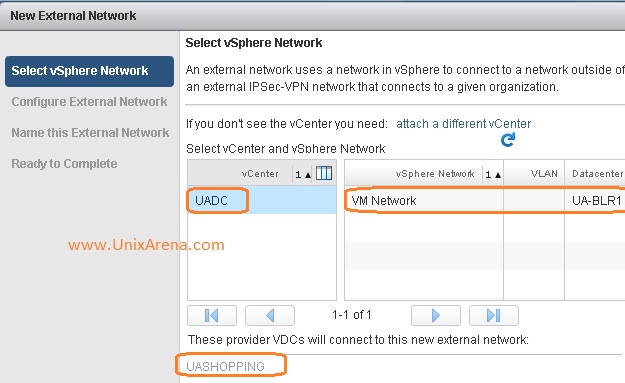
2.Select the vSphere network which is going to be used for provider vDC’s external network.

Select the vSphere Network

Select the vSphere Network

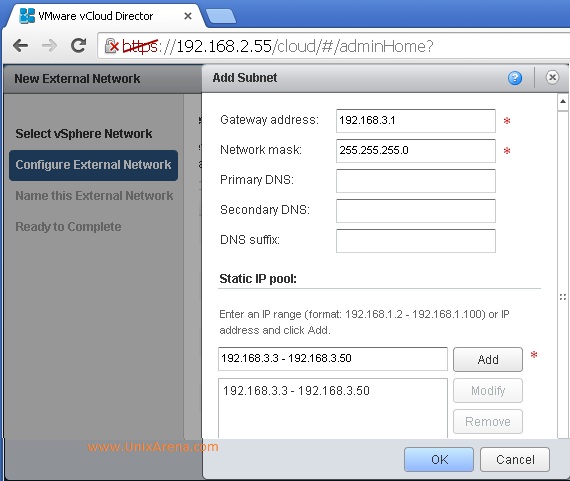
3.Click on “Add network” and enter the subnet,gateway,DNS and static network pool range information.

Enter the external network details

Enter the external network details

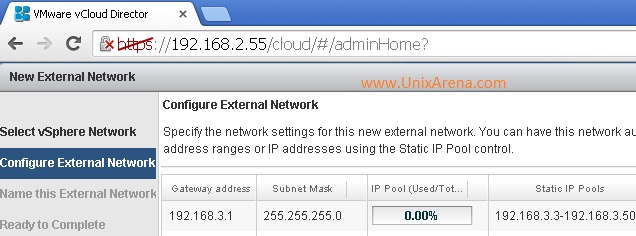
Here is the external network information.

External Network

External Network

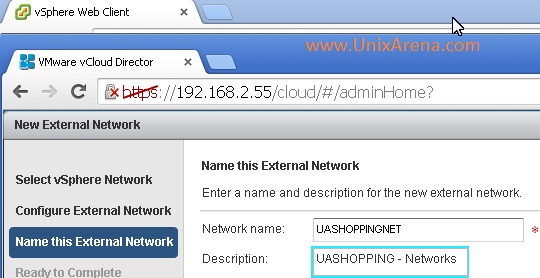
4.Name the external network which you have just created ,

Name the External Network

Name the External Network

5.Click Finish to complete the wizard.

External Network

External Network

6.We have just completed the networking part of vCloud director.

External Network

External Network

Create a new organization

1.Click on the “Create a new Organization” .

Creating the new Organization

Creating the new Organization

As i said ,each organization will have unique URL which will be given to cloud end user to manage their virtual infrastructure.

2. LDAP options. Sorry! I will be using only local user accounts.

LDAP options

LDAP options

3.Add a local user .

Adding the local users

Adding the local users

4.I have added two users with different access.

Local users

Local users

5.Set the Catalog settings for organization .

catalog settings

catalog settings

6.Settings the email preference.

Email Preference

Email Preference

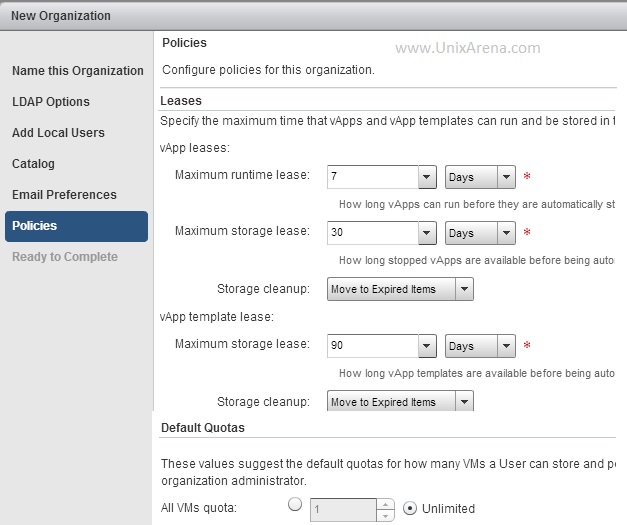
7.Set the policies  for the organization.

policies for org

policies for org

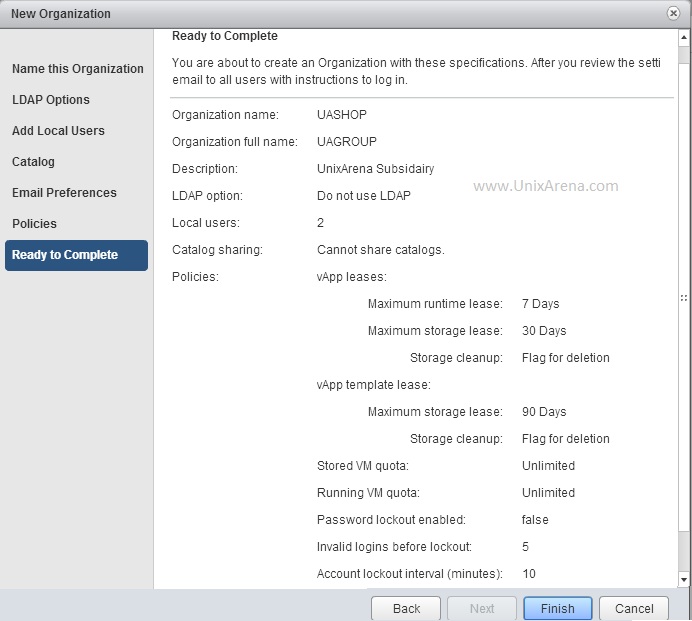
8.Review the summary and click finish.

Review the summary & Click Finish

Review the summary & Click Finish

We have successfully created the new organization.

  1. Attach a vCenter  - Completed 
  2. Create a Provider vDC – Completed 
  3. Create an external network
  4. Create a network pool
  5. Create a new organization
  6. Allocate the resources to an organization
  7. Add a Catalog to an organization

What’s next ? We need to allocate the resources to the organization . Click on next page to continue …

The post VMware vCloud Director Build From Scratch – 2 appeared first on UnixArena.
Redhat Enterprise Virtualization – Overview

$
0
0

Red Hat had played vital role on Linux revolution and they proved that Linux can be used on the enterprise computing. Today Red Hat is  the world’s largest distributor of Linux. To reduce the infrastructure costs , all the companies are behind the virtualization. Companies like VMware,Citrix and Oracle are offerings enterprise virtualization products to accommodate different virtual guests. What about Redhat ? Are they have any product like VMware vSphere or Oracle VM for x86 ? Yes. They have their own enterprise virtualization product called Redhat Enterprise virtualization.

What are the best things about Redhat Enterprise virtualization ?

According to the redhat site,

  • RHEV – Support for up to 160 logical CPUs and up to 2TB of memory per virtual machine (VM)
  • Up to 95% to 140% performance gains for real-world enterprise workloads like SAP, Oracle, and Microsoft Exchange
  • Consolidation ratios of 850+ VMs with enterprise workloads running on a single server
  • Robust Microsoft Exchange performance and high I/O throughput in Oracle database workloads
  • Supports oracle DB and IBM’s DB2
  • Supports Microsoft’s IAAS and LAMP
  • Compare to other vendors, RHEV’s TOC is very less.
  • Better performance

What are the guest operating systems are supported on RHEV ? 

  • Red Hat Enterprise Linux 3 (32 bit and 64 bit)
  • Red Hat Enterprise Linux 4 (32 bit and 64 bit)
  • Red Hat Enterprise Linux 5 (32 bit and 64 bit)
  • Red Hat Enterprise Linux 6 (32 bit and 64 bit)
  • Red Hat Enterprise Linux 7 (32 bit and 64 bit)
  • Windows 7 (32 bit and 64 bit)
  • Windows Server 2003 Service Pack 2 and newer (32 bit and 64 bit)
  • Windows Server 2008 (32 bit and 64 bit)
  • Windows Server 2008 R2 (64 bit only)
  • Windows XP Service Pack 3 and newer (32 bit only)

Compare the Redhat enterprise virtualization components with VMware vSphere & Oracle VM

RHEVVMware vSphereOracle VM for x86Description
RHEV-HVMware ESXiOracle VM serverHypervisor(Bare-metal)
RHEV-MVMware vCenterOracle VM ManagerCentralized Manager
Web Access ? YesWeb Access ? YesWeb Access ? YesUser interface

Redhat Enterprise virtualization – Implementation Workflow :

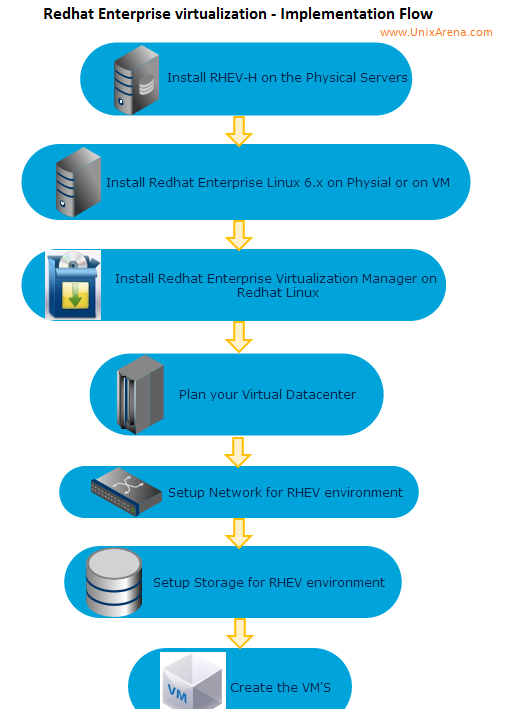
To implement Redhat enterprise virtualization, You need to install the RHEV-H hypervisor on the physical server. Then you need redhat  enterprise Linux 6.x server to install the RHEV-M software. Since RHEV-M host is going to manage the entire RHEV environment, you need database to store the virtual objects and retrieve in quick time. RHEV-M provides option to connect external database as well. Once you have configured the redhat enterprise virtualization manger(RHEV-M), you can attach the RHEV-H node to it using the administrative web portal.Using this portal, you can setup the RHEV network and storage. Once you have done everything as mentioned in the workflow, you are good start creating the VM for use.

Workflow Implementation- RHEV

Workflow Implementation- RHEV

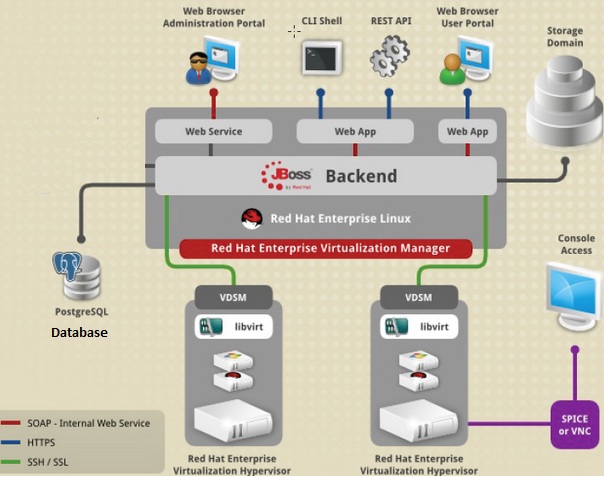
 How the RHEV components are interconnected with each other ?

Redhat Enterprise virtualization manager(RHEV-M) is the central hub to manage the RHEV environment. All the RHEV-H hosts are attached to Manager. You can have database also withing RHEV-M box or external based  on your environment requirement.

Architecture of RHEV

Architecture of RHEV

Hope this article may shed some light on Redhat Enterprise Virtualization. Many more to come about RHEV.  Stay Tuned  with UnixArena.

Thank you for visiting UnixArena.

The post Redhat Enterprise Virtualization – Overview appeared first on UnixArena.
Redhat Enterprise virtualization- Installing RHEV-H

$
0
0

To install Redhat enterprise virtualization hypervisor(RHEV-H), You need a hardware with “virtualization Technology”(VT-X) enabled processors.Once you have such a hardware ,then you can start installing RHEV-H on it. You need to download the bootable “Redhat enterprise virtualization hypervisor” ISO image from Redhat website  with valid subscription. If you do not have one , Redhat is providing 60 days trail for RHEV. Just sign up using corporate email address and download the ISO. This article is going to demonstrate the “redhat enterprise virtualization hypervisor” installation with step by step screenshots. At the end of this article, we will see how we can install this hypervisor on top of VMware workstation for learning purpose.

Minimum Hardware Requirements:

  • 2 GB Memory (Only for host)
  • 1 CPU  (VT-x enabled CPU)
  • 10GB HDD
  • 1 NIC

Redhat Enterprise Virtualization – Hypervisor Installation

1.Burn the ISO image in DVD and insert in Server’s DVD drive .Make sure that you have set the DVD as first bootable device.

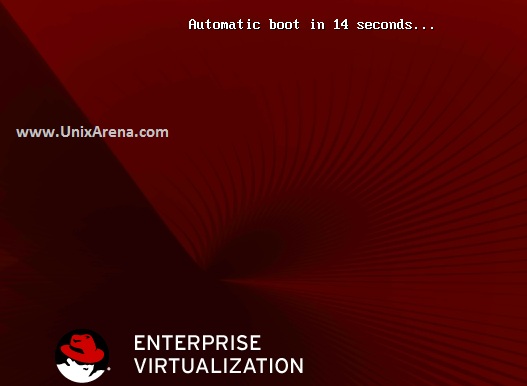
2.Once the system is booted from DVD , you will get screen like below.

Booting from RHEV-H DVD

Booting from RHEV-H DVD

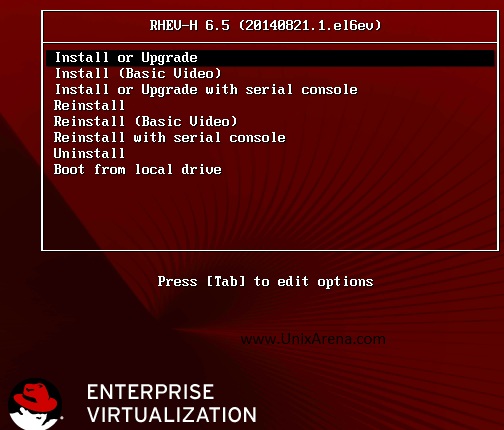
3.Select the boot options  and click on tab to edit the installation mode.

Select the boot option and press tab to edit the  mode

Select the boot option and press tab to edit the mode

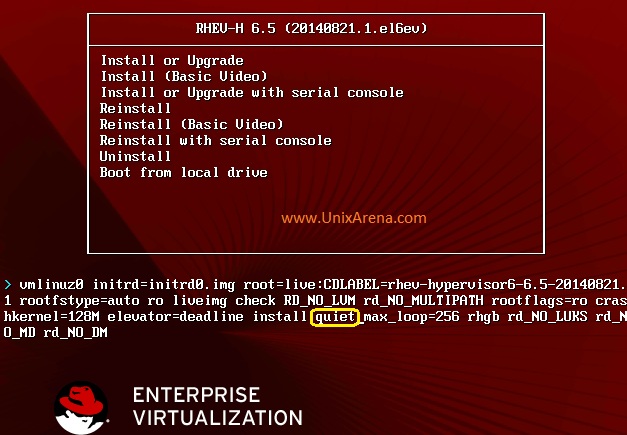
4.Remove the “quiet” from the boot options to disable the quiet mode installation.(I would like to see what’s going on the system)

Remove the "quite"

Remove the “quiet”

After removing “quiet” , screen must something like below.Just press “enter” to boot the system.

After removing "quiet"

After removing “quiet”

5.You can see that kernel is loading for the hypervisor installation.

Kernel is loading

Kernel is loading

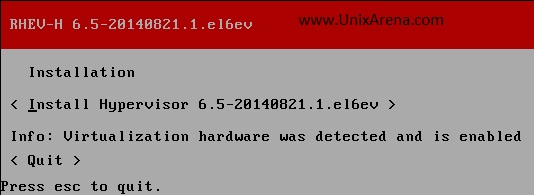
6.Select the “Install hypervisor 6.5-xxxx”  and press enter to continue.

Select the Hyper-visor image to install

Select the Hyper-visor image to install

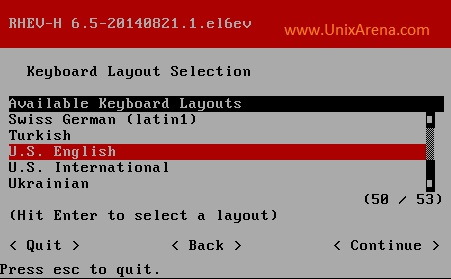
7.Select the keyboard layout and continue the installation.

Selecting the keyboard layout

Selecting the keyboard layout

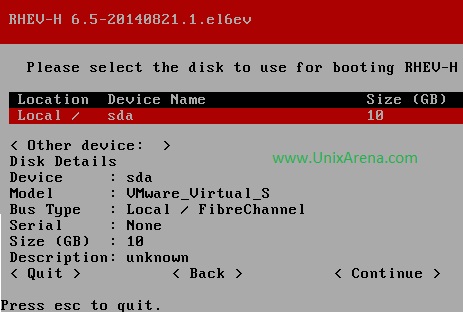
8.Select the internal disk for hypervisor boot partition.

select the disk

select the disk

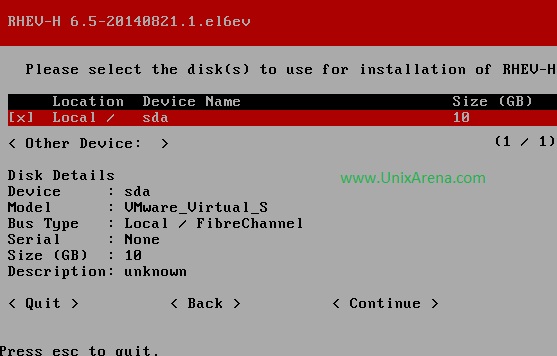
9.Select the same disk for RHEV hypervisor installation.

RHEV-H install disk

RHEV-H install disk

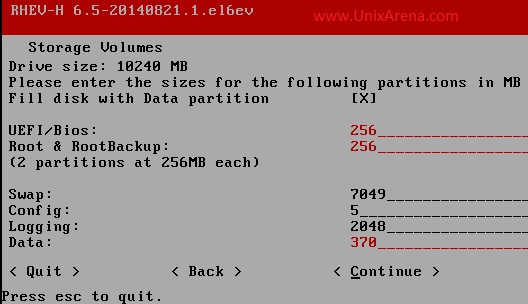
10.Let’s go with default partitions and system calculated size .

Partition size

Partition size

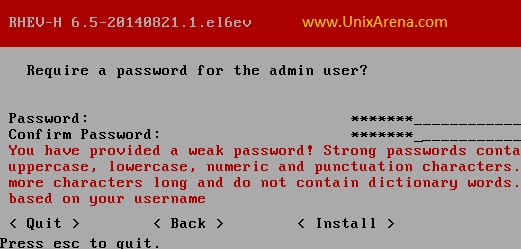
11.Set the admin password. This is the super user for RHEV-H .Click install to proceed with installation.

Set the admin passowrd

Set the admin password

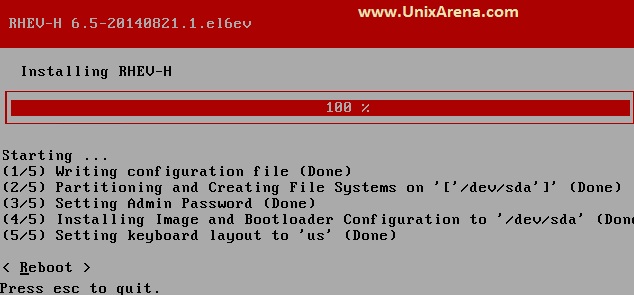
12.Installation kicks and completes like below. Select “Reboot” to boot from harddrive.

Installation completed

Installation completed

13.Remove the DVD or alter the Bios option to boot the system from local harddrive.

Grub Menu

Grub Menu

14.Once the system is up , you can see the console screen like below.

RHEV-H console screen

RHEV-H console screen

Click on Page 2 to see the post configuration and how to setup the RHEV-H on VMware workstation.

The post Redhat Enterprise virtualization- Installing RHEV-H appeared first on UnixArena.
Redhat Enterprise virtualization Manager – Install & configure

$
0
0

To manage the redhat enterprise virtualization hypervisor (RHEV-H) , you have to configure the Redhat Enterprise Virtualization Manager (RHEV-M) on Redhat Enterprise Linux 6.x operating system. RHEV-M provides a feature rich graphical based web interface to manage the virtual infrastructure from single point. It provides host management ,guest management,storage management and high availability infrastructure. We can access the web-portal on both “http” and “https” with ports 90 and 443 respectively.By default RHEV-M uses “postgresql” database but we can also provide the external database to setup the RHEV-M environment. Let’s see how we can install and configure the Redhat Enterprise virtualization Manager.

Prerequisite:

  • Redhat Enterprise Linux 6.x Operating System with internet connectivity
  • Redhat Valid Subscription account or Trail account.

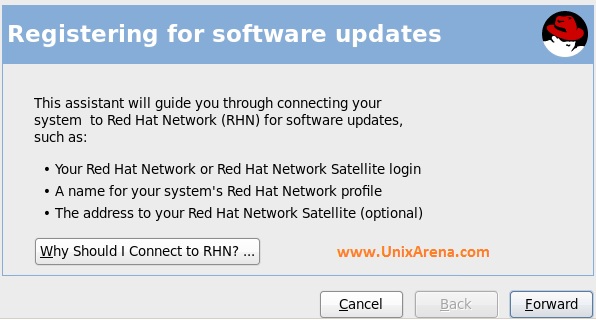
Registering RHEL 6.x with Redhat Network.

1. Login to Redhat Linux 6.x host and register with Redhat network using the valid Redhat Enterprise virtualization Subscription.

  • Gnome-> System  - > Register with RHN network  or
  • command line – Execute “rhn_register”.
Register with Redhat

Register with Redhat

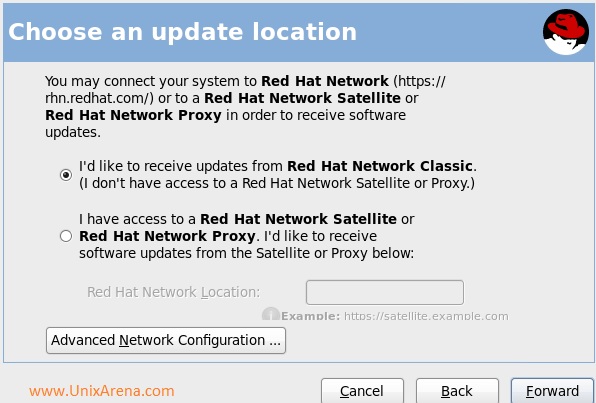
2.Go with “Redhat Classic network”. If your system requires proxy for internet connection, click on “Advance network configuration” to enter the proxy information.

Redhat Classic network

Redhat Classic network

3.Enter the username /password to connect to redhat network.

Enter username/password

Enter username/password

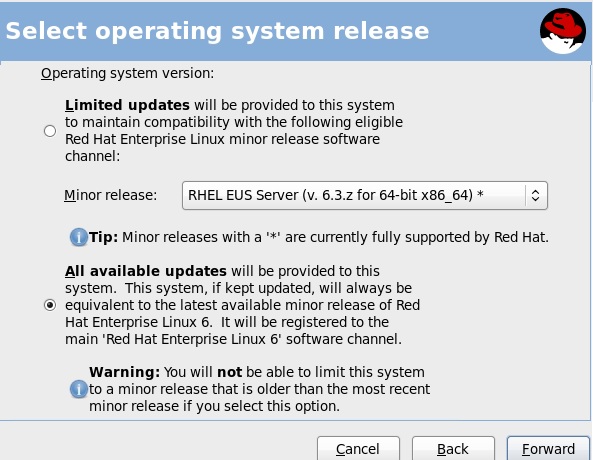
4.Select the system update model. If you do not want to update the system with major release, just select “Limited Updates” .

Select the update model

Select the update model

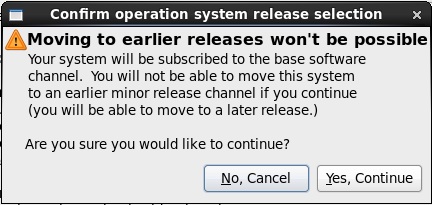
I am proceeding with “All Available Updates”  since its a LAB environment.Click Yes to continue

Click Yes

Click Yes

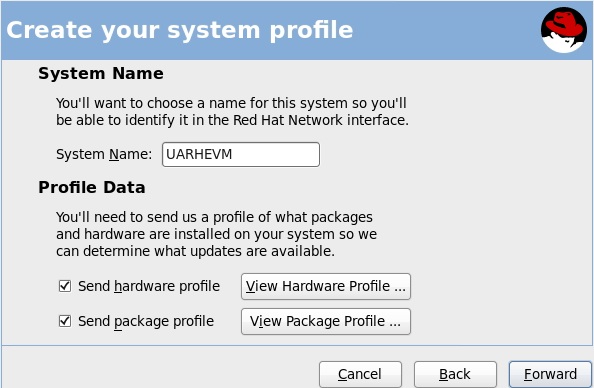
.5.Create the system profile.

Create the system profile

Create the system profile

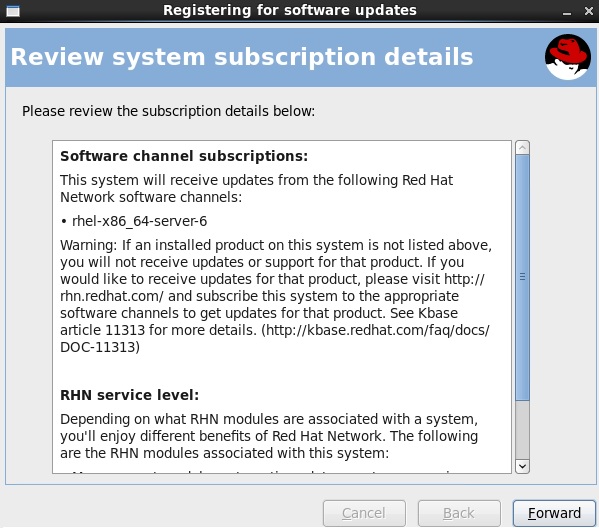
6.Review the subscription details and click forward to continue.

Review the subscription

Review the subscription

7.Click to finish the registration.

Finish the registration

Finish the registration

8.Open a terminal or  login to server using ssh. Add the redhat channel for the software update.

# rhn-channel --add --channel=rhel-x86_64-server-6
# rhn-channel --add --channel=rhel-x86_64-server-supplementary-6
# rhn-channel --add --channel=rhel-x86_64-server-6-rhevm-3.4
# rhn-channel --add --channel=jbappplatform-6-x86_64-server-6-rpm

9.Install the RHEV-M rpm using below command.

[root@UARHEVM ~]# yum install rhevm
Loaded plugins: product-id, rhnplugin, security, subscription-manager, versionlock
Updating certificate-based repositories.
Unable to read consumer identity
Setting up Upgrade Process
Resolving Dependencies
--> Running transaction check
---> Package rhevm.noarch 0:3.1.0-55.el6ev will be updated
--> Processing Dependency: rhevm = 3.1.0-55.el6ev for package: rhevm-notification-service-3.1.0-55.el6ev.noarch
--> Processing Dependency: rhevm = 3.1.0-55.el6ev for package: rhevm-dbscripts-3.1.0-55.el6ev.noarch
--> Processing Dependency: rhevm = 3.1.0-55.el6ev for package: rhevm-userportal-3.1.0-55.el6ev.noarch
--> Processing Dependency: rhevm = 3.1.0-55.el6ev for package: rhevm-restapi-3.1.0-55.el6ev.noarch
--> Processing Dependency: rhevm = 3.1.0-55.el6ev for package: rhevm-backend-3.1.0-55.el6ev.noarch
--> Processing Dependency: rhevm = 3.1.0-55.el6ev for package: rhevm-genericapi-3.1.0-55.el6ev.noarch
--> Processing Dependency: rhevm = 3.1.0-55.el6ev for package: rhevm-tools-common-3.1.0-55.el6ev.noarch
--> Processing Dependency: rhevm = 3.1.0-55.el6ev for package: rhevm-webadmin-portal-3.1.0-55.el6ev.noarch

10.Once the RHEV-M is installed, just begin the RHEV-M configuration using “engine-setup” command.According to my environment , i have answered to “engine-setup” questions. Please alter it according to your environment.

[root@UARHEVM ~]# engine-setup
[ INFO  ] Stage: Initializing
[ INFO  ] Stage: Environment setup
          Configuration files: ['/etc/ovirt-engine-setup.conf.d/10-packaging.conf']
          Log file: /var/log/ovirt-engine/setup/ovirt-engine-setup-20141003055244-ef2xzx.log
          Version: otopi-1.2.2 (otopi-1.2.2-1.el6ev)
[ INFO  ] Stage: Environment packages setup
[ INFO  ] Stage: Programs detection
[ INFO  ] Stage: Environment setup
[ INFO  ] Stage: Environment customization

          --== PRODUCT OPTIONS ==--

          --== PACKAGES ==--

[ INFO  ] Checking for product updates...
          Setup has found updates for some packages, do you wish to update them now? (Yes, No) [Yes]:
[ INFO  ] Checking for an update for Setup...
          Setup will not be able to rollback new packages in case of a failure, because installed ones were not found in enabled repositories.
          Do you want to abort Setup? (Yes, No) [Yes]: No

          --== NETWORK CONFIGURATION ==--

          Host fully qualified DNS name of this server [UARHEVM]:
[WARNING] Host name UARHEVM has no domain suffix
[WARNING] Failed to resolve UARHEVM using DNS, it can be resolved only locally
          Setup can automatically configure the firewall on this system.
          Note: automatic configuration of the firewall may overwrite current settings.
          Do you want Setup to configure the firewall? (Yes, No) [Yes]:
[ INFO  ] iptables will be configured as firewall manager.

          --== DATABASE CONFIGURATION ==--

          Where is the Engine database located? (Local, Remote) [Local]:
          Setup can configure the local postgresql server automatically for the engine to run. This may conflict with existing applications.
          Would you like Setup to automatically configure postgresql and create Engine database, or prefer to perform that manually? (Automatic, Manual) [Automatic]:

          --== OVIRT ENGINE CONFIGURATION ==--

          Application mode (Both, Virt, Gluster) [Both]:
          Default storage type: (NFS, FC, ISCSI, POSIXFS, GLUSTERFS) [NFS]:
          Engine admin password:
          Confirm engine admin password:
[WARNING] Password is weak: it is based on a dictionary word
          Use weak password? (Yes, No) [No]: yes

          --== PKI CONFIGURATION ==--

          Organization name for certificate [Test]: UARHEVZONE

          --== APACHE CONFIGURATION ==--

          Setup can configure apache to use SSL using a certificate issued from the internal CA.
          Do you wish Setup to configure that, or prefer to perform that manually? (Automatic, Manual) [Automatic]:
          Setup can configure the default page of the web server to present the application home page. This may conflict with existing applications.
          Do you wish to set the application as the default page of the web server? (Yes, No) [Yes]:

          --== SYSTEM CONFIGURATION ==--

          Configure WebSocket Proxy on this machine? (Yes, No) [Yes]:
          Configure an NFS share on this server to be used as an ISO Domain? (Yes, No) [Yes]:
          Local ISO domain path [/var/lib/exports/iso]:
          Local ISO domain ACL [0.0.0.0/0.0.0.0(rw)]:
          Local ISO domain name [ISO_DOMAIN]:

          --== MISC CONFIGURATION ==--

          Would you like transactions from the Red Hat Access Plugin sent from the RHEV Manager to be brokered through a proxy server? (Yes, No) [No]:

          --== END OF CONFIGURATION ==--

[ INFO  ] Stage: Setup validation
[WARNING] Warning: Not enough memory is available on the host. Minimum requirement is 4096MB, and 16384MB is recommended.
          Do you want Setup to continue, with amount of memory less than recommended? (Yes, No) [No]: Yes

          --== CONFIGURATION PREVIEW ==--

          Engine database name                    : engine
          Engine database secured connection      : False
          Engine database host                    : localhost
          Engine database user name               : engine
          Engine database host name validation    : False
          Engine database port                    : 5432
          NFS setup                               : True
          PKI organization                        : UARHEVZONE
          Application mode                        : both
          Firewall manager                        : iptables
          Update Firewall                         : True
          Configure WebSocket Proxy               : True
          Host FQDN                               : UARHEVM
          NFS export ACL                          : 0.0.0.0/0.0.0.0(rw)
          NFS mount point                         : /var/lib/exports/iso
          Datacenter storage type                 : nfs
          Configure local Engine database         : True
          Set application as default page         : True
          Configure Apache SSL                    : True
          Require packages rollback               : False
          Upgrade packages                        : True

          Please confirm installation settings (OK, Cancel) [OK]:
[ INFO  ] Stage: Transaction setup
[ INFO  ] Stopping engine service
[ INFO  ] Stopping websocket-proxy service
[ INFO  ] Stage: Misc configuration
[ INFO  ] Stage: Package installation
[ INFO  ] Yum Downloading: rhel-x86_64-server-6/filelists 22 M(98%)
[ INFO  ] Yum Status: Downloading Packages
[ INFO  ] Yum Download/Verify: iptables-1.4.7-11.el6.x86_64
[ INFO  ] Yum Download/Verify: iptables-ipv6-1.4.7-11.el6.x86_64
[ INFO  ] Yum Download/Verify: rhevm-cli-3.4.0.6-4.el6ev.noarch
[ INFO  ] Yum Status: Check Package Signatures
[ INFO  ] Yum Status: Running Test Transaction
[ INFO  ] Yum Status: Running Transaction
[ INFO  ] Yum update: 1/6: iptables-1.4.7-11.el6.x86_64
[ INFO  ] Yum update: 2/6: iptables-ipv6-1.4.7-11.el6.x86_64
[ INFO  ] Yum update: 3/6: rhevm-cli-3.4.0.6-4.el6ev.noarch
[ INFO  ] Yum updated: 4/6: rhevm-cli
[ INFO  ] Yum updated: 5/6: iptables-ipv6
[ INFO  ] Yum updated: 6/6: iptables
[ INFO  ] Yum Verify: 1/6: rhevm-cli.noarch 0:3.4.0.6-4.el6ev - u
[ INFO  ] Yum Verify: 2/6: iptables.x86_64 0:1.4.7-11.el6 - u
[ INFO  ] Yum Verify: 3/6: iptables-ipv6.x86_64 0:1.4.7-11.el6 - u
[ INFO  ] Yum Verify: 4/6: rhevm-cli.noarch 0:3.1.1.2-1.el6ev - ud
[ INFO  ] Yum Verify: 5/6: iptables-ipv6.x86_64 0:1.4.7-5.1.el6_2 - ud
[ INFO  ] Yum Verify: 6/6: iptables.x86_64 0:1.4.7-5.1.el6_2 - ud
[ INFO  ] Stage: Misc configuration
[ INFO  ] Initializing PostgreSQL
[ INFO  ] Creating PostgreSQL 'engine' database
[ INFO  ] Configuring PostgreSQL
[ INFO  ] Creating Engine database schema
[ INFO  ] Creating CA
[ INFO  ] Configuring WebSocket Proxy
[ INFO  ] Generating post install configuration file '/etc/ovirt-engine-setup.conf.d/20-setup-ovirt-post.conf'
[ INFO  ] Stage: Transaction commit
[ INFO  ] Stage: Closing up

          --== SUMMARY ==--

[WARNING] Warning: Not enough memory is available on the host. Minimum requirement is 4096MB, and 16384MB is recommended.
          SSH fingerprint: B4:01:10:44:9D:09:73:87:67:0F:6D:8F:E3:9C:46:A6
          Internal CA 20:F8:28:D5:7B:34:C6:5E:0E:11:72:6F:A9:8B:40:5E:1A:C2:04:6D
          Web access is enabled at:

http://UARHEVM:80/ovirt-engine


https://UARHEVM:443/ovirt-engine

          Please use the user "admin" and password specified in order to login

          --== END OF SUMMARY ==--

[ INFO  ] Starting engine service
[ INFO  ] Restarting httpd
[ INFO  ] Restarting nfs services
[ INFO  ] Stage: Clean up
          Log file is located at /var/log/ovirt-engine/setup/ovirt-engine-setup-20141003055244-ef2xzx.log
[ INFO  ] Generating answer file '/var/lib/ovirt-engine/setup/answers/20141003055834-setup.conf'
[ INFO  ] Stage: Pre-termination
[ INFO  ] Stage: Termination
[ INFO  ] Execution of setup completed successfully
[root@UARHEVM ~]#

12. You can access the Redhat Enterprise Virtualization Manager from the web using below mentioned web links.

  •  http://Server-IP:80/ovirt-engine
  • https://Server-IP:443/ovirt-engine
RHEV-M login

RHEV-M login

We have successfully installed and configured the Redhat Enterprise virtualization Manager . In the next article, we will see how to play with RHEV-M web portal and creating the virtual Machines. Stay Tuned with UnixArena.

Share it ! Comment it !! Be Sociable !!!

The post Redhat Enterprise virtualization Manager – Install & configure appeared first on UnixArena.
How to enable root user on Redhat Hypervisor ?

$
0
0

Redhat Enterprise virtualization’s core part is Redhat Hypervisor. I have never been worked such a long  hours to get/recover the root password on any Unix/Linux operating system. Even i have recovered VMware ESXi’s root  password in quick time. During the Redhat Enterprise virtualization hypervisor’s installation, we will be just setting the user “admin” password. But where can i find the root password for RHEV-H ? I have referred the so many support articles from redhat and those just guides the way to reset the root password if its already set. In my case, i suppose to set new one. How can   i do it ?

I have  booted the Redhat Hypervisor(RHEV-H) in rescue mode and tried to reset the root password on the shell(as root) .But i was getting error like “authentication token manipulation error”. some of the support article guides that if the user is locked, then you can’t reset the account password but that applies only to normal user. But in my case , i am unable to unlock it .(“password -s root” shows still user is locked).System shows that hypervisor is using different authentication.Don’t know what it is !!! (Could be RSA key based)

Then my mind started working like typical Unix admin and edited the shadow/password files manually and end up with corrupted system.LOL ! It’s Okay since i am playing with my LAB systems. I have just re-ran the REHV-H setup to bring it up.

Finally i just woke up and found the way of setting the root password for RHEV-H. Its very simple ..

1. Just login to RHEV-H using “admin” account.

RHEV-H console screen

RHEV-H console screen

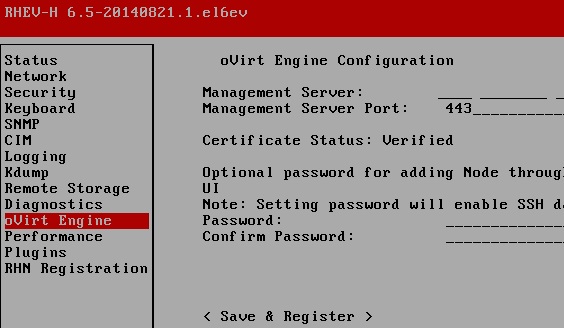
2.Navigate it to oVirt-engine.

Setting root password

oVirt-Engine

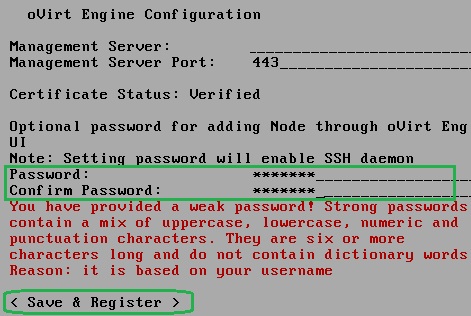
3.Use the arrow keys to navigate to “password” section and set the new password for root user.

Setting root password

Setting root password

4.Save & Register.

5. Open a putty session with RHEV-H . Just login as root user with password which you have set in the oVirt Engine configuration.

[root@uarhevh1 ~]# uname -a
Linux uarhevh1 2.6.32-431.29.2.el6.x86_64 #1 SMP Sun Jul 27 15:55:46 EDT 2014 x86_64 x86_64 x86_64 GNU/Linux
[root@uarhevh1 ~]# id
uid=0(root) gid=0(root) groups=0(root),498(sfcb) context=unconfined_u:unconfined_r:unconfined_t:s0-s0:c0.c1023
[root@uarhevh1 ~]# tty
/dev/pts/0
[root@uarhevh1 ~]# df -h
Filesystem            Size  Used Avail Use% Mounted on
/dev/mapper/live-rw   1.5G  456M  1.1G  31% /
/dev/mapper/HostVG-Config
                      7.8M  2.4M  5.1M  32% /config
tmpfs                 2.9G     0  2.9G   0% /dev/shm
[root@uarhevh1 ~]# cat /etc/redhat-release
Red Hat Enterprise Virtualization Hypervisor release 6.5 (20140821.1.el6ev)
[root@uarhevh1 ~]#

Not sure why Redhat didn’t use  ”root” in the oVirt-Engine screen.Could be Security reason? Who knows !!!

Share it ! Comment it !! Be Sociable !!!

The post How to enable root user on Redhat Hypervisor ? appeared first on UnixArena.

How to create a Datacenter and Cluster on RHEV-M ?

$
0
0

Redhat Provides the wonderful administrative portal to manage the Redhat Enterprise virtualization environment. Redhat enterprise virtualization Manager is responsible to provide the administrative portal, user portal and reports portal. Its also manage the virtual objects and maintains the inventory on its own database. It performs the similar operations like VMware vCenter server or Oracle VM Manager if we compare to other hypervisor vendors(On their respective virtualization products). In this article ,we will see how to build the new virtual datacenter ,configuring the cluster and adding the new host to the cluster.

Accessing the RHEV-M portal

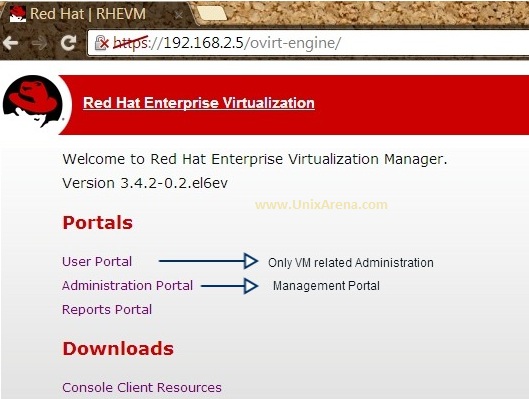
1. Access the Redhat Enterprise virtualization Manager in browser.

RHEV-M Home Page

RHEV-M Home Page

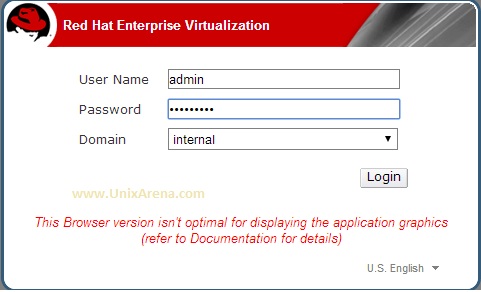
2.Click on the “Administration Portal” and login using “admin” user. (RHEV-M password)

Administrative portal

Administrative portal

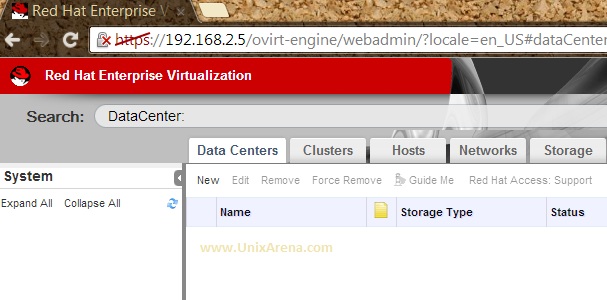
3.Here is the home screen of RHEV-M administrative login.

Administrative portal - Home page

Administrative portal – Home page

Creating the Virtual Datacenter:

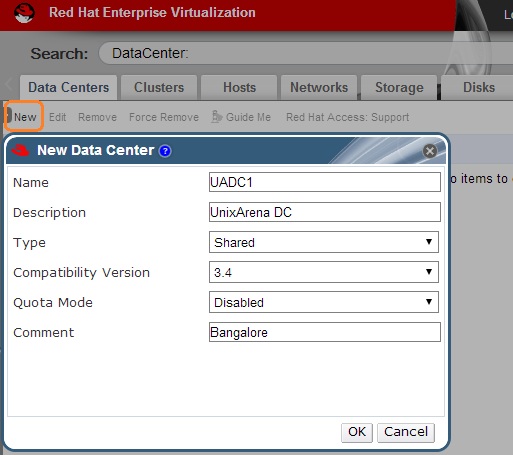
4.Click on “new” From datacenter tab to create a new virtual datacenter.

Creating the DC

Creating the DC

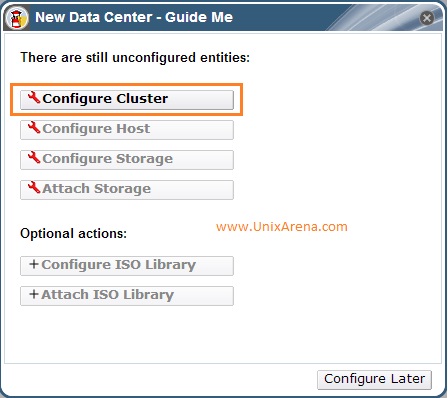
5.Automatically “Guide Me” window popups to guide with the next task to setup the environment,

DC GUIDE

DC GUIDE

Configuring the Cluster 

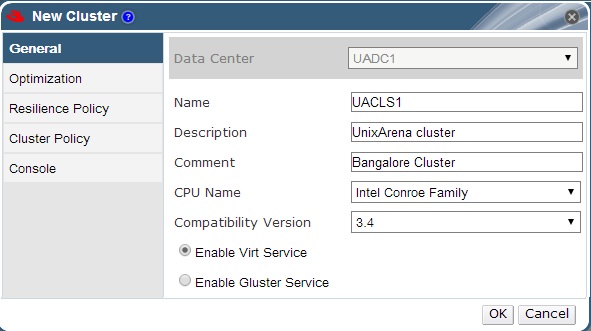
6.Click on the “Configure Cluster”. Enter the cluster name and other information according to your environment  and click OK to create the new cluster. Do not select “Enable Gluster Service” since this option is not applicable for hypervisors”

Creating the cluster

Creating the cluster

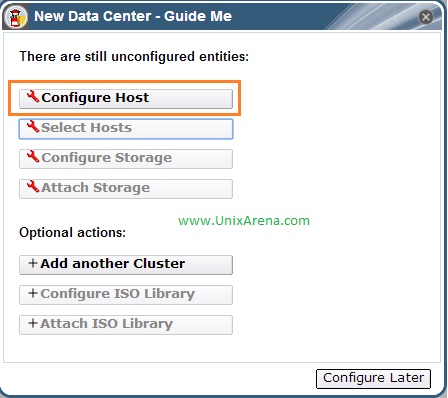
7. The DC guide popups and showing the next task to do .

DC Guide

DC Guide

Configuring the Host (Adding the hypervisor host to RHEV-M)

8.In the RHEV-H , Navigate to the oVirt-Engine tab and provide the RHEV-M IP address and Register it .

RHEVH host configuration

RHEVH host configuration

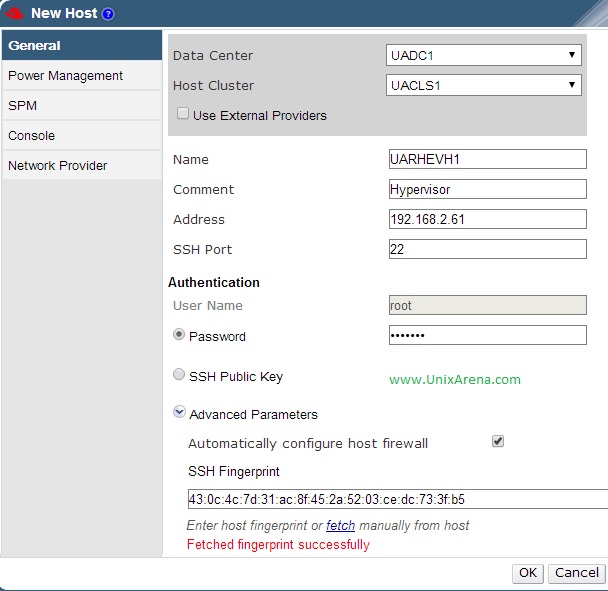
9. Click on Configure Host in the RHEV-M browser. (Step 7). Enter the hostname , IP address and port details. In the Authentication Tab, Provide the root password .In the advanced tab, click on fetch to  get the fingerprint.Click “OK” to add the host.

Adding the RHEV-H to RHEV-M

Adding the RHEV-H to RHEV-M

You can simply “cancel” the power management configuration  if you are not going to use it .

power Management

power Management

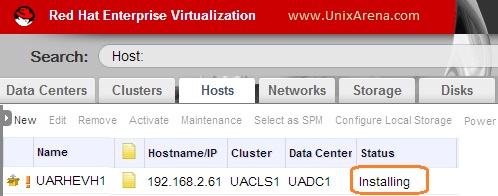
10. RHEV-M is installing the necessary packages on RHEV-H.

Installing packages on RHEV-H

Installing packages on RHEV-H

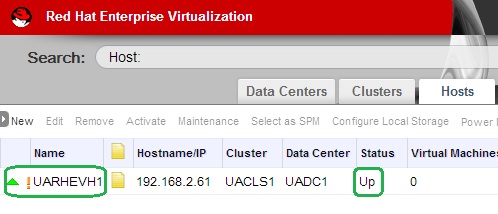
11.You can see that Redhat Enterprise virtualization  hypervisor is successfully added to the RHEV-Manager.

RHEV-H is ready

RHEV-H is ready

We have successfully created the datacenter , cluster and added the Redhat hypervisor to the created cluster environment.

Share it ! Comment it !! Be Sociable !!!

The post How to create a Datacenter and Cluster on RHEV-M ? appeared first on UnixArena.
How to add ISCSI Storage to RHEV ?

$
0
0

To store the virtual machines , you need centralized storage like SAN or NFS file server. Not everyone in world can afford the SAN cost since it requires lot hardwares like fiber channel cables, SFP  connectors, SAN switches and Storage. But iSCSI storage can be easily setup using the existing system network.You just need spend money for iSCSI servers(Ex:Netapp storage boxes). Here we will see how we can add the iSCSI storage target to the Redhat virtualization  environment.These shared storage can be used to store the VM’s which requires the high availability.

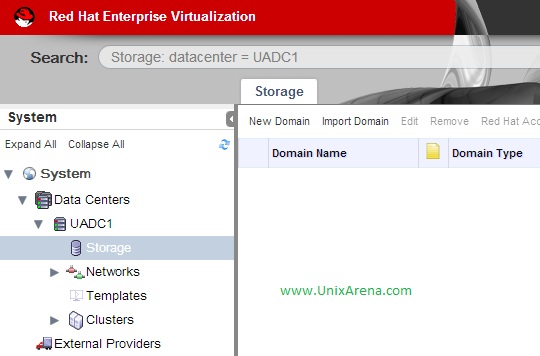
1. Login to the Redhat Enterprise Virtualization Manager  and navigate to the storage tab.

Login to RHEV-M and Navigate to Storage

Login to RHEV-M and Navigate to Storage

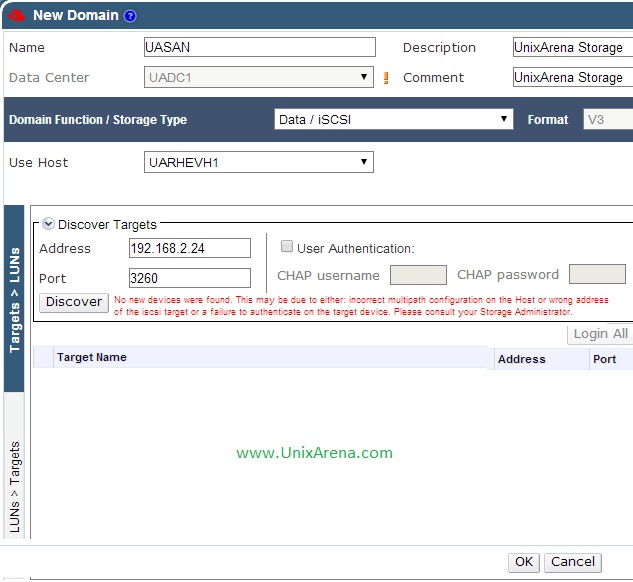
2.Click on New Domain

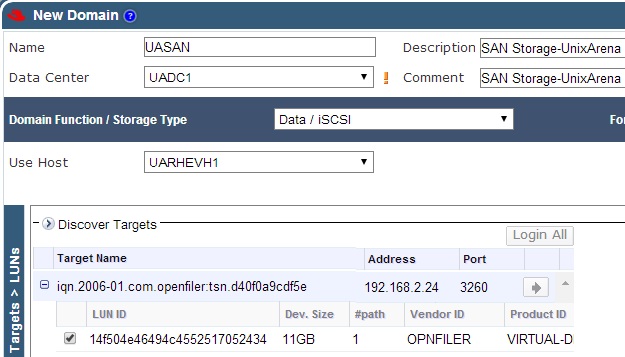
  • Enter the Name and Description of the storage
  • Select the Domain Function/Storage Type as Data/iSCSI
  • Enter the iSCSI server IP and Port Number
  • Click on Discover.
Enter the ISCSI server details 2

Enter the ISCSI server details 2

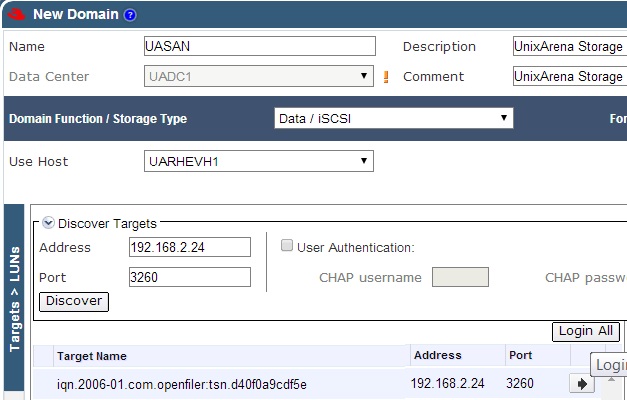
3.Just click on “Login all ” to initiate the session with ISCSI server on the available targets.

After the Discover

After the Discover

4.Once you have logged in to the selected target, you can see the LUN’s which has been  assigned to that target.

LUNS are visible

LUNS are visible

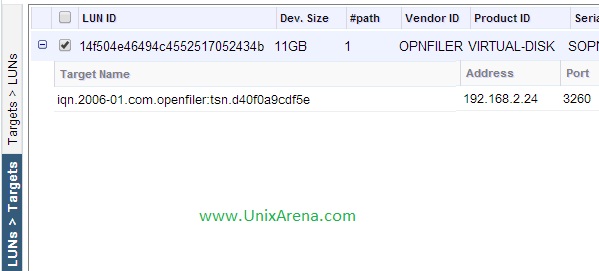
5.This window provides two type of options, (Left side vertical boxes)

  1. By selecting the target , you can see the allocated LUNS.
  2. By selecting the LUN, You can find the target.

In my case, just one target and that also has only one LUN. The above mentioned options will be useful when you find the multiple targets and multiple LUNS on the discover.

6.Just select the LUN and click OK to create the storage domain.

Select the LUN and click OK

Select the LUN and click OK

7.In few minutes , new storage domain will be ready .

Storage is active now

Storage is active now

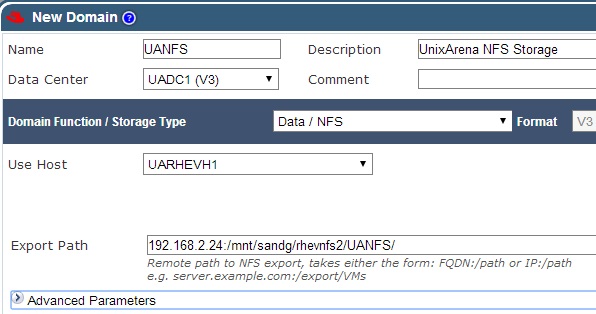
8.The same way you can add new storage domain for NFS storage as well . In the storage domain window, you need to enter details something like below.

NFS sample

NFS sample

It will be mounting like below on the Redhat hypervisor.

[root@uarhevh1 ~]# df -h |grep 192
192.168.2.24:/mnt/sandg/rhevnfs2/UANFS
                      3.7G   74M  3.5G   3% /rhev/data-center/mnt/192.168.2.24:_mnt_sandg_rhevnfs2_UANFS
[root@uarhevh1 ~]#

Normally, iSCSI Storage domain   will be used to store the virtual machines and NFS Storage domain  will be used to store the ISO images of guest operating systems.

Hope this article is informative to you .

Share it ! Comment it !! Be Sociable !!!

The post How to add ISCSI Storage to RHEV ? appeared first on UnixArena.
Architecture of Exadata Database Machine – Part 2

$
0
0

Exadata Database machine provides a high performance,high availability and plenty of storage space platform for oracle database .The high availability clustering is is provided by Oracle RAC and ASM will be responsible for storage mirroring .Infiniband technology provides high bandwidth and low latency cluster interconnect and storage networking.  The powerful compute nodes joins in the RAC cluster to offers the great performance.

In this article, we will see the

  • Exadata Database Machine Network architecture
  • Exadata Database Machine Storage architecture
  • Exadata Database Machine Software architecture.
  • How to scale up the Exadata Database Machine

Key components of the Exadata Database Machine

Shared storage: Exadata Storage servers 

Database Machine provides intelligent, high-performance shared storage to both single-instance and RAC implementations of Oracle Database using Exadata Storage Server technology.The Exadata storage servers is designed to provide the storage to oracle database using the ASM (Automatic Storage Management). ASM keeps the redundant copies of data on separate Exadata Storage Servers and it protects against the data loss if you lost the disk or entire storage server.

Shared Network – Infiniband 

Database machine uses the infiniband network for interconnect between database servers and exadata storage servers. The infiniband network provides 40Gb/s speed.So the latency is very low and offers the high bandwidth. In Exadata Database machine , multiple infiniband switches  and interface boning will be used to provide the network redundancy.

Shared cache:

The database machine’s RAC environment, the database instance buffer cache are shared. If one instance has kept some data on cache and that required by another instance,the data will be provided to the required node via infiniband cluster interconnect. It increases the performance since the data is happening between memory to memory via cluster interconnect.

Database Server cluster:

The Exadata database machine’s full rack consists , 8 compute nodes and you can able to build the 8-n0de cluster using the oracle RAC. The each  compute nodes has up to 80 CPU cores and 256GB memory .

Cluster interconnect:

By default, the database machine is configured use the infiniband storage network as cluster interconnect.

Database Machine – Network Architecture

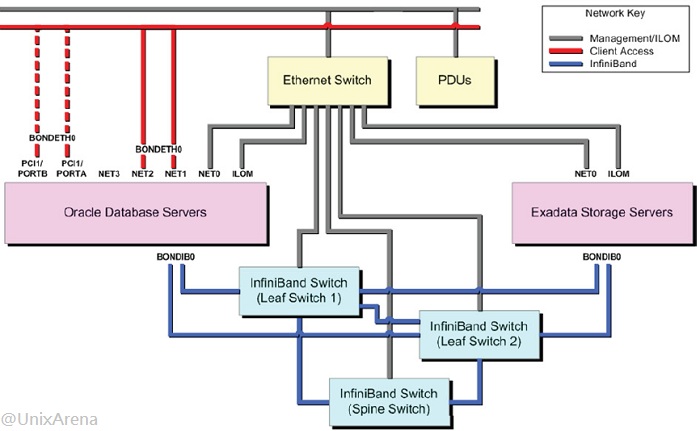
Exadata Network Architecture

There are three different networks has been shown on the above diagram.

Management Network –  ILOM:

ILOM(Integrated lights out manager) is the default remote hardware management on all oracle servers.It uses the traditional Ethernet network to manage the exadata database machine remotely. ILOM provides the graphical remote administration facility and   it also helps the system administrators to monitor the hardware remotely.

Client Access:

The database servers will be accessed by application servers via Ethernet network. Bonding will be created using multiple ethernet adapters for network redundancy and load balancing. Note: This database machine consists Cisco switch to provide the connectivity to ethernet networks.

InfiniBand Network Architecture

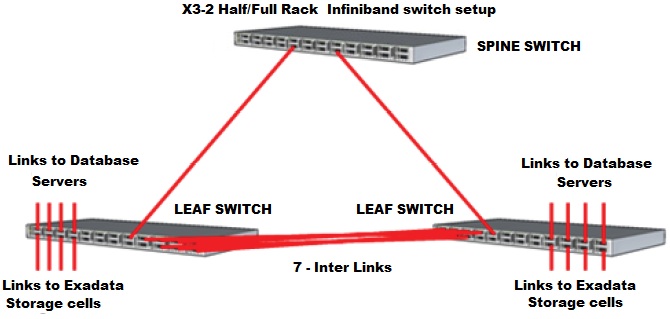
The below diagrams shows that how the infiniband links are connected to different components on X3-2 Half/Full Rack setup.

infiniband switch x3-2 half-full rack

infiniband switch x3-2 half-full rack

The spine switch will be exists only on half rack and full rack  exadata database configuration only. The spine switch will help you to scale the environment by providing the Inifiniband links to multiple racks. In the quarter rack of X3-2 model, you will get leaf switches . You can scale up to 18 rack by adding the infiniband cables to the infiniband switches.

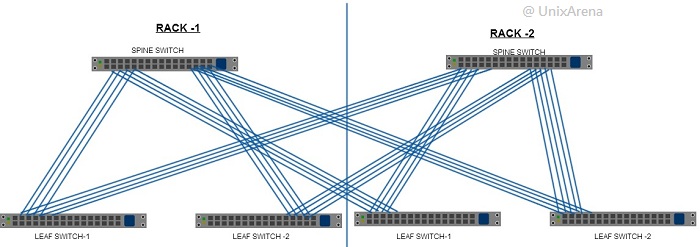
How we can interconnect two racks ? Have a look at the below diagram closely.Single InfiniBand network formed based on a Fat Tree topology

Scale two Racks

Scale two Racks

Six ports on each leaf switch are reserved for external connectivity.These ports are used for Connecting to media servers for tape backup,Connecting to external ETL servers,Client or application access Including Oracle Exalogic Elastic Cloud

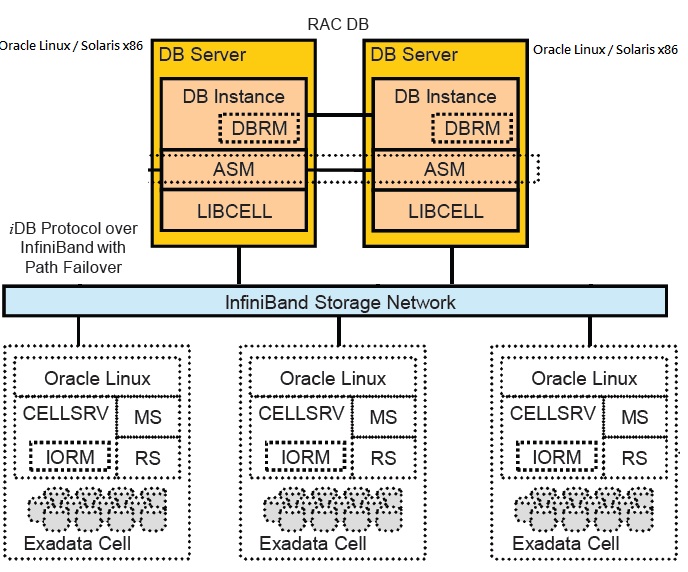
Database Machine Software Architecture

Software architecture- exadata

Software architecture- exadata

CELLSRV, MS,RS & IORM are the important process of the exadata storage cell servers. In the DB servers , these storage’s griddisks are used to create the ASM diskgroup.In the database server, there will be special library called LIBCELL. In combination with the database kernel and ASM, LIBCELL transparently maps database I/O to exadata storage server.

There is no other filesystems are allowed to create in Exadata storage cell. Oracle Database must use the ASM for volume manager and filesystem.

Customers has option to choose the database servers operating system between oracle Linux and oracle Solaris x86 . Exadata will support the oracle database 11g release 2 and laster versions of database.

Database Machine Storage  Architecture

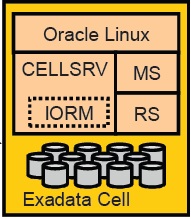
Exadata Storage cell

Exadata Storage cell

Exadata storage servers has above mentioned software components.  Oracle Linux is the default operating system for exadata storage cell software . CELLSRV is the core exadata storage component which provides the most of the services. Management Server (MS) provides Exadata cell management and configuration.MS is responsible for sending alerts and collects some statistics in addition to those collected by CELLSRV.Restart Server (RS) is used to start up/shut down the CELLSRV and MS services and monitors these services to automatically restart them if required.

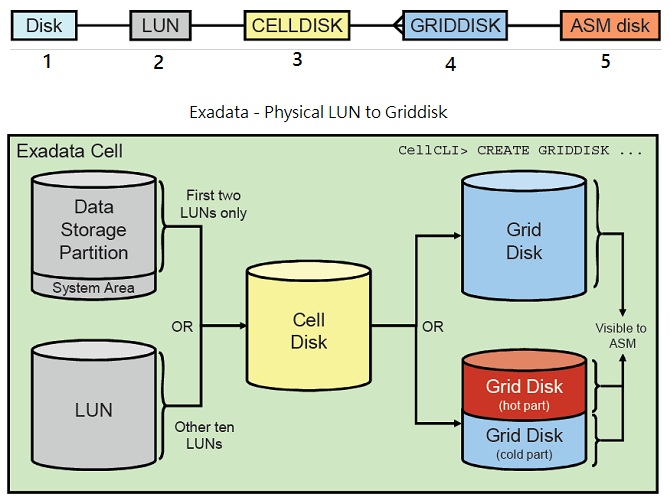
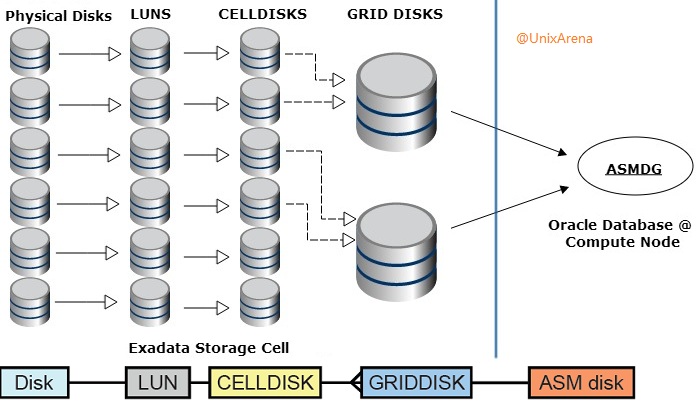
How the disks are mapped to  Database from the Exadata storage servers ?

Exadata Disks overview

Exadata Disks overview

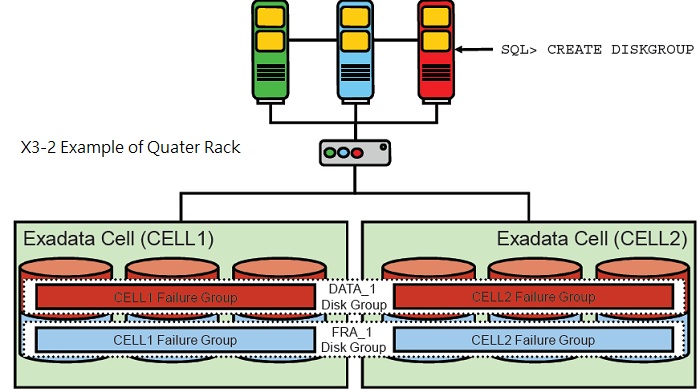
If you look the below image , you can observe that database servers is considering   the each cell nodes as failure group.

Exadata DG

Exadata DG

Thank you for visiting UnixArena.


The post Architecture of Exadata Database Machine – Part 2 appeared first on UnixArena.
Exploring the Exadata Storage Cell Processes – Part 3

$
0
0

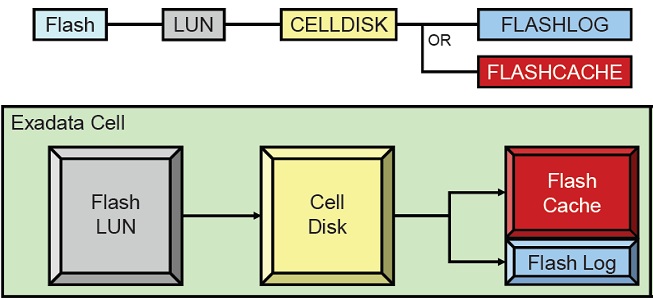
Exadata storage cell is new to the industry and only oracle is offering such a customized storage for oracle database. Unlike the traditional  SAN storage ,Exadata data storage will help to reduce the processing at the DB node level. Since the exadata storage cell has its own processors and 64GB physical memory , it can easily offload the DB nodes. It has huge amount of Flash storage to speed up the I/O .The default Flash cache settings is write through. These flash can also be used as storage (like harddrive). Flash devices can give 10x better performance than normal harddrive.

Examine the Exadata Storage cell Processes

1. Login to Exadata storage cell .

login as: root
root@192.168.2.50's password:
Last login: Sat Nov 15 01:50:58 2014
[root@uaexacell1 ~]#
[root@uaexacell1 ~]# uname -a
Linux uaexacell1 2.6.39-300.26.1.el5uek #1 SMP Thu Jan 3 18:31:38 PST 2013 x86_64 x86_64 x86_64 GNU/Linux
[root@uaexacell1 ~]#

2.List the exadata cell restart server process.(RS)

[root@uaexacell1 ~]# ps -ef |grep cellrs
root     10001     1  0 14:23 ?        00:00:00 /opt/oracle/cell11.2.3.2.1_LINUX.X64_130109/cellsrv/bin/cellrssrm -ms 1 -cellsrv 1
root     10009 10001  0 14:23 ?        00:00:00 /opt/oracle/cell11.2.3.2.1_LINUX.X64_130109/cellsrv/bin/cellrsmmt -ms 1 -cellsrv 1
root     10010 10001  0 14:23 ?        00:00:00 /opt/oracle/cell11.2.3.2.1_LINUX.X64_130109/cellsrv/bin/cellrsomt -ms 1 -cellsrv 1
root     10011 10001  0 14:23 ?        00:00:00 /opt/oracle/cell11.2.3.2.1_LINUX.X64_130109/cellsrv/bin/cellrsbmt -ms 1 -cellsrv 1
root     10012 10011  0 14:23 ?        00:00:00 /opt/oracle/cell11.2.3.2.1_LINUX.X64_130109/cellsrv/bin/cellrsbkm -rs_conf /opt/oracle/cell11.2.3.2.1_LINUX.X64_130109/cellsrv/deploy/config/cellinit.ora -ms_conf /opt/oracle/cell11.2.3.2.1_LINUX.X64_130109/cellsrv/deploy/config/cellrsms.state -cellsrv_conf /opt/oracle/cell11.2.3.2.1_LINUX.X64_130109/cellsrv/deploy/config/cellrsos.state -debug 0
root     10022 10012  0 14:23 ?        00:00:00 /opt/oracle/cell11.2.3.2.1_LINUX.X64_130109/cellsrv/bin/cellrssmt -rs_conf /opt/oracle/cell11.2.3.2.1_LINUX.X64_130109/cellsrv/deploy/config/cellinit.ora -ms_conf /opt/oracle/cell11.2.3.2.1_LINUX.X64_130109/cellsrv/deploy/config/cellrsms.state -cellsrv_conf /opt/oracle/cell11.2.3.2.1_LINUX.X64_130109/cellsrv/deploy/config/cellrsos.state -debug 0
root     12992 12945  0 14:48 pts/2    00:00:00 grep cellrs
[root@uaexacell1 ~]#

RS – Restart server process is responsible to make the cellsrv & ms process up for all the time. If these process are not responding or terminated, automatically RS(restart server) , will restart the cellsrv & ms process.

3.List the MS process. (Management Server process). MS maintains the cell configuration with the help of cellcli(command line utility). It also responsible for sending alerts and collecting the exadata cell statistics.

[root@uaexacell1 ~]# ps -ef | grep ms.err
root     10013 10009  1 14:23 ?        00:00:21 /usr/java/jdk1.5.0_15/bin/java -Xms256m -Xmx512m -Djava.library.path=/opt/oracle/cell11.2.3.2.1_LINUX.X64_130109/cellsrv/lib -Ddisable.checkForUpdate=true -jar /opt/oracle/cell11.2.3.2.1_LINUX.X64_130109/oc4j/ms/j2ee/home/oc4j.jar -out /opt/oracle/cell11.2.3.2.1_LINUX.X64_130109/cellsrv/deploy/log/ms.lst -err /opt/oracle/cell11.2.3.2.1_LINUX.X64_130109/cellsrv/deploy/log/ms.err
root     13945 12945  0 14:56 pts/2    00:00:00 grep ms.err
[root@uaexacell1 ~]#
MS(Management server) process’s parent process id belongs to RS (restart server).RS will restart the MS when it crashes or terminated abnormally.

4.CELLSRV is multi-threaded  process which provides the storage services to the database nodes. CELLSRV communicates with oracle database to serve simple block requests,such as database buffer cache reads and smart scan requests. You list the cellsrv process using below mentioned command.

[root@uaexacell1 ~]# ps -ef | grep "/cellsrv "
root      5705  10010 8 19:13 ?        00:08:20 /opt/oracle/cell11.2.3.2.1_LINUX.X64_130109/cellsrv/bin/cellsrv 100 5000 9 5042
1000      8390  4457  0 20:57 pts/1    00:00:00 grep /cellsrv
[root@uaexacell1 ~]#
CELLSRV process’s parent process id belongs to RS process(restart server).RS will restart the CELLRSV when it crashes or terminated abnormally.

5.Let me  kill the MS process and see if it restarts automatically.

[root@uaexacell1 ~]# ps -ef |grep ms.err
root     10013 10009  0 14:23 ?        00:00:23 /usr/java/jdk1.5.0_15/bin/java -Xms256m -Xmx512m -Djava.library.path=/opt/oracle/cell11.2.3.2.1_LINUX.X64_130109/cellsrv/lib -Ddisable.checkForUpdate=true -jar /opt/oracle/cell11.2.3.2.1_LINUX.X64_130109/oc4j/ms/j2ee/home/oc4j.jar -out /opt/oracle/cell11.2.3.2.1_LINUX.X64_130109/cellsrv/deploy/log/ms.lst -err /opt/oracle/cell11.2.3.2.1_LINUX.X64_130109/cellsrv/deploy/log/ms.err
root     15220 12945  0 15:06 pts/2    00:00:00 grep ms.err
[root@uaexacell1 ~]# kill -9 10013
[root@uaexacell1 ~]# ps -ef |grep ms.err
root     15245 12945  0 15:07 pts/2    00:00:00 grep ms.err
[root@uaexacell1 ~]# ps -ef |grep ms.err
root     15249 12945  0 15:07 pts/2    00:00:00 grep ms.err
[root@uaexacell1 ~]#

within few seconds another MS process has started with new PID.

[root@uaexacell1 ~]# ps -ef |grep ms.err
root     15366 10009 74 15:07 ?        00:00:00 /usr/java/jdk1.5.0_15/bin/java -Xms256m -Xmx512m -Djava.library.path=/opt/oracle/cell11.2.3.2.1_LINUX.X64_130109/cellsrv/lib -Ddisable.checkForUpdate=true -jar /opt/oracle/cell11.2.3.2.1_LINUX.X64_130109/oc4j/ms/j2ee/home/oc4j.jar -out /opt/oracle/cell11.2.3.2.1_LINUX.X64_130109/cellsrv/deploy/log/ms.lst -err /opt/oracle/cell11.2.3.2.1_LINUX.X64_130109/cellsrv/deploy/log/ms.err
root     15379 12945  0 15:07 pts/2    00:00:00 grep ms.err
[root@uaexacell1 ~]#

6.How to stop and start the services on exadata storage cell  using the init scripts ? Its like other start up scripts will be located on /etc/init.d and link has been added to /etc/rc3.d to bring up the cell process on the start-up.

[root@uaexacell1 ~]# cd /etc/init.d
[root@uaexacell1 init.d]# ls -lrt |grep cell
lrwxrwxrwx 1 root root    50 Nov 15 01:15 celld -> /opt/oracle/cell/cellsrv/deploy/scripts/unix/celld
[root@uaexacell1 init.d]# cd /etc/rc3.d
[root@uaexacell1 rc3.d]# ls -lrt |grep cell
lrwxrwxrwx 1 root root 15 Nov 15 01:15 S99celld -> ../init.d/celld
[root@uaexacell1 rc3.d]#

This script can be used to start, stop, restart the exadata cell software.

To stop the cell software

[root@uaexacell1 rc3.d]# ./S99celld stop
Stopping the RS, CELLSRV, and MS services...
The SHUTDOWN of services was successful.
[root@uaexacell1 rc3.d]#

To start the cell software

[root@uaexacell1 rc3.d]# ./S99celld start
Starting the RS, CELLSRV, and MS services...
Getting the state of RS services...  running
Starting CELLSRV services...
The STARTUP of CELLSRV services was successful.
Starting MS services...
The STARTUP of MS services was successful.
[root@uaexacell1 rc3.d]#

TO restart the cell software,

[root@uaexacell1 rc3.d]# ./S99celld restart
Stopping the RS, CELLSRV, and MS services...
The SHUTDOWN of services was successful.
Starting the RS, CELLSRV, and MS services...
Getting the state of RS services...  running
Starting CELLSRV services...
The STARTUP of CELLSRV services was successful.
Starting MS services...
The STARTUP of MS services was successful.
[root@uaexacell1 rc3.d]#
Cell software services will be managed using celladmin user and cellcli utility. You can also start,stop,restart the services using cellcli utility.We will see the cellcli in next article.

Hope this article give you the overview of the exadata storage cell processes.

Thank you for visiting UnixArena.

The post Exploring the Exadata Storage Cell Processes – Part 3 appeared first on UnixArena.
Exadata – CELLCLI command Line Utility1 – Part 4

$
0
0

Exadata storage is managed by CELLCLI command line utility. Management process (MS) will communicate with cellcli to maintain the configuration on the system. CELLCLI utility can be launched by user  “celladmin” or “root”. In this article ,we will see how to list the storage objects and how to stop/start the cell services using the CELLCLI utility.At the end of the article, we will see how to use the help command to form the command syntax.

1. Login to Exadata storage cell using celladmin user and start cellcli utility.

[celladmin@uaexacell1 ~]$ id
uid=1000(celladmin) gid=500(celladmin) groups=500(celladmin),502(cellusers)
[celladmin@uaexacell1 ~]$ cellcli
CellCLI: Release 11.2.3.2.1 - Production on Sun Nov 16 16:05:27 GMT+05:30 2014

Copyright (c) 2007, 2012, Oracle.  All rights reserved.
Cell Efficiency Ratio: 1

CellCLI>

Note:CELLCLI is case in-sensitive. So you can use the both upper & lower case.

2. List the cell information. (Exadata storage box)

CellCLI> list cell
         uaexacell1      online

CellCLI> list cell detail
         name:                   uaexacell1
         bbuTempThreshold:       60
         bbuChargeThreshold:     800
         bmcType:                absent
         cellVersion:            OSS_11.2.3.2.1_LINUX.X64_130109
         cpuCount:               1
         diagHistoryDays:        7
         fanCount:               1/1
         fanStatus:              normal
         flashCacheMode:         WriteThrough
         id:                     a3c87541-4d0e-478a-9ec9-8a4bea3eeaac
         interconnectCount:      2
         interconnect1:          eth1
         iormBoost:              0.0
         ipaddress1:             192.168.1.5/24
         kernelVersion:          2.6.39-300.26.1.el5uek
         makeModel:              Fake hardware
         metricHistoryDays:      7
         offloadEfficiency:      1.0
         powerCount:             1/1
         powerStatus:            normal
         releaseVersion:         11.2.3.2.1
         releaseTrackingBug:     14522699
         status:                 online
         temperatureReading:     0.0
         temperatureStatus:      normal
         upTime:                 0 days, 2:24
         cellsrvStatus:          running
         msStatus:               running
         rsStatus:               running

CellCLI>

3. List the available storage devices  on the system.It will  list both harddrives and flash disks.

CellCLI> LIST LUN
         /opt/oracle/cell11.2.3.2.1_LINUX.X64_130109/disks/raw/DISK00    /opt/oracle/cell11.2.3.2.1_LINUX.X64_130109/disks/raw/DISK00    normal
         /opt/oracle/cell11.2.3.2.1_LINUX.X64_130109/disks/raw/DISK01    /opt/oracle/cell11.2.3.2.1_LINUX.X64_130109/disks/raw/DISK01    normal
         /opt/oracle/cell11.2.3.2.1_LINUX.X64_130109/disks/raw/DISK02    /opt/oracle/cell11.2.3.2.1_LINUX.X64_130109/disks/raw/DISK02    normal
         /opt/oracle/cell11.2.3.2.1_LINUX.X64_130109/disks/raw/DISK03    /opt/oracle/cell11.2.3.2.1_LINUX.X64_130109/disks/raw/DISK03    normal
         /opt/oracle/cell11.2.3.2.1_LINUX.X64_130109/disks/raw/DISK04    /opt/oracle/cell11.2.3.2.1_LINUX.X64_130109/disks/raw/DISK04    normal
         /opt/oracle/cell11.2.3.2.1_LINUX.X64_130109/disks/raw/DISK05    /opt/oracle/cell11.2.3.2.1_LINUX.X64_130109/disks/raw/DISK05    normal
         /opt/oracle/cell11.2.3.2.1_LINUX.X64_130109/disks/raw/DISK06    /opt/oracle/cell11.2.3.2.1_LINUX.X64_130109/disks/raw/DISK06    normal
         /opt/oracle/cell11.2.3.2.1_LINUX.X64_130109/disks/raw/DISK07    /opt/oracle/cell11.2.3.2.1_LINUX.X64_130109/disks/raw/DISK07    normal
         /opt/oracle/cell11.2.3.2.1_LINUX.X64_130109/disks/raw/DISK08    /opt/oracle/cell11.2.3.2.1_LINUX.X64_130109/disks/raw/DISK08    normal
         /opt/oracle/cell11.2.3.2.1_LINUX.X64_130109/disks/raw/DISK09    /opt/oracle/cell11.2.3.2.1_LINUX.X64_130109/disks/raw/DISK09    normal
         /opt/oracle/cell11.2.3.2.1_LINUX.X64_130109/disks/raw/DISK10    /opt/oracle/cell11.2.3.2.1_LINUX.X64_130109/disks/raw/DISK10    normal
         /opt/oracle/cell11.2.3.2.1_LINUX.X64_130109/disks/raw/DISK11    /opt/oracle/cell11.2.3.2.1_LINUX.X64_130109/disks/raw/DISK11    normal
         /opt/oracle/cell11.2.3.2.1_LINUX.X64_130109/disks/raw/DISK12    /opt/oracle/cell11.2.3.2.1_LINUX.X64_130109/disks/raw/DISK12    normal
         /opt/oracle/cell11.2.3.2.1_LINUX.X64_130109/disks/raw/DISK13    /opt/oracle/cell11.2.3.2.1_LINUX.X64_130109/disks/raw/DISK13    normal
         /opt/oracle/cell11.2.3.2.1_LINUX.X64_130109/disks/raw/FLASH00   /opt/oracle/cell11.2.3.2.1_LINUX.X64_130109/disks/raw/FLASH00   normal
         /opt/oracle/cell11.2.3.2.1_LINUX.X64_130109/disks/raw/FLASH01   /opt/oracle/cell11.2.3.2.1_LINUX.X64_130109/disks/raw/FLASH01   normal
         /opt/oracle/cell11.2.3.2.1_LINUX.X64_130109/disks/raw/FLASH02   /opt/oracle/cell11.2.3.2.1_LINUX.X64_130109/disks/raw/FLASH02   normal
         /opt/oracle/cell11.2.3.2.1_LINUX.X64_130109/disks/raw/FLASH03   /opt/oracle/cell11.2.3.2.1_LINUX.X64_130109/disks/raw/FLASH03   normal
         /opt/oracle/cell11.2.3.2.1_LINUX.X64_130109/disks/raw/FLASH04   /opt/oracle/cell11.2.3.2.1_LINUX.X64_130109/disks/raw/FLASH04   normal
         /opt/oracle/cell11.2.3.2.1_LINUX.X64_130109/disks/raw/FLASH05   /opt/oracle/cell11.2.3.2.1_LINUX.X64_130109/disks/raw/FLASH05   normal
         /opt/oracle/cell11.2.3.2.1_LINUX.X64_130109/disks/raw/FLASH06   /opt/oracle/cell11.2.3.2.1_LINUX.X64_130109/disks/raw/FLASH06   normal
         /opt/oracle/cell11.2.3.2.1_LINUX.X64_130109/disks/raw/FLASH07   /opt/oracle/cell11.2.3.2.1_LINUX.X64_130109/disks/raw/FLASH07   normal
         /opt/oracle/cell11.2.3.2.1_LINUX.X64_130109/disks/raw/FLASH08   /opt/oracle/cell11.2.3.2.1_LINUX.X64_130109/disks/raw/FLASH08   normal
         /opt/oracle/cell11.2.3.2.1_LINUX.X64_130109/disks/raw/FLASH09   /opt/oracle/cell11.2.3.2.1_LINUX.X64_130109/disks/raw/FLASH09   normal
         /opt/oracle/cell11.2.3.2.1_LINUX.X64_130109/disks/raw/FLASH10   /opt/oracle/cell11.2.3.2.1_LINUX.X64_130109/disks/raw/FLASH10   normal
         /opt/oracle/cell11.2.3.2.1_LINUX.X64_130109/disks/raw/FLASH11   /opt/oracle/cell11.2.3.2.1_LINUX.X64_130109/disks/raw/FLASH11   normal
         /opt/oracle/cell11.2.3.2.1_LINUX.X64_130109/disks/raw/FLASH12   /opt/oracle/cell11.2.3.2.1_LINUX.X64_130109/disks/raw/FLASH12   normal
         /opt/oracle/cell11.2.3.2.1_LINUX.X64_130109/disks/raw/FLASH13   /opt/oracle/cell11.2.3.2.1_LINUX.X64_130109/disks/raw/FLASH13   normal

CellCLI>
My Exdata storage is running on virtual hardware. That’s why you are seeing the storage devices are listing with full path. In real hardware, You will be just seeing the controller number and disks numbers. (Ex: 0_0 0_0 normal). Note: Exadata VM will be used by oracle only for training purposes.

4.  The below command will list only the harddisks attached to the exadata server.

CellCLI> list lun where disktype=harddisk
         /opt/oracle/cell11.2.3.2.1_LINUX.X64_130109/disks/raw/DISK00    /opt/oracle/cell11.2.3.2.1_LINUX.X64_130109/disks/raw/DISK00    normal
         /opt/oracle/cell11.2.3.2.1_LINUX.X64_130109/disks/raw/DISK01    /opt/oracle/cell11.2.3.2.1_LINUX.X64_130109/disks/raw/DISK01    normal
         /opt/oracle/cell11.2.3.2.1_LINUX.X64_130109/disks/raw/DISK02    /opt/oracle/cell11.2.3.2.1_LINUX.X64_130109/disks/raw/DISK02    normal
         /opt/oracle/cell11.2.3.2.1_LINUX.X64_130109/disks/raw/DISK03    /opt/oracle/cell11.2.3.2.1_LINUX.X64_130109/disks/raw/DISK03    normal
         /opt/oracle/cell11.2.3.2.1_LINUX.X64_130109/disks/raw/DISK04    /opt/oracle/cell11.2.3.2.1_LINUX.X64_130109/disks/raw/DISK04    normal
         /opt/oracle/cell11.2.3.2.1_LINUX.X64_130109/disks/raw/DISK05    /opt/oracle/cell11.2.3.2.1_LINUX.X64_130109/disks/raw/DISK05    normal
         /opt/oracle/cell11.2.3.2.1_LINUX.X64_130109/disks/raw/DISK06    /opt/oracle/cell11.2.3.2.1_LINUX.X64_130109/disks/raw/DISK06    normal
         /opt/oracle/cell11.2.3.2.1_LINUX.X64_130109/disks/raw/DISK07    /opt/oracle/cell11.2.3.2.1_LINUX.X64_130109/disks/raw/DISK07    normal
         /opt/oracle/cell11.2.3.2.1_LINUX.X64_130109/disks/raw/DISK08    /opt/oracle/cell11.2.3.2.1_LINUX.X64_130109/disks/raw/DISK08    normal
         /opt/oracle/cell11.2.3.2.1_LINUX.X64_130109/disks/raw/DISK09    /opt/oracle/cell11.2.3.2.1_LINUX.X64_130109/disks/raw/DISK09    normal
         /opt/oracle/cell11.2.3.2.1_LINUX.X64_130109/disks/raw/DISK10    /opt/oracle/cell11.2.3.2.1_LINUX.X64_130109/disks/raw/DISK10    normal
         /opt/oracle/cell11.2.3.2.1_LINUX.X64_130109/disks/raw/DISK11    /opt/oracle/cell11.2.3.2.1_LINUX.X64_130109/disks/raw/DISK11    normal
         /opt/oracle/cell11.2.3.2.1_LINUX.X64_130109/disks/raw/DISK12    /opt/oracle/cell11.2.3.2.1_LINUX.X64_130109/disks/raw/DISK12    normal
         /opt/oracle/cell11.2.3.2.1_LINUX.X64_130109/disks/raw/DISK13    /opt/oracle/cell11.2.3.2.1_LINUX.X64_130109/disks/raw/DISK13    normal

CellCLI>

5.The below command list only the flash devices which are attached to the exadata storage server.

CellCLI> list lun where disktype=flashdisk
         /opt/oracle/cell11.2.3.2.1_LINUX.X64_130109/disks/raw/FLASH00   /opt/oracle/cell11.2.3.2.1_LINUX.X64_130109/disks/raw/FLASH00   normal
         /opt/oracle/cell11.2.3.2.1_LINUX.X64_130109/disks/raw/FLASH01   /opt/oracle/cell11.2.3.2.1_LINUX.X64_130109/disks/raw/FLASH01   normal
         /opt/oracle/cell11.2.3.2.1_LINUX.X64_130109/disks/raw/FLASH02   /opt/oracle/cell11.2.3.2.1_LINUX.X64_130109/disks/raw/FLASH02   normal
         /opt/oracle/cell11.2.3.2.1_LINUX.X64_130109/disks/raw/FLASH03   /opt/oracle/cell11.2.3.2.1_LINUX.X64_130109/disks/raw/FLASH03   normal
         /opt/oracle/cell11.2.3.2.1_LINUX.X64_130109/disks/raw/FLASH04   /opt/oracle/cell11.2.3.2.1_LINUX.X64_130109/disks/raw/FLASH04   normal
         /opt/oracle/cell11.2.3.2.1_LINUX.X64_130109/disks/raw/FLASH05   /opt/oracle/cell11.2.3.2.1_LINUX.X64_130109/disks/raw/FLASH05   normal
         /opt/oracle/cell11.2.3.2.1_LINUX.X64_130109/disks/raw/FLASH06   /opt/oracle/cell11.2.3.2.1_LINUX.X64_130109/disks/raw/FLASH06   normal
         /opt/oracle/cell11.2.3.2.1_LINUX.X64_130109/disks/raw/FLASH07   /opt/oracle/cell11.2.3.2.1_LINUX.X64_130109/disks/raw/FLASH07   normal
         /opt/oracle/cell11.2.3.2.1_LINUX.X64_130109/disks/raw/FLASH08   /opt/oracle/cell11.2.3.2.1_LINUX.X64_130109/disks/raw/FLASH08   normal
         /opt/oracle/cell11.2.3.2.1_LINUX.X64_130109/disks/raw/FLASH09   /opt/oracle/cell11.2.3.2.1_LINUX.X64_130109/disks/raw/FLASH09   normal
         /opt/oracle/cell11.2.3.2.1_LINUX.X64_130109/disks/raw/FLASH10   /opt/oracle/cell11.2.3.2.1_LINUX.X64_130109/disks/raw/FLASH10   normal
         /opt/oracle/cell11.2.3.2.1_LINUX.X64_130109/disks/raw/FLASH11   /opt/oracle/cell11.2.3.2.1_LINUX.X64_130109/disks/raw/FLASH11   normal
         /opt/oracle/cell11.2.3.2.1_LINUX.X64_130109/disks/raw/FLASH12   /opt/oracle/cell11.2.3.2.1_LINUX.X64_130109/disks/raw/FLASH12   normal
         /opt/oracle/cell11.2.3.2.1_LINUX.X64_130109/disks/raw/FLASH13   /opt/oracle/cell11.2.3.2.1_LINUX.X64_130109/disks/raw/FLASH13   normal

CellCLI>

6.List the celldisks

CellCLI> list celldisk
         CD_DISK00_uaexacell1    normal
         CD_DISK01_uaexacell1    normal
         CD_DISK02_uaexacell1    normal
         CD_DISK03_uaexacell1    normal
         CD_DISK04_uaexacell1    normal
         CD_DISK05_uaexacell1    normal
         CD_DISK06_uaexacell1    normal
         CD_DISK07_uaexacell1    normal
         CD_DISK08_uaexacell1    normal
         CD_DISK09_uaexacell1    normal
         CD_DISK10_uaexacell1    normal
         CD_DISK11_uaexacell1    normal
         CD_DISK12_uaexacell1    normal
         CD_DISK13_uaexacell1    normal
         FD_00_uaexacell1        normal
         FD_01_uaexacell1        normal
         FD_02_uaexacell1        normal
         FD_03_uaexacell1        normal
         FD_04_uaexacell1        normal
         FD_05_uaexacell1        normal
         FD_06_uaexacell1        normal
         FD_07_uaexacell1        normal
         FD_08_uaexacell1        normal
         FD_09_uaexacell1        normal
         FD_10_uaexacell1        normal
         FD_11_uaexacell1        normal
         FD_12_uaexacell1        normal
         FD_13_uaexacell1        normal

CellCLI>

7. List grid disks

CellCLI> list griddisk
         DATA01_CD_DISK00_uaexacell1     active
         DATA01_CD_DISK01_uaexacell1     active
         DATA01_CD_DISK02_uaexacell1     active
         DATA01_CD_DISK03_uaexacell1     active
         DATA01_CD_DISK04_uaexacell1     active
         DATA01_CD_DISK05_uaexacell1     active
         DATA01_CD_DISK06_uaexacell1     active
         DATA01_CD_DISK07_uaexacell1     active
         DATA01_CD_DISK08_uaexacell1     active
         DATA01_CD_DISK09_uaexacell1     active
         DATA01_CD_DISK10_uaexacell1     active
         DATA01_CD_DISK11_uaexacell1     active
         DATA01_CD_DISK12_uaexacell1     active
         DATA01_CD_DISK13_uaexacell1     active

CellCLI>

8. List the flash disks which are configured as flashcache.

CellCLI> list flashcache detail
         name:                   uaexacell1_FLASHCACHE
         cellDisk:               FD_05_uaexacell1,FD_02_uaexacell1,FD_04_uaexacell1,FD_03_uaexacell1,FD_01_uaexacell1,FD_12_uaexacell1
         creationTime:           2014-11-16T18:57:54+05:30
         degradedCelldisks:
         effectiveCacheSize:     4.3125G
         id:                     f972c16a-5fcc-4cc7-8083-a06b026f662b
         size:                   4.3125G
         status:                 normal

CellCLI>

9.List the flashcache which are configured as flashlog.

CellCLI> list flashlog detail
         name:                   uaexacell1_FLASHLOG
         cellDisk:               FD_13_uaexacell1
         creationTime:           2014-11-16T16:31:23+05:30
         degradedCelldisks:
         effectiveSize:          512M
         efficiency:             100.0
         id:                     1fbc893b-4ab1-4861-b6cc-0b86bd45376d
         size:                   512M
         status:                 normal
CellCLI>

10.List only the status of the RS,MS and CELLSRV status.

CellCLI> list cell attributes rsStatus, msStatus, cellsrvStatus detail
         rsStatus:               running
         msStatus:               running
         cellsrvStatus:          running

11. To stop the services using CELLCLI,

CellCLI> alter cell shutdown services all

Stopping the RS, CELLSRV, and MS services...
The SHUTDOWN of services was successful.

CellCLI>

12.To start the services using CELLCLI,

CellCLI> alter cell startup services all

Starting the RS, CELLSRV, and MS services...
Getting the state of RS services...  running
Starting CELLSRV services...
The STARTUP of CELLSRV services was successful.
Starting MS services...
The STARTUP of MS services was successful.

CellCLI>

13.To restart the services forcefully using CELLCLI,

CellCLI> alter cell restart services all force

Stopping the RS, CELLSRV, and MS services...
The SHUTDOWN of services was successful.
Starting the RS, CELLSRV, and MS services...
Getting the state of RS services...  running
Starting CELLSRV services...
The STARTUP of CELLSRV services was successful.
Starting MS services...
The STARTUP of MS services was successful.

CellCLI>

The same way you can shutdown the services forcefully by swapping the “restart” command with  “shutdown”

14. How to get the command syntax  help in Exadata CELLCLI ?

Just execute the command “help” to get the list of commands.

CellCLI> help

 HELP [topic]
   Available Topics:
        ALTER
        ALTER ALERTHISTORY
        ALTER CELL
        ALTER CELLDISK
        ALTER FLASHCACHE
        ALTER GRIDDISK
        ALTER IBPORT
        ALTER IORMPLAN
        ALTER LUN
        ALTER PHYSICALDISK
        ALTER QUARANTINE
        ALTER THRESHOLD
        ASSIGN KEY
        CALIBRATE
        CREATE
        CREATE CELL
        CREATE CELLDISK
        CREATE FLASHCACHE
        CREATE FLASHLOG
        CREATE GRIDDISK
        CREATE KEY
        CREATE QUARANTINE
        CREATE THRESHOLD
        DESCRIBE
        DROP
        DROP ALERTHISTORY
        DROP CELL
        DROP CELLDISK
        DROP FLASHCACHE
        DROP FLASHLOG
        DROP GRIDDISK
        DROP QUARANTINE
        DROP THRESHOLD
        EXPORT CELLDISK
        IMPORT CELLDISK
        LIST
        LIST ACTIVEREQUEST
        LIST ALERTDEFINITION
        LIST ALERTHISTORY
        LIST CELL
        LIST CELLDISK
        LIST FLASHCACHE
        LIST FLASHCACHECONTENT
        LIST FLASHLOG
        LIST GRIDDISK
        LIST IBPORT
        LIST IORMPLAN
        LIST KEY
        LIST LUN
        LIST METRICCURRENT
        LIST METRICDEFINITION
        LIST METRICHISTORY
        LIST PHYSICALDISK
        LIST QUARANTINE
        LIST THRESHOLD
        SET
        SPOOL
        START

CellCLI>

15. To get the help for specific topic,use HELP <TOPIC> command.

CellCLI> HELP LIST

  Enter HELP LIST <object_type> for specific help syntax.
    <object_type>:  {ACTIVEREQUEST | ALERTHISTORY | ALERTDEFINITION | CELL
                     | CELLDISK | FLASHCACHE | FLASHLOG | FLASHCACHECONTENT | GRIDDISK
                     | IBPORT | IORMPLAN | KEY | LUN
                     | METRICCURRENT | METRICDEFINITION | METRICHISTORY
                     | PHYSICALDISK | QUARANTINE | THRESHOLD }

CellCLI>

16.To get the help of specific command,use the below syntax,

CellCLI> HELP LIST CELLDISK

  Usage: LIST CELLDISK [ | ] [<attribute_list>] [DETAIL]

  Purpose: Displays specified attributes for cell disks.

  Arguments:
    :  The name of the cell disk to be displayed.
    :  an expression which determines which cell disks should
                be displayed.
    <attribute_list>: The attributes that are to be displayed.
                      ATTRIBUTES {ALL | attr1 [, attr2]... }

  Options:
    [DETAIL]: Formats the display as an attribute on each line, with
              an attribute descriptor preceding each value.

  Examples:
    LIST CELLDISK cd1 DETAIL
    LIST CELLDISK where freespace > 100M

CellCLI>

You can check the exadata storage cell logs using the below command,

CellCLI> list alerthistory
         1_1     2014-11-15T01:17:14+05:30       critical        "File system "/" is 84% full, which is above the 80% threshold. Accelerated space reclamation has started.  This alert will be cleared when file system "/" becomes less than 75% full. Top three directories ordered by total space usage are as follows: /usr        : 2.35G /tmp        : 1.37G /opt        : 593.27M"
         1_2     2014-11-15T01:25:44+05:30       critical        "File system "/" is 84% full, which is above the 80% threshold. Accelerated space reclamation has started.  This alert will be cleared when file system "/" becomes less than 75% full. Top three directories ordered by total space usage are as follows: /usr        : 2.35G /tmp        : 1.37G /opt        : 593.36M"
         1_3     2014-11-15T01:36:51+05:30       critical        "File system "/" is 84% full, which is above the 80% threshold. Accelerated space reclamation has started.  This alert will be cleared when file system "/" becomes less than 75% full. Top three directories ordered by total space usage are as follows: /usr        : 2.35G /tmp        : 1.37G /opt        : 593.38M"
         1_4     2014-11-15T01:44:27+05:30       critical        "File system "/" is 84% full, which is above the 80% threshold. Accelerated space reclamation has started.  This alert will be cleared when file system "/" becomes less than 75% full. Top three directories ordered by total space usage are as follows: /usr        : 2.35G /tmp        : 1.37G /opt        : 593.39M"
         1_5     2014-11-16T15:00:21+05:30       clear           "File system "/" is 62% full, which is below the 75% threshold. Normal space reclamation will resume."
         2       2014-11-16T14:47:28+05:30       critical        "RS-7445 [Serv CELLSRV hang detected] [It will be restarted] [] [] [] [] [] [] [] [] [] []"
         3       2014-11-16T15:07:05+05:30       critical        "RS-7445 [Serv MS is absent] [It will be restarted] [] [] [] [] [] [] [] [] [] []"
         4       2014-11-16T16:31:51+05:30       critical        "ORA-07445: exception encountered: core dump [_ZN14FlashCacheCore20fcDeleteMemoryForFciEj()+45] [11] [0x000000000] [] [] []"
         5       2014-11-16T16:32:57+05:30       critical        "ORA-07445: exception encountered: core dump [_ZN14FlashCacheCore20fcDeleteMemoryForFciEj()+45] [11] [0x000000000] [] [] []"
         6       2014-11-16T16:34:42+05:30       critical        "ORA-07445: exception encountered: core dump [_ZN14FlashCacheCore20fcDeleteMemoryForFciEj()+45] [11] [0x000000000] [] [] []"
         7       2014-11-16T16:36:15+05:30       critical        "ORA-07445: exception encountered: core dump [_ZN14FlashCacheCore20fcDeleteMemoryForFciEj()+45] [11] [0x000000000] [] [] []"
         8       2014-11-16T16:44:28+05:30       critical        "ORA-07445: exception encountered: core dump [_ZN14FlashCacheCore20fcDeleteMemoryForFciEj()+45] [11] [0x000000000] [] [] []"
         9       2014-11-16T16:49:00+05:30       critical        "ORA-07445: exception encountered: core dump [_ZN14FlashCacheCore20fcDeleteMemoryForFciEj()+45] [11] [0x000000000] [] [] []"
         10      2014-11-16T16:52:32+05:30       critical        "ORA-07445: exception encountered: core dump [_ZN14FlashCacheCore20fcDeleteMemoryForFciEj()+45] [11] [0x000000000] [] [] []"
         11      2014-11-16T16:58:42+05:30       critical        "ORA-07445: exception encountered: core dump [_ZN14FlashCacheCore20fcDeleteMemoryForFciEj()+45] [11] [0x000000000] [] [] []"
         12      2014-11-16T16:59:48+05:30       critical        "RS-7445 [CELLSRV monitor disabled] [Detected a flood of restarts] [] [] [] [] [] [] [] [] [] []"
         13      2014-11-16T17:07:04+05:30       critical        "ORA-07445: exception encountered: core dump [_ZN14FlashCacheCore20fcDeleteMemoryForFciEj()+45] [11] [0x000000000] [] [] []"
         14      2014-11-16T18:31:17+05:30       critical        "ORA-07445: exception encountered: core dump [_ZN14FlashCacheCore20fcDeleteMemoryForFciEj()+45] [11] [0x000000000] [] [] []"

CellCLI>

Hope this article is informative to you.More to come about Exadata database machine!!! Stay tuned!

Thank you for visiting UnixArena

The post Exadata – CELLCLI command Line Utility1 – Part 4 appeared first on UnixArena.
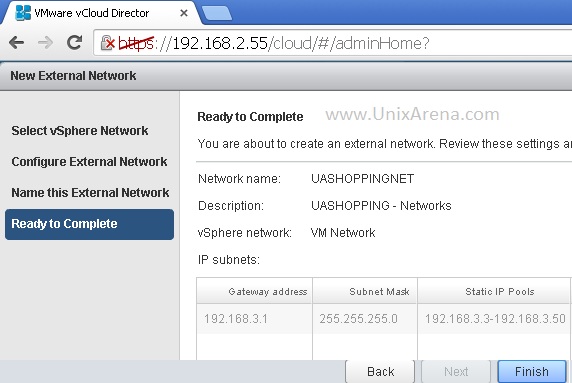
Exadata Storage Cell – Administrating the Disks – Part 5

$
0
0

Exadata Storage server uses the cell software to manage the disks. Like volume manager, we need to build couple of virtual layers to get the grid disks.These griddisk will be used  to create the ASM disk group on the database level . In this article, we will see that how we can create/delete the celldisk, griddisk,flashcache & flashlog using the  cellcli utility as well as Linux command line.As i said earlier, we can also use flash disk to create the griddisks for high write intensive databases. But in most of the cases, we will be using those flash disks for flashcache and flashlog purposes due to the storage limitation.

Exadata Storage Architecture

The below diagram will explain that how the virtual storage objects are built on exadata storage server .

Exadata storage cell disks

Exadata storage cell disks


1. Login to the  exadata storage server celladmin and start cellcli utility.

[celladmin@uaexacell1 ~]$ id
uid=1000(celladmin) gid=500(celladmin) groups=500(celladmin),502(cellusers)
[celladmin@uaexacell1 ~]$ cellcli
CellCLI: Release 11.2.3.2.1 - Production on Sun Nov 16 22:19:23 GMT+05:30 2014

Copyright (c) 2007, 2012, Oracle.  All rights reserved.
Cell Efficiency Ratio: 1

CellCLI>

2.List the physical disks. It lists all the attached harddisks and flash drives.

CellCLI> list physicaldisk
         /opt/oracle/cell11.2.3.2.1_LINUX.X64_130109/disks/raw/DISK00    /opt/oracle/cell11.2.3.2.1_LINUX.X64_130109/disks/raw/DISK00    normal
         /opt/oracle/cell11.2.3.2.1_LINUX.X64_130109/disks/raw/DISK01    /opt/oracle/cell11.2.3.2.1_LINUX.X64_130109/disks/raw/DISK01    normal
         /opt/oracle/cell11.2.3.2.1_LINUX.X64_130109/disks/raw/DISK02    /opt/oracle/cell11.2.3.2.1_LINUX.X64_130109/disks/raw/DISK02    normal
         /opt/oracle/cell11.2.3.2.1_LINUX.X64_130109/disks/raw/DISK03    /opt/oracle/cell11.2.3.2.1_LINUX.X64_130109/disks/raw/DISK03    normal
         /opt/oracle/cell11.2.3.2.1_LINUX.X64_130109/disks/raw/DISK04    /opt/oracle/cell11.2.3.2.1_LINUX.X64_130109/disks/raw/DISK04    normal
         /opt/oracle/cell11.2.3.2.1_LINUX.X64_130109/disks/raw/DISK05    /opt/oracle/cell11.2.3.2.1_LINUX.X64_130109/disks/raw/DISK05    normal
         /opt/oracle/cell11.2.3.2.1_LINUX.X64_130109/disks/raw/DISK06    /opt/oracle/cell11.2.3.2.1_LINUX.X64_130109/disks/raw/DISK06    normal
         /opt/oracle/cell11.2.3.2.1_LINUX.X64_130109/disks/raw/DISK07    /opt/oracle/cell11.2.3.2.1_LINUX.X64_130109/disks/raw/DISK07    normal
         /opt/oracle/cell11.2.3.2.1_LINUX.X64_130109/disks/raw/DISK08    /opt/oracle/cell11.2.3.2.1_LINUX.X64_130109/disks/raw/DISK08    normal
         /opt/oracle/cell11.2.3.2.1_LINUX.X64_130109/disks/raw/DISK09    /opt/oracle/cell11.2.3.2.1_LINUX.X64_130109/disks/raw/DISK09    normal
         /opt/oracle/cell11.2.3.2.1_LINUX.X64_130109/disks/raw/DISK10    /opt/oracle/cell11.2.3.2.1_LINUX.X64_130109/disks/raw/DISK10    normal
         /opt/oracle/cell11.2.3.2.1_LINUX.X64_130109/disks/raw/DISK11    /opt/oracle/cell11.2.3.2.1_LINUX.X64_130109/disks/raw/DISK11    normal
         /opt/oracle/cell11.2.3.2.1_LINUX.X64_130109/disks/raw/DISK12    /opt/oracle/cell11.2.3.2.1_LINUX.X64_130109/disks/raw/DISK12    normal
         /opt/oracle/cell11.2.3.2.1_LINUX.X64_130109/disks/raw/DISK13    /opt/oracle/cell11.2.3.2.1_LINUX.X64_130109/disks/raw/DISK13    normal
         /opt/oracle/cell11.2.3.2.1_LINUX.X64_130109/disks/raw/FLASH00   /opt/oracle/cell11.2.3.2.1_LINUX.X64_130109/disks/raw/FLASH00   normal
         /opt/oracle/cell11.2.3.2.1_LINUX.X64_130109/disks/raw/FLASH01   /opt/oracle/cell11.2.3.2.1_LINUX.X64_130109/disks/raw/FLASH01   normal
         /opt/oracle/cell11.2.3.2.1_LINUX.X64_130109/disks/raw/FLASH02   /opt/oracle/cell11.2.3.2.1_LINUX.X64_130109/disks/raw/FLASH02   normal
         /opt/oracle/cell11.2.3.2.1_LINUX.X64_130109/disks/raw/FLASH03   /opt/oracle/cell11.2.3.2.1_LINUX.X64_130109/disks/raw/FLASH03   normal
         /opt/oracle/cell11.2.3.2.1_LINUX.X64_130109/disks/raw/FLASH04   /opt/oracle/cell11.2.3.2.1_LINUX.X64_130109/disks/raw/FLASH04   normal
         /opt/oracle/cell11.2.3.2.1_LINUX.X64_130109/disks/raw/FLASH05   /opt/oracle/cell11.2.3.2.1_LINUX.X64_130109/disks/raw/FLASH05   normal
         /opt/oracle/cell11.2.3.2.1_LINUX.X64_130109/disks/raw/FLASH06   /opt/oracle/cell11.2.3.2.1_LINUX.X64_130109/disks/raw/FLASH06   normal
         /opt/oracle/cell11.2.3.2.1_LINUX.X64_130109/disks/raw/FLASH07   /opt/oracle/cell11.2.3.2.1_LINUX.X64_130109/disks/raw/FLASH07   normal
         /opt/oracle/cell11.2.3.2.1_LINUX.X64_130109/disks/raw/FLASH08   /opt/oracle/cell11.2.3.2.1_LINUX.X64_130109/disks/raw/FLASH08   normal
         /opt/oracle/cell11.2.3.2.1_LINUX.X64_130109/disks/raw/FLASH09   /opt/oracle/cell11.2.3.2.1_LINUX.X64_130109/disks/raw/FLASH09   normal
         /opt/oracle/cell11.2.3.2.1_LINUX.X64_130109/disks/raw/FLASH10   /opt/oracle/cell11.2.3.2.1_LINUX.X64_130109/disks/raw/FLASH10   normal
         /opt/oracle/cell11.2.3.2.1_LINUX.X64_130109/disks/raw/FLASH11   /opt/oracle/cell11.2.3.2.1_LINUX.X64_130109/disks/raw/FLASH11   normal
         /opt/oracle/cell11.2.3.2.1_LINUX.X64_130109/disks/raw/FLASH12   /opt/oracle/cell11.2.3.2.1_LINUX.X64_130109/disks/raw/FLASH12   normal
         /opt/oracle/cell11.2.3.2.1_LINUX.X64_130109/disks/raw/FLASH13   /opt/oracle/cell11.2.3.2.1_LINUX.X64_130109/disks/raw/FLASH13   normal

CellCLI>

3.Check the existing celldisks.

CellCLI> LIST CELLDISK

CellCLI>

4. Create the celldisks on all disks. (we  normally do this)

CellCLI> CREATE CELLDISK ALL
CellDisk CD_DISK00_uaexacell1 successfully created
CellDisk CD_DISK01_uaexacell1 successfully created
CellDisk CD_DISK02_uaexacell1 successfully created
CellDisk CD_DISK03_uaexacell1 successfully created
CellDisk CD_DISK04_uaexacell1 successfully created
CellDisk CD_DISK05_uaexacell1 successfully created
CellDisk CD_DISK06_uaexacell1 successfully created
CellDisk CD_DISK07_uaexacell1 successfully created
CellDisk CD_DISK08_uaexacell1 successfully created
CellDisk CD_DISK09_uaexacell1 successfully created
CellDisk CD_DISK10_uaexacell1 successfully created
CellDisk CD_DISK11_uaexacell1 successfully created
CellDisk CD_DISK12_uaexacell1 successfully created
CellDisk CD_DISK13_uaexacell1 successfully created
CellDisk FD_00_uaexacell1 successfully created
CellDisk FD_01_uaexacell1 successfully created
CellDisk FD_02_uaexacell1 successfully created
CellDisk FD_03_uaexacell1 successfully created
CellDisk FD_04_uaexacell1 successfully created
CellDisk FD_05_uaexacell1 successfully created
CellDisk FD_06_uaexacell1 successfully created
CellDisk FD_07_uaexacell1 successfully created
CellDisk FD_08_uaexacell1 successfully created
CellDisk FD_09_uaexacell1 successfully created
CellDisk FD_10_uaexacell1 successfully created
CellDisk FD_11_uaexacell1 successfully created
CellDisk FD_12_uaexacell1 successfully created
CellDisk FD_13_uaexacell1 successfully created

CellCLI> LIST CELLDISK
         CD_DISK00_uaexacell1    normal
         CD_DISK01_uaexacell1    normal
         CD_DISK02_uaexacell1    normal
         CD_DISK03_uaexacell1    normal
         CD_DISK04_uaexacell1    normal
         CD_DISK05_uaexacell1    normal
         CD_DISK06_uaexacell1    normal
         CD_DISK07_uaexacell1    normal
         CD_DISK08_uaexacell1    normal
         CD_DISK09_uaexacell1    normal
         CD_DISK10_uaexacell1    normal
         CD_DISK11_uaexacell1    normal
         CD_DISK12_uaexacell1    normal
         CD_DISK13_uaexacell1    normal
         FD_00_uaexacell1        normal
         FD_01_uaexacell1        normal
         FD_02_uaexacell1        normal
         FD_03_uaexacell1        normal
         FD_04_uaexacell1        normal
         FD_05_uaexacell1        normal
         FD_06_uaexacell1        normal
         FD_07_uaexacell1        normal
         FD_08_uaexacell1        normal
         FD_09_uaexacell1        normal
         FD_10_uaexacell1        normal
         FD_11_uaexacell1        normal
         FD_12_uaexacell1        normal
         FD_13_uaexacell1        normal

CellCLI>

We have successfully created the celldisks on all the harddisks and flashdisks. This is one time activity and you no need to perform celldisk creation unless you replace any faulty drives.

5.To create the griddisk on all the harddisks , use the below command.

CellCLI> create griddisk ALL HARDDISK  PREFIX=CD_DISK
GridDisk CD_DISK_CD_DISK00_uaexacell1 successfully created
GridDisk CD_DISK_CD_DISK01_uaexacell1 successfully created
GridDisk CD_DISK_CD_DISK02_uaexacell1 successfully created
GridDisk CD_DISK_CD_DISK03_uaexacell1 successfully created
GridDisk CD_DISK_CD_DISK04_uaexacell1 successfully created
GridDisk CD_DISK_CD_DISK05_uaexacell1 successfully created
GridDisk CD_DISK_CD_DISK06_uaexacell1 successfully created
GridDisk CD_DISK_CD_DISK07_uaexacell1 successfully created
GridDisk CD_DISK_CD_DISK08_uaexacell1 successfully created
GridDisk CD_DISK_CD_DISK09_uaexacell1 successfully created
GridDisk CD_DISK_CD_DISK10_uaexacell1 successfully created
GridDisk CD_DISK_CD_DISK11_uaexacell1 successfully created
GridDisk CD_DISK_CD_DISK12_uaexacell1 successfully created
GridDisk CD_DISK_CD_DISK13_uaexacell1 successfully created

CellCLI>

6.If you want to create the griddisk with specific size & name,  use the below syntax,

CellCLI> CREATE GRIDDISK DATA01_DG celldisk = CD_DISK00_uaexacell1, size =100M
GridDisk DATA01_DG successfully created

CellCLI> list griddisk
         DATA01_DG       active

CellCLI> list griddisk detail
         name:                   DATA01_DG
         availableTo:
         cachingPolicy:          default
         cellDisk:               CD_DISK00_uaexacell1
         comment:
         creationTime:           2014-11-16T22:27:50+05:30
         diskType:               HardDisk
         errorCount:             0
         id:                     d681708b-9717-41fc-afad-78d61ca2f476
         offset:                 48M
         size:                   96M
         status:                 active

CellCLI>

If you are having the Exadata quarter rack , you need to create the same size grid disks on all the exadata storage cells. Oracle ASM will mirror across all the cell nodes for redundancy. When Database requires the additional space , its highly recommended to create the griddisk with existing griddisk size.

7.How to delete the griddisk ? Drop (delete) the specific griddisk using the below syntax

CellCLI>  list griddisk DATA01_DG
         DATA01_DG       active

CellCLI> drop  griddisk DATA01_DG
GridDisk DATA01_DG successfully dropped

CellCLI>  list griddisk DATA01_DG

CELL-02007: Grid disk does not exist: DATA01_DG
CellCLI>

8.You can also drop the bunch of grid disks using the prefix.Please see the below syntax.

CellCLI> list griddisk
         CD_DISK_CD_DISK00_uaexacell1    active
         CD_DISK_CD_DISK01_uaexacell1    active
         CD_DISK_CD_DISK02_uaexacell1    active
         CD_DISK_CD_DISK03_uaexacell1    active
         CD_DISK_CD_DISK04_uaexacell1    active
         CD_DISK_CD_DISK05_uaexacell1    active
         CD_DISK_CD_DISK06_uaexacell1    active
         CD_DISK_CD_DISK07_uaexacell1    active
         CD_DISK_CD_DISK08_uaexacell1    active
         CD_DISK_CD_DISK09_uaexacell1    active
         CD_DISK_CD_DISK10_uaexacell1    active
         CD_DISK_CD_DISK11_uaexacell1    active
         CD_DISK_CD_DISK12_uaexacell1    active
         CD_DISK_CD_DISK13_uaexacell1    active

CellCLI> drop griddisk all prefix=CD_DISK
GridDisk CD_DISK_CD_DISK00_uaexacell1 successfully dropped
GridDisk CD_DISK_CD_DISK01_uaexacell1 successfully dropped
GridDisk CD_DISK_CD_DISK02_uaexacell1 successfully dropped
GridDisk CD_DISK_CD_DISK03_uaexacell1 successfully dropped
GridDisk CD_DISK_CD_DISK04_uaexacell1 successfully dropped
GridDisk CD_DISK_CD_DISK05_uaexacell1 successfully dropped
GridDisk CD_DISK_CD_DISK06_uaexacell1 successfully dropped
GridDisk CD_DISK_CD_DISK07_uaexacell1 successfully dropped
GridDisk CD_DISK_CD_DISK08_uaexacell1 successfully dropped
GridDisk CD_DISK_CD_DISK09_uaexacell1 successfully dropped
GridDisk CD_DISK_CD_DISK10_uaexacell1 successfully dropped
GridDisk CD_DISK_CD_DISK11_uaexacell1 successfully dropped
GridDisk CD_DISK_CD_DISK12_uaexacell1 successfully dropped
GridDisk CD_DISK_CD_DISK13_uaexacell1 successfully dropped

CellCLI>

The above command deletes the griddisk which name starts from “CD_DISK”.

9. How to drop specific celldisk ? Drop  the specific celldisk using the below syntax.

CellCLI> list celldisk CD_DISK00_uaexacell1
         CD_DISK00_uaexacell1    normal

CellCLI> drop celldisk CD_DISK00_uaexacell1
CellDisk CD_DISK00_uaexacell1 successfully dropped

CellCLI> list celldisk CD_DISK00_uaexacell1

CELL-02525: Unknown cell disk: CD_DISK00_uaexacell1

CellCLI>

 Playing the Flashdisks

1. List the flashdisks

CellCLI> LIST CELLDISK where disktype=flashdisk
         FD_00_uaexacell1        normal
         FD_01_uaexacell1        normal
         FD_02_uaexacell1        normal
         FD_03_uaexacell1        normal
         FD_04_uaexacell1        normal
         FD_05_uaexacell1        normal
         FD_06_uaexacell1        normal
         FD_07_uaexacell1        normal
         FD_08_uaexacell1        normal
         FD_09_uaexacell1        normal
         FD_10_uaexacell1        normal
         FD_11_uaexacell1        normal
         FD_12_uaexacell1        normal
         FD_13_uaexacell1        normal

CellCLI>

Flashdisks will commonly used to create the flashcache and flashlog.

Exadata Flashdisk

Exadata Flashdisk

2.Configuring  specific  flashdisks as flashlog.

CellCLI>  CREATE FLASHLOG celldisk='FD_00_uaexacell1,FD_01_uaexacell1' , SIZE=100M
Flash log uaexacell1_FLASHLOG successfully created

CellCLI> LIST FLASHLOG
         uaexacell1_FLASHLOG     normal

CellCLI> LIST FLASHLOG DETAIL
         name:                   uaexacell1_FLASHLOG
         cellDisk:               FD_00_uaexacell1,FD_01_uaexacell1
         creationTime:           2014-11-16T23:02:50+05:30
         degradedCelldisks:
         effectiveSize:          96M
         efficiency:             100.0
         id:                     a12265f9-f80b-491b-a0e5-518b2143eede
         size:                   96M
         status:                 normal

CellCLI>

3.Configuring flashcache on specific flashdisks.

CellCLI> CREATE FLASHCACHE celldisk='FD_03_uaexacell1,FD_04_uaexacell1' , SIZE=100M
Flash cache uaexacell1_FLASHCACHE successfully created

CellCLI> LIST FLASHCACHE
         uaexacell1_FLASHCACHE   normal

CellCLI> LIST FLASHCACHE DETAIL
         name:                   uaexacell1_FLASHCACHE
         cellDisk:               FD_04_uaexacell1,FD_03_uaexacell1
         creationTime:           2014-11-16T23:04:50+05:30
         degradedCelldisks:
         effectiveCacheSize:     96M
         id:                     fe936779-abfc-4b70-a0d0-5146523cef48
         size:                   96M
         status:                 normal

CellCLI>

4.Deleting the flashlog.

CellCLI> DROP FLASHLOG
Flash log uaexacell1_FLASHLOG successfully dropped

CellCLI> LIST FLASHLOG

CellCLI>

5.Deleting the flashcache.

CellCLI> LIST FLASHCACHE
         uaexacell1_FLASHCACHE   normal

CellCLI> DROP FLASHCACHE
Flash cache uaexacell1_FLASHCACHE successfully dropped

CellCLI> LIST FLASHCACHE

CellCLI>

We need to invoke cellcli utility to manage the virtual storage objects. Is it possible manage the storage from command line ? Yes. You can manage the storage from linux command line. The below example will show that all the cellcli commands can be executed from the command line.you need to provide the command along with “cellcli -e” .

[celladmin@uaexacell1 ~]$  cellcli -e create griddisk all harddisk  prefix=UADB
GridDisk UADB_CD_DISK01_uaexacell1 successfully created
GridDisk UADB_CD_DISK02_uaexacell1 successfully created
GridDisk UADB_CD_DISK03_uaexacell1 successfully created
GridDisk UADB_CD_DISK04_uaexacell1 successfully created
GridDisk UADB_CD_DISK05_uaexacell1 successfully created
GridDisk UADB_CD_DISK06_uaexacell1 successfully created
GridDisk UADB_CD_DISK07_uaexacell1 successfully created
GridDisk UADB_CD_DISK08_uaexacell1 successfully created
GridDisk UADB_CD_DISK09_uaexacell1 successfully created
GridDisk UADB_CD_DISK10_uaexacell1 successfully created
GridDisk UADB_CD_DISK11_uaexacell1 successfully created
GridDisk UADB_CD_DISK12_uaexacell1 successfully created
GridDisk UADB_CD_DISK13_uaexacell1 successfully created
[celladmin@uaexacell1 ~]$  cellcli -e list griddisk where disktype=harddisk
         UADB_CD_DISK01_uaexacell1       active
         UADB_CD_DISK02_uaexacell1       active
         UADB_CD_DISK03_uaexacell1       active
         UADB_CD_DISK04_uaexacell1       active
         UADB_CD_DISK05_uaexacell1       active
         UADB_CD_DISK06_uaexacell1       active
         UADB_CD_DISK07_uaexacell1       active
         UADB_CD_DISK08_uaexacell1       active
         UADB_CD_DISK09_uaexacell1       active
         UADB_CD_DISK10_uaexacell1       active
         UADB_CD_DISK11_uaexacell1       active
         UADB_CD_DISK12_uaexacell1       active
         UADB_CD_DISK13_uaexacell1       active
[celladmin@uaexacell1 ~]$

Hope this article is informative to you.  Share it ! Comment it ! Be Sociable !!!

The post Exadata Storage Cell – Administrating the Disks – Part 5 appeared first on UnixArena.
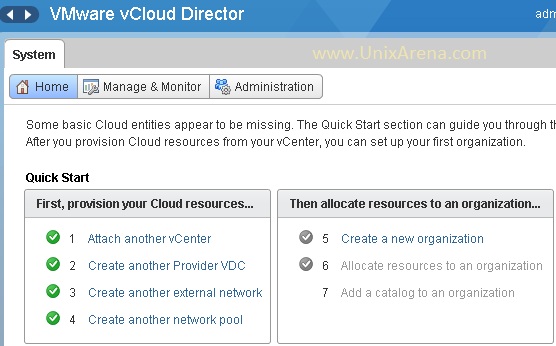
Exadata – Distributed Command-Line Utility (dcli) – Part 6

$
0
0

Distributed command line utility(dcli) provides an option to execute the monitoring and administration commands on multiple servers simultaneously.In exadata database  machine , you may need to create the griddisks on all the exadata storage cells frequently. Each time , you need to login to all the storage cells and create the griddisk manually.But dcli will make our life easier once you configured  the all the storage cells on any one of the storage cell or on the database node. In this article ,we will see how to configure the dcli on multiple storage cells.

It’s good to configure the dcli on the database server. So that  you no need to login to exadata storage cells for each grid disk creation/drop.

1. Login to the database server or any one of the exadata storage cell.Make sure all the exadata stroage cells has been added to the /etc/hosts file.

[root@uaexacell1 ~]# cat /etc/hosts
# Do not remove the following line, or various programs
# that require network functionality will fail.
127.0.0.1               localhost.localdomain localhost
192.168.2.50            uaexacell1
192.168.2.51            uaexacell2
192.168.2.52            uaexacell3
[root@uaexacell1 ~]#

2. Create the file with all the exadata storage cell .

[root@uaexacell1 ~]# cat << END >> exacells
> uaexacell1
> uaexacell2
> uaexacell3
> END
[root@uaexacell1 ~]#
[root@uaexacell1 ~]# cat exacells
uaexacell1
uaexacell2
uaexacell3
[root@uaexacell1 ~]#

3.Create the ssh key for the host.

[root@uaexacell1 ~]# ssh-keygen -t rsa
Generating public/private rsa key pair.
Enter file in which to save the key (/root/.ssh/id_rsa):
Created directory '/root/.ssh'.
Enter passphrase (empty for no passphrase):
Enter same passphrase again:
Your identification has been saved in /root/.ssh/id_rsa.
Your public key has been saved in /root/.ssh/id_rsa.pub.
The key fingerprint is:
15:ac:fb:66:8b:5f:32:09:dd:b9:e7:ca:6c:ef:6b:b4 root@uaexacell1
[root@uaexacell1 ~]#

4.Execute the below command to make the password less login for all the hosts which we have added in exacells file. DCLI Utility configures the password less authentication across the nodes using ssh .

[root@uaexacell1 ~]# dcli -g exacells -k
The authenticity of host 'uaexacell1 (192.168.2.50)' can't be established.
RSA key fingerprint is e6:e9:4f:d1:a0:05:eb:38:d5:bf:5b:fb:2a:5f:2c:b7.
Are you sure you want to continue connecting (yes/no)? yes
Warning: Permanently added 'uaexacell1,192.168.2.50' (RSA) to the list of known hosts.
celladmin@uaexacell1's password:
celladmin@uaexacell2's password:
celladmin@uaexacell3's password:
uaexacell1: ssh key added
uaexacell2: ssh key added
uaexacell3: ssh key added
[root@uaexacell1 ~]#

We have successfully configured the dcli utility on all the exadata storage cells. Now we can monitor & administrate cells nodes from the current host.

5.Let me check the status of the all exadata cells.

[root@uaexacell1 ~]# dcli -g exacells cellcli -e list cell
uaexacell1: uaexacell1   online
uaexacell2: uaexacell1   online
uaexacell3: uaexacell1   online
[root@uaexacell1 ~]#

6.Create the griddisk on all the exadata storage node using the dcli utility.

[root@uaexacell1 ~]# dcli -g exacells cellcli -e list celldisk where disktype=harddisk
uaexacell1: CD_DISK01_uaexacell1         normal
uaexacell1: CD_DISK02_uaexacell1         normal
uaexacell1: CD_DISK03_uaexacell1         normal
uaexacell1: CD_DISK04_uaexacell1         normal
uaexacell1: CD_DISK05_uaexacell1         normal
uaexacell1: CD_DISK06_uaexacell1         normal
uaexacell1: CD_DISK07_uaexacell1         normal
uaexacell1: CD_DISK08_uaexacell1         normal
uaexacell1: CD_DISK09_uaexacell1         normal
uaexacell1: CD_DISK10_uaexacell1         normal
uaexacell1: CD_DISK11_uaexacell1         normal
uaexacell1: CD_DISK12_uaexacell1         normal
uaexacell1: CD_DISK13_uaexacell1         normal
uaexacell2: CD_DISK01_uaexacell1         normal
uaexacell2: CD_DISK02_uaexacell1         normal
uaexacell2: CD_DISK03_uaexacell1         normal
uaexacell2: CD_DISK04_uaexacell1         normal
uaexacell2: CD_DISK05_uaexacell1         normal
uaexacell2: CD_DISK06_uaexacell1         normal
uaexacell2: CD_DISK07_uaexacell1         normal
uaexacell2: CD_DISK08_uaexacell1         normal
uaexacell2: CD_DISK09_uaexacell1         normal
uaexacell2: CD_DISK10_uaexacell1         normal
uaexacell2: CD_DISK11_uaexacell1         normal
uaexacell2: CD_DISK12_uaexacell1         normal
uaexacell2: CD_DISK13_uaexacell1         normal
uaexacell3: CD_DISK01_uaexacell1         normal
uaexacell3: CD_DISK02_uaexacell1         normal
uaexacell3: CD_DISK03_uaexacell1         normal
uaexacell3: CD_DISK04_uaexacell1         normal
uaexacell3: CD_DISK05_uaexacell1         normal
uaexacell3: CD_DISK06_uaexacell1         normal
uaexacell3: CD_DISK07_uaexacell1         normal
uaexacell3: CD_DISK08_uaexacell1         normal
uaexacell3: CD_DISK09_uaexacell1         normal
uaexacell3: CD_DISK10_uaexacell1         normal
uaexacell3: CD_DISK11_uaexacell1         normal
uaexacell3: CD_DISK12_uaexacell1         normal
uaexacell3: CD_DISK13_uaexacell1         normal
[root@uaexacell1 ~]# 
[root@uaexacell1 ~]#  dcli -g exacells cellcli -e create griddisk HRDB celldisk=CD_DISK01_uaexacell1, size=100M
uaexacell1: GridDisk HRDB successfully created
uaexacell2: GridDisk HRDB successfully created
uaexacell3: GridDisk HRDB successfully created
[root@uaexacell1 ~]#
[root@uaexacell1 ~]#  dcli -g exacells cellcli -e list griddisk HRDB detail
uaexacell1: name:                HRDB
uaexacell1: availableTo:
uaexacell1: cachingPolicy:       default
uaexacell1: cellDisk:            CD_DISK01_uaexacell1
uaexacell1: comment:
uaexacell1: creationTime:        2014-11-17T15:46:43+05:30
uaexacell1: diskType:            HardDisk
uaexacell1: errorCount:          0
uaexacell1: id:                  3bf213a3-dafc-41b7-b133-5580dd04c334
uaexacell1: offset:              48M
uaexacell1: size:                96M
uaexacell1: status:              active
uaexacell2: name:                HRDB
uaexacell2: availableTo:
uaexacell2: cachingPolicy:       default
uaexacell2: cellDisk:            CD_DISK01_uaexacell1
uaexacell2: comment:
uaexacell2: creationTime:        2014-11-17T15:46:43+05:30
uaexacell2: diskType:            HardDisk
uaexacell2: errorCount:          0
uaexacell2: id:                  21014da6-6e17-4ca1-a7dc-cc059bd75654
uaexacell2: offset:              48M
uaexacell2: size:                96M
uaexacell2: status:              active
uaexacell3: name:                HRDB
uaexacell3: availableTo:
uaexacell3: cachingPolicy:       default
uaexacell3: cellDisk:            CD_DISK01_uaexacell1
uaexacell3: comment:
uaexacell3: creationTime:        2014-11-17T15:46:43+05:30
uaexacell3: diskType:            HardDisk
uaexacell3: errorCount:          0
uaexacell3: id:                  3821ce2c-4376-4674-8cb4-6c8868b5b1f9
uaexacell3: offset:              48M
uaexacell3: size:                96M
uaexacell3: status:              active
[root@uaexacell1 ~]#

You can also use the dcli command without having the hosts file.

[root@uaexacell1 ~]# dcli -c uaexacell1,uaexacell2,uaexacell3 cellcli -e drop griddisk HRDB
uaexacell1: GridDisk HRDB successfully dropped
uaexacell2: GridDisk HRDB successfully dropped
uaexacell3: GridDisk HRDB successfully dropped
[root@uaexacell1 ~]#

Hope this article is informative to you .

Thank you for visiting UnixArena

The post Exadata – Distributed Command-Line Utility (dcli) – Part 6 appeared first on UnixArena.
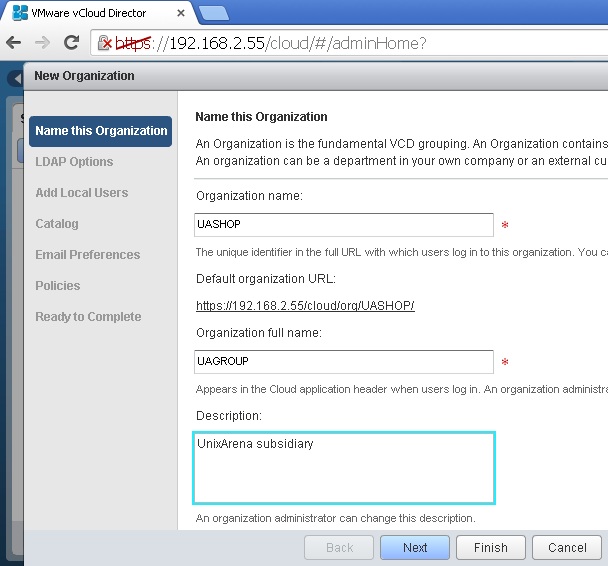

Exadata Storage Cell Commands Cheat Sheet

$
0
0

It is not an easy to remember the commands since most of the UNIX administrators are working on multiple Operating systems and different  OS flavors. Exadata and ZFS appliance are adding additional responsibility to Unix administrator and need to remember those appliance commands as well. This article will provide the reference to all Exadata storage cell commands with examples for some complex command options.

All the below mentioned commands will work only on cellcli prompt.

Listing the Exadata Storage cell Objects (LIST)

CommandDescriptionExamples
cellcliTo Manage the Exadata  cell Storage[root@uaexacell1 init.d]# cellcli
CellCLI: Release 11.2.3.2.1 – Production on Tue Nov 18 02:16:03 GMT+05:30 2014
Copyright (c) 2007, 2012, Oracle.  All rights reserved.
Cell Efficiency Ratio: 1CellCLI>
LIST CELLList the Cell StatusCellCLI> LIST CELL
uaexacell1      online
CellCLI>
LIST LUNTo list all the physical Drive & Flash drives
LIST PHYSICALDISKTo list all the physical Drive & Flash drives
 LIST LUN where celldisk = <celldisk>To list the LUN which is mapped to specific diskCellCLI> LIST LUN where celldisk = FD_13_uaexacell1
FLASH13  FLASH13   normal
LIST CELL DETAILList the cell Status with all attributesCellCLI> LIST CELL DETAIL
name:                   uaexacell1
bbuTempThreshold:       60
bbuChargeThreshold:     800
bmcType:                absent
LIST CELL attributes  <attribute>To list the specific cell attributesCellCLI> LIST CELL attributes flashCacheMode
WriteThrough
LIST CELLDISKList all the cell DisksCellCLI> LIST CELLDISK
CD_DISK00_uaexacell1    normal
CD_DISK01_uaexacell1    normal
LIST CELLDISK DETAILList all the cell Disks with Detailed informationCellCLI> LIST CELLDISK detail
name:                   FD_13_uaexacell1
comment:
creationTime:           2014-11-15T01:46:57+05:30
deviceName:             0_0
devicePartition:        0_0
diskType:               FlashDisk
LIST CELLDISK <CELLDISK> detailTO list the Specific celldisk detailCellCLI>  LIST CELLDISK FD_00_uaexacell1 detail
name:                   FD_00_uaexacell1
comment:
creationTime:           2014-11-15T01:46:56+05:30
LIST CELLDISK where disktype=harddiskTo list the celldisk which are created using harddiskCellCLI> LIST CELLDISK where disktype=harddisk
CD_DISK00_uaexacell1    normal
CD_DISK01_uaexacell1    normal
CD_DISK02_uaexacell1    normal
LIST CELLDISK where disktype=flashdiskTo list the celldisk which are created using FlashdiskCellCLI> LIST CELLDISK where disktype=flashdisk
FD_00_uaexacell1        normal
FD_01_uaexacell1        normal
FD_02_uaexacell1        normal
LIST CELLDISK where freespace > SIZETo list the celldisks which has more than specificed sizeCellCLI>  LIST CELLDISK where freespace > 50M
FD_00_uaexacell1        normal
FD_01_uaexacell1        normal
LIST FLASHCACHETo list the configured FLASHCACHE
LIST FLASHCACHE DETAILTo list the configured FLASHCACHE in detail
LIST FLASHLOGTo list the configured FLASHLOG
LIST FLASHLOG DETAILTo list the configured FLASHLOG in detail
LIST FLASHCACHECONTENTTo list the Flashcache content
LIST GRIDDISKTo list the griddisksCellCLI> LIST GRIDDISK
DATA01_CD_DISK00_uaexacell1     active
DATA01_CD_DISK01_uaexacell1     active
LIST GRIDDISK DETAILTo list the griddisks in detailCellCLI>  LIST GRIDDISK DETAIL
name:                   DATA01_CD_DISK00_uaexacell1
availableTo:
cachingPolicy:          default
cellDisk:               CD_DISK00_uaexacell1
LIST GRIDDISK <GRIDDISK_NAME>To list the specific GriddiskCellCLI> LIST GRIDDISK DATA01_CD_DISK00_uaexacell1
DATA01_CD_DISK00_uaexacell1     active
LIST GRIDDISK <GRIDDISK_NAME> detailTo list the specific Griddisk in detailCellCLI>  LIST GRIDDISK DATA01_CD_DISK00_uaexacell1 detail
name:                   DATA01_CD_DISK00_uaexacell1
availableTo:
cachingPolicy:          default
cellDisk:               CD_DISK00_uaexacell1
LIST GRIDDISK where size > SIZETo list the griddisk which size is higher than specified valueCellCLI> LIST GRIDDISK where size > 750M
DATA01_CD_DISK00_uaexacell1     active
LIST IBPORTTo list the inifiniband Port
LIST IORMPLANTo list the IORMPLANCellCLI> LIST IORMPLAN
uaexacell1_IORMPLAN     active
LIST IORMPLAN DETAILTo list the IORMPLAN  in DETAILCellCLI> LIST IORMPLAN DETAIL
name:                   uaexacell1_IORMPLAN
catPlan:
dbPlan:
objective:              basic
status:                 active
LIST METRICCURRENTTo get the I/O’s second for all the objectsCellCLI>  LIST METRICCURRENT
CD_BY_FC_DIRTY                  CD_DISK00_uaexacell1                            0.000 MB
CD_BY_FC_DIRTY                  CD_DISK01_uaexacell1                            0.000 MB
CD_BY_FC_DIRTY                  CD_DISK02_uaexacell1                            0.000 MB
CD_BY_FC_DIRTY                  CD_DISK03_uaexacell1                            0.000 MB
LIST METRICCURRENT cl_cput, cl_runq detailTo list the RUNQCellCLI> list metriccurrent cl_cput, cl_runq detail
name:                   CL_CPUT
alertState:             normal
collectionTime:         2014-11-18T02:42:26+05:30
metricObjectName:       uaexacell1
metricType:             Instantaneous
metricValue:            4.7 %
objectType:             CELLname:                   CL_RUNQ
alertState:             normal
collectionTime:         2014-11-18T02:42:26+05:30
metricObjectName:       uaexacell1
metricType:             Instantaneous
metricValue:            12.2
objectType:             CELL
LIST QUARANTINETo list the QUARANTINE disk
LIST QUARANTINE detailTo list the QUARANTINE disk in detail
 LIST THRESHOLDTo list the thersold limits
LIST THRESHOLD DETAILTo list the thersold limits in detail
LIST ACTIVEREQUESTTo list the active Requests
LIST ALERTHISTORYTo list the alerts

CREATING the Exadata Storage cell Objects (CREATE)

The below commands will be used most commonly on exadata storage to create the virtual objects.

CREATE CELL  <CELL_NAME> interconnect1=<ethx>Configures the cell networkCellCLI> CREATE CELL uaexacell1  interconnect1=eth1
Cell uaexacell1 successfully created
Starting CELLSRV services…
The STARTUP of CELLSRV services was successful.
Flash cell disks, FlashCache, and FlashLog will be created.
CREATE CELLDISK <CELLDISK_NAME>  <LUN>Creates cell disk(s) according to attributes provided. CREATE CELLDISK UADBG1  LUN=00_00
CREATE CELLDISK ALL HARDISKCreates cell disk(s) on all the harddisksCellCLI> CREATE CELLDISK ALL HARDDISK
CellDisk CD_DISK00_uaexacell1 successfully created
CellDisk CD_DISK01_uaexacell1 successfully created
CellDisk CD_DISK02_uaexacell1 successfully created
CREATE CELLDISK ALLCreates cell disk(s) on all the harddisks & flashdisksCellCLI> CREATE CELLDISK ALL
CellDisk CD_DISK00_uaexacell1 successfully created
CREATE CELLDISK ALL FLASHDISKCreates cell disk(s) on all the  flashdisksCellCLI> CREATE CELLDISK ALL FLASHDISK
CellDisk FD_00_uaexacell1 successfully created
CREATE FLASHCACHE celldisk=”Flash_celldisk1″Creates flash cache for IO requests on specific flashdiskCellCLI> CREATE FLASHCACHE celldisk=”FD_00_uaexacell1,FD_01_uaexacell1″, size=500M
CREATE FLASHCACHE  ALL size = <size>Creates flash cache for IO requests on all devices
with specific size
CREATE FLASHCACHE  ALL size = 10G
CREATE FLASHLOG  celldisk=”Flash_celldisk1″Creates flash log for logging requests on specified flashdiskCellCLI> CREATE FLASHLOG celldisk=”FD_00_uaexacell1,FD_01_uaexacell1″, size=500M
CREATE FLASHLOG  ALL size = <size>Creates flash log for logging requests on all devices
with specific size
CREATE FLASHLOG  ALL size = 252M
CREATE GRIDDISK  <GRIDDISK_NAME> CELLDISK=<celldisk>Creates grid disk on specific diskCellCLI> CREATE GRIDDISK UADBDK1 CELLDISK=CD_DISK00_uaexacell1
GridDisk UADBDK1 successfully created
CellCLI>
CREATE GRIDDISK  <GRIDDISK_NAME> CELLDISK=<celldisk>, size=<size>Creates grid disk  on specific disk with specific sizeCellCLI> CREATE GRIDDISK UADBDK2 CELLDISK=CD_DISK02_uaexacell1, SIZE=100M
GridDisk UADBDK2 successfully created
CellCLI>
CREATE GRIDDISK ALL  HARDDISK PREFIX=<Disk_Name>, size=<size>Create Grid disks on all the harddisk with specific size.CellCLI> CREATE GRIDDISK ALL  HARDDISK PREFIX=UADBPROD, size=100M
Cell disks were skipped because they had no freespace for grid disks: CD_DISK00_uaexacell1.
GridDisk UADBPROD_CD_DISK01_uaexacell1 successfully created
GridDisk UADBPROD_CD_DISK02_uaexacell1 successfully created
GridDisk UADBPROD_CD_DISK03_uaexacell1 successfully created
GridDisk UADBPROD_CD_DISK04_uaexacell1 successfully created
GridDisk UADBPROD_CD_DISK05_uaexacell1 successfully created
GridDisk UADBPROD_CD_DISK06_uaexacell1 successfully created
GridDisk UADBPROD_CD_DISK07_uaexacell1 successfully created
GridDisk UADBPROD_CD_DISK08_uaexacell1 successfully created
GridDisk UADBPROD_CD_DISK09_uaexacell1 successfully created
GridDisk UADBPROD_CD_DISK10_uaexacell1 successfully created
CREATE GRIDDISK ALL  FLASHDISK PREFIX=<Disk_Name>, size=<size>Create Grid disks on all the flashdisk with specific size.CellCLI> CREATE GRIDDISK ALL FLASHDISK PREFIX=UAFLSHDB, size=100M
GridDisk UAFLSHDB_FD_00_uaexacell1 successfully created
GridDisk UAFLSHDB_FD_01_uaexacell1 successfully created
GridDisk UAFLSHDB_FD_02_uaexacell1 successfully created
GridDisk UAFLSHDB_FD_03_uaexacell1 successfully created
GridDisk UAFLSHDB_FD_04_uaexacell1 successfully created
GridDisk UAFLSHDB_FD_05_uaexacell1 successfully created
GridDisk UAFLSHDB_FD_06_uaexacell1 successfully created
GridDisk UAFLSHDB_FD_07_uaexacell1 successfully created
GridDisk UAFLSHDB_FD_08_uaexacell1 successfully created
GridDisk UAFLSHDB_FD_09_uaexacell1 successfully created
GridDisk UAFLSHDB_FD_10_uaexacell1 successfully created
CREATE KEYCreates and displays random key for use in assigning client keys.CellCLI> CREATE KEY
1820ef8f9c2bafcd12e15ebfe267abad
CellCLI>
CREATE QUARANTINE quarantineType=<“SQLID” or “DISK REGION” or \
“SQL PLAN” or “CELL OFFLOAD”> attributename=value
Define the attributes for a new quarantine entityCellCLI> CREATE QUARANTINE quarantineType=”SQLID”, sqlid=”5xnjp4cutc1s8″
Quarantine successfully created.
CellCLI>
CREATE THRESHOLD <Thersold1>   attributename=valueDefines conditions for generation of a metric alert.CellCLI> CREATE THRESHOLD db_io_rq_sm_sec.db123  comparison=’>’, critical=120
Threshold db_io_rq_sm_sec.db123 successfully created
CellCLI>

DELETING the Exadata Storage cell Objects (DROP)

The below mentioned cellcli commands will help you to remove the various objects on the exadata storage cell. Be carefully with “force” option since it can remove the object even though it is in use.

DROP ALERTHISTORY <ALER1>, <ALERT2>Removes the specific alert from the cell’s alert history.CellCLI> DROP ALERTHISTORY 2
Alert 2 successfully dropped
CellCLI>
DROP ALERTHISTORY ALLRemoves all alert from the cell’s alert history.CellCLI> DROP ALERTHISTORY ALL
Alert 1_1 successfully dropped
Alert 1_2 successfully dropped
Alert 1_3 successfully dropped
Alert 1_4 successfully dropped
Alert 1_5 successfully dropped
Alert 1_6 successfully dropped
DROP THRESHOLD <THERSOLD>Removes specific threshold from the cellCellCLI> DROP THRESHOLD db_io_rq_sm_sec.db123
Threshold db_io_rq_sm_sec.db123 successfully dropped
CellCLI>
DROP THRESHOLD ALLRemoves all  threshold from the cellCellCLI> DROP THRESHOLD ALL
DROP QUARANTINE <quarantine1>Removes quarantine from the cellCellCLI> DROP QUARANTINE QADB1
DROP QUARANTINE ALLRemoves all the quarantine from the cellCellCLI> DROP QUARANTINE ALL
DROP GRIDDISK <Griddisk_Name>Removes the specific grid disk from the cellCellCLI> DROP GRIDDISK UADBDK1
GridDisk UADBDK1 successfully dropped
CellCLI>
DROP GRIDDISK ALL PREFIX=<GRIDDISK_STARTNAME>Removes the set of grid disks from the cell by using the prefixCellCLI> DROP GRIDDISK ALL PREFIX=UAFLSHDB
GridDisk UAFLSHDB_FD_00_uaexacell1 successfully dropped
GridDisk UAFLSHDB_FD_01_uaexacell1 successfully dropped
GridDisk UAFLSHDB_FD_02_uaexacell1 successfully dropped
GridDisk UAFLSHDB_FD_03_uaexacell1 successfully dropped
GridDisk UAFLSHDB_FD_04_uaexacell1 successfully dropped
GridDisk UAFLSHDB_FD_05_uaexacell1 successfully dropped
DROP GRIDDISK  <GRIDDISK> ERASE=1passRemoves the specific  grid disks from the cell and Performs secure data deletion on the grid diskCellCLI> DROP GRIDDISK  UADBPROD_CD_DISK10_uaexacell1 ERASE=1pass
GridDisk UADBPROD_CD_DISK10_uaexacell1 successfully dropped
CellCLI>
DROP GRIDDISK  <GRIDDISK> FORCEDrops grid disk even if it is currently active.CellCLI> DROP GRIDDISK  UADBPROD_CD_DISK08_uaexacell1 FORCE
GridDisk UADBPROD_CD_DISK08_uaexacell1 successfully dropped
DROP GRIDDISK ALL HARDDISKDrops griddisks which are created on top of hardiskDROP GRIDDISK ALL HARDDISK

Modifying  the Exadata Storage cell Objects (ALTER)

The below mentioned commands will help you to modify the cell attributes and various objects setting. ALTER command will be used to perform the start/stop/restart the MS/RS/CELLSRV services as well.


ALTER ALERTHISTORY 123 examinedby=<user_name>Sets the examinedby attribute of alerts ALTER ALERTHISTORY 123 examinedby=<lingesh>
ALTER CELL RESTART SERVICES ALLAll(RS+CELLSRV+MS) services are restartedCellCLI>ALTER CELL RESTART SERVICES ALL
ALTER CELL RESTART SERVICES < RS | MS | CELLSRV >To restart specific servicesCellCLI>ALTER CELL RESTART SERVICES RS
CellCLI>ALTER CELL RESTART SERVICES MS
CellCLI>ALTER CELL RESTART SERVICES CELLSRV
ALTER CELL SHUTDOWN SERVICES ALLAll(RS+CELLSRV+MS) services will be haltedCellCLI>ALTER CELL SHUTDOWN SERVICES
ALTER CELL SHUTDOWN SERVICES < RS | MS | CELLSRV >To shutdown specfic serviceCellCLI>ALTER CELL SHUTDOWN SERVICES RS
CellCLI>ALTER CELL SHUTDOWN SERVICES MS
CellCLI>ALTER CELL SHUTDOWN SERVICES CELLSRV
ALTER CELL STARTUP SERVICES ALLAll(RS+CELLSRV+MS) services will be startedCellCLI>ALTER CELL STARTUP SERVICES
ALTER CELL STARTUP SERVICES < RS | MS | CELLSRV >To start specific ServiceCellCLI>ALTER CELL STARTUP SERVICES RS
CellCLI>ALTER CELL STARTUP SERVICES MS
CellCLI>ALTER CELL STARTUP SERVICES CELLSRV
ALTER CELL NAME=<Name>To Set the Name/Re-name to the Exadata Storage CellCellCLI> ALTER CELL NAME=UAEXACELL1
Cell UAEXACELL1 successfully altered
CellCLI>
ALTER CELL flashCacheMode=WriteBackTo Modify the flashcache mode to writeback from writethrough. To perform this,You need to drop the flashcache & Stop the cellsrv .Then you need to create the new FlashcacheCellCLI> DROP flashcache
Flash cache UAEXACELL1_FLASHCACHE successfully dropped
CellCLI>
CellCLI> ALTER CELL SHUTDOWN SERVICES CELLSRV
Stopping CELLSRV services…
The SHUTDOWN of CELLSRV services was successful.
CellCLI>
CellCLI>  ALTER CELL flashCacheMode=WriteBack
Cell UAEXACELL1 successfully altered
CellCLI>
CellCLI> CREATE FLASHCACHE celldisk=”FD_00_uaexacell1,FD_01_uaexacell1″, size=500M
ALTER CELL interconnect1=<Network_Interface>To set the network interface for cell stroage.CellCLI> ALTER CELL INTERCONNECT1=eth1
A restart of all services is required to put new network configuration into effect. MS-CELLSRV communication may be hampered until restart.Cell UAEXACELL1 successfully altered
ALTER CELL LED OFFThe chassis LED is turned   off.CellCLI> ALTER CELL LED OFF
ALTER CELL LED ONThe chassis LED is turned   on.CellCLI> ALTER CELL LED ON
ALTER CELL smtpServer='<SMTP_SERVER>’Set the SMTP serverCellCLI> ALTER CELL smtpServer=’myrelay.unixarena.com’
ALTER CELL smtpFromAddr='<myaddress@mydomain.com>’Set the Email From AddressCellCLI> ALTER CELL smtpFromAddr=’uacell@unixarena.com’
ALTER CELL smtpToAddr='<myemail@mydomain.com>’Send the alrets to this Email  AddressCellCLI> ALTER CELL smtpToAddr=’lingeshwaran.rangasamy@gmail.com’
ALTER CELL smtpFrom='<myhostname>’Alias host name for emailCellCLI> ALTER CELL smtpFrom=’uaexacell1′
ALTER CELL smtpPort=’25’Set the SMTP portCellCLI> ALTER CELL smtpPort=’25’
ALTER CELL smtpUseSSL=’TRUE’Make the smtp to use SLLCellCLI> ALTER CELL smtpUseSSL=’TRUE’
ALTER CELL notificationPolicy=’critical,warning,clear’Send the alrets for critical,warning and clearCellCLI> ALTER CELL notificationPolicy=’critical,warning,clear’
ALTER CELL notificationMethod=’mail’Set the notification method as emailCellCLI> ALTER CELL notificationMethod=’mail’
ALTER CELLDISK <existing_celldisk_name> name='<new_cell_name>’,
comment='<comments>’
Modify’s the celldisk nameCellCLI> ALTER CELLDISK CD_DISK00_uaexacell1 name=’UACELLD’, comment=’Re-named for UnixArena’
CellDisk UACELLD successfully altered
ALTER CELLDISK ALL HARDDISK FLUSHDirty blocks for all harddisk will be flushedCellCLI> ALTER CELLDISK ALL HARDDISK FLUSH
ALTER CELLDISK ALL HARDDISK FLUSH NOWAITAllows alter command to complete while flush operation continues on all harddisksCellCLI> ALTER CELLDISK ALL HARDDISK FLUSH NOWAIT
Flash cache flush is in progress
CellCLI>
ALTER CELLDISK ALL HARDDISK CANCEL FLUSHPrevious flush operation on all harddisk will be terminatedCellCLI> ALTER CELLDISK ALL HARDDISK CANCEL FLUSH
CellDisk CD_DISK02_uaexacell1 successfully altered
CellDisk CD_DISK03_uaexacell1 successfully altered
CellDisk CD_DISK04_uaexacell1 successfully altered
CellDisk CD_DISK05_uaexacell1 successfully altered
ALTER CELLDISK <CELLDISK> FLUSHDirty blocks for specific  celldisk will be flushedCellCLI> ALTER CELLDISK  CD_DISK02_uaexacell1
ALTER CELLDISK  <CELLDISK> FLUSH  NOWAITAllows alter command to complete while flush operation continues on specific celldiskCellCLI> ALTER CELLDISK  CD_DISK02_uaexacell1 FLUSH NOWAIT
Flash cache flush is in progress
 ALTER FLASHCACHE ALL size=<size>Resize the all Flash celldisks to specified size ALTER FLASHCACHE ALL size=100G
ALTER FLASHCACHE ALLAll the flashsdisks will be assigned to FlashcacheCellCLI> ALTER FLASHCACHE ALL
Flash cache uaexacell1_FLASHCACHE altered successfully
ALTER FLASHCACHE CELLDISK='<Flashcelldisk1>,<Flashcelldisk2>’The specified Flashcell disks be assigned to Flashcache &
other flashdisks will be removed
CellCLI>  ALTER FLASHCACHE CELLDISK=’FD_09_uaexacell1,FD_04_uaexacell1′
Flash cache uaexacell1_FLASHCACHE altered successfully
ALTER FLASHCACHE ALL FLUSHDirty blocks for all Flashdisks will be flushedCellCLI> ALTER FLASHCACHE ALL
ALTER FLASHCACHE ALL  CANCEL FLUSHPrevious flush operation on all Flashdisk will be terminatedCellCLI> ALTER FLASHCACHE ALL CANCEL FLUSH
Flash cache uaexacell1_FLASHCACHE altered successfully
ALTER FLASHCACHE ALL FLUSH NOWAITAllows alter command to complete while flush operation
continues on all the flash celldisk
CellCLI> ALTER FLASHCACHE ALL FLUSH NOWAIT
Flash cache flush is in progress
ALTER FLASHCACHE CELLDISK=<FLASH-CELLDISK> FLUSHDirty blocks for specific  flash celldisk will be flushedCellCLI> ALTER FLASHCACHE CELLDISK=FD_04_uaexacell1 FLUSH
Flash cache uaexacell1_FLASHCACHE altered successfully
ALTER FLASHCACHE CELLDISK=<FLASH-CELLDISK> CANCEL FLUSHPrevious flush operation on specific flash celldisk will be terminatedCellCLI> ALTER FLASHCACHE CELLDISK=FD_04_uaexacell1 CANCEL FLUSH
Flash cache uaexacell1_FLASHCACHE altered successfully

Hope this Quick Reference will help you to administrate the Exadata storage cell.

Do not modify the Exadata Storage cell configuration without notifying oracle support.

The post Exadata Storage Cell Commands Cheat Sheet appeared first on UnixArena.
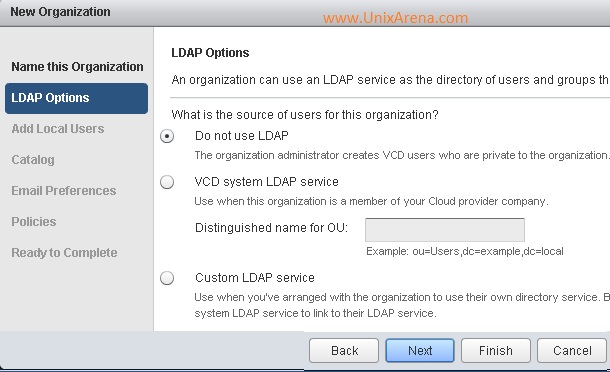
VMTurbo 5.0 – Control in the Software Defined Universe

$
0
0

Virualization is very powerful technology but  it comes with greater responsibility as well. If you do not configure or maintain your virtual environment properly, it will affect whole environment. Do you would like to know how ? In most of the cases , SAN storage systems will be shared for all the physical and virtual environments. If you do more storage v-motions, SAN storage may not able to responds to the other servers which are connected to it due to High aggressive IOPS from VMware ESXi nodes. That’s why i said , Virualization is very powerful .You need to handle with care. If you handle it properly, you can get benefit from it. If not , you will suffer for sure.

VMturbo

VMturbo

VMtrubo 5.0 which has released  on 2nd week of November 2014. What VMturbo 5.0 offers ?  Will it improve the service level of the VM’s ? Let’s talks about  it. VMturbo is moving forward to the market based approach. Operations Manager is the foundation of VMTurbo’s unified control platform. Engineering and operations teams use it for capacity planning, workload reservation & deployment, and run-time performance assurance and efficiency.

Virtualizing Business-Critical Applications

Virtualization is not a solution for the all type of environments but to reduce the cost ,we have forced to virtualize it. If you move, high CPU,Memory contention applications like SAP,Oracle, SQL  and Exchange to virtual machine, you need to allocate the resources carefully for the VM. By its nature virtualization introduces sharing of resources; however, business-critical applications can be particularly sensitive about sharing resources – in other words, contention. VMtrubo help’s to Leverage the smarter consolidation of application workloads through intelligent placement and allocation decisions.

VMTurbo can:

  • Significantly increase VM densities, often by 30% or more, without introducing additional business risk.
  • Assure application workload performance, preventing problems from occurring in the first place.
  • Free up Ops teams to focus on key business projects and priorities.
  • Enable virtualizing mission-critical applications with confidence.

Optimal Workload Placement

VMTurbo takes a different approach.  It models your environment as an efficient marketplace between buyers and sellers, letting your workloads and infrastructure work it out for themselves.  It’s continuously looking at your environment, and always knows what workload to place where and when to keep your environment in a healthy equilibrium, where your application users are kept happy while maximizing the use of precious resources.

Through dynamic workload management and resource allocation decisions, combined with smarter consolidation of critical and non-critical application workloads, VMTurbo can:

  • Assure application workload automation performance through smart resource allocation decisions, preventing many problems from occurring in the first place.
  • Free up operations teams to focus on key business projects and priorities.Make workload automation placement decisions within and across clusters and clouds.
VMturbo

VMturbo

Virtualized Capacity Planning and Management

VMturbo digs very deeply in to the VM’s and virtual resources. VMTurbo approaches capacity planning in a fundamentally different way. It uses efficient market principles to balance the supply and demand in your infrastructure, and applies these principles both now and into the future, producing accurate and actionable plans to ensure current and projected application needs are met without over spending on new hardware.

VMTurbo’s capacity planning simulator can guide on,

  • Data Center Consolidations
  • Upgrading Server Hardware
  • Improving VM Headroom
  • Deploying New Application Workloads
  • Disaster Recovery Planning
  • Physical to Virtual (P2V) Migrations
  • Hypervisor (V2V) Migrations
  • Cluster Flattening

For free assessment, please drop email to sales@vmtrubo.com to know that how much money you can save on existing VMware/hyper-v environment by doing over provisioning.

Efficient and Differentiated Cloud Infrastructure Services

VMTurbo’s intelligent resource allocation and workload placement capabilities provide service providers with a new way to drive more value from their server and storage infrastructure: increasing virtual machine density ratios without compromising workload performance.

Using these capabilities, service providers can:

  • Realize gains of 30% or more in virtual machine density over what is achievable with native hypervisor tools and resource scheduling
  • Optimize compute and storage resources in ongoing operations, as well as planning and deploying new workloads
  • Maximize storage utilization without risking storage outages by aligning thin provisioning in the virtualization and storage domains
  • Reclaim terabytes of wasted storage by identifying files that were not removed when virtual machines were decommissioned
VMturbo - Cloud control

VMturbo – Cloud control

VMTurbo prescribes preventive actions—and can automate them, if enabled—to ensure quality of service for workloads running in virtual data centers while driving the most efficient utilization of resources. This allows you to:

  • Reduce the number of incidents, problems and alerts in your virtual and storage infrastructure by preventing problems before they become critical
  • Eliminate labor-intensive activities associated with triaging problems and incidents from performance bottlenecks in your server and storage infrastructure, virtual data centers and virtual machines
  • Decrease the number of service desk calls by providing customers with greater insight about service performance and consumption, so they can eliminate your infrastructure as a cause of application performance issues

Avoiding Workload Resource Over Allocation

VMturbo dramatically increase VM Densities. The below video will make you understand that why we should not over provision too much.

Reclaim Resources and Rightsizing to Avoid VM Sprawl

VMturbo will help you  track down dormant or Zombie VMs, orphaned files, excess snapshot and log file usage and more, VMTurbo helps you reclaim precious storage and compute resources that can be used for nobler purposes.And because VMTurbo’s control system uses efficient market principles to balance supply and demand, it always knows the right move to rightsize your VMs to the right configuration to keep your application users happy while efficiently using your infrastructure resources.

VMturbo

VMturbo

Reduce Licensing Costs

VMTurbo’s Operations Manager assures workload and application performance while utilizing the environment as efficiently as possible. This means fewer processors/hosts are required to run applications without having to sacrifice performance. In addition, our purpose built Policy Engine capability enables dynamic group creation which help ensure VMs only run on those hosts that have been licensed.

With VMTurbo you can reduce licensing costs in two ways:

  1. Reduce the number of processors/hosts requiring licensing
    VMTurbo is the only software-driven solution for ensuring performance while utilizing the infrastructure as efficiently as possible. With increased VM density you’ll spend less on licensing costs.
  2. Keep the VMs on the licensed hosts
    VMTurbo’s Policy Engine enables you to use regular expressions to create dynamic groups for both hosts and VMs, you can then define a rule which ensures these groups stay together in a dynamic virtualized data center.
VMTurbo customers have been able to reduce infrastructure and licensing costs by 40% to 70% by leveraging Operations Manager

vRealize Operations (vCOps) also similar to VMturbo operations but it just takes the measurement from the individual components.But VMtubro digs from application to SAN storage and provides the valid recommendation.

Below are some of the key additions and enhancements VMturbo are bringing to market with 5.0 release.

Thank you for visiting UnixArena.

The post VMTurbo 5.0 – Control in the Software Defined Universe appeared first on UnixArena.

Oracle Solaris 11 – Beginners Guide

$
0
0

If you are working as a Sun Solaris system administrator, you know that how rapidly Solaris  operating system  is changing from version to version. There were  a lot difference between Solaris 9  and Solaris 10. But people were able to grab the changes quickly in the past when it was transformed from Solaris 8/9 to Solaris 10. ZFS and Zones were not utilized potentially on Solaris 10 and this could be the reason why the system administrators couldn’t find any difficulties. But now most of the people are asking that how and where to start for oracle Solaris 11. Oracle Solaris 11 is completely different from Solaris 10. Oracle has set the default root filesystem as ZFS from Solaris 11 onwards. In other words , we are forced to use the liveupgrade and brand new Image Packing system.

This article will be helpful only for engineers who are currently working on Solaris 10 Operating System. If you are new to Solaris operating system, it will be quite difficult to grab the things.

Few months back, Oracle has released Solaris 11.2  and there were lots of new features added compare to oracle Solaris 11.1.

Here we will see the learning path for Oracle Solaris 11.

1. Download the Oracle Solaris 11.2 from the oracle Website and install it on VMware workstation or virtual box as guest operating system. (Only for Learning purpose)

2. As you know that IPS repository  is mandatory from Oracle Solaris 11, You should know that how to setup the Image Packaging system repository on your server.

At the end of this exercise  , you should be able to install/uninstall packages on Oracle Solaris 11.

3.There are lot of new enhancement has been made on zones. Please go through the below article to understand the new features of the Solaris 11 zone’s.

At the same time you should go through the difference between Solaris 11.1 and Solaris 11.2 since new type of zone has been introduced on Solaris 11.2

After reading the above mentioned articles, you are good to proceed with zone installation.

4. Liveupgrade commands are completely renamed. (Ex: lucreate,lustatus). In oracle Solaris 11, you need to use “beadm” set of commands will be used to manage the boot environment.

5. Jumpstart has been replaced by Automated Installer.

6. Configuring the DNS on Oracle Solaris 11.

7.Oracle Solaris 11 has COMSTAR package to make the host as ISCSI server

8.There is new utility called distribution constructor which is introduced in Oracle Solaris 11 to customize the bootable images.

9.There are lot of new things has been introduced on Oracle Solaris 11 networking stack. In Oracle Solaris 11, you can able to create the virtual NICs and Virtual Switches.

10.Patching the Oracle Solaris 11 environment. (Sorry. There is no Patching  concept from Oracle Solaris 11. Only Package updates)

11.Migrating from Oracle Solaris 10 to Oracle Solaris 11 (There is no direct method to migrate from Solaris 10 to Solaris 11)

12.Please go through the below article to see the upgrade from Oracle Solaris 11.1 to Oracle Solaris 11.2

13. The below article will help you to understand the configuration difference  between Solaris 10 & Solaris 11.

14.Refer the below mentioned article if  you face any IPS repo issue.

Hope these articles are more than enough to understand the Solaris 11 concepts and core features.

I haven’t add more theory on this article. I strongly believes that only piratical can make you understand better than anything.

Thank you for visiting UnixArena

Share it ! Comment it !! Be Sociable !

The post Oracle Solaris 11 – Beginners Guide appeared first on UnixArena.
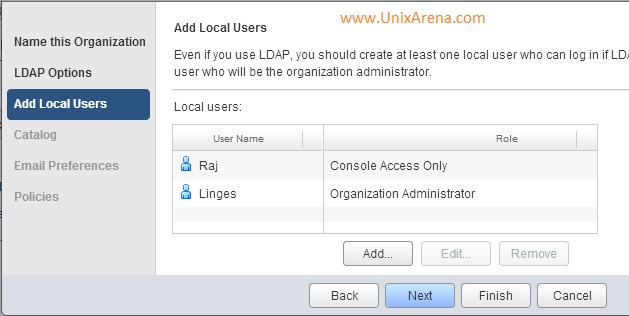
Dynamically Adding Memory CPU to VM on VMware

$
0
0

VMware vSphere’s hot-add Memory and hot-plug CPU functions allow you to add the CPU and Memory while virtual machine is up and running. It will help you to add the additional  resources whenever required and  no need to bring down the VM for each time.But  you can’t remove the resources once you have added the VM while its  running.This Hot-add RAM and Hot-plug CPU will work on specific version of windows server operating systems.(Windows Server 2008 ) I have tested this features on Redhat Enterprise Linux 6.3 and it works like charm. These featutures are heavily  depends on the guest operating systems kernel and most of the Unix Like operating system’s kernel can recognize the hardware changes quickly and it will start using it.

Enterprise Operating systems like Oracle Solaris , IBM AIX and HP-UX supports these features from over the decade with help of their own RISC architecture hardwares.

In this article ,we will see that how we can enable the hot-plug CPU and Hot-add RAM on existing VM .

Enabling the VMware vSphere Hot-plug CPU & Hot-Add RAM Feature

1. Login to the VMware vSphere Client and Halt the VM .

Halt the VM

Halt the VM

2.Right click the VM and edit the virtual machine settings.

Edit the VM Settings

Edit the VM Settings

3.Expand the  CPU tab  like below.

Expand the CPU

Expand the CPU

4.Navigate to CPU hot Plug option .

CPU Hot Plug Option

CPU Hot Plug Option

5.Select the “Enable CPU Hot Add” Box.

Check the Enable CPU Hot Add

Check the Enable CPU Hot Add

6.Same way you can configure for memory as well. Just enable the Memory Hot plug like below. So that you can add the memory to the virtual machine while  its running.

Enable the Memory Hot Plug

Enable the Memory Hot Plug

7.Once you have done the above settings just power on the system. Now your VM can support the Hot-plug CPU & Hot-Add RAM features of VMware vSphere.

Power On the VM

Power On the VM


Testing the VMware vSphere Hot-plug CPU & Hot-Add RAM

1.Login the VM and check the current CPU & Memory information.(RHEL 6)

CPU:

[root@UAWEB1 ~]# lscpu
Architecture:          x86_64
CPU op-mode(s):        32-bit, 64-bit
Byte Order:            Little Endian
CPU(s):                1
On-line CPU(s) list:   0
Thread(s) per core:    1
Core(s) per socket:    1
CPU socket(s):         1
NUMA node(s):          1
Vendor ID:             GenuineIntel
CPU family:            6
Model:                 58
Stepping:              9
CPU MHz:               2893.459
BogoMIPS:              5786.91
L1d cache:             32K
L1i cache:             32K
L2 cache:              256K
L3 cache:              3072K
NUMA node0 CPU(s):     0
[root@UAWEB1 ~]#

Memory:

[root@UAWEB1 ~]# free -m
             total       used       free     shared    buffers     cached
Mem:          1869        211       1658          0         11         74
-/+ buffers/cache:        125       1744
Swap:         4031          0       4031
[root@UAWEB1 ~]#

2.Go Back to VMware vSphere Client console and edit the virtual Machine to increase the memory.(Increased from 2048 to 2560).Click OK to save the settings.

Increase the Memory while system is running

Increase the Memory while system is running

3.Execute the below command on VM guest to see whether newly added memory is reflecting or not.

[root@UAWEB1 ~]# free -m
             total       used       free     shared    buffers     cached
Mem:          2381        221       2160          0         11         74
-/+ buffers/cache:        135       2246
Swap:         4031          0       4031
[root@UAWEB1 ~]#

We can see that total memory has been increased 500MB. Which means Hot RAM feature is working fine on RHEL 6.x

4.Let me increase the number of virtual CPU for the VM guest.

Add additional CPU to the VM while running

Add additional CPU to the VM while running

5.Check on the CPU information on RHEL VM.

[root@UAWEB1 ~]# lscpu
Architecture:          x86_64
CPU op-mode(s):        32-bit, 64-bit
Byte Order:            Little Endian
CPU(s):                2
On-line CPU(s) list:   0,1
Thread(s) per core:    1
Core(s) per socket:    1
CPU socket(s):         2
NUMA node(s):          1
Vendor ID:             GenuineIntel
CPU family:            6
Model:                 58
Stepping:              9
CPU MHz:               2893.459
BogoMIPS:              5786.91
L1d cache:             32K
L1i cache:             32K
L2 cache:              256K
L3 cache:              3072K
NUMA node0 CPU(s):     0,1
[root@UAWEB1 ~]#

We can see that CPU(s) count has been increased from 1 to 2.

Why VMware is not enabling the Hot Memory & Hot CPU feature by default ? There is an little overhead by enabling the features. That’s why customers need to decides  whether they require this feature or not.

Thank you for visiting UnixArena

Share it ! Comment it !! Be Sociable !!!

The post Dynamically Adding Memory CPU to VM on VMware appeared first on UnixArena.
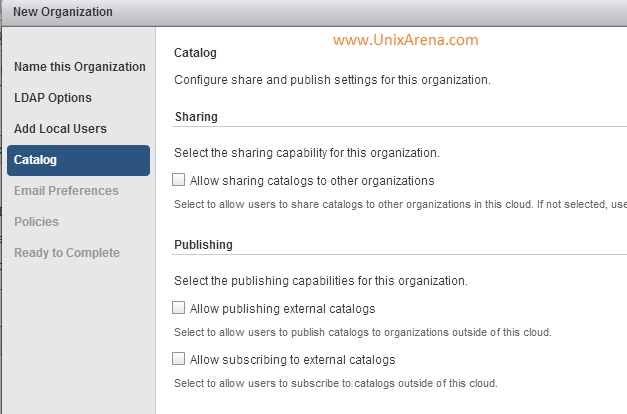
LDOM – How to find the physical Memory size ?

$
0
0

In UnixArena,we have talked more about LDOM aka Oracle VM for SPARC.But this article will provide the solution to identify the installed physical memory of the server from control domain. There is no direct command available to find out the total physical memory and un-allocated memory  from control domain.Once you have set the resources limit to control domain, all the hardware related commands and monitoring tools will display what we have  allocated to it. You can use prtidag or top command to verify it.

For an example, If you have SPARC T4-4 server, which normally comes with 256yGB physical Memory. Once you have set 16GB memory to control domain, prtdiag will display only 16GB. How can you identify the un-allocated physical memory ? If you are new to the environment, how can you identify the total  physical memory ?

Option:1

  1. Login to ILOM and to find the physical memory of the server. (#value1)
  2. Use the “ldm list” to know the currently allocated memory for primary domain and guest domains.(#value2)
  3. Subtract the physical memory from allocated memory.  (Un-allocated memory= value1-value2)

Option:2

  1. Use “ldm list-devices -a” command to know the total physical memory. (You need to add the all pieces of memory addresses from this command) (#value1)
  2. Use the “ldm list” to know the currently allocated memory for primary domain and guest domains.(#value2)
  3. Subtract the physical memory from allocated memory.  (Un-allocated memory= value1-value2)

If you go with Option#2, You need to calculate the values like below to find the (value#1 ), total physical memory.

root@UACD1:~# ldm list-devices -a memory
MEMORY
    PA                   SIZE            BOUND
    0xa00000             32M             _sys_
    0x2a00000            96M             _sys_
    0x8a00000            374M            _sys_
    0x20000000           256M            primary
    0x30000000           7424M           Guest1
    0x200000000          8G              Guest2
    0x400000000          512M            Guest3
    0x420000000          3328M           Guest1
    0x4f0000000          4352M           Guest4
    0x600000000          8G              Guest5
    0x800000000          2560M           Guest1
    0x8a0000000          5632M           Guest5
    0xa00000000          5376M           Guest2
    0xb50000000          256M            Guest1
    0xb60000000          2560M           Guest4
    0xc00000000          3840M           Guest4
    0xcf0000000          1280M
    0xd40000000          3G              Guest5
    0xe00000000          1792M           Guest6
    0xe70000000          2G              Guest5
    0xef0000000          4352M
    0x1000000000         2G              Guest5
    0x1080000000         2816M           Guest5
    0x1130000000         3328M           Guest5
    0x1200000000         256M            Guest1
    0x1210000000         7936M           Guest6
    0x1400000000         8G              Guest1
    0x1600000000         256M            primary
    0x1610000000         256M            primary
    0x1620000000         256M            primary
    0x1630000000         256M            primary
    0x1640000000         256M            primary
    0x1650000000         256M            primary
    0x1660000000         6656M
    0x1800000000         4G              Guest5
    0x1900000000         2G              primary
    0x1980000000         1280M           Guest5
    0x19d0000000         768M            primary
    0x1a00000000         2G              Guest3
    0x1a80000000         6G              Guest5
    0x1c00000000         6G              Guest1
    0x1d80000000         2G
    0x1e00000000         2560M           Guest6
    0x1ea0000000         5632M           Guest7
    0x2000000000         8G              Guest5
    0x2200000000         2G              Guest2
    0x2280000000         4G              Guest4
    0x2380000000         512M            Guest6
    0x23a0000000         256M            primary
    0x23b0000000         1280M           Guest6
    0x2400000000         2816M           Guest3
    0x24b0000000         256M            Guest5
    0x24c0000000         512M            Guest3
    0x24e0000000         2304M           Guest5
    0x2570000000         2G              Guest3
    0x25f0000000         256M            Guest5
    0x2600000000         6912M           Guest6
    0x27b0000000         1280M
    0x2800000000         6G              Guest6
    0x2980000000         256M            Guest5
    0x2990000000         1792M           Guest6
    0x2a00000000         2560M           Guest6
    0x2aa0000000         256M            Guest2
    0x2ab0000000         1280M           Guest4
    0x2b00000000         512M            Guest2
    0x2b20000000         1536M           Guest1
    0x2b80000000         256M            Guest4
    0x2b90000000         512M            Guest3
    0x2bb0000000         1280M           Guest6
    0x2c00000000         512M            Guest3
    0x2c20000000         7680M           Guest7
    0x2e00000000         8G
    0x3000000000         7936M           Guest5
    0x31f0000000         256M            Guest8
    0x3200000000         5632M           Guest3
    0x3360000000         2560M           Guest1
    0x3400000000         8G              Guest8
    0x3600000000         2G              Guest7
    0x3680000000         2G
    0x3700000000         512M            Guest7
    0x3720000000         3584M
    0x3800000000         7936M           Guest8
    0x39f0000000         256M            primary
    0x3a00000000         7424M           Guest5
    0x3bd0000000         512M            Guest1
    0x3bf0000000         256M            primary
    0x3c00000000         1792M           Guest3
    0x3c70000000         256M            Guest7
    0x3c80000000         256M            Guest5
    0x3c90000000         1792M
    0x3d00000000         2G              primary
    0x3d80000000         256M            Guest7
    0x3d90000000         1G
    0x3dd0000000         8960M           primary
root@UACD1:~#

To eliminate the above complexity, i have developed one small script .

This script can provide you the below information.

  1. Total Physical memory
  2. Allocated Physical Memory
  3. Un-allocated Physical Memory
  4. Primary and Guest Domains memory segments

Here is the sample output of the script.

root@UACD:~# ./ldm.mem.sh
----------------------------------
Total Physical Memory = 1024.0000 GB
----------------------------------

---------------------------------------
Total Allocated Physical Memory = 584 GB
---------------------------------------

------------------------------------------
Total Unallocated Physical Memory = 440.0000 GB
------------------------------------------

---------------Memory Allocations for Guest & Primary Domain-----------------
primary
    RA               PA               SIZE
    0x30000000       0x30000000       8G
------------------------------------------------------------------------------
GUEST1
    RA               PA               SIZE
    0x30000000       0x230000000      64G
------------------------------------------------------------------------------
GUEST2
    RA               PA               SIZE
    0x80000000       0x300000000000   256G
------------------------------------------------------------------------------
GUEST3
    RA               PA               SIZE
    0x80000000       0x80000000000    256G
------------------------------------------------------------------------------

What else you need ? Just grab the script and use it .

You have to run the script from control domain as root user.

Copy the below script to your control domain and run it like above after setting the execute permission.

#!/usr/bin/bash
# Solaris LDOM (Oracle VM for SPARC)- Total Memory calculation script
ARCHI=$(echo `uname -m`)
if [ "$ARCHI" = "sun4v"  ];then
MBSEG=$(echo `/usr/sbin/ldm list-devices -a memory  |awk ' { print $2 } ' |sort -nr |grep -v SIZE |grep M |tr -d M |awk '{sum+=$1}END{print sum}' |sed '/^$/d' ` )
GBSEG=$(echo `/usr/sbin/ldm list-devices -a memory  |awk ' { print $2 } ' |sort -nr |grep -v SIZE |grep G |tr -d G |awk '{sum+=$1}END{print sum}' |sed '/^$/d' ` )
if [ -z "$MBSEG" ];
then
TOTALPHYMEM="$GBSEG"
else
if [ -z "$GBSEG" ];
then
TMBSEG=$(echo "scale=4;$MBSEG/1024" |bc )
TOTALPHYMEM="$TMBSEG"
else
TMBSEG=$(echo "scale=4;$MBSEG/1024" |bc )
TOTALPHYMEM=$(echo "$TMBSEG" "+" "$GBSEG" |bc)
fi
fi
echo "----------------------------------"
echo "Total Physical Memory = $TOTALPHYMEM GB"
echo "----------------------------------"
GBSEGUSED=$(echo `/usr/sbin/ldm list |awk ' { print $6 } ' |grep -v MEMORY |grep G|tr -d G |awk '{sum+=$1}END{print sum}' |sed '/^$/d' ` )
MBSEGUSED1=$(echo `/usr/sbin/ldm list |awk ' { print $6 } ' |grep -v MEMORY |grep M|tr -d M |awk '{sum+=$1}END{print sum}'|sed '/^$/d' ` )
if [ -z "$MBSEGUSED1" ]; then
TOTALPHYMEMUSED="$GBSEGUSED"
else
if [ -z "$GBSEGUSED" ]; then
MBSEGUSED=$(echo "scale=4;$MBSEGUSED1/1024" |bc )
TOTALPHYMEMUSED="$MBSEGUSED"
else
MBSEGUSED=$(echo "scale=4;$MBSEGUSED1/1024" |bc )
TOTALPHYMEMUSED=$(echo "$MBSEGUSED" "+" "$GBSEGUSED" |bc)
fi
fi
echo
echo "---------------------------------------"
echo "Total Allocated Physical Memory = $TOTALPHYMEMUSED GB"
echo "---------------------------------------"
echo
echo "------------------------------------------"
echo "Total Unallocated Physical Memory = $(echo "$TOTALPHYMEM" "-" "$TOTALPHYMEMUSED" |bc ) GB"
echo "------------------------------------------"
echo
echo "---------------Memory Allocations for Guest & Primary Domain-----------------"
ldm list-domain -o memory |egrep -v "NAME|MEMORY" |sed '/^$/d'
echo "------------------------------------------------------------------------------"
echo
echo "Credits:"
echo "========"
echo "Lingeswaran R"
echo "www.UnixArena.com"
echo "------------------------------------------------------------------------------"
else
echo "This server is not based on sun4v Architecture"
echo "-------------------------------------------------------------------------------"
echo "Credits:"
echo "********"
echo "Lingeswaran R"
echo "www.UnixArena.com"
echo "------------------------------------------------------------------------------"
fi

Hope this script will be useful for you.

Share it ! Comment it !! Be Sociable !!!

The post LDOM – How to find the physical Memory size ? appeared first on UnixArena.
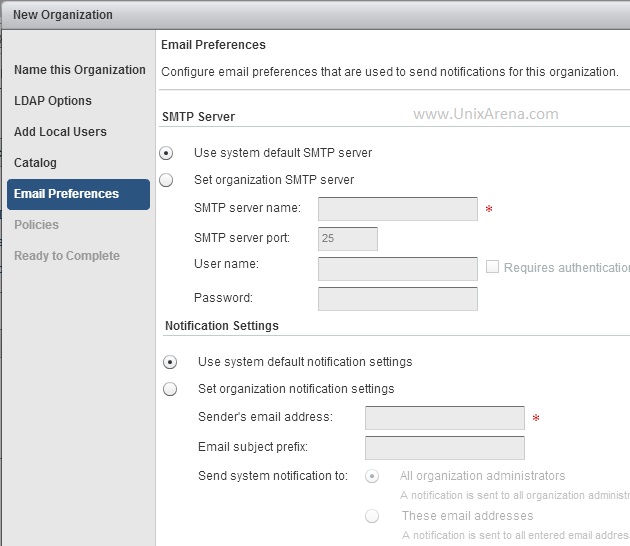
Viewing all 369 articles
Browse latest View live


<script src="https://jsc.adskeeper.com/r/s/rssing.com.1596347.js" async> </script>