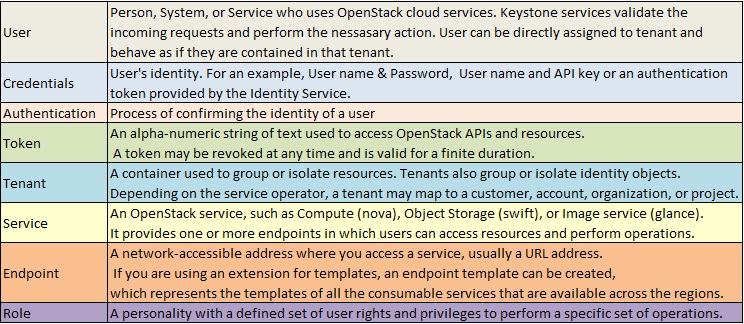
Keystone provides the identify service in openstack which is responsible for user management. It tracks the openstack users and their permissions. It provides a catalog of available services with their API endpoints. OpenStack Identity Service needs to install on controller node. Keystone will use the database to store the information. So we need to configure the keystone service to use the locally installed Mysql DB. Before proceeding further, You need to understand the terms like User, credentials , Authentication, Token, Tenant, service, Endpoint and Role.
OpenStack Identity Service Installation : (Keystone) – Juno .
To select the specific version of openstack , please go through the article part 1.
1.Install the keystone Service on the openstack controller node, along with python-keystone client.
root@OSCTRL-UA:~# apt-get install keystone
Reading package lists... Done
Building dependency tree
Reading state information... Done
The following extra packages will be installed:
  libgmp10 libjs-jquery libjs-sphinxdoc libjs-underscore librabbitmq1
  libyaml-0-2 python-amqp python-anyjson python-babel python-babel-localedata
  python-crypto python-decorator python-dns python-dogpile.cache
  python-dogpile.core python-eventlet python-formencode python-greenlet
  python-iso8601 python-jsonschema python-keystone python-keystoneclient
  python-kombu python-ldap python-librabbitmq python-lockfile python-lxml
  python-migrate python-mock python-netaddr python-oauthlib python-openid
  python-oslo.config python-oslo.messaging python-passlib python-paste
  python-pastedeploy python-pastedeploy-tpl python-pastescript python-pbr
  python-prettytable python-pycadf python-repoze.lru python-routes python-scgi
  python-setuptools python-sqlalchemy python-sqlalchemy-ext python-stevedore
  python-tempita python-tz python-webob python-yaml ssl-cert
Suggested packages:
  javascript-common python-amqp-doc python-crypto-dbg python-crypto-doc
  python-egenix-mxdatetime python-greenlet-doc python-greenlet-dev
  python-greenlet-dbg python-memcache python-boto python-beanstalkc
  python-django python-kombu-doc python-pika python-pymongo python-ldap-doc
  python-pyasn1 python-lxml-dbg python-mock-doc ipython python-netaddr-docs
  python-pastewebkit libjs-mochikit libapache2-mod-wsgi libapache2-mod-python
  libapache2-mod-scgi python-pgsql python-flup python-cherrypy python-cheetah
  python-sqlalchemy-doc python-psycopg2 python-kinterbasdb python-pymssql
  python-webob-doc openssl-blacklist
The following NEW packages will be installed:
  keystone libgmp10 libjs-jquery libjs-sphinxdoc libjs-underscore librabbitmq1
  libyaml-0-2 python-amqp python-anyjson python-babel python-babel-localedata
  python-crypto python-decorator python-dns python-dogpile.cache
  python-dogpile.core python-eventlet python-formencode python-greenlet
  python-iso8601 python-jsonschema python-keystone python-keystoneclient
  python-kombu python-ldap python-librabbitmq python-lockfile python-lxml
  python-migrate python-mock python-netaddr python-oauthlib python-openid
  python-oslo.config python-oslo.messaging python-passlib python-paste
  python-pastedeploy python-pastedeploy-tpl python-pastescript python-pbr
  python-prettytable python-pycadf python-repoze.lru python-routes python-scgi
  python-setuptools python-sqlalchemy python-sqlalchemy-ext python-stevedore
  python-tempita python-tz python-webob python-yaml ssl-cert
0 upgraded, 55 newly installed, 0 to remove and 49 not upgraded.
Need to get 7,722 kB of archives.
After this operation, 44.7 MB of additional disk space will be used.
Do you want to continue? [Y/n] y
Get:1 http://in.archive.ubuntu.com/ubuntu/ trusty/main libgmp10 amd64 2:5.1.3+dfsg-1ubuntu1 [218 kB]
Get:2 http://in.archive.ubuntu.com/ubuntu/ trusty/main librabbitmq1 amd64 0.4.1-1 [35.2 kB]
Selecting previously unselected package python-dns.
Preparing to unpack .../python-dns_2.3.6-3_all.deb ...
Unpacking python-dns (2.3.6-3) ...
Preparing to unpack .../python-ldap_2.4.10-1build1_amd64.deb ...
Unpacking python-ldap (2.4.10-1build1) ...
Selecting previously unselected package python-lxml.
Preparing to unpack .../python-lxml_3.3.3-1ubuntu0.1_amd64.deb ...
Unpacking python-lxml (3.3.3-1ubuntu0.1) ...
Selecting previously unselected package python-oauthlib.
<<<<<<<<<>>>>>>>
Setting up python-scgi (1.13-1.1build1) ...
Setting up python-sqlalchemy-ext (0.8.4-1build1) ...
Setting up ssl-cert (1.0.33) ...
Setting up python-keystoneclient (1:0.7.1-ubuntu1.2) ...
Setting up keystone (1:2014.1.5-0ubuntu1) ...
Generating RSA private key, 2048 bit long modulus
..............................+++
.......+++
e is 65537 (0x10001)
Generating RSA private key, 2048 bit long modulus
................................................................................+++
...............+++
e is 65537 (0x10001)
Using configuration from /etc/keystone/ssl/certs/openssl.conf
Check that the request matches the signature
Signature ok
The Subject's Distinguished Name is as follows
countryName           :PRINTABLE:'US'
stateOrProvinceName   :ASN.1 12:'Unset'
localityName          :ASN.1 12:'Unset'
organizationName      :ASN.1 12:'Unset'
commonName            :ASN.1 12:'www.example.com'
Certificate is to be certified until Sep 17 20:00:57 2025 GMT (3650 days)

Write out database with 1 new entries
Data Base Updated
keystone start/running, process 7709
Processing triggers for libc-bin (2.19-0ubuntu6.6) ...
Processing triggers for ureadahead (0.100.0-16) ...
root@OSCTRL-UA:~#
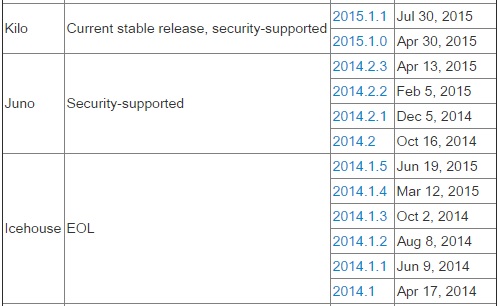
According to wiki.openstack.org
Check the installed package version details ,
root@OSCTRL-UA:~# dpkg -l | grep keystone
ii  keystone                            1:2014.2.3-0ubuntu1~cloud0            all          OpenStack identity service - Daemons
ii  python-keystone                     1:2014.2.3-0ubuntu1~cloud0            all          OpenStack identity service - Python library
ii  python-keystoneclient               1:0.10.1-0ubuntu1.1~cloud0            all          Client library for OpenStack Identity API
ii  python-keystonemiddleware           1.0.0-1ubuntu0.14.10.2~cloud0         all          Middleware for OpenStack Identity (Keystone) - Python 2.x
root@OSCTRL-UA:~#
Compare the table above & command output to know the Openstack release name. In our case , it is using “Juno”.
2. Specify the location of the database in the configuration file. In this guide, we use a MySQL database on the controller node with the username keystone. Replace KEYSTONE_DBPASS with a suitable password for the database user. Edit the keystone.conf like below. (Refer Part 2 to know the pre-defined password)
root@OSCTRL-UA:~# cat /etc/keystone/keystone.conf |grep -v "#" |grep connection
connection = mysql://keystone:keydb123@OSCTRL-UA/keystone
root@OSCTRL-UA:~#
User=keystone
Password=keydb123
Controller HostName = OSCTRL-UA
3.Delete the default SQLite database which is created automatically during the installation.
root@OSCTRL-UA:~# rm /var/lib/keystone/keystone.db
root@OSCTRL-UA:~#
4. Configure the Mysql database for keystone service. First you need to login as Mysql root with configured password. (Refer Part to know the Mysql root password)
root@OSCTRL-UA:~# mysql -u root -pstack
Welcome to the MySQL monitor.  Commands end with ; or \g.
Your MySQL connection id is 48
Server version: 5.5.44-0ubuntu0.14.04.1 (Ubuntu)

Copyright (c) 2000, 2015, Oracle and/or its affiliates. All rights reserved.

Oracle is a registered trademark of Oracle Corporation and/or its
affiliates. Other names may be trademarks of their respective
owners.

Type 'help;' or '\h' for help. Type '\c' to clear the current input statement.

mysql> CREATE DATABASE keystone;
Query OK, 1 row affected (0.00 sec)

mysql> GRANT ALL PRIVILEGES ON keystone.* TO 'keystone'@'localhost' IDENTIFIED BY 'keydb123';
Query OK, 0 rows affected (0.00 sec)

mysql> GRANT ALL PRIVILEGES ON keystone.* TO 'keystone'@'%' IDENTIFIED BY 'keydb123';
Query OK, 0 rows affected (0.00 sec)

mysql> exit
Bye
root@OSCTRL-UA:~#
In Mysql ,we have just created the table called “keystone” and grated all privileges to “keystone” user . keystone database user password is “keydb123”.
5. Populate the Identity service(keystone) database.
root@OSCTRL-UA:~# su -s /bin/sh -c "keystone-manage db_sync" keystone
root@OSCTRL-UA:~#
6. Define an authorization token to use as a shared secret between the Identity Service and other OpenStack services. Use openssl to generate a random token and store it in the keystone configuration file.
root@OSCTRL-UA:~# openssl rand -hex 10
a5d5bc4c4f358460ddc0
root@OSCTRL-UA:~# vi /etc/keystone/keystone.conf
root@OSCTRL-UA:~# head -3 /etc/keystone/keystone.conf
[DEFAULT]
# A "shared secret" between keystone and other openstack services
admin_token = a5d5bc4c4f358460ddc0
root@OSCTRL-UA:~#
7. Configure the log directory for keystone service. Edit the /etc/keystone/keystone.conf file and update the [DEFAULT] section.
root@OSCTRL-UA:~# vi /etc/keystone/keystone.conf
root@OSCTRL-UA:~# head -4 /etc/keystone/keystone.conf
[DEFAULT]
# A "shared secret" between keystone and other openstack services
admin_token = a5d5bc4c4f358460ddc0
log_dir = /var/log/keystone
root@OSCTRL-UA:~#
8.Restart the keystone service to take effect of new settings.
root@OSCTRL-UA:~# service keystone restart
keystone stop/waiting
keystone start/running, process 8458
root@OSCTRL-UA:~#
9.Add cronjob to perform the expired tokens clean up. By default keystone service stores the expired token in the database indefinitely. This will increase the database size and may reduce the performance. So its better to purge the expired tokens hourly basis.
root@OSCTRL-UA:~# (crontab -l 2>&1 | grep -q token_flush) || echo '@hourly /usr/bin/keystone-manage token_flush >/var/log/keystone/keystone-tokenflush.log 2>&1' >> /var/spool/cron/crontabs/root
root@OSCTRL-UA:~# crontab -l
@hourly /usr/bin/keystone-manage token_flush >/var/log/keystone/keystone-tokenflush.log 2>&1
root@OSCTRL-UA:~#
Configure Apache HTTP server:
1. Install Apache server.
 root@OSCTRL-UA:~# apt-get install apache2
Reading package lists... Done
Building dependency tree
Reading state information... Done
The following extra packages will be installed:
  apache2-bin apache2-data libapr1 libaprutil1 libaprutil1-dbd-sqlite3
  libaprutil1-ldap
Suggested packages:
  apache2-doc apache2-suexec-pristine apache2-suexec-custom apache2-utils
The following NEW packages will be installed:
  apache2 apache2-bin apache2-data libapr1 libaprutil1 libaprutil1-dbd-sqlite3
  libaprutil1-ldap
0 upgraded, 7 newly installed, 0 to remove and 0 not upgraded.
Need to get 1,270 kB of archives.
After this operation, 5,238 kB of additional disk space will be used.
Do you want to continue? [Y/n] y
2.Install mod-wsgi for apache2.
root@OSCTRL-UA:~# apt-get install libapache2-mod-wsgi
Reading package lists... Done
Building dependency tree
Reading state information... Done
The following NEW packages will be installed:
  libapache2-mod-wsgi
0 upgraded, 1 newly installed, 0 to remove and 0 not upgraded.
Need to get 67.4 kB of archives.
After this operation, 248 kB of additional disk space will be used.
Get:1 http://in.archive.ubuntu.com/ubuntu/ trusty-updates/main libapache2-mod-wsgi amd64 3.4-4ubuntu2.1.14.04.2 [67.4 kB]
Fetched 67.4 kB in 3s (19.6 kB/s)
Selecting previously unselected package libapache2-mod-wsgi.
(Reading database ... 95781 files and directories currently installed.)
Preparing to unpack .../libapache2-mod-wsgi_3.4-4ubuntu2.1.14.04.2_amd64.deb ...
Unpacking libapache2-mod-wsgi (3.4-4ubuntu2.1.14.04.2) ...
Setting up libapache2-mod-wsgi (3.4-4ubuntu2.1.14.04.2) ...
apache2_invoke: Enable module wsgi
 * Restarting web server apache2
3. Edit the “/etc/apache2/apache2.conf” and configure the ServerName option to reference the controller node.
root@OSCTRL-UA:~# cat /etc/apache2/apache2.conf |grep ServerName
ServerName OSCTRL-UA
root@OSCTRL-UA:~#
4. Create/Edit the /etc/apache2/sites-available/wsgi-keystone.conf file with the following content.
Listen 5000
Listen 35357


    WSGIDaemonProcess keystone-public processes=5 threads=1 user=keystone display-name=%{GROUP}
    WSGIProcessGroup keystone-public
    WSGIScriptAlias / /var/www/cgi-bin/keystone/main
    WSGIApplicationGroup %{GLOBAL}
    WSGIPassAuthorization On
    = 2.4>
      ErrorLogFormat "%{cu}t %M"

    LogLevel info
    ErrorLog /var/log/apache2/keystone-error.log
    CustomLog /var/log/apache2/keystone-access.log combined


    WSGIDaemonProcess keystone-admin processes=5 threads=1 user=keystone display-name=%{GROUP}
    WSGIProcessGroup keystone-admin
    WSGIScriptAlias / /var/www/cgi-bin/keystone/admin
    WSGIApplicationGroup %{GLOBAL}
    WSGIPassAuthorization On
    = 2.4>
      ErrorLogFormat "%{cu}t %M"

    LogLevel info
    ErrorLog /var/log/apache2/keystone-error.log
    CustomLog /var/log/apache2/keystone-access.log combined
5. Enable the Identity service virtual hosts.
# ln -s /etc/apache2/sites-available/wsgi-keystone.conf /etc/apache2/sites-enabled
6.Create the directory structure for the WSGI components under /var/www/cgi-bin/
# mkdir -p /var/www/cgi-bin/keystone
7. Copy WSGI components.
root@OSCTRL-UA:~# curl http://git.openstack.org/cgit/openstack/keystone/plain/httpd/keystone.py?h=stable/juno | tee /var/www/cgi-bin/keystone/main /var/www/cgi-bin/keystone/admin
8.Adjust ownership and permissions on this directory and the files in it.
# chown -R keystone:keystone /var/www/cgi-bin/keystone
# chmod 755 /var/www/cgi-bin/keystone/*
9. Stop the keystone and restart apache2 & keystone.
root@OSCTRL-UA:~# service keystone stop
root@OSCTRL-UA:~# service apache2 restart
root@OSCTRL-UA:~# service keystone start
Click on Page 2 to continue ….
The post Openstack – Configuring Keystone service – Part 3 appeared first on UnixArena.


